 Adobe Community
- Home
- Premiere Pro
- Discussions
- Re: Major color shift on export in Premiere, not a...
- Re: Major color shift on export in Premiere, not a...
Major color shift on export in Premiere, not a Quicktime problem

Copy link to clipboard
Copied
Hi all,
I know others have long been experiencing this same problem, but all of the other forums on this topic that I've been able to find haven't resolved or acutely described the problem, and the discussion always devolves into lengthy discussions with solutions that ultimately don't fix the issue, so I hope this doesn't come off as a redundant post.
The problem: Like many other posters, when I export from Premiere--even when I export lossless ProRes 422 HQ--I have major color shifting / desaturation / other color issues in my end product, and this is consistent across Mac/PCs, whether I have the latest version of Premiere or of my OS, etc.
Yes, I know I can open my lossless file in VLC instead of Quicktime and my color will be accurate/preserved, but that's because VLC matches your source color on the back end. YouTube, Vimeo, & Facebook--where I'll actually be publishing my videos--don't do that, and the color is radically shifted/desaturated etc. when I upload there, which is what really matters here. By my lights, all of this means that something in the export itself is to blame.
Does anyone know what this issue is and how to fix it? And I want to be clear here--I'm viewing the color in both the export and the Premiere project window from the same monitor, so I don't understand how it can be a monitor calibration issue.
I'm by no means a color or technical expert--I just recently began motion graphics and editing--but this just seems like a consistent issue with Premiere / Media Encoder not exporting with remote fidelity to what you see in your editing window. This has been an incredibly frustrating problem for well over a year. I'm hopeful it's just a togglable setting that I have on/off, but I'm worried that's not the case. If this is an issue that Adobe knows about and can admit to, even THAT would be helpful. At least then I can stop trying to find the magic setting in Premiere or Media Encoder that fixes my issue and start working around what I know to be an immovable issue.
I hope someone from Adobe can chime in, since I know tons of other post-producers who are much more tech-savvy than I am who complain about the exact same problem, and they use wild work-arounds that only approximate a real solution to get by. Any thoughts on what to do would be really appreciated.


 47
Replies
47
47
Replies
47

Copy link to clipboard
Copied
It is a monitor calibration issue. It happened to me before.
I'll give my experience on my Mac and you can learn from it.
My exports used to be extremely different from what i'm seeing in Premiere, aside from VLC.
This simply is because Premiere's program monitors overrides any Display profile you set. try it for yourself, play around with display profiles, all colors will change except what you see in the program monitor in premiere.
In other words, media players are affected by display profiles, and premiere's program monitor is not.
The monitor color profile that worked best for me was Adobe RGB.

Copy link to clipboard
Copied
Adobe Premier is an overpriced piece of sh** that can't even do the job correctly. I spend so much time on the phone with Adobe support team (not to mention that half of them don't even know what they doing) , on forums, etc.
Everyone is always saying, its the monitor, not Premiere, it Quick time use VLC, its this and that...!
Well, I have 4 different computers from MacBook pro 2017 (retina), iMac 2017 5K, 2013 iMac, Mac Pros with Eizo Screens. I calibrate my screens every month and I spend a lot of time and money to make sure everything is Calibrated properly.
As everyone id blaming Quick time for being a bad choice for viewing the footage, its actually not true as the VLC player is the layer. Just export a JPEG from you footage and open it in Photoshop or any software you want. You will see that the colour shift is done by Premiere and the colours are washed out, same as the Quick time player displays.
All of this colour shift issues will appear in After Effect, Encoder......except Photoshop. Funny enough, if you export your videos in Photoshop, you ok! They will look exactly the same before and after export!
How come Colorista, Final Cut or Photoshop don't have any problems with the colours? How come its just Adobe Video Programs?
Just to help some of you, when colour grading in Premiere Pro, change your monitor to sRGB. After export, change it back to RGB and the colours will look good.
Adobe should think about improving their software before increasing their prices as they do!
Copy link to clipboard
Copied
I was hoping you carefully read the post just before yours.
Premiere's program monitor overrides any Color profile set by the OS. Period.
No Matter how many calibration you do, it will always be different.
You are so angry and breaking your head over nothing, because the moment your video is viewed on another device/monitor, all your hard work with calibration and nailing the colors right is washed down the drain. It's not your fault, it's not Adobe's fault, even if you color using DaVinci it will not matter because your colors are NEVER going to be seen the way you intend them to be seen. Unless you are editing a high-budget full feature that will be displayed in Theatres, than that's a different story.
That being said, go ahead and import the exported video to Premiere and compare it with the original. IF there is a CONSIDERABLE difference, than come back to us with full details of how you are exporting (Full system specs, storage configuration, PP version, Export settings, etc.) So we can trouble shoot and help you out.

Copy link to clipboard
Copied
I work with a number of colorists who do long-form work. So ... actually ... even for theatrical release, what they saw on their screen and what is seen in the theatre ... always varies, sometimes ... quite often ... markedly.
In multiplex theatres, room-to-room can be remarkably different.
The average Joe or Jonette doesn't see this, as our eyes are such marvelous relative instruments ... but the person that did the grade sees it.
Other than that, you're quite correct ... no matter the gear, no matter the calibration setup, you can't get two monitors in the same suite/viewing environment to perfectly match.
So ... one needs to set up to produce to standards, then let it go and get on with life. And this means knowing about what standards you need to produce to BEFORE you buy the gear, and knowing if it can be used to produce to standards ... if so, under what setup circumstances.
Anything else is just ... um ... dissing in your beer.
Neil

Copy link to clipboard
Copied
In multiplex theatres, room-to-room can be remarkably different.
That's what THX is for. 
Copy link to clipboard
Copied
Yea ... um ... concept is great, implementation and up-keep of the rooms as bulbs change & whatnot maybe isn't perfect ... ahem.
Copy link to clipboard
Copied
It does need upkeep.
Unfortunately, I haven't any such theaters in my area for eyes on review.
Copy link to clipboard
Copied
Most of the colorists I know look at theaters being 'calibrated' to THX or anything else as a marketing ploy ... it's a great concept they'll admit, and really some theaters and/or chains take it something sort of seriously ... but most theaters ... hey, it looks ok, right? I mean, give your eyes a couple minutes, you'll adjust ...
I know our local, which is actually in general not too bad ... can still vary a bit room to room. Now I doubt that 10 other patrons going in there can tell ... because really, our eyes are such relative demons aren't they?
Neil

Copy link to clipboard
Copied
You're not offering any solutions to what is being asked, you just keep talking technical jargon and working around the issue at hand with a 'safe reply'
Copy link to clipboard
Copied
Someone needs to create a LUT that matches the Premiere Export colors accurately to what's actually shown within Premiere so that they can be uploaded most accurately to Youtube/Quicktime/Iphones/ETC. That's what the majority of the consumers/editors here are talking about exporting their video to... not theaters. Also, nobody uses VLC player to watch crap.

Copy link to clipboard
Copied
is very frustrating... getting stuff to look right ( or at least very close ).
you might want to try using Resolve along with PPro.. see if there's some work flow that would make stuff work well.
It's more work (time ) but sometimes a person can do some basic stuff and export an intermediate and then edit ( kinda backwards, cause usually color is one of the last things dealt with ( tweaking it ).
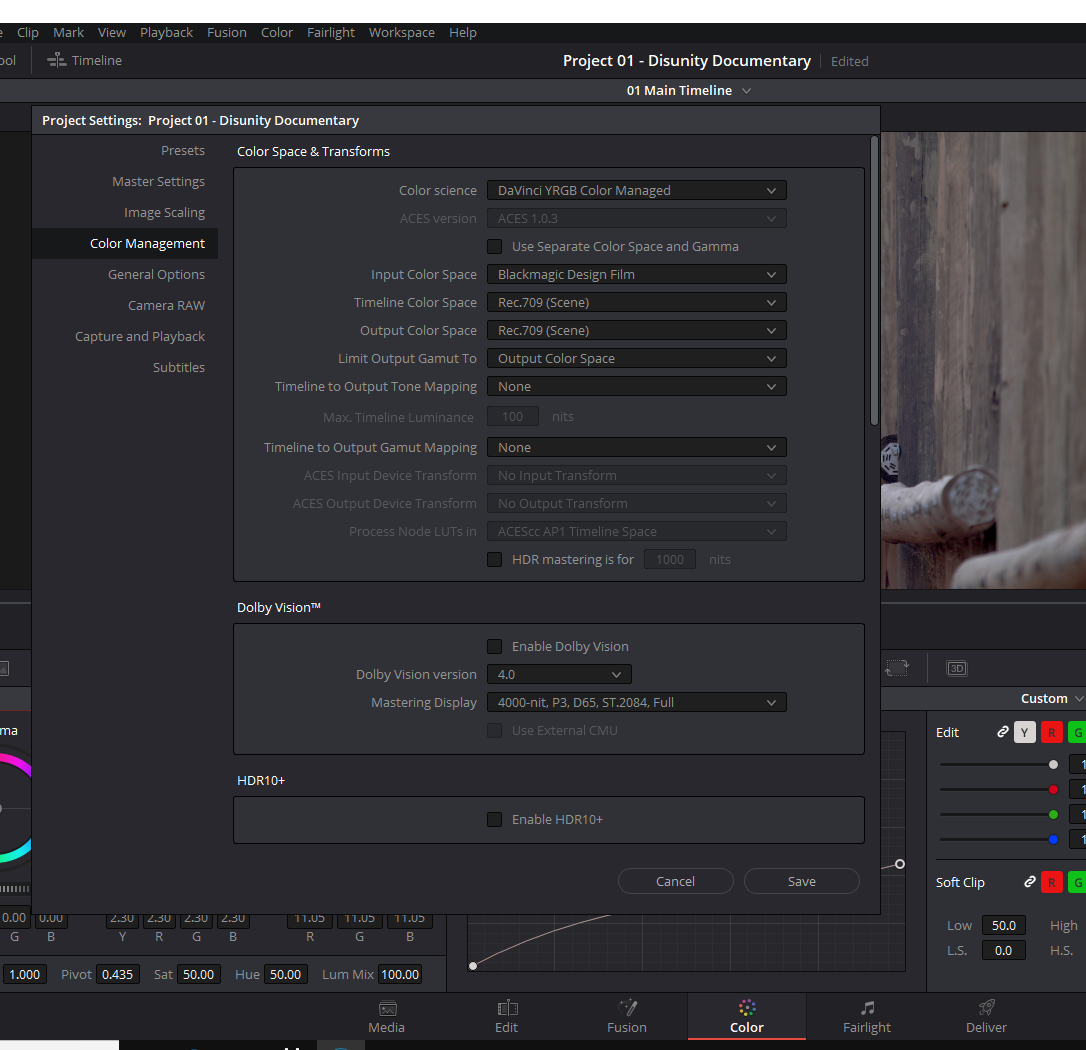
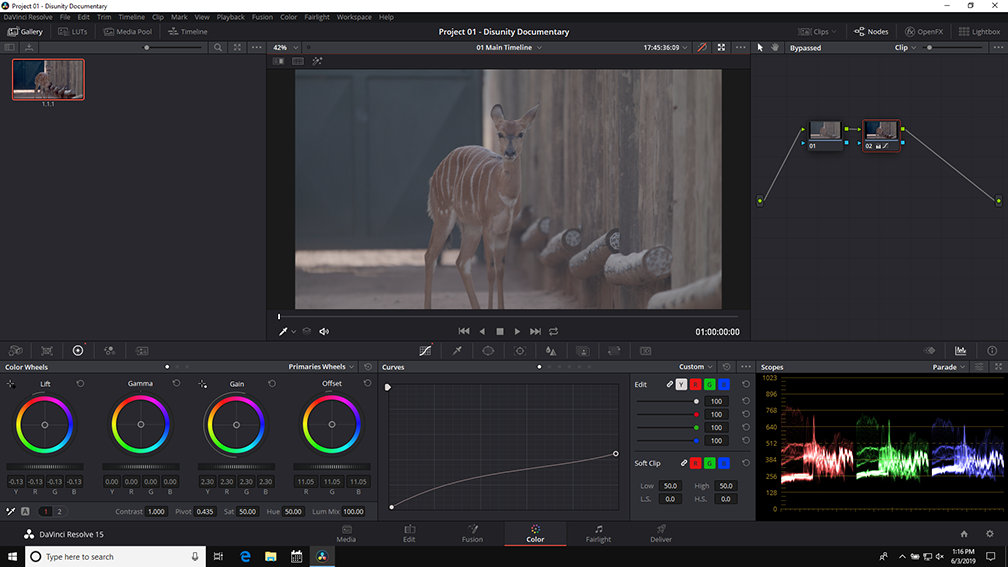
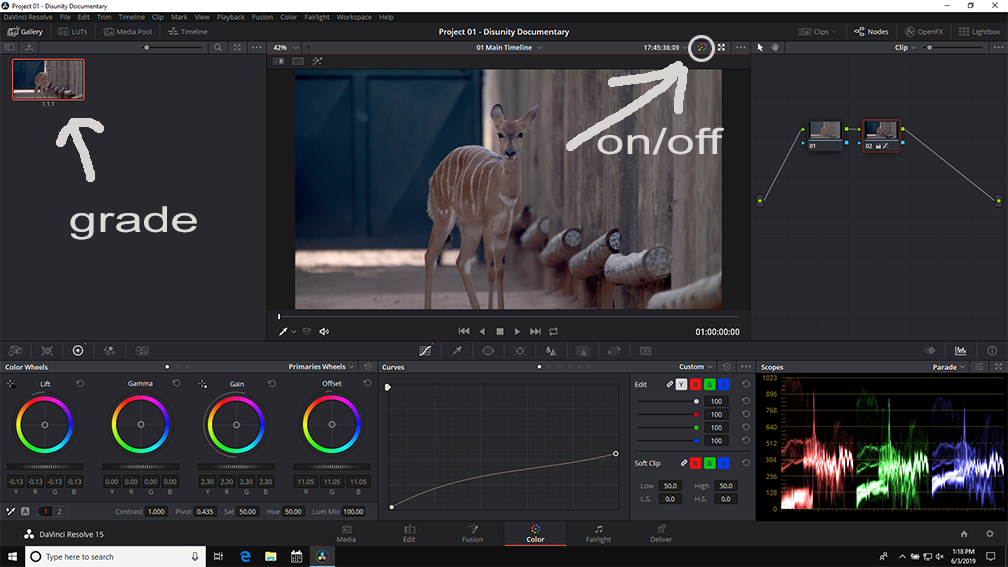
But anyway, here's some screenshots. They are 1) color space settings for source timeline output etc. 2) original footage ( flat unsaturated) 3) initial adjustment saved as a grade ( which can then be applied to all the clips shot in same light etc. ).. was showing someone how to turn the nodes on and off ( see original compared to grade ).
important thing is to keep shooting and editing and note that you and me and a million others have been dealing with this sort of frustration a real long time.

good luck

Copy link to clipboard
Copied
here's adobe lut for that.
Copy link to clipboard
Copied
Premiere is totally color managed for use on a Rec.709 broadcast standards system.
If you work on such a system, it doesn't matter what you look at the exports on, IF the player doesn't mess with the signal. It will be what you saw in Pr.
AND ... your exports will appear as any other pro produced materials will on screens out and about.
Which is not to say that ANY screen out in the wild will ever show what you saw on your properly calibrated and profiled system, because that is physically impossible. Colorists deal with this every day.
And understand that most screens, from TV's through computer monitors to "devices" come with built-in options "to enhance the viewing experience". In other words they mess with shadows, saturation, and brightness continually throughout any video playback.
Unless the user disables all that crap.
No one will ever see your material as it appeared on your computer. You'll get closer IF you run a properly and tightly color managed Rec.709 monitor.
Btw ... Apple has a US market share clear up to 12% now. In the rest of the world it's about 7% or something like that. Anyone who thinks that only people with the new Apple P3 screens will be viewing their material is assuming quite a bit, including that they only expect to attract viewers from the smallest share of the market out there.
Neil

Copy link to clipboard
Copied
I am so glad to have found this thread because I thought I was going crazy. The amount of time I have WASTED trying to get my export to match my program is ridiculous. And looks like most of the "answers" from Adobe experts amount to "just deal with it." A LUT is an awesome idea. Or we can just migrate to Davinci -- which does not have this issue. That's probably the direction I'm going. The time spend learning a new NLE should be more than made up for by not having to deal with this crap.
Copy link to clipboard
Copied
Like everything, one has choices to make. Due to the design of the Mac OS Colorsync utility and the Retina monitors, nothing on a "modern" Mac's monitor system is even close to pro video standards.
Pro standards for displaying anything other that true HDR ... are still primaries video sRGB, white point D65, gamma 2.4, Bt.(Rec) 709 including both the camera transform function and the display transform function, and a monitor brightness of 100 nits (cdm/2).
I spent a ton of time trying to sort the color management process and issues within Premiere and also on the Macs last year ... hours with a Premiere engineer, digging through every documentation and user experience from calibration experts and pro colorists dealing with both Premiere and the Mac OS/monitors, and ... found everything but the expected brightness of the Retina monitors. Which I finally found a few days ago.
So ... what are the specs your Mac is designed to provide you for video monitoring?
- Native primaries of P3, remapped (sort of but not exactly) similar to video sRGB;
- white point of D65;
- gamma "sRGB" (as stated) which is actually closer to but not actually the same shape as gamma 1.96;
- application of only the Bt.(Rec) 709 camera transform function, leaving out the required display transform function of the full pro broadcast standard;
- brightness of 350 nits.
The only part of that which is "correct" is the white point of D65.
So ... the viewing system on a Mac is no where near pro standards. In any way, shape, or form. The brightness is way high, the contrast/gamma off, color primaries not nailed, saturation ... off.
The Retina monitors are beautiful screens, and fully capable of awesome images. But the ColorSync utility is not helping you at all. Even the BBC has built an app for going into ColorSync and modding it to make the system closer to pro broadcast standards. Though most of the colorists I know who've looked into that app found it very ... dense to figure out.
The Adobe engineers have now two options in the Preferences/General section which may help you ... first, the one that's been there awhile but recently quietly renamed ... then a new one just added and not actually announced ...
Display Color Management
This option tells Premiere to look at the ICC profile of the OS for the various monitors on the computer, and attempt to adapt the image on the internal monitors ... Source, Reference, Program, and Transmit Out ... to the monitor's current display space. That can, on many Mac systems, allow Premiere to show you a correct (or very close) image on your Retina monitor through the Mac OS.
Extended Dynamic Range Monitoring (when available)
Understand, I had to sort through engineer-speak to puzzle out what this does. You may also find this useful.
This option tells Premiere to allow for up to 500 nits monitor brightness ... and by checking that box in the preferences, then adjusting the monitor itself, being able to work especially with media in excess of old-dynamic range 8 stops or so but under 500 nits. Essentially ... work on a Retina monitor. With higher brightness levels than Premiere would normally choose to use.
Try both settings. You may find them helpful.
This is NOT in any way shape or form an HDR setting or option. This is only for "extended range monitors like the Reticna monitors" ...
(For actual HDR out of Premiere, you need an external device like the AJA/Kona gear or the BlackMagic Decklink to select Premiere's HDR image stream and deliver that to the HDR monitor. See my just-updated FAQ here on HDR in Premiere Pro.)
But ... I do suggest you test your outputs. Have your exports played on a properly color managed pro video system ... to check and see how close they come. If you know any colorists with a fully calibrated Grade 1 reference monitor, send them a short bit of video demonstrative of the 'edges' of your choices ... black points, whites, tonal range and color and saturation.
Then you'll know where your imagery stands.
Neil
Copy link to clipboard
Copied
The example images I posted above ( of the nice animal ) was strictly 'levels'. ZERO color correction.
That relates ( more or less ) to brightness and contrast and saturation midtones, etc... I didn't change a single color.
So, this issue of seeing something darker or lighter is primary a 'levels' issue... not a color issue.
That boils down to a basic thing... in 8 bit land... it is simply 0-255 or 16-236, or whatever it is... Now it gets complicated.
Broadcast traditionally is 16-235 or whatever ( I keep forgetting the exact numbers ). zero is black 255 is white.
using computer screens ( which like sRGB 0-255 ) is weird because video is either full ( 0-255) or limited ( 16-235).
My DSLR lets me choose when I shoot video... full or limited. I use limited. My BMPCC just shoots without that choice ( raw).
Every camera has it's own settings.
Once you stick that into an NLE then the NLE determines how it's interpreted. On TOP OF THAT there's the monitor and hardware ( like Nvidia control panel , or ICC profile management ). So it gets complicated.
The main thing is to export what you like when it gets to where you are delivering it.
In this case nothing else matters. Although it should be fairly simple and standardized ( full or limited ) it isn't standardized. It's all over the map.
Hopefully we can get YOU to where you are happy with final product that matches what you actually SEE when you are editing. That's the main goal.
Copy link to clipboard
Copied
note:
TV used to be cathode ray tubes... those giant TV things before flat screens and led and so on.
THOSE CRT's HATED full black ( closed black) and bright white ( hot blown out white ). They HATED 0-255. That's where all this comes from.
TODAY we don't have the same restrictions ( unless you still have an old CRT TV ). Hence the confusion.

Copy link to clipboard
Copied
Maybe that video would help you!
It actually worked.
https://www.youtube.com/watch?v=noFlexiSJxo


Copy link to clipboard
Copied
I know this is an old thread but I experienced a similar color shift on export to H.264. I had a project using motion titles and upon export I would get a color shift between when the titles were present and when they were not present. To me the colors looked more accurate when the titles were present. Here's what I found:
When the titles were present, the render engine was using software encoding. When they weren't present the render engine was switching to hardware encoding. I was getting a mix of both hardware and software encoded footage. There's a setting you can change when exporting the footage to use the software encoder only. This solved the color shifting for me.
If you're not happy with your final colors, try encoding with software. For some reason, my hardware accelerated encoding (nVidia) shifts the colors. I can post a sample if anyone is interested.
Copy link to clipboard
Copied
Interesting post ... please post this over on the UserVoice system so it gets directly to the engineers.
Neil

Copy link to clipboard
Copied
Enabling Display Color Management will make your exports appear as they do on the Program Monitor.
Preferences--> General --> Enable Display Color Management (Requires GPU)
https://www.youtube.com/watch?v=YzZY2ZOlb5I
Copy link to clipboard
Copied
Hi Josh. I work mostly in fashion and beauty. To get skintones and fabric richness right when exporting out of Premiere/Media Encoder is an F_ING nightmare, as you know.
This is a cheap work around but it works pretty good. Create an adjustment layer and drop a gamma effect on it. The default is 10. If you increase the gamma by two or three points and darken the footage before export, the export itself comes out nearly perfect to what you see on your monitor in Premiere.
Until I migrate all finishing to Davinci, I'm stuck with this cheap workaround. Everything else on this two-page thread is psychobabble. LOL
Copy link to clipboard
Copied
So, how's that export look on say a colorist's highly managed system?
Neil
-
- 1
- 2

 AdChoices