 Adobe Community
- Home
- Premiere Pro
- Discussions
- Re: "Why does my footage look darker in Premiere?"...
- Re: "Why does my footage look darker in Premiere?"...

Copy link to clipboard
Copied
Courageous community member Matt Johnson made a video based on this document. Watch here for a visualization of the solution, and read on to understand why the color shift is happening in the first place.
1. What's the issue?
a. "My exports look washed out when I view them in QuickTime player"
b. "When I post my video on YouTube it looks less saturated and the blacks are raised"
c. Footage appears darker after imported into Premiere Pro
d. Help!! Premiere Pro CC is changing the color of my imported footage
When importing footage into Premiere Pro, the display of the video looks more saturated than when it is played back on other apps such as VLC, QuickTime, After Effects, or a number of web browsers like Safari or Google Chrome. When played back on YouTube through those web browsers, the video also appears less saturated than it does in Premiere. As far as we know, this is a Mac-only issue. If you're experiencing this behavior and you're on a Windows machine, please send me a private message!

Side by side, you can see that video in Premiere (left) is displayed with more saturation than the video displayed in QuickTime (right).
(Screenshots provided from this forum post)

Quicktime on top, Premiere on bottom
(Screenshots from Boots Riley's "Sorry to Bother You")
2. Why is it happening?
a. Premiere displays video based on the assumption that your monitor is set to Rec709 color space and that your footage was recorded in reference to gamma 2.4, because that's the gamma standard for broadcast television. Gamma 2.4 displays with higher contrast — blacker blacks and whiter whites. It was chosen for broadcast television because the people who were deciding playback standards figured that people were watching TV in their dark living rooms, and they thought increased contrast levels looks prettier in that setting.
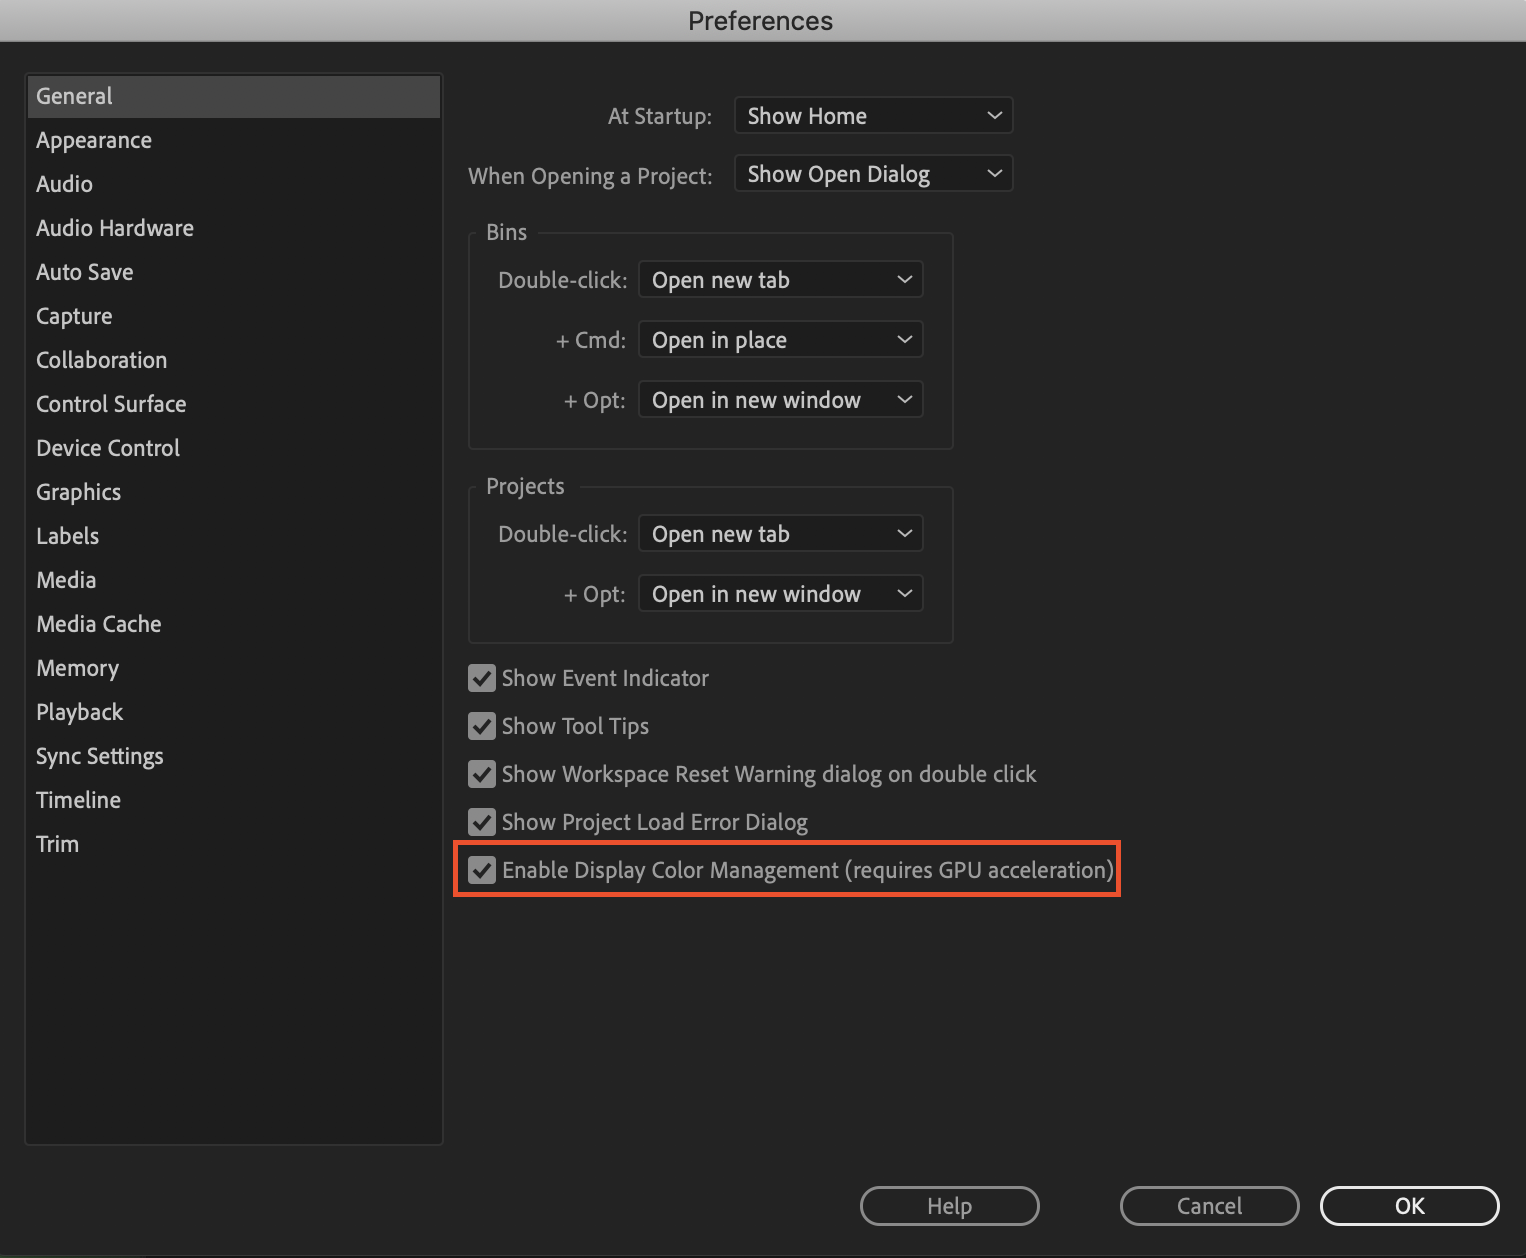
i. Premiere has a feature called "Display Color Management" that will coordinate with your monitor's display settings in order to correctly display in a Rec709, gamma 2.4 profile.
Premiere Pro > Preferences > General > "Enable Display Color Management (requires GPU acceleration)"
It's the last box on the list and it should always be enabled! For more detailed instructions, go here.
b. Monitors have become fairly standardized over the years, but apps haven't. Other apps like QuickTime, Final Cut Pro, and web browsers like Chrome and Safari display video in a scene-referred gamma 1.96 profile despite what your monitor is set to. Gamma 1.96 profiles play video back in a way that looks closer to what you see in real life — lighter blacks and softer whites.
c. This gamma shift is completely dependent on what app you play your video back in, as most users have figured out on their own. FCP 10, QuickTime, and certain web browsers all play video back in the same way, so people assume that they're displaying the video "correctly" when in reality, it's just that they're displaying the video under similar standards. Your video files are fine! The actual color codes within the pixels of your video are not changing in between apps. The miscommunication is happening between the apps and the monitor they're being displayed on.
TL;DR Premiere uses the same display standards as broadcast television does. Other video playback apps like QuickTime have begun to adhere to different video playback standards. This is what causes videos to display differently in between each app.
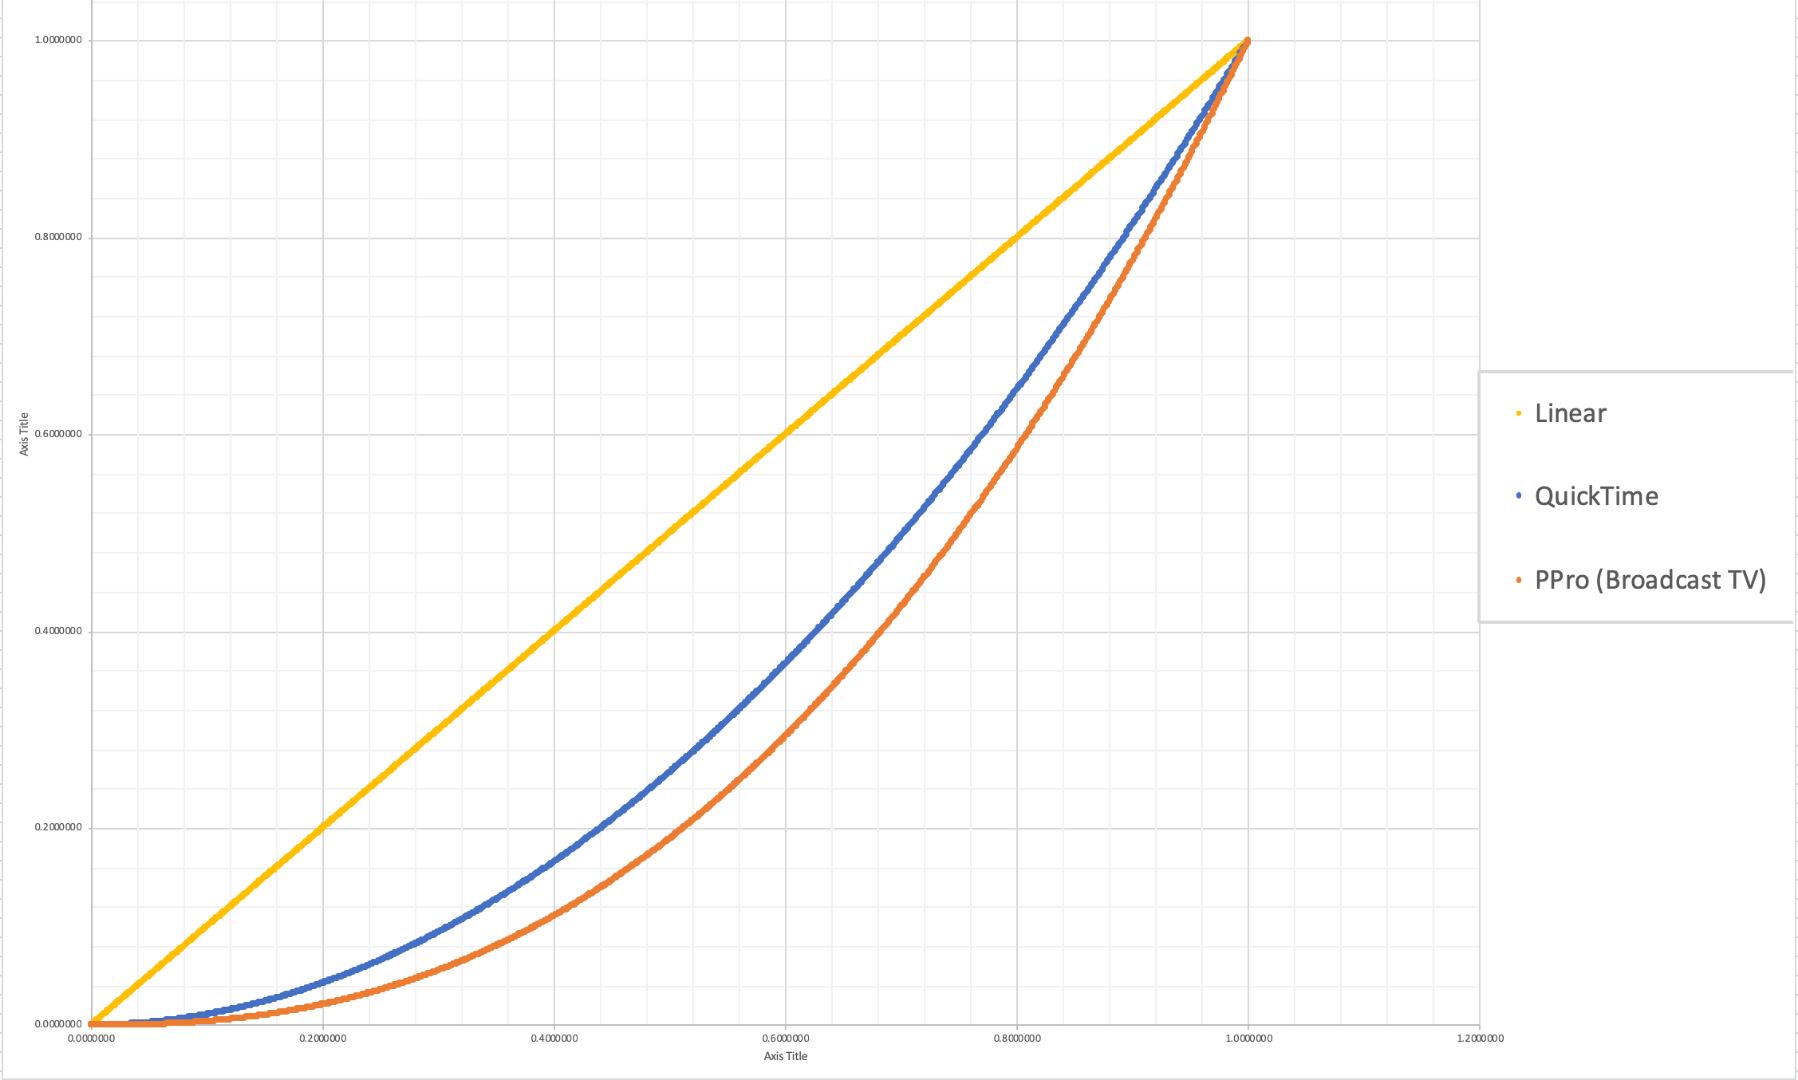
The graph above is a visual representation of the gamma display standards of Premiere Pro (orange), which dips into the darker end of the spectrum, compared to the gamma display standards of QuickTime (blue), which don't have the capability to display those dark colors and therefore QuickTime displays video with less saturation which gives it that "washed out" appearance.
(Graph and data by franciscrossman-J6rJng)
3. But why is it worse on my new iMac monitor?
a. Newer Mac displays are wide color gamut (close to P3) and can display more vibrant colors than Rec709 is capable of reproducing. Without any conversion, your Rec709 colors will be displayed as if they were P3 and will appear much more saturated than intended. Display color management is designed to fix this. It maps the Rec709 values to the appropriate P3 values so that the colors look the same.
i. Scroll up for instructions on how to enable Display Color Management, or go here.
b. Again, this is a matter of display and playback. Your actual video file is fine and if it's played back on a different monitor, it'll display correctly!
4. Is there a way to get all my playback apps on the same page?
a. Yes! One of our engineers created a LUT that will darken your video the appropriate amount so that when you play it back in a different app, it will look as it did in Premiere. Technically speaking, the LUT will correct the mathematical difference between gamma 1.96 and 2.4.
i. Download the Gamma Compensation LUT here!
ii. After downloading the LUT (.cube file) and saving it somewhere accessible, prepare to export your sequence!
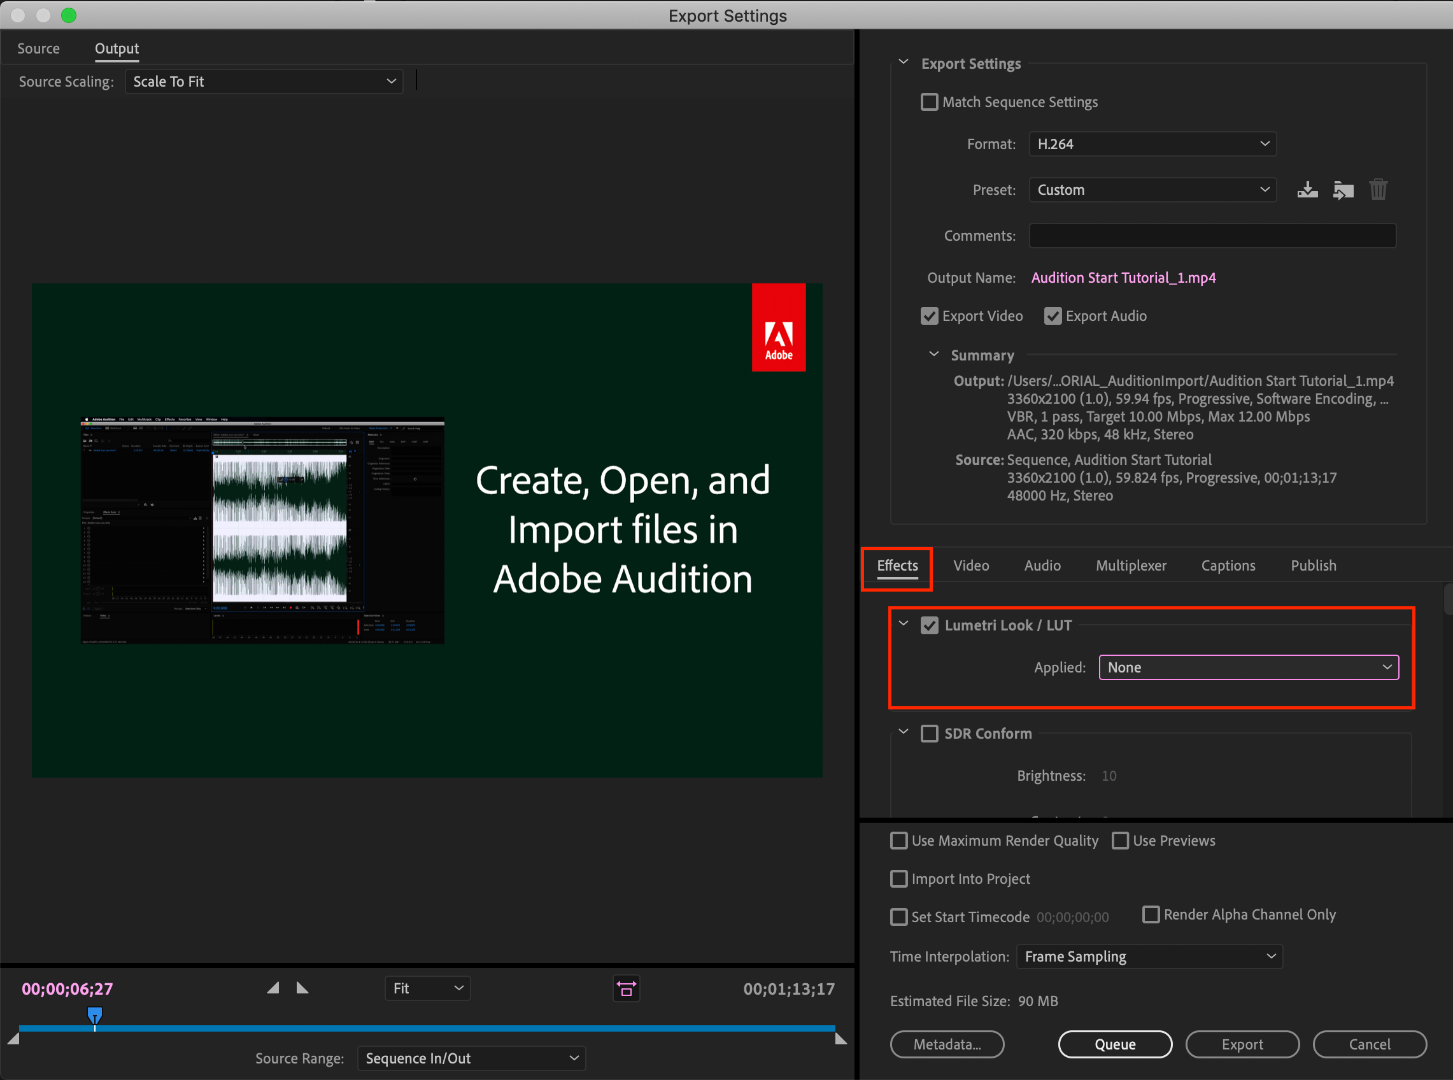
File > Export (Command+M or CNTRL+M) will pull up the Export Settings window, pictured below.
About halfway down the window, there's a few tabs to adjust encoding settings. Go to the tab marked "Effects" and you'll see an option to enable a Lumetri Look/LUT. Check that box, open the drop-down menu, and click "Select..." to navigate to the space you saved the LUT in.
iii. After you've selected the LUT, Premiere may display that there is "None" selected. That's a common glitch, the LUT has been applied. Sorry for the confusion!
b. However, this needs to be the last thing you do to your video! Either that or you need to save a backup of your video without this LUT on it. Because this LUT is darkening the color code of the video, in some cases, it will darken to the point where you can't get the detail back.
c. If you want to take the LUT off and you don't have a LUT-less backup, you can apply this reversal LUT that will return your video to the color levels you had before you applied the LUT. Perform the same steps listed above with the "Undo Gamma Compensation" LUT!
If you have any other questions about this issue, feel free to send me a private message.
For other support issues, you can check out our company contact options here! Contact us | Adobe
Thank you all for your collaboration and discussion so we could better investigate this issue! You help us to help you.
-Caroline
[DOWNLOAD LINKS]


 1 Correct answer
Hi all!
Thank you so much for your patience! We have a new solution for this available in Premiere 24.0. You can follow the workflow in this YouTube video to accommodate the QuickTime gamma shift between operating systems. Your image will look the same in QuickTime as it does in Premiere.
 262
Replies
262
262
Replies
262

Copy link to clipboard
Copied
THIS DOES NOT WORK WITH THE NEW M1 MACBOOK PRO

Copy link to clipboard
Copied
You would need to explain what specifically is not working for anyone to have a clue what to say.
And color management is bad enough on PCs, but the Mac Retina monitor Macs actively mis-apply the Rec.709 video standards. They apply only the scene-referred transform, but not the also required display-referred transform function. Making it nearly impossible to work "normal" Rec.709 on them and have that appear as you expect on non-Mac devices ... unless you have a proper Rec.709 viewing capability attached to your Mac device.
Some of the new iPads, though, if you know how to set them up, are pretty awesome actually at color managment for Rec.709.
Neil
Copy link to clipboard
Copied
Hey Neil,
That's a fair point - I'll expand.
When you apply the QT LUT in the export settings, it completely blacks out the video. I assumed it might just be in the preview window so I exported it and the final product was a completely black video. Zero color.
Again, this is in reference to the new M1 MacBooks. The QT LUT used to be a great fix for me on my old 2019 MBP.
Copy link to clipboard
Copied
That's just weird. Wonder why?
Can you go to software only mode on those?
Neil
Copy link to clipboard
Copied
I can try that today. Happy to upload a screen share if you think it would be helpful
Copy link to clipboard
Copied
Tried this and I couldn't find a software only option unless I was selecting that in the export window. I tried that and the same issue is occuring.
I also tried adding the QT lut on an adjustment layer in the timeline and it, unfortunately, presented the same issue.
SHOOT!!!!
Copy link to clipboard
Copied
Ah, software only is the option in the Projects panel for Mercury Acceleration, which means GPU use.
Neil

Copy link to clipboard
Copied
Hi,
Re. applying the QT LUT in PP 2021 = black video output;
what fixed this for me, on my :
2012 15”MBP (Mojave)
2013 iMac (Catalina)
2020 13” MBP M1 (BigSur)
…was using the open CL or software only option, for rendering. Metal didn’t work on any machine.
Hope this helps!

Copy link to clipboard
Copied
Hi there,
Thanks a lot for figuring out a solution to Lut leading to a black video output, but as i'm new could you somehow guide me onto how to use the open CL or software only option. Sorry I have no clue where to look for those options.
Thanks 🙂
Copy link to clipboard
Copied
The Project Settings dialog ... where you set the initial settings for the project from name through cache locations through everything else. There's an option called "Mercury Transmit" which is where you set GPU use.
Neil

Copy link to clipboard
Copied
I'm having the same problem and I know many others are too. Did you ever find a fix? Thanks

Copy link to clipboard
Copied
For those having problem with black output after applying LUT in Premiere Pro 2020, I've discovered another workaround. Probably this CUBE file is broken, so...
I've used IWLTBAP Lut Generator to generate PNG, placed it in Premiere 2018, applied CUBE from Adobe, and generated new CUBE, which is working in Premiere Pro. It's somehow big (7mb), I don't know why. I link it here: https://drive.google.com/file/d/1Dw89r84PziwK6NcbJojDdOVhRxtA6UOE/view?usp=sharing
Cheers!

Copy link to clipboard
Copied
SO helpful!
Copy link to clipboard
Copied
Well done

Copy link to clipboard
Copied
It was driving me crazy!! Thanks!

Copy link to clipboard
Copied
youre amazing thank you so much! is there anyway you could reverse engineer the Undo LUT from the OP as well?
Copy link to clipboard
Copied
Hey Caroline, The issue I'm having is that when I apply the Gamme compensation LUT on export my video goes completely black. If I apply on an adjustment layer within my timeline, it still goes black but when I turn down the intensity of the LUT in the colour tab my video comes back and I can view it. But at 100% intensity, my whole video is black. I am trying to fix my issues with having different colours after export and this seems like the fix but weird how it doesn't adjust my colours properly. Thanks!!
Copy link to clipboard
Copied
Nevermind! I have found a fix! the most recent post of this thread before me was helpful!

Copy link to clipboard
Copied
Thank you for this! I'm on After Effects and I have the same problem. I want to apply the LUT, but I don't know how because on the download page, it says: "Do not use this LUT on an Adjustment layer!", and I use Media Encoder for my final renders. Thank you!

Copy link to clipboard
Copied
After experimenting with this (and ultimately giving up on the gamma-fix LUT), I have some questions.
First, I tried using the export LUT Adobe provides in this article, and while it does technically push the gamma darker in the final video, it also darkens any sRGB graphics/images/photos in the exported video. I had to stop using the LUT for this reason because it was messing up imported bitmaps.
So what is this Gamma Compensation LUT for then? If I'm understanding the intent, the LUT makes exported videos appear "correct" when played back locally in QuickTime (or "in a different app" as quoted from the article), but not for videos intended for YouTube, Vimeo, etc. For the latter, Enabling Color Correction should be all that is required...correct?
90% of this article says to simply Enable Color Correction and not worry about how the video will appear elsewhere, but then at the very end recommends using this LUT as well. If someone could clarify the intent of the LUT, it would help clarify this ongoing problem.

Copy link to clipboard
Copied
Yup, same issue here @toddd21898654
My client assets and logos were all getting effected as well by the LUT.
Following
Copy link to clipboard
Copied
It's a dense thread and actually what it does is covered in several posts but jeez ... it's a lot of reading.
You need to understand the underlying issue though.
Rec.709 has been and is the standard for all video from broadcast through about everything else except for the high-theatrical work in the two professional P3 spaces. Now we have the incoming HDR in several variants to add fun to the mix, of course. (Apple's new Display-P3 is not a pro standards space, just a proprietary one.)
Rec.709 standards are very clear: (video) sRGB Primaries, D65 white point, gamma 2.4 (2.2 for 'bright room' work), and a display screen brightness of 100 nits in a moderately dark room. Included in those standards are two transform functions ... the camera transform function and the display transform function.
Premiere pro and all other pro NLEs and such work with Rec.709 according to those standards.
Premiere wasn't originally "built" with user settings for color management because it was hard-coded assuming all users would set their systems and monitors up accordingly. If you're running Premiere on a fully color-managed system, it works perfectly.
Apple, being well, special, decided to create their own playground. Wrapped around the beautiful Retina monitors that are closer natively to P3 than sRGB/Rec.709. Which is fine.
But ... they decided to display "Rec.709" in a unique way, Apple being, well, Apple. So ... they apply only the camera transform function, do not apply the also-required display transform function, and substitute what they call "sRGB gamma" ... which doesn't exist, btw. The reverse engineering between Adobe and the colorists I hang with concluded it's basically almost mostly like something in between gamma 1.95 and 1.96. Sort of.
They built this into their ColorSync color management utility. And it's been driving colorists and other companies nuts. Because by intention, they display Rec.709 tagged material differently than on any other gear. I dunno why, hey, it's Apple.
The result is that "normal" Rec.709 media played on variuos apps/players in a Mac system will look typically a bit milky in shadows and either under or over saturated. So ... in Premiere (prior to the Display color managment option) ... you worked it so it looked good in Premiere, exported and viewed on the Mac outside and ... what the hay?
There were problems everywhere. It didn't look the same outside Pr on that Mac, nor did it look right on any proper system. And no, this wasn't just an Adobe problem. Resolve had the same trouble. I'll get to that in a bit.
So Adobe engineers added the DCM option, which tells Pr to look at the ICC profile of a monitor, and remap the image to give a (hopefully) correct view on whatever monitor you've got. Which makes working pretty accurately inside of Pr now possible.
And that file now appears correctly on properly color managed systems for Rec. 709. Cool, right?
But remember, Colorsync applies an odd Rec.709 "standard", right? So outside Pr on the Mac, it's still "not the same" as inside Pr. It can't be.
So ... the Adobe people provided that transform LUT to make the file look "right" on a Retina Mac with Colorsync in full bloom.
However, you've changed the pixel data to get around Colorsync, so now, on all non-Mac displays, the file shows with crushed shadows and oversaturated colors. Which is what, 85% of the screens out there?
Davinci Resolve had of course the same problem, and their "we give up..." solution was to add the export option of Rec.709A ... and yes, A is for Apple.
It changes the NLC tags in the file so that Colorsync displays the file as a proper Rec.709 file, sRGB primaries through gamma 2.4 and yes, both transforms. Cool, right? I mean, do this on any computer running Resolve, open the file on a Mac, it's as close as that Mac screen is ... which of course, may or may not be close to standards but who notices.
But ... outside of the Mac Colorsync utility ... that file will now show with crushed shadows and oversaturation. Which means all broadcast setup rigs will now show that file ... badly.
Just like after applying that export transform LUT from Premiere.
You can't win. You can't make a file that will look "correct" in Colorsync and on straight broadcast Rec.709 screens, and I've been through the long tales of colorists who've tried to figure out a way to somehow bridge the chasm.
What you can do ... is setup and work as close to a known standard as possible. Then export and just let it go, as all colorists have to do. You cannot over-ride the bizarre color crud that's out there.
If you produce to the same standard that all pro media is produced to, then your media, on any one device, will look relatively like other pro media on that device.
And of course, not even colorists with more money in calibration gear than you have in computers & camera can make two screens in their suite identical ... just close. Once you leave the room, out in the wild, the screen, OS, and viewing environments are all over the place.
Neil
Copy link to clipboard
Copied
Neil - this response is herculean in scope. Thank you. Your analysis matches what I've been piecing together through various sources. Was especially interesting perusing threads about Rec.709A in the DaVinci forums, for there was just as much confusion there about industry standards versus Apple's "interpretation" of those standards.
If anyone from Adobe is reading, would be helpful to update this article with additional clarification about these "Gamma Correction" LUTs and in what context they should be used. I could see a lot of users using these incorrectly and harming their footage when viewed outside their Mac display.
Copy link to clipboard
Copied
Agreed. I've been through several online colorist discussions in the last couple months where it got sorta raucous with everyone ticked off that what SHOULD be simply and relibly handled by the OSs, apps, and gear vendors.
A simple freaking video standard universally applied.
Is that so much to ask? Sigh.
One for SDR, the Rec.709 is there ... or agree on a replacement. And everyone applies it. They have to do that with certain coding conventions or none of the 'net would work.
Why not video standards?
And maybe two strains of HDR ... please Heaven, not mulitple HDR types ...
Neil

Copy link to clipboard
Copied
Hi Todd,
"If anyone from Adobe is reading..."
You can file the issue with devs on User Voice.
Thanks,
Kevin

 AdChoices