 Adobe Community
- Home
- Premiere Pro
- Discussions
- Re: "Why does my footage look darker in Premiere?"...
- Re: "Why does my footage look darker in Premiere?"...

Copy link to clipboard
Copied
Courageous community member Matt Johnson made a video based on this document. Watch here for a visualization of the solution, and read on to understand why the color shift is happening in the first place.
1. What's the issue?
a. "My exports look washed out when I view them in QuickTime player"
b. "When I post my video on YouTube it looks less saturated and the blacks are raised"
c. Footage appears darker after imported into Premiere Pro
d. Help!! Premiere Pro CC is changing the color of my imported footage
When importing footage into Premiere Pro, the display of the video looks more saturated than when it is played back on other apps such as VLC, QuickTime, After Effects, or a number of web browsers like Safari or Google Chrome. When played back on YouTube through those web browsers, the video also appears less saturated than it does in Premiere. As far as we know, this is a Mac-only issue. If you're experiencing this behavior and you're on a Windows machine, please send me a private message!

Side by side, you can see that video in Premiere (left) is displayed with more saturation than the video displayed in QuickTime (right).
(Screenshots provided from this forum post)

Quicktime on top, Premiere on bottom
(Screenshots from Boots Riley's "Sorry to Bother You")
2. Why is it happening?
a. Premiere displays video based on the assumption that your monitor is set to Rec709 color space and that your footage was recorded in reference to gamma 2.4, because that's the gamma standard for broadcast television. Gamma 2.4 displays with higher contrast — blacker blacks and whiter whites. It was chosen for broadcast television because the people who were deciding playback standards figured that people were watching TV in their dark living rooms, and they thought increased contrast levels looks prettier in that setting.
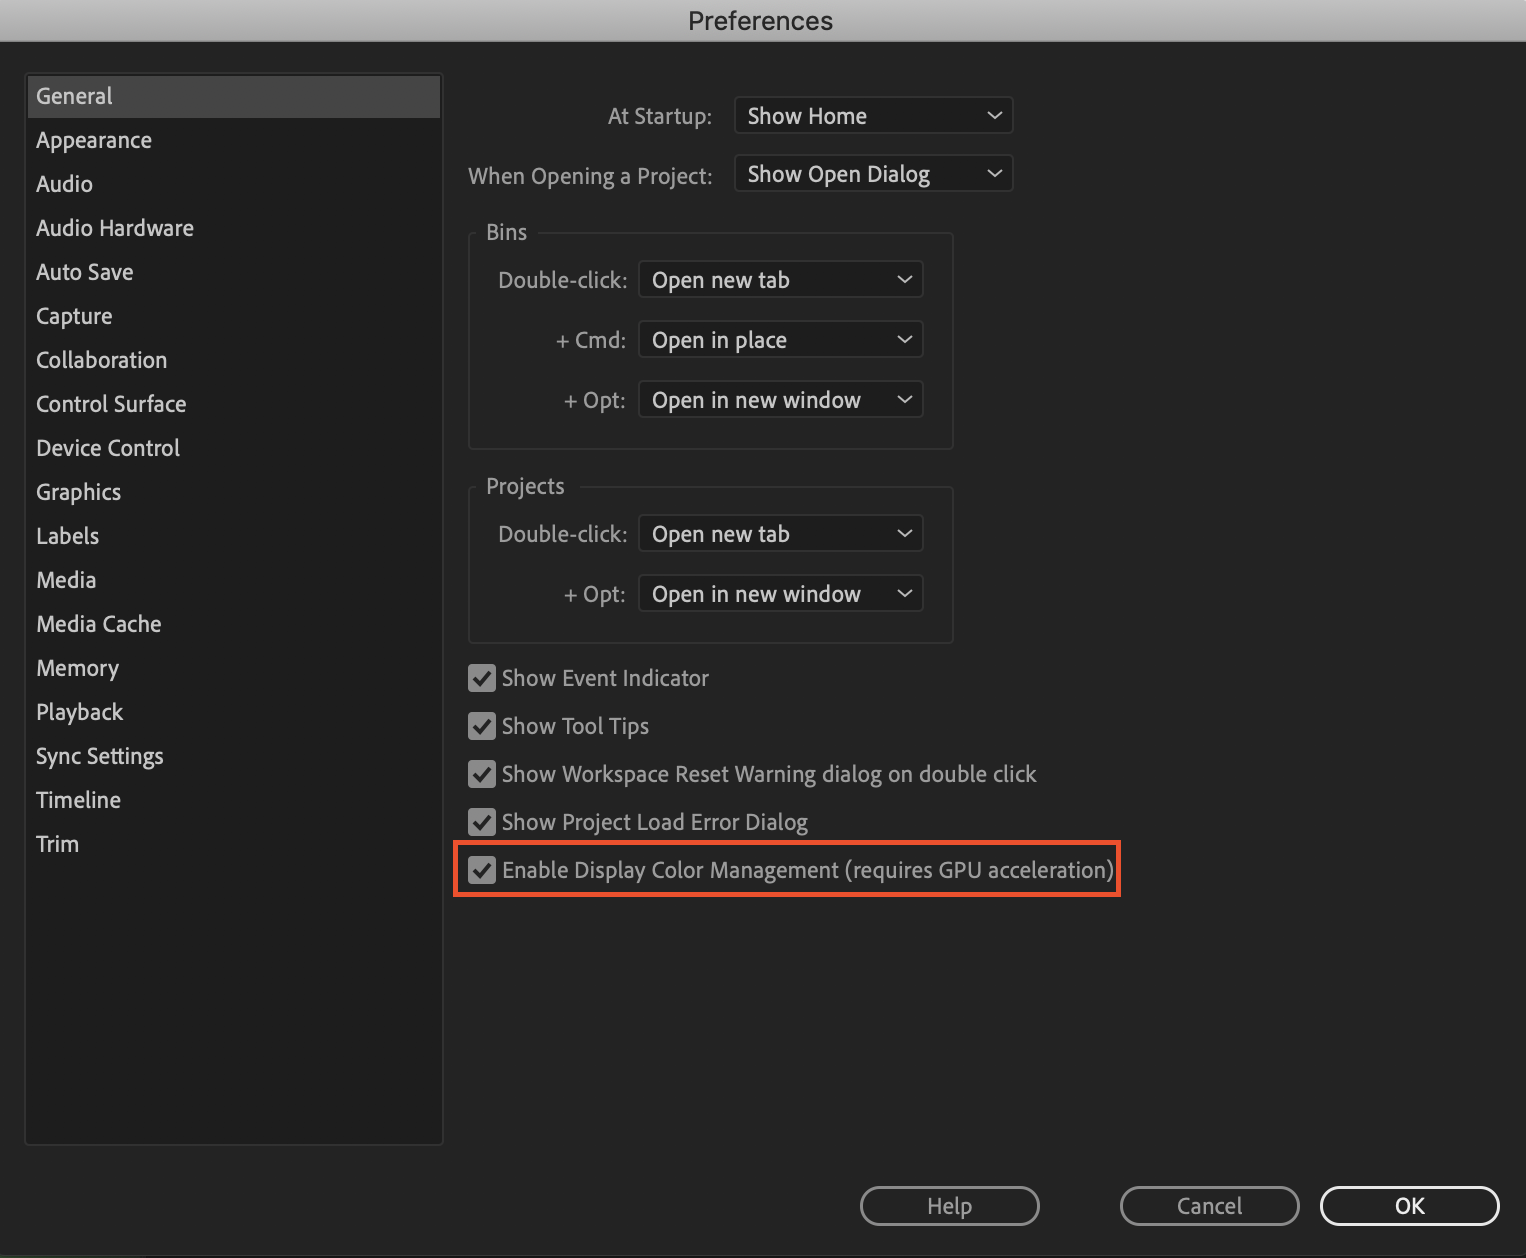
i. Premiere has a feature called "Display Color Management" that will coordinate with your monitor's display settings in order to correctly display in a Rec709, gamma 2.4 profile.
Premiere Pro > Preferences > General > "Enable Display Color Management (requires GPU acceleration)"
It's the last box on the list and it should always be enabled! For more detailed instructions, go here.
b. Monitors have become fairly standardized over the years, but apps haven't. Other apps like QuickTime, Final Cut Pro, and web browsers like Chrome and Safari display video in a scene-referred gamma 1.96 profile despite what your monitor is set to. Gamma 1.96 profiles play video back in a way that looks closer to what you see in real life — lighter blacks and softer whites.
c. This gamma shift is completely dependent on what app you play your video back in, as most users have figured out on their own. FCP 10, QuickTime, and certain web browsers all play video back in the same way, so people assume that they're displaying the video "correctly" when in reality, it's just that they're displaying the video under similar standards. Your video files are fine! The actual color codes within the pixels of your video are not changing in between apps. The miscommunication is happening between the apps and the monitor they're being displayed on.
TL;DR Premiere uses the same display standards as broadcast television does. Other video playback apps like QuickTime have begun to adhere to different video playback standards. This is what causes videos to display differently in between each app.
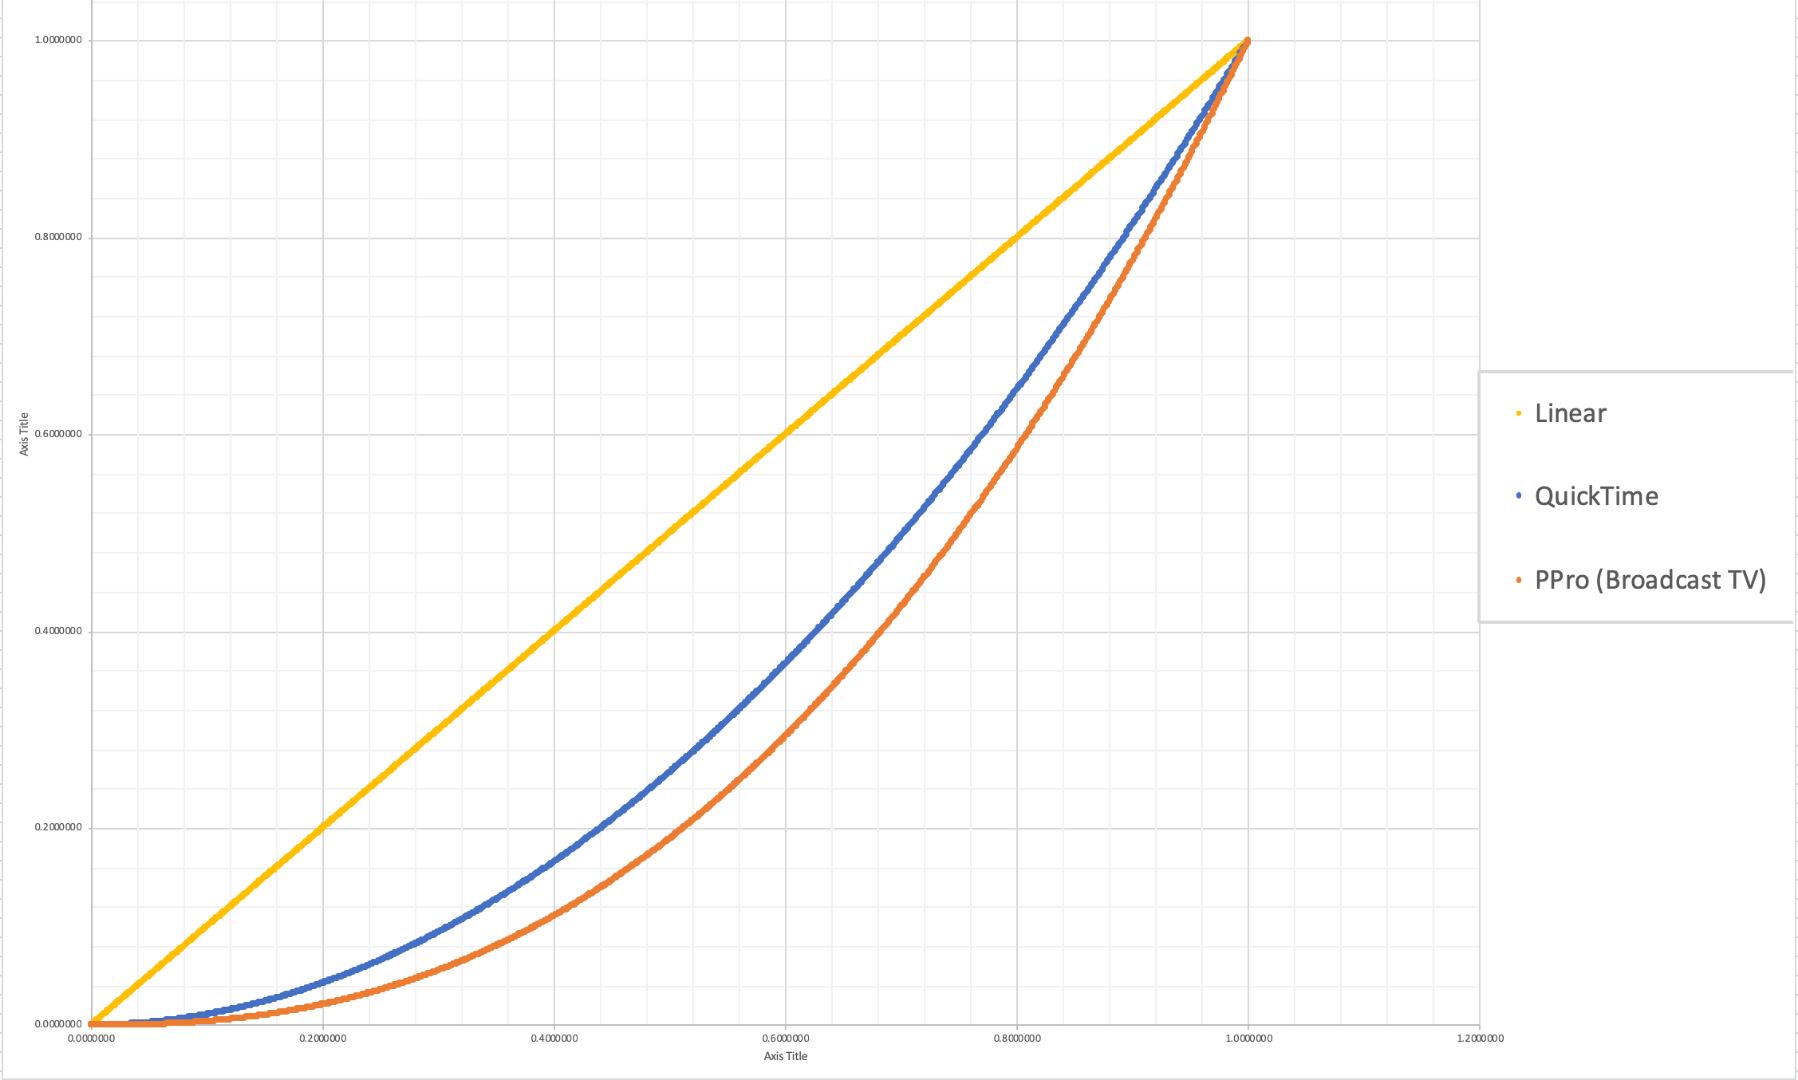
The graph above is a visual representation of the gamma display standards of Premiere Pro (orange), which dips into the darker end of the spectrum, compared to the gamma display standards of QuickTime (blue), which don't have the capability to display those dark colors and therefore QuickTime displays video with less saturation which gives it that "washed out" appearance.
(Graph and data by franciscrossman-J6rJng)
3. But why is it worse on my new iMac monitor?
a. Newer Mac displays are wide color gamut (close to P3) and can display more vibrant colors than Rec709 is capable of reproducing. Without any conversion, your Rec709 colors will be displayed as if they were P3 and will appear much more saturated than intended. Display color management is designed to fix this. It maps the Rec709 values to the appropriate P3 values so that the colors look the same.
i. Scroll up for instructions on how to enable Display Color Management, or go here.
b. Again, this is a matter of display and playback. Your actual video file is fine and if it's played back on a different monitor, it'll display correctly!
4. Is there a way to get all my playback apps on the same page?
a. Yes! One of our engineers created a LUT that will darken your video the appropriate amount so that when you play it back in a different app, it will look as it did in Premiere. Technically speaking, the LUT will correct the mathematical difference between gamma 1.96 and 2.4.
i. Download the Gamma Compensation LUT here!
ii. After downloading the LUT (.cube file) and saving it somewhere accessible, prepare to export your sequence!
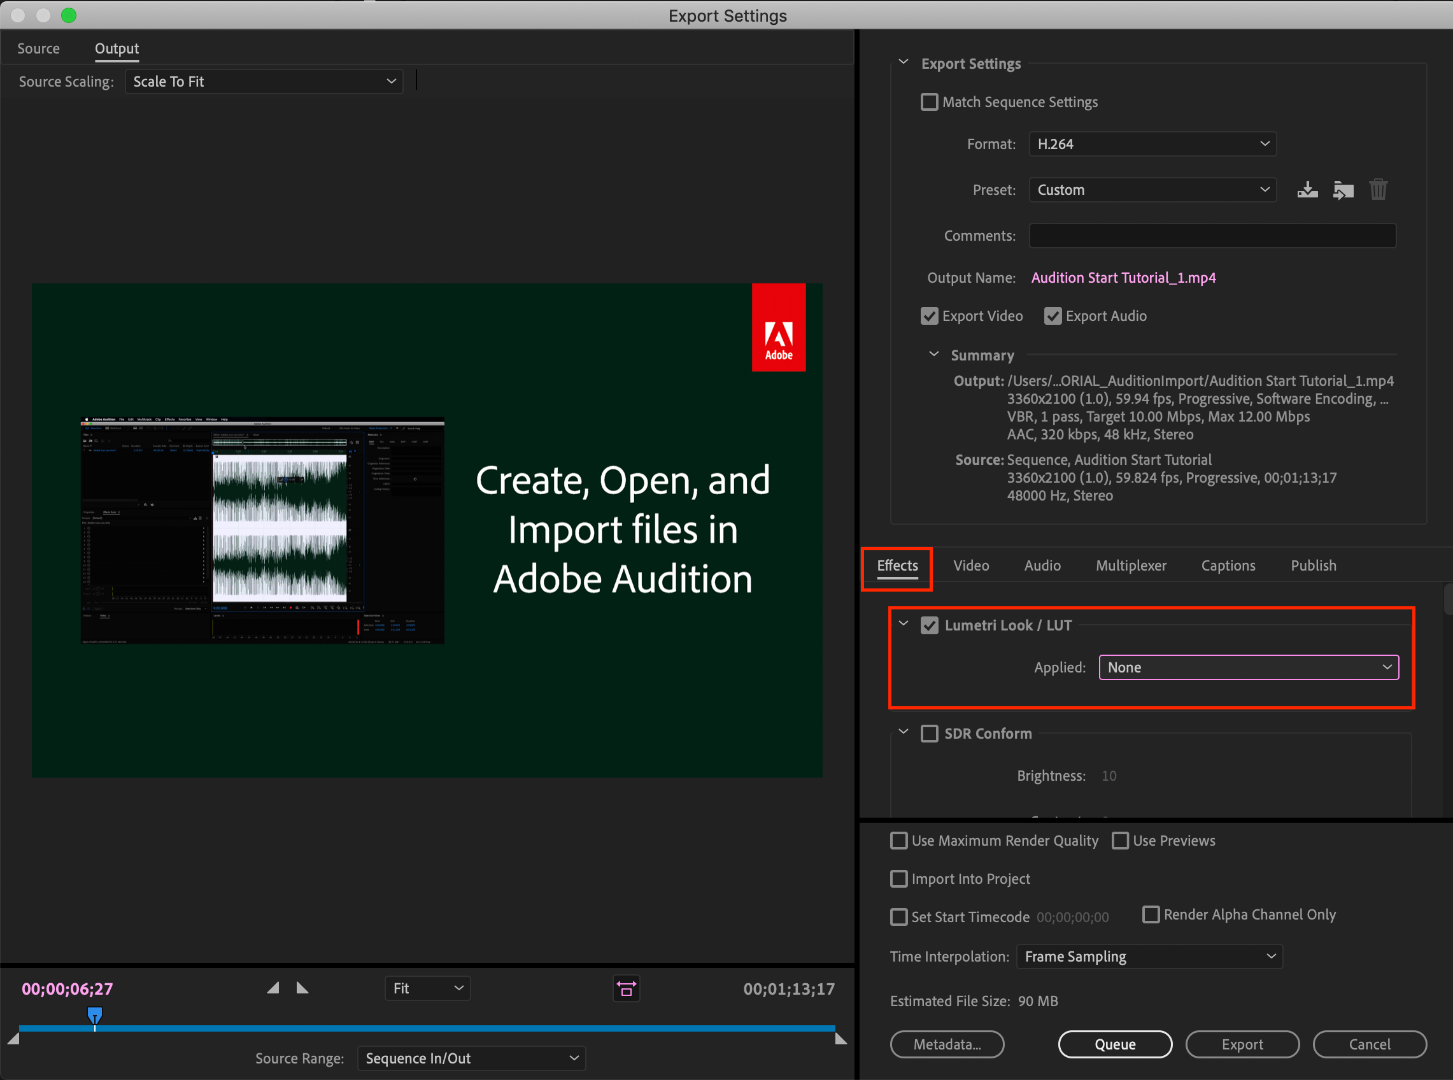
File > Export (Command+M or CNTRL+M) will pull up the Export Settings window, pictured below.
About halfway down the window, there's a few tabs to adjust encoding settings. Go to the tab marked "Effects" and you'll see an option to enable a Lumetri Look/LUT. Check that box, open the drop-down menu, and click "Select..." to navigate to the space you saved the LUT in.
iii. After you've selected the LUT, Premiere may display that there is "None" selected. That's a common glitch, the LUT has been applied. Sorry for the confusion!
b. However, this needs to be the last thing you do to your video! Either that or you need to save a backup of your video without this LUT on it. Because this LUT is darkening the color code of the video, in some cases, it will darken to the point where you can't get the detail back.
c. If you want to take the LUT off and you don't have a LUT-less backup, you can apply this reversal LUT that will return your video to the color levels you had before you applied the LUT. Perform the same steps listed above with the "Undo Gamma Compensation" LUT!
If you have any other questions about this issue, feel free to send me a private message.
For other support issues, you can check out our company contact options here! Contact us | Adobe
Thank you all for your collaboration and discussion so we could better investigate this issue! You help us to help you.
-Caroline
[DOWNLOAD LINKS]


 1 Correct answer
Hi all!
Thank you so much for your patience! We have a new solution for this available in Premiere 24.0. You can follow the workflow in this YouTube video to accommodate the QuickTime gamma shift between operating systems. Your image will look the same in QuickTime as it does in Premiere.
 262
Replies
262
262
Replies
262

Copy link to clipboard
Copied
Hi Todd, was wondering if you came to a conclusion on this matter? Your observation makes total sense to me and I'm surprised it hasn't been raised more often. I'm questioning this LUT being an actual issue rather than a fix.
As my client complained about the look of the preview exports from Premiere I was sending not matching the grading previews they received from the colourist, I decided to use the compensation LUT. This superficially solved the issue, client was very happy, whilst a big concern was growing inside me. I knew that what I was doing was actually irreversibly altering the footage and as you said footage and graphics were turning darker.
I'm now about to finalise the project and export a deliverable for broadcast? What do I do? Will I still apply the compensation LUT or not?
Thanks

Copy link to clipboard
Copied
They make it very clear ... that LUT is only to make the exported image look properly Rec.709 on the Mac systems running ColorSync ... do not use the LUT for any broadcast export/deliverables.
If you are working in PrPro on a Mac with Retina and ColorSync, use the Display Color Management option to get a more correct image in your PrPro "internal monitors", and export without the "gamma modification LUT".
As noted by my colorist friends (mostly total Mac people I'd note) ... the only Mac screens they recommend for viewing their output on are some of the newer iPads with a couple settings turned off and a slight tweak to something else. Those can come pretty close to their Flanders reference monitors.
Neil
Copy link to clipboard
Copied
Neil, thanks so much for your quick reply. It is now clear for me, I'll give up on that LUT. Funnily enough, it solves the issue whilst making it worse.
Marian
Copy link to clipboard
Copied
Solves the issue while making it worse ... yea, perfect encapsulation.
My colorist buds are so freaking beyond frustrated with the color mis-manglement between Apple and the rest sort-of of the world. It should be easy and quick for them to have a joint zoom call for an hour or two, agree on the standards that everybody then uses.
But ... well ... some folks like being unique. 😉
Neil

Copy link to clipboard
Copied
I did actually. Even made a video about it. 🙂
https://www.youtube.com/watch?v=kcNWzP-vLJY&t=23s
To answer your question though, if you are exporting a deliverable for broadcast, I would NOT use the Adobe LUT. Export as normal. The preview you see in Premiere is Rec.709, which is what broadcast uses, so as long as you are happy with how the video looks in Premiere, it will look reasonably the same when broadcast.
The only reason to use the Adobe gamma correction LUT is when exporting video for use on a Mac. That's it. I explain that in the video as well.
Copy link to clipboard
Copied
Nice vid there, good job!
And yes, the BM folks say in person that the "A" in Rec.709-A is for ... Apple.
Neil

Copy link to clipboard
Copied
Hi Neil,
I feel like you could be the one to answer me this.
I'm on an iMac with a Retina screen so, if I'm not mistaken, it has a P3 color space.
My videofootage should match the REC 709 color space and Premiere's native color space is also REC 709.
Now when I edit and color grade my footage on this iMac, naturally I grade it based on what I see (aside from what the scopes tell me).
So if I check the color management box in Premiere it will try to match the P3 color space, right?
If I grade like this, will I be grading in the wrong direction?
Should I color calibrate my Screen to match REC 709 as close as possible, making the checkbox obsolete?
I don't really care if the final render looks "good" on my Mac as long as the image from Premiere and what the customer will see on youtube are not too different.
Copy link to clipboard
Copied
Yea, the "native" space of the monitor is P3. And the ColorSync utility then applies a re-mapping based on an incomplete (flawed) implementation of the Rec.709 standards. So the problem is the remapping done by ColorSync.
For working in Premiere, make sure the "Display color management" option is checked. That will cause Premiere to look at the ICC profile driving the monitor from the OS, and remap Premeire's Program monitor accordingly. You should see a pretty useful look at your pixels within Premiere.
For viewing "outside" Premiere, you really need a monitor that is callibrated to Rec.709 and that done on a "clean" signal not affected by ColorSync ... essentially, using BlackMagic or AJA devices to take the signal prior to the OS. It's somewhat perhaps easier on a PC these days, oddly enough. Though you still have to be very pro-active to get what you need.
Neil

Copy link to clipboard
Copied
This LUT worked perfectly for a long while, but at some point in 2020, after an update, it stopped functioning. After selecting the compensation LUT in the export window, as suggested in this article, it does not load and has no effect on the output. Colors are washed out. Other users on Reddit are reporting this abnormal behavior, as well. Is there a fix in the works?
I'm using a 2019 16' Mac Book Pro, running Catelina, and Premiere Pro 2020 v14.8
Copy link to clipboard
Copied
Just following up - uninstalling and then reinstalling Premiere fixed this issue.

Copy link to clipboard
Copied
Just tossing in my 2 cents, as I had the same issue, and I'm not 100% sure this is the fix, but it worked for me.
When I checked the Color Management, my PPro timeline would darken.
After back tracking and starting from scratch, turns out I missed one step when calibrating my monitor.
I didn't fully remove the prior ICC active profile in Windows color management.
This time, I removed it all, and set the default to Win sRGB profile. (I set that default on the Advanced page in Win Color Managment top drop down menu)
Then, reset the monitor to factory settings.
Then, ran the calibration (rec.709, gamma 2.4, nits 100)
Then re installed it in Win CM, and ticked all the right boxes, set the icc as the default and the system default.
And when I re opened PPro, the timeline was no longer dark!!!
Again, I am not sure this is the answer. But it worked for me.
I'm thinking somebody out there could've easily made the same mistake of not removing the old icc, and setting the default, before calibrating. If you don't remove the old icc, you are calibrating over an existing icc, and the new icc is based on that old one, so when you delete the old one and the compouter defaults back to sRGB, your new one changes the sRGB icc signal to your new icc and now it isn't a true rec.709, because it's changing the sRGB signal, but was made to change the signal of the old icc. So if you check the box to use Color Management in PPro, your icc is not correct and that's why the timeline is dark.
Yes, I'm an amatuer and you can say I'm clueless about this stuff. I just went on a hunch and for some reason it worked.
My system is Ryzen 7, gpu GTX1050ti, 32gb.
It's worth a shot to check it out. Lemme know if it works.
Copy link to clipboard
Copied
This is the correct process Letty. And thanks for posting about it.
As that we should always start from the default ICC profile rather than our last one is not understood by most people. But the OS profile and monitor need to be "zeroed out" to begin the calibration process. I've realized that is something I normally leave out when listing how to do it, because I don't even think about that step.
My bad ... that's a rather crucial step in the process.
Neil
Copy link to clipboard
Copied
See, all your advice is working on me!

Copy link to clipboard
Copied
I have completely opposite problem and my footage looks darker and more saturated when I open it in Premiere. After exporting it looks the same dark and saturated and that solutions what was offered in this article don't work and make video even more if applied.
please help someone!!
Copy link to clipboard
Copied
Which computer, monitor, and OS?
As noted, make sure on a Mac you have the preferences option for "display color management" turned on, but without more details, can't give any other advice.
Neil

Copy link to clipboard
Copied
I tried applying the QT gamma compensation Lut in the lumetri look/LUT section in the export...but it turns my footage completely black. Any help?

Copy link to clipboard
Copied
If you have one of the newest Macs, the LUT doesn't work and turns everything black, it happens with me.

Copy link to clipboard
Copied
Hello!
I just came across your post. Are you still seeing this problem? I ask because the issue where applying the LUT causes the footage to turn black was fixed earlier this year, when Premiere Pro v15 was released.
Regards,
Fergus
Copy link to clipboard
Copied
Evan Anthony is a colorist I "talk" with quite a bit, and respect. He's got a list of steps that he recommends his Mac-based clients use when looking at media he's graded for them. With his permission, I'm posting his steps here. It helps the Retina screens get closer to a proper Rec.709 view of your pixels.
Neil

Copy link to clipboard
Copied
>I export a video, it comes out with a darker gamma than it should.
>I export a video with the GCLUT file, it comes out even darker than it already was.
>I export a video with the Undo GCLUT file, it comes out brighter than it should.
What in the... Is this some kind of joke, Adobe?
My video is on MP4 AVC, REC 709, 4:4:4.
Video info:
"Format : AVC
Format/Info : Advanced Video Codec
Format profile : High 4:4:4 Predictive@L5.1
Format settings : 4 Ref Frames
Format settings, CABAC : No
Format settings, Reference : 4 frames
Codec ID : avc1
Codec ID/Info : Advanced Video Coding
Duration : 8 s 200 ms
Bit rate mode : Variable
Bit rate : 12.2 Mb/s
Maximum bit rate : 120 Mb/s
Width : 2 560 pixels
Height : 1 440 pixels
Display aspect ratio : 16:9
Frame rate mode : Constant
Frame rate : 60.000 FPS
Color space : YUV
Chroma subsampling : 4:4:4
Bit depth : 8 bits
Scan type : Progressive
Bits/(Pixel*Frame) : 0.055
Stream size : 11.9 MiB (100%)
Color range : Full
Color primaries : BT.709
Transfer characteristics : BT.709
Matrix coefficients : BT.709"
My sequence settings on Premiere are on REC 709 and I've tried any kind of export settings in MP4, but nothing makes the gamma look correct. My monitor is a BenQ PD2700Q, 10bit, 100% sRGB coverage, with gamma set as the sRGB preset default. Any other gamma configuration makes Windows show incorrect grays (darker or brighter than it actually is).
When I capture a test video of my desktop with OBS it always shows correct gamma on all media players, except for editing programs like Premiere Pro and DaVinci Resolve. Why is that?
Or even better, WHY there's not a more flexible option to fix the gamma?
And why on earth can't I have an exported MP4 video, from Premiere, without it pixelating the reds in any setting and in any crazy high bitrate? OBS captures in normal AVC MP4 4:4:4 with no such problems.
Copy link to clipboard
Copied
You don't list a couple of crucial things ... such as your OS and any calibration for that BenQ, or whether you're using the 'diplay color management' option in Preferences.
My first comment however, is your codec setup is wrong. The actual defined YUV sRGB/Rec.709 standard says it should all be in 'limited' range. Period. The only 'full' range should be RGB 4:4:4:4 formats such as DPX and a couple of the other high-end high-bit-depth files that are 12 bit. If you are setting 'full' in OBS, I would encourage you to change it. This is probably the heart of your problem.
"Limited" range doesn't mean that the media is displayed as 16-235, which is a common misunderstanding. It affects how the media is mapped within 0-255. For proof, on a properly set up system, both full and limited range media show exactly correctly ... mapped to 0-255 on the monitor. Both the RGB-12-bit (full) and YUV-8/10 bit files will be mapped and displayed 0-255.
What happens to a Rec.709/YUV file mapped to 'full' on a system set to do everything in full? It will take that file you have, with data already internally mapped to 0-255, grab the values at 16 and shove those down to 0, raise the values at 235 to 255. Which sounds like the behavior you're getting.
Pro colorists have demonstrated this for noobs of their trade for years. Is it totally counter-intuitive? Oh heck yes!
I tried setting up for "full" when I started out also, because why wouldn't you? But it's a misunderstanding of what the standards are and what happens in reality.
PrPro will use Rec.709 YUV media as limited, because that is the appropriate methodology according to the Rec.709 standards. The internal monitors are hard-coded to correct sRGB/YUV/Rec.709 processing.
My system is a PC running with a BenQ PD2720U as my transmit-out, calibrated with the Xrite i1 Display Pro puck/software then profiled with LightSpace using Resolve as a patch generator. My monitor and GPU settings are all 'limited'. This is correct. In Resolve, I use the 'auto' settings mostly because that will correctly use 'limited' and 'full' according to the nature of the media according to standards.
My display and scopes of videos are identical between PrPro and Resolve. In both apps, standard YUV Rec.709 clips display as full, as do the RGB full DPX type clips. This is correct behavior.
Neil
Copy link to clipboard
Copied
Sorry. Windows 10 (latest version, 20H2). My monitor comes calibrated from factory, I guess, as it came with a paper with some calibration graphics on it that I have no idea how to understand it.
If I set the gamma to be darker, in order for it to match the desktop image to what comes out from Premiere, it just makes the final result even darker.
The problem here is not on the monitor gamma, as it stays true to the original image in all media players before exporting on Premiere.
Display color management was on, which was showing darker gamma, then I turned it off, now it shows the correct gamma, but only on the preview window.
THANK YOU! The culprit was indeed the full range!
Once I had set color format to 444, color space to sRGB and color range to partial, captured videos are now coming out with correct gamma from Premiere.
The reds are still blurry no matter what I do. Maybe it's the codec Premiere uses?
Greatly appreciated lesson, sir! Now I understand it and will remember it for life!
"...then profiled with LightSpace using Resolve as a patch generator."
— This specific part I don't know what you're talking about, sorry. I'm not a pro editor.
If you explain it in noob terms I can probably understand.
Again, thank you very much!
Copy link to clipboard
Copied
Calibration is having the puck record data from the screen, comparing the image sent to the screen (each image is a "patch") against the image measured on the screen by the puck. Then the program creates an ICC profile to re-map image data so that it's closer to what was sent for each 'patch'. That ICC profile is then 'given' to the OS for that monitor.
So you run say i1 Display Pro software with their puck. It generates a series of color patches at different levels dark to light on the screen, and measures them. Computes the difference between what was sent and what was measured. Creates that ICC profile and sets it in the OS for all images sent to that monitor.
Profiling is a different thing. It checks what your calibration got you. It checks what the screen is showing for each patch sent, and then generates charts showing what the screen is doing versus what it should be doing. It's something that only the upper calibration software does, and the one I've been using is the free version of LightSpace. This software was made by Lightillusion but they've now come out with a new program they call ColourSpaceCMS ... cms for "colour management system".
To create a profile, you run LightSpace or ColourSpace with the i1 puck, while also running BlackMagic's Davinci Resolve. Ls or Cs then somehow communicates with Resolve to use that app to generate the patches on screen. After it's run the patch series, it produces the charts. The charts show the actual versus the ideal ... and show you if there are problems where you don't match the minimal needs you have.
My BenQ PD2720U came with a pretty certificate of calibration also. Whatever. Makes nice wall art or something. And this monitor was designed for video work ... with built in Rec.709, HDR emulation, and 'dark room' Rec.709 modes.
First thing I did was run a series of checs on it. Um ... Rec.709 calls for a 100 nits brightness, and their 'calibrated' Rec.709 came it at a brightness of over 250 nits. Not hardly ... and the gamma was not exactly 2.4 either. Nor was the white point spot-on.
So ... it took a few passes calibrating it with the i1 Display Pro software/puck, then making a profile with the LightSpace/Resolve pairing, until the charts generated by the profiling showed I had this puppy tightly under proper Rec.709 control.
Now, understand I demand more from my monitors than most Premiere users need for that, as I teach pro colorists how to color in PrPro, and I need my setup to show dead-on screenwise on theirs. Their systems built with monitors that cost more than my entire suite. I mean, they've got more in their spectroradiometers (fancy screen-reading devices) than I do for my computer, and it's a 24-core Ryzen w 128GB of RAM and a 2080Ti.
So ... using something like the i1 Display Pro setup, you can get your screen close enough that very few people could ever tell it wasn't a full-on colorist's setup.
Neil

Copy link to clipboard
Copied
It doesn't work on Macbook Air M1.
When I apply the LUT, the whole video becomes pure black. No exposition at all.
Anybody encountered a way to fix it?

Copy link to clipboard
Copied
This is a known problem with previous versions of Premiere Pro when running on Apple silicon-based Macs. It was fixed, starting with version 15 of Premiere Pro.
Regards,
Fergus

 AdChoices