 Adobe Community
- Home
- Premiere Pro
- Discussions
- "Why does my footage look darker in Premiere?" Col...
- "Why does my footage look darker in Premiere?" Col...

Copy link to clipboard
Copied
Courageous community member Matt Johnson made a video based on this document. Watch here for a visualization of the solution, and read on to understand why the color shift is happening in the first place.
1. What's the issue?
a. "My exports look washed out when I view them in QuickTime player"
b. "When I post my video on YouTube it looks less saturated and the blacks are raised"
c. Footage appears darker after imported into Premiere Pro
d. Help!! Premiere Pro CC is changing the color of my imported footage
When importing footage into Premiere Pro, the display of the video looks more saturated than when it is played back on other apps such as VLC, QuickTime, After Effects, or a number of web browsers like Safari or Google Chrome. When played back on YouTube through those web browsers, the video also appears less saturated than it does in Premiere. As far as we know, this is a Mac-only issue. If you're experiencing this behavior and you're on a Windows machine, please send me a private message!

Side by side, you can see that video in Premiere (left) is displayed with more saturation than the video displayed in QuickTime (right).
(Screenshots provided from this forum post)

Quicktime on top, Premiere on bottom
(Screenshots from Boots Riley's "Sorry to Bother You")
2. Why is it happening?
a. Premiere displays video based on the assumption that your monitor is set to Rec709 color space and that your footage was recorded in reference to gamma 2.4, because that's the gamma standard for broadcast television. Gamma 2.4 displays with higher contrast — blacker blacks and whiter whites. It was chosen for broadcast television because the people who were deciding playback standards figured that people were watching TV in their dark living rooms, and they thought increased contrast levels looks prettier in that setting.
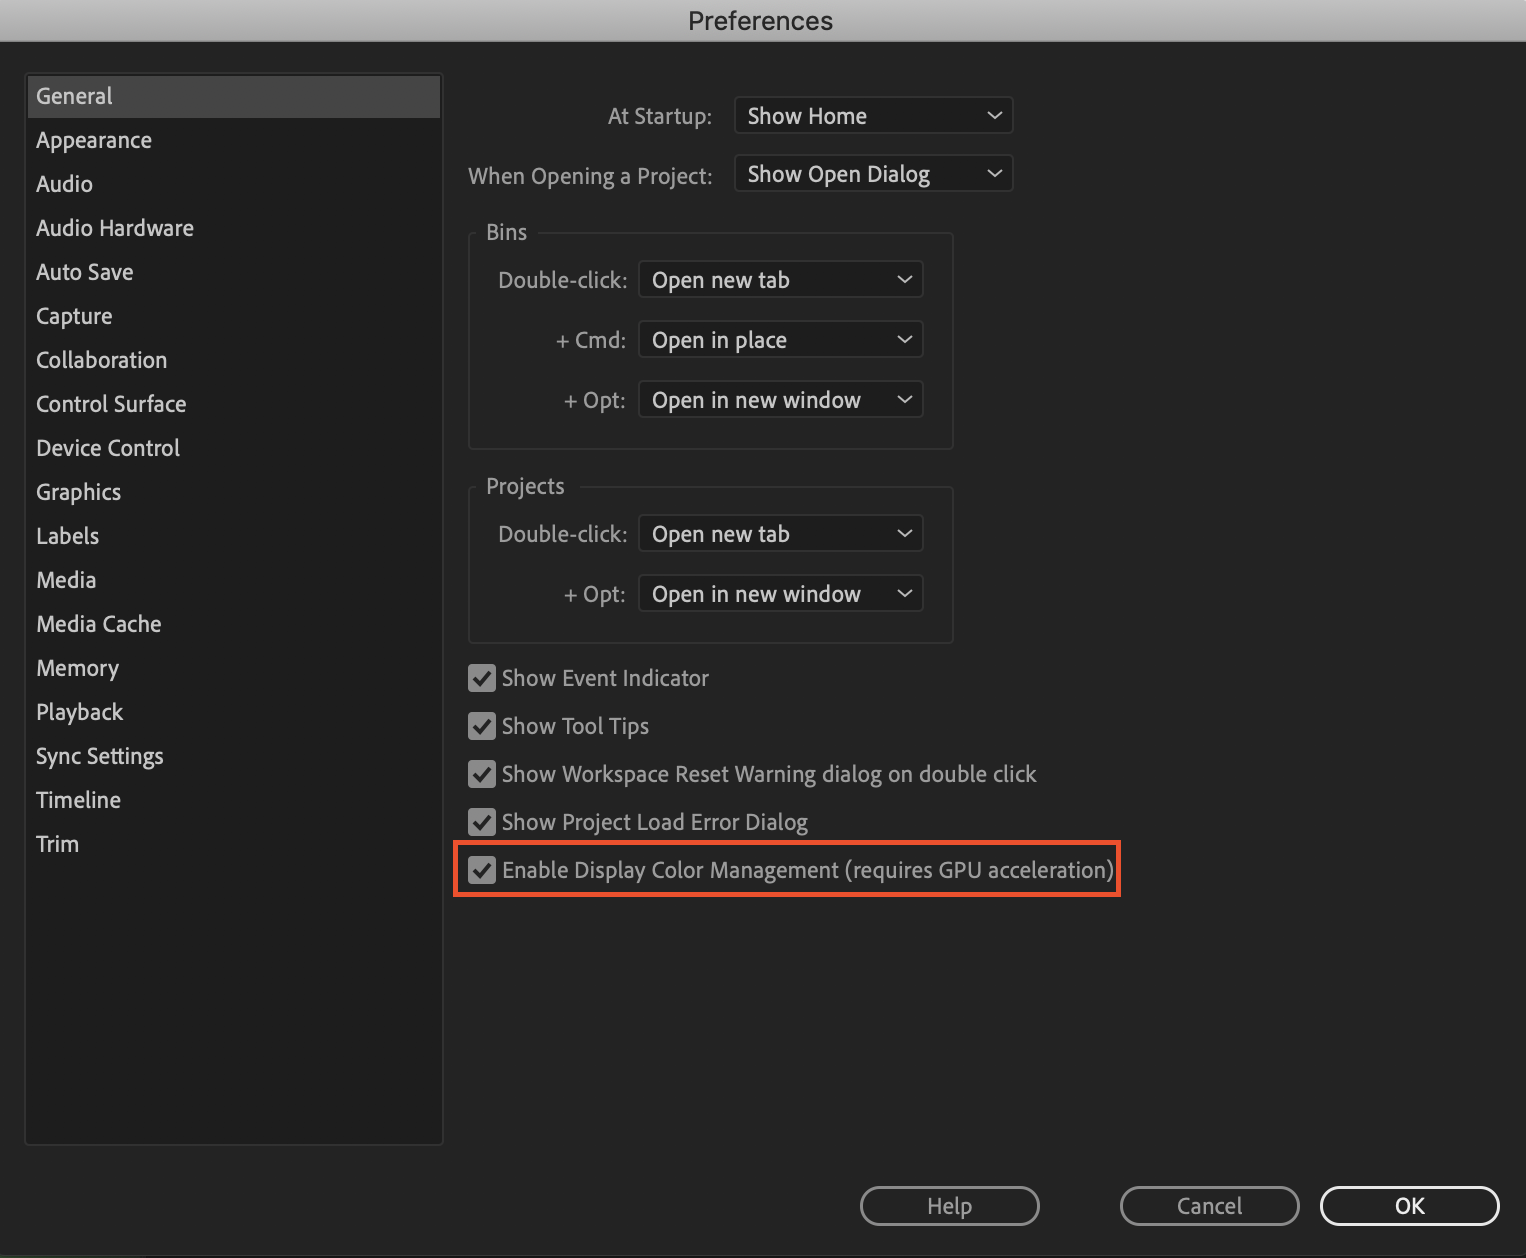
i. Premiere has a feature called "Display Color Management" that will coordinate with your monitor's display settings in order to correctly display in a Rec709, gamma 2.4 profile.
Premiere Pro > Preferences > General > "Enable Display Color Management (requires GPU acceleration)"
It's the last box on the list and it should always be enabled! For more detailed instructions, go here.
b. Monitors have become fairly standardized over the years, but apps haven't. Other apps like QuickTime, Final Cut Pro, and web browsers like Chrome and Safari display video in a scene-referred gamma 1.96 profile despite what your monitor is set to. Gamma 1.96 profiles play video back in a way that looks closer to what you see in real life — lighter blacks and softer whites.
c. This gamma shift is completely dependent on what app you play your video back in, as most users have figured out on their own. FCP 10, QuickTime, and certain web browsers all play video back in the same way, so people assume that they're displaying the video "correctly" when in reality, it's just that they're displaying the video under similar standards. Your video files are fine! The actual color codes within the pixels of your video are not changing in between apps. The miscommunication is happening between the apps and the monitor they're being displayed on.
TL;DR Premiere uses the same display standards as broadcast television does. Other video playback apps like QuickTime have begun to adhere to different video playback standards. This is what causes videos to display differently in between each app.
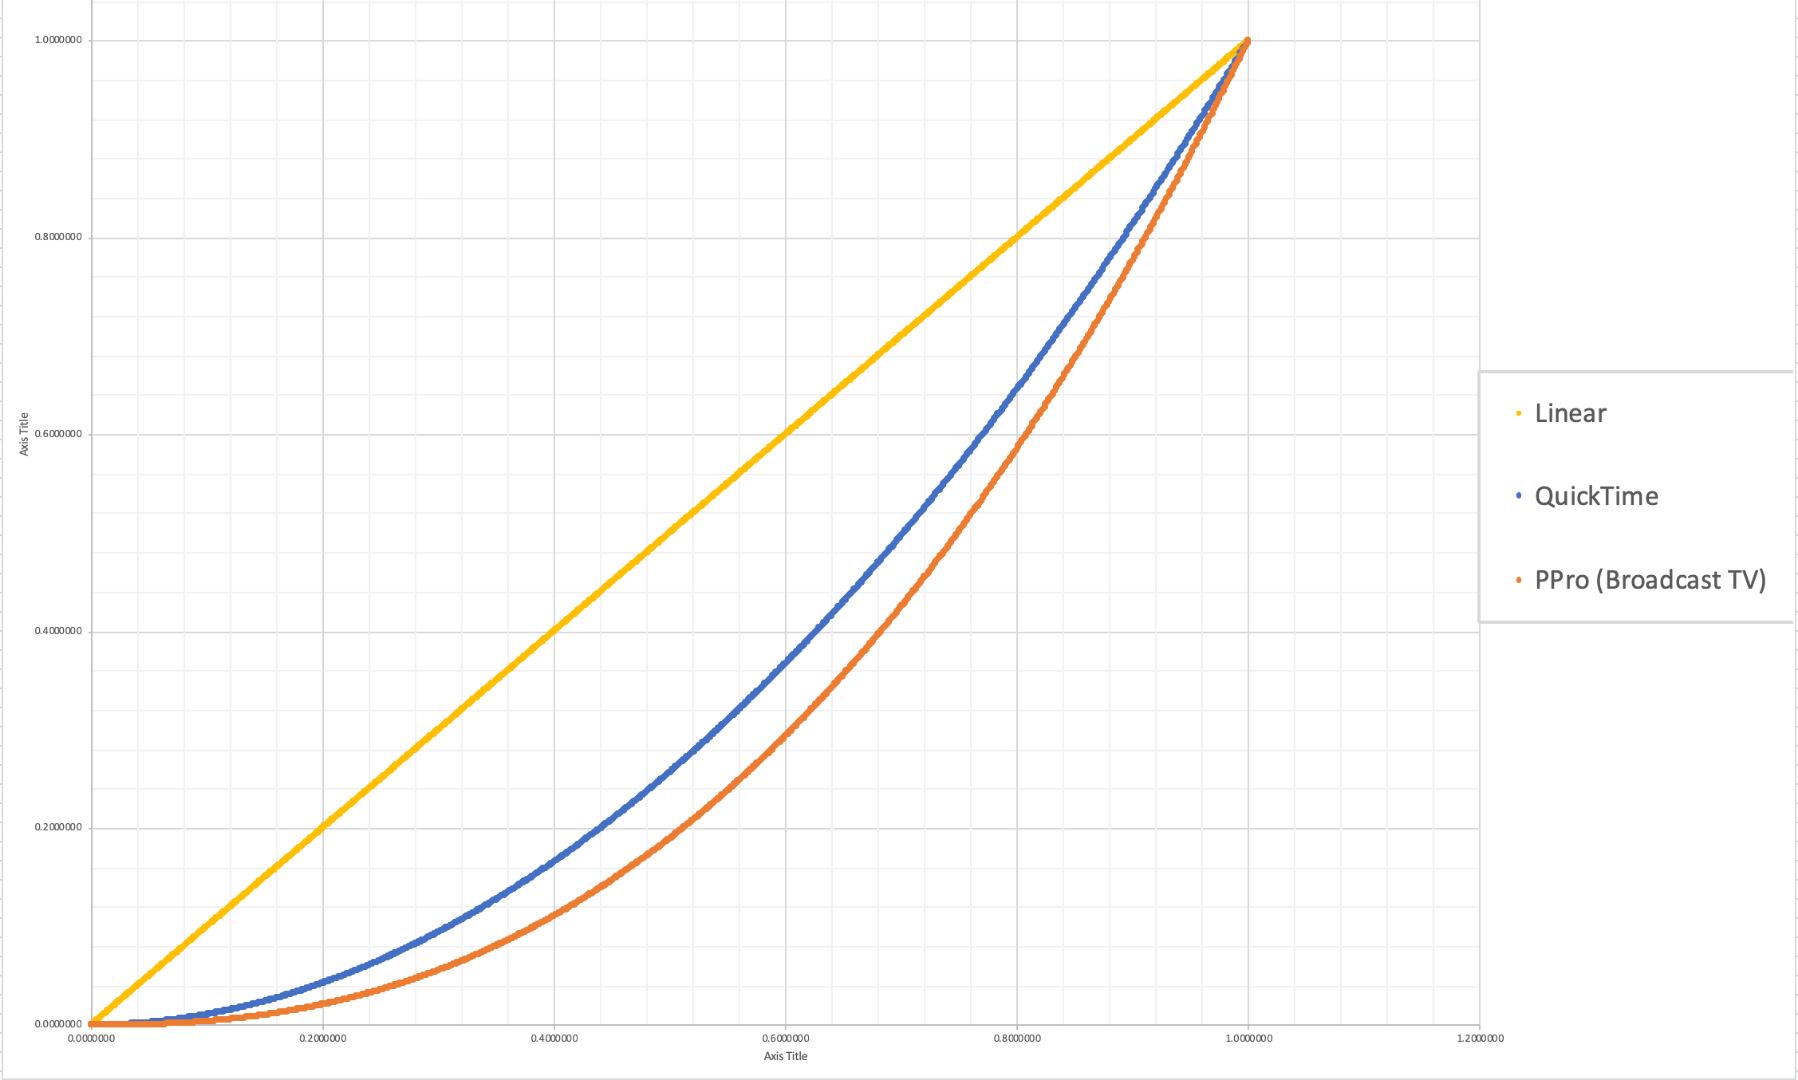
The graph above is a visual representation of the gamma display standards of Premiere Pro (orange), which dips into the darker end of the spectrum, compared to the gamma display standards of QuickTime (blue), which don't have the capability to display those dark colors and therefore QuickTime displays video with less saturation which gives it that "washed out" appearance.
(Graph and data by franciscrossman-J6rJng)
3. But why is it worse on my new iMac monitor?
a. Newer Mac displays are wide color gamut (close to P3) and can display more vibrant colors than Rec709 is capable of reproducing. Without any conversion, your Rec709 colors will be displayed as if they were P3 and will appear much more saturated than intended. Display color management is designed to fix this. It maps the Rec709 values to the appropriate P3 values so that the colors look the same.
i. Scroll up for instructions on how to enable Display Color Management, or go here.
b. Again, this is a matter of display and playback. Your actual video file is fine and if it's played back on a different monitor, it'll display correctly!
4. Is there a way to get all my playback apps on the same page?
a. Yes! One of our engineers created a LUT that will darken your video the appropriate amount so that when you play it back in a different app, it will look as it did in Premiere. Technically speaking, the LUT will correct the mathematical difference between gamma 1.96 and 2.4.
i. Download the Gamma Compensation LUT here!
ii. After downloading the LUT (.cube file) and saving it somewhere accessible, prepare to export your sequence!
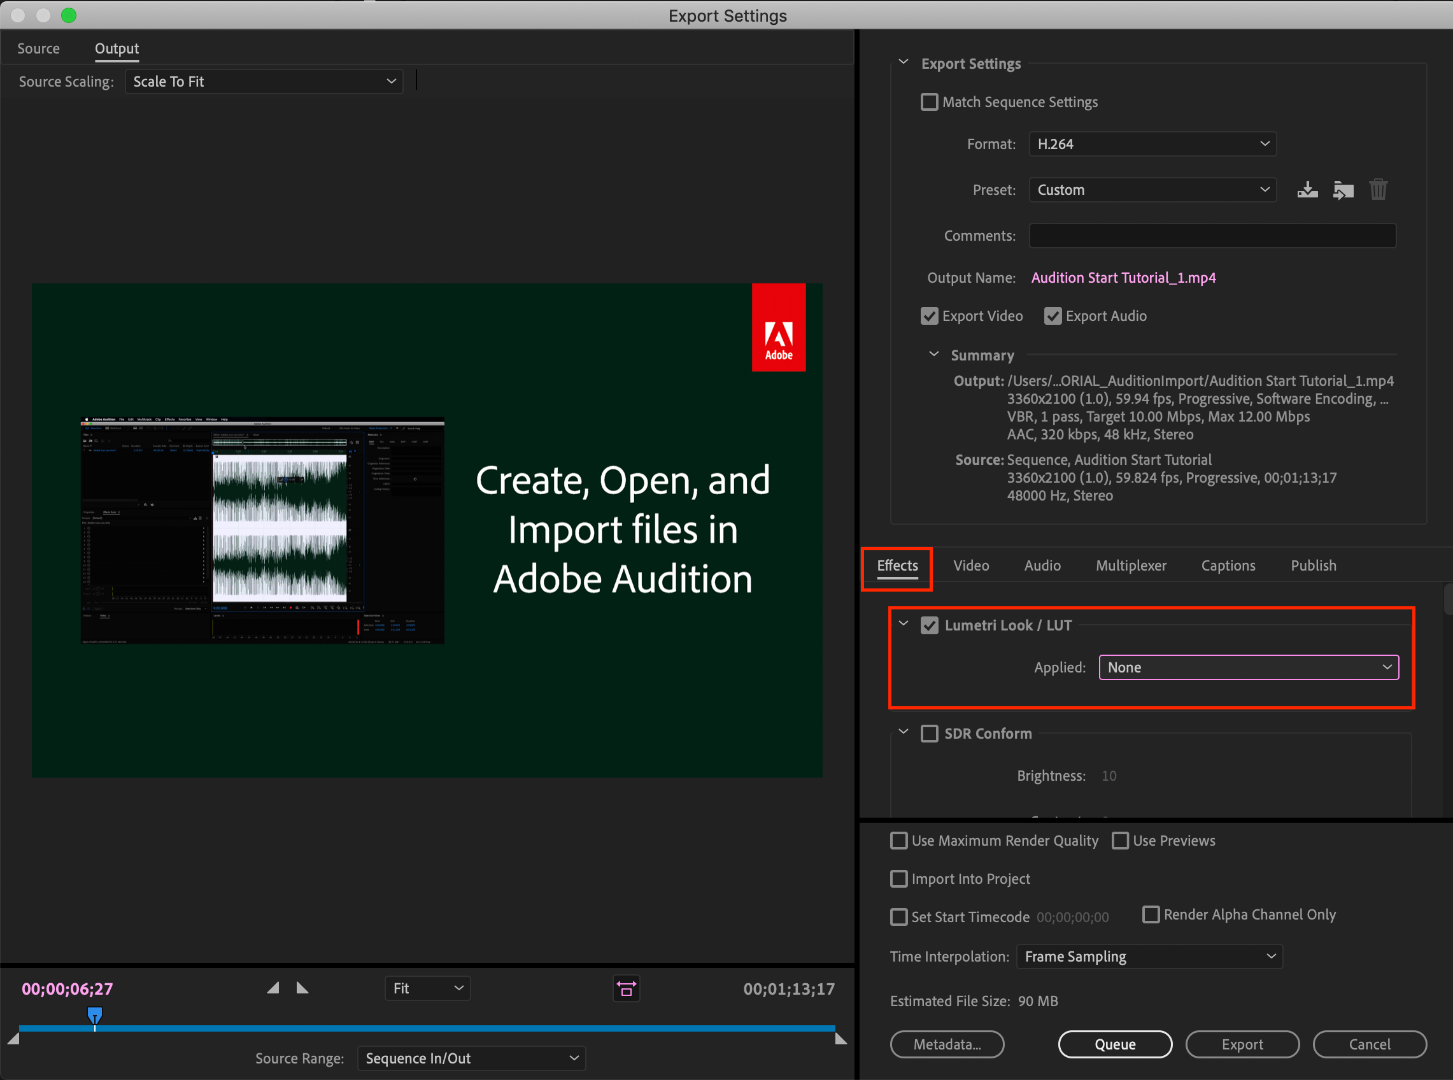
File > Export (Command+M or CNTRL+M) will pull up the Export Settings window, pictured below.
About halfway down the window, there's a few tabs to adjust encoding settings. Go to the tab marked "Effects" and you'll see an option to enable a Lumetri Look/LUT. Check that box, open the drop-down menu, and click "Select..." to navigate to the space you saved the LUT in.
iii. After you've selected the LUT, Premiere may display that there is "None" selected. That's a common glitch, the LUT has been applied. Sorry for the confusion!
b. However, this needs to be the last thing you do to your video! Either that or you need to save a backup of your video without this LUT on it. Because this LUT is darkening the color code of the video, in some cases, it will darken to the point where you can't get the detail back.
c. If you want to take the LUT off and you don't have a LUT-less backup, you can apply this reversal LUT that will return your video to the color levels you had before you applied the LUT. Perform the same steps listed above with the "Undo Gamma Compensation" LUT!
If you have any other questions about this issue, feel free to send me a private message.
For other support issues, you can check out our company contact options here! Contact us | Adobe
Thank you all for your collaboration and discussion so we could better investigate this issue! You help us to help you.
-Caroline
[DOWNLOAD LINKS]


 1 Correct answer
Hi all!
Thank you so much for your patience! We have a new solution for this available in Premiere 24.0. You can follow the workflow in this YouTube video to accommodate the QuickTime gamma shift between operating systems. Your image will look the same in QuickTime as it does in Premiere.
 262
Replies
262
262
Replies
262

Copy link to clipboard
Copied
With Enable Display Color Management (EDCM) on, Premiere looks at the ICC profile for the monitor in the OS, and remaps the image to display as Rec.709. So it is crucial to have the ICC profile set to Rec.709 also. If not, it will adapt to a wrong profile.
So the piece here I can't answer is whether or not your color space/profile in the OS is set to Rec.709.
Neil

Copy link to clipboard
Copied
I am having this same issue and it is only with 5D Mark III footage. The C100 camera looks identical to the source footage.
Screenshots of 5D footage here
Orig:

In Premiere:

It definitely looks way different than it did in-camera when I was shooting. I turned on the "Enable Display Color Management" option in General settings and tried the Gamma Compensation LUT which actually makes it darker.
Please help!!!
Copy link to clipboard
Copied
"Original" how are you determining that?
The viewer of a 5D is not of course a professionally color managed screen, or even close.
So ... what is your OS, what color space/profile ICC does your OS have set, what is your monitor, what settings is it set to, have you calibrated this with a puck and software then run a profile to see what the reality of your monitor is compared to the space you expect?
Neil

Copy link to clipboard
Copied
DRHUG, you should just start a new post ( thread on forum ) about your particular camera thing... you own experience, cause this thread has been worn out with never ending permutations of color space stuff.
Your canon camera is fine and nice and it won't be that hard to fix what's going on with your source vs. what it looks like in PPRO.
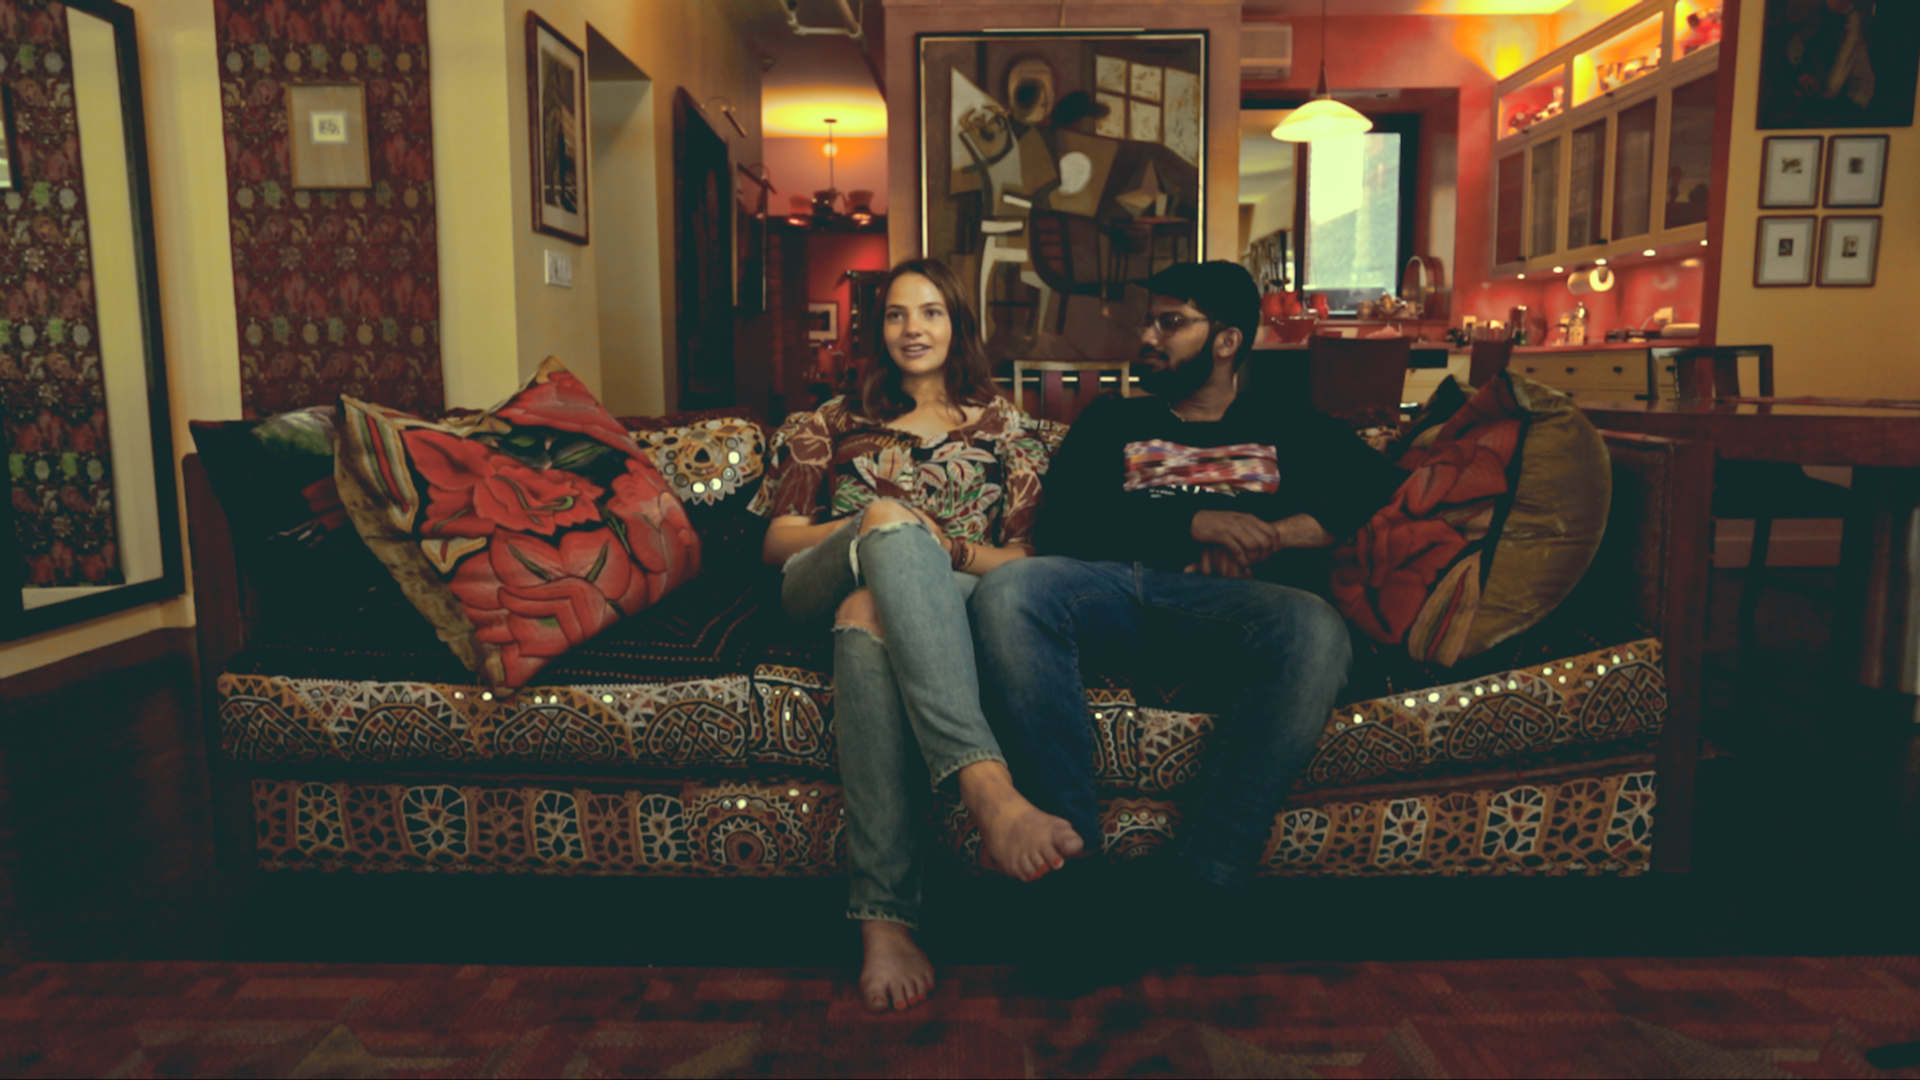
The white girl has good flesh tones sorta, and the other guy is OK too I guess, but the guy who painted the picture on the wall in the background may have some mental problems. You just have to adjust your levels and you'll be fine.

Copy link to clipboard
Copied
also, with auto white balance and no control over you light color temp ( make your own light ) you have a mix of 56k and 32k ( blue and warm , or blue and orange, or basically yellow and so on … ) .. so if you do your levels and then use hue v sat on that yellow stuff and bring it down a bit, you should be fine.

Copy link to clipboard
Copied
"Original" how are you determining that?
There only one way that can be determined, which you're aware of, and it doesn't allow for screen shots.
Copy link to clipboard
Copied
You know that, I know that ... I was asking the other user how he was determining "original".
No camera of course has a completely color/tonal correct screen. Not even Alexa or RED. Which is why one uses monitors with false color, zebras, the like on-set. To make sure you only clip what you know you're gonna clip.
Not even the cameras with the capability to record in RAW or log with a settable "viewing LUT" in-camera have "perfect" viewing screens.
Neil
Copy link to clipboard
Copied
You know that, I know that
And it's important that we make other users aware of it as well by insisting they stop using their computer monitor as a 'reference'. Don't you think?
Copy link to clipboard
Copied
Ain't gonna happen, sadly.
But they can get a better viewing environment than they have. IF they go about it intentionally.
Neil
Copy link to clipboard
Copied
This is a video by the Baselight team on what happens within the Mac OS regarding video color. And it includes the best and most detailed instructions I've seen ANYWHERE on how to go into the Mac ColorSync utility and set that so that all your apps display color properly on the Retina/P3-Display screens.
The first ten minutes explain both what happens and why, and how to change settings so it all works correctly.
https://www.filmlight.ltd.uk/training/resources/truelight/QuickTimeColour.php
Neil
Copy link to clipboard
Copied
DRHUG, you should really consider ( if you ever come back ) posting a new message in the forum about your desire to solve problems like this.
You'll get the same nice people to help with advice, etc.
Most people using PPro don't have super duper color calibrated monitors and all that stuff, and use their computer monitors which are sRGB I guess. So, don't be alarmed. It's pretty normal for basic editing stuff ( like diving off a cliff with a camera on your head).
Everyone seeing your 2 comparison screenshots will realize that it's a matter of 'comparison' ( whether it is legal SMPTE standard or NOT ) it is what you are experiencing and you should be respected and thanked for posting those shots so people can understand your problem.
So, thanks for posting those shots.
I took the 2nd one ( the dark one ) , which as a screenshot is probably 8 bit sRGB, just to play with basic levels in an NLE to show you that you can in fact correct stuff so it looks nicer using your current monitor..
At this point we are not concerned with the final delivery to a fancy TV broadcaster or a big Producer of Hollywood movies, where color spaces are of paramount importance. Right now we are dealing with what is coming out of your camera and what it looks like in PPro.. and within your sRGB color space, making it look closer to what you shot.
The blacks are clipped in your screenshot so I couldn't do much with that … in my NLE... but here's the screenshot of a quick correction on my LAPTOP WITH SRGB stupid monitor.
Copy link to clipboard
Copied
That's from your DARK version screenshot.
I still think the person who painted that picture on back wall may have mental issues. It reminds me of " nude descending a staircase "
Copy link to clipboard
Copied
whoops.. a bit greenish on the walls... but you know how to fix it...

Copy link to clipboard
Copied
Help!When I going to add Lut in that "effects" tab and i clicked "select" at the Lumetri Look/LUT section, nothing happens(I mean i cant even select the lut because when i clicked "select" it just nothing happens). What am i doing wrong? Please help

Copy link to clipboard
Copied
This is a great way to summarize all of the feedback I've gathered across multiple forums and discussions for the past several days. I've been dealing with this problem for 3 weeks since I got the new MacBook Pro 2019 OS Mojave with Retina monitor. This issue persists with Premiere Pro CC 20018 and 2019 on this computer. Note, this issue does not exist on 2013 MacBook Pro OS Leopard with Premiere Pro 2018 or 2019 so it's something with the LCD monitor but this one comes Retina standard. Why are today's monitors calibrated differently than the 2013 ones?
Copy link to clipboard
Copied
The newer Mac products use a completely different color space, one ONLY used by Macs with the Retina monitors. No one else in the world looks at the same color space. The older ones used the nearly universally standard sRGB based Rec.709 standard for video.
What's actually worse ... not only do the newer Macs with the Display-P3 space Retina monitors have screens with vastly different color primaries than the video sRGB over 90% of video media is produced on, the Mac ColorSync utility doesn't apply standards to converting Rec.709 media onto a Retina screen. They use only the "scene-referred" or camera transform function to the media ... but not the display-referred transform that is the other half of the Rec.709 standard.
Color primaries are off due to the different color space and therefore improper mapping of media to pixels, and the gamma (brightness/darkness curve) is off due to the improper application of Rec.709 math to the file data.
Again, the older Mac screens were sRGB based. The newer ones and the OS are built around the new Mac ecosphere. Which doesn't integrate well with the rest of the world.
Neil

Copy link to clipboard
Copied
Overall this is a very helpful article, and I am most grateful to have the info. I am however, uncertain about the "stickyness" of selecting the Gamma Compensation LUT in the Export dialog, especially since the UI shows None even after the LUT is applied.
So if I follow the steps above to Export a version of my Sequence for the first time, I can see that the output looks different. If I then continue to edit the sequence in Premiere, do I have to re-select/apply the LUT in the Export Dialog each time I want to render the results of my editing, or does Premiere remember to use the LUT each time?
Similarly, I don't how to interpret these statements at the end:
"However, this needs to be the last thing you do to your video! Either that or you need to save a backup of your video without this LUT on it. Because this LUT is darkening the color code of the video, in some cases, it will darken to the point where you can't get the detail back.
c. If you want to take the LUT off and you don't have a LUT-less backup, you can apply this reversal LUT that will return your video to the color levels you had before you applied the LUT. Perform the same steps listed above with the "Undo Gamma Compensation" LUT!"
I would have thought that applying the LUT in the Export step would only affect the file produced by the export. So to produce a version without the LUT's impact, I should be able to just Export again, without the LUT. But from the above it sounds like either the LUT has somehow been applied to my sources (before Export), or that there's no way turn off the application of the LUT during export, except by also applying the Undo LUT. In short, it would be great if someone could accurately describe how LUTs applied during Export work, and what to do in a real world editing session, in which one does lots of Exports. Thanks!

Copy link to clipboard
Copied
This LUT saved my life for the past 5 months, However I noticed after the most recent update to Premiere it no longer works. It exports much darker and contrasty than previously, Did something change to the program in the most recent update? Is there an updated LUT? Has anyone else noticed this?
Copy link to clipboard
Copied
Same thing happening to me. Does this LUT need updating? It's too contrast-heavy and dark. Perhaps what could help would be a % ammount of LUT to apply in the export settings. A strength slider for the LUT, of sorts, so we can tweak amount to apply.

Copy link to clipboard
Copied
That's a great idea! I still would like to know why in Premiere 2019 this is happening. My exports looked the same as my program monitor in version 2017.

Copy link to clipboard
Copied
Just add the LUT in the creative tab and you can take down intensity there.
Copy link to clipboard
Copied
And/or wouldn't just adding this to an ADJ layer on top of all your footage work and you just adjust opacity of the layer?
Copy link to clipboard
Copied
For the original point of this thread, that's not all that useful. The LUT is being applied to make the exported file look like it did in Premiere, after its exported.
Due to the unfortunate misapplication of standards for Rec.709 in the Apple CM utility ColorSync.
Neil

Copy link to clipboard
Copied
Great post carolinesears!

Copy link to clipboard
Copied
Thanks guys!!!

 AdChoices