 Adobe Community
- Home
- Premiere Pro
- Discussions
- Switch Back to Original Media for Export: 4K Iphon...
- Switch Back to Original Media for Export: 4K Iphon...
Switch Back to Original Media for Export: 4K Iphone footage

Copy link to clipboard
Copied
Hello Adobe community! I am new to Premiere Pro and looking for major help on an export issue, as I'm trying to export for Youtube in high resolution. Here's what happened:
1. Filmed my video on my Iphone 11 Pro in 4K (orginal footage is 3160 x 2140 at 30 fps)
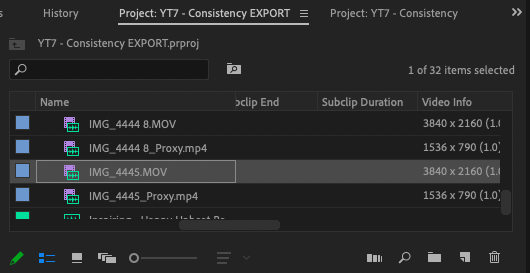
2. Edited with proxies - I wasn't sure on the proper proxy format, so it defaulted to using 1536 x 790 which is super odd!
3. All original media has proxies in proxy folder - not sure if they're online or offline??
3. Tried exporting many ways - Changing the sequence settings, toggling proxies... Running out of options 😞
4. When I upload to Youtube, there are black bars and it's very blurry
**I am hoping to export with the orginal media of 3160 x 2140 by switching the proxies back to orginal media. The end goal: When I upload to Youtube, I'm hoping to have no black bars and a clear picture.
Any help appreciated!! Thank you 🙂
(I've attached some photos here for reference)


 5
Replies
5
5
Replies
5

Copy link to clipboard
Copied
The problem is you made the sequence from the proxy clips. Note the sequence frame size?
In Premiere, you make the sequence with the original media ... then toggle the proxies on/off with the toggle proxies icon in the Program monitor.
That way you work with proxies when needed, but simply switch forth and back as you wish.
Does PrPro see those prozies as attached?
Neil

Copy link to clipboard
Copied
I think you should start over and get your proxies correct. Yours are not, correct proxies do not show a line item in the project and you don't import them. You do ATTACH them. It actually should be done for you when you create/ingest the actual media files.
Bummer your footage is such a weird size.
790x535 or 1054x713 are some sizes to match that oddball footage.
The below tutorials are good, but IGNORE any reference to h.264 proxy format, use only the ProRes or Cineform formats.
VideoRevealed: Multicam Proxy Workflow in Adobe Premiere Pro — Premiere Bro
Proxy workflow in Adobe Premiere Pro - YouTube

Copy link to clipboard
Copied
With Premiere Pro's Proxy Workflow, proxy files are attached to the full resolution files. You always work with the full resolution files in the project and you enable/disable Proxy use in the Program panel or the Source panel. As such, you never import the "_proxy.mov" files. You attach them.
This tutorial shows the process:
https://helpx.adobe.com/premiere-pro/how-to/proxy-media.html
You can monitor the creation of the proxies in the Progress tab.
It can be very helpful to enable "Proxy" in the Project tab Metadata Display options so that you can see the attached proxy file in line with the full resolution file when using List View.


Since you've imported and edited the proxy files, you'll need to make a duplicate Sequence, change the duplicate Sequence settings to 3840-by-2160 and manually replace each proxy file with the full reoslution file. Once completed, you'll have a 2160 Sequence that you can export at full resolution.
For future reference, consider converting your iPhone original clips to Apple ProRes422 LT matching the source (so, you'll have 3840x2160 ProRes source for Premiere Pro). If your computer isn't older than 2013 or 2014 and you have high bandwidth drives, you can probably edit 2160 ProRes422 LT directly. Make sure that the Sequence Video Previews are also set to ProRes422 LT. Export an edited master at ProRes422 LT and then use Media Encoder to conver to H264 for YouTube. You'll also be taking advantage of Smart Rendering with this workflow (things will be faster). If you're getting laggy playback, create 1280-by-720 ProRes422 Proxy proxies for the 2160 ProRes422 LT files from within the Premiere Pro project tab and enable Proxies in the Program tab or Source tab. (720 ProRes422 Proxy should play smoothly on just about any computer form 2008 or newer with USB3, maybe USB2, standard hard drives).
Copy link to clipboard
Copied
This was extremely helpful thank you very much!!
It took me 2 weeks to create this video, so I didn't end up re-starting I re-linked all my media manual to the original 4K files. It looks like it worked!
I updated the sequence settings to match the source settings (3840 x 2160), and so on export it now says that the source settings match the sequence.
I have just one last question for exporting if you don't mind:
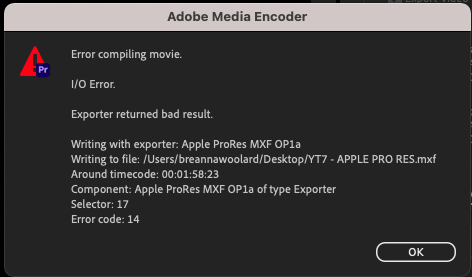
Under Format I selected "Apple ProRes MXF OP1a" as that was the only one with Apple Pro Res in the title. The Preset I used is Apple ProRes 422 LT. However, I have this notice on export (see attached)
Any thoughts on how to export from here?
Thank you in advance!
Copy link to clipboard
Copied
ProRes is a QuickTime format ... so the main place to go for ProRes exports is the QuickTime format option, then scroll down for the ProRes options.
That warning ... note that it has a timecode? Normally on warnings with t-c in them, you need to go to that spot on the timeline and check what's going on. Sometimes even redo something.
Neil

 AdChoices