- Home
- RoboHelp
- Discussions
- <RH9_Microsoft HTML Help> Add the plus icon on the...
- <RH9_Microsoft HTML Help> Add the plus icon on the...
<RH9_Microsoft HTML Help> Add the plus icon on the TOC.

Copy link to clipboard
Copied
Hi all,
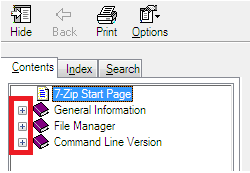
Please help me add the plus icon as the following figure to my TOC:

Thank you.
Copy link to clipboard
Copied
Are you not seeing this icon? It is a standard icon so you should be. can you post an image of what you are seeing and tell whether it only affects one file?
Copy link to clipboard
Copied
Hi there
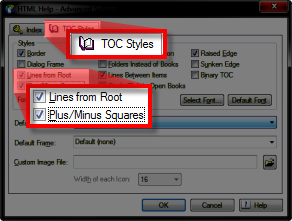
Look at the Single Source Layout recipe for the Microsoft HTML Help layout. Specifically, click the Edit... button next to Advanced Settings.
Now click the TOC Styles tab from the Advanced Settings dialog and enable the Lines from Root option. Once you have done that, you may enable the Plus/Minus Squares option.

Cheers... Rick ![]()
| Helpful and Handy Links RoboHelp Wish Form/Bug Reporting Form Begin learning RoboHelp HTML 7, 8 or 9 within the day! |

Copy link to clipboard
Copied
Hi Captiv8r, it's helpful.
Can I know what capture tool u are using for those figures. I'm using Fullshot and I don't see the effect as you did with them.
Copy link to clipboard
Copied
Rick should be safely tucked up in bed right now. The tool used is Snagit from Techsmith. It's the best tool around.
See www.grainge.org for RoboHelp and Authoring tips


Copy link to clipboard
Copied
Thank you, Peter, because you is always here to solve any trouble. ^^

Copy link to clipboard
Copied
Hi Peter, can you show me exactly that effect in the SnagIt ? I already install the SnagIt but still not find out that effect.
Copy link to clipboard
Copied
Select an area of the image in Snagit and then look for Spotlight and Magnify on the Image menu.
See www.grainge.org for RoboHelp and Authoring tips

Copy link to clipboard
Copied
Hi all
Rick is awake now and having coffee and breakfast at a coffee shop in Chicago. ![]()
Peter is correct that SnagIt is my favorite screen capture tool and the best I've ever used. But what you are seeing isn't something SnagIt just "does". It's a technique I've perfected.
I capture the image, then use the Spotlight tool to provide a "dimmed" area outside the area of interest.
Then I resize the image to make it smaller. Generally I resize to perhaps 60% up to maybe 70% or 80% of original image size.
Then I use the Shape tool to draw the outline.
And I use a different Shape to provide the shaded area "zooming out".
I'll see if I can record a video showing it in action. Hang on...
Okay, audio isn't the best as it seemed to default to the laptop mic and not my Bluetooth headset... Grrrr
Hopefully this helps. I'll be facilitating a class until late this afternoon, but will check in when I get back to the hotel.
Cheers... Rick ![]()
| Helpful and Handy Links RoboHelp Wish Form/Bug Reporting Form Begin learning RoboHelp HTML 7, 8 or 9 within the day! |
Find more inspiration, events, and resources on the new Adobe Community
Explore Now
