• Global community
    • Language:
      • Deutsch
      • English
      • Español
      • Français
      • Português
  • 日本語コミュニティ
    Dedicated community for Japanese speakers
  • 한국 커뮤니티
    Dedicated community for Korean speakers
Exit
0

How to get rid of height ridge while painting material masks?

Enthusiast ,
Jul 02, 2021 Jul 02, 2021

Copy link to clipboard

Copied

mix.jpg


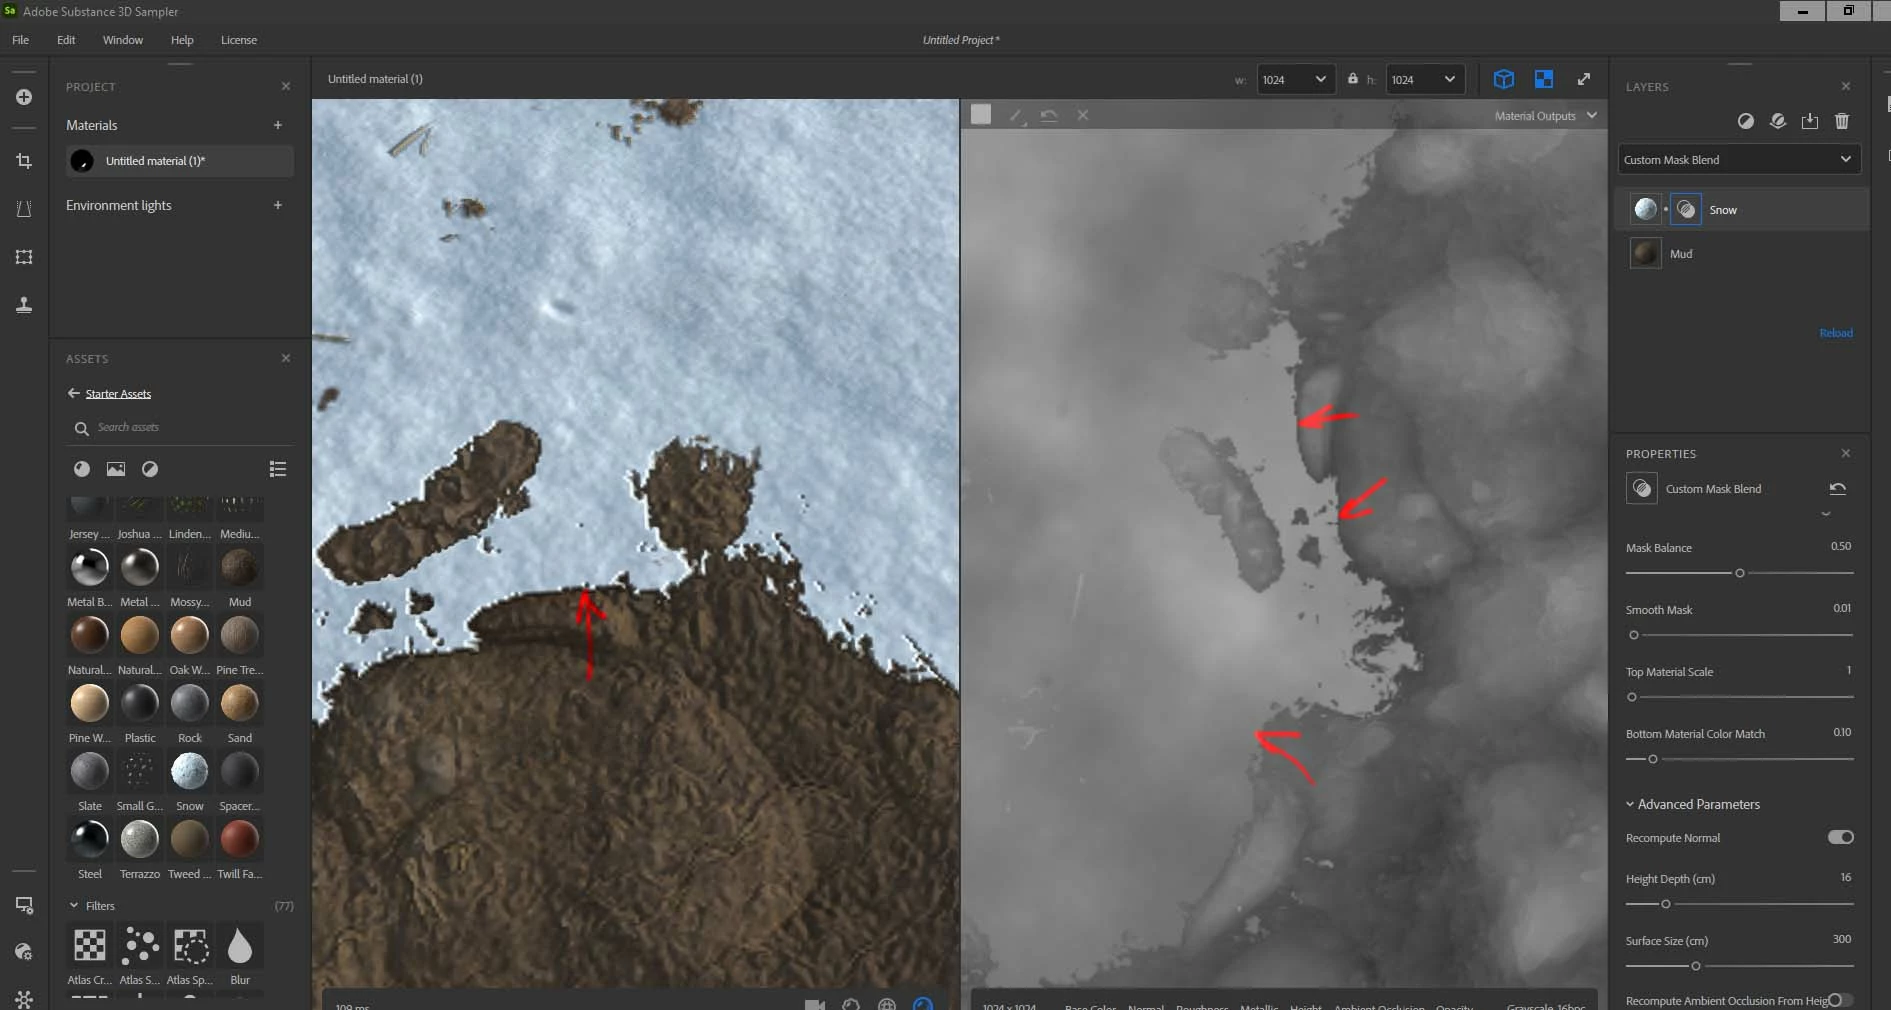
in Designer for example I never get  such thing since I usually  multipy the painted "mask" on the bottom material height  and add on a top one.   They mix properly that way withot such boder cliff  or something .


I suppose  the blending materials is a main purpose of Sampler  so how can force it to do in realistic manner?    In "Height blend " mode  it works perectly ok   but I have no idea how to add custom mask there?

TOPICS
How to

Views

1.5K

Translate

Translate

Report

Report
Community guidelines
Be kind and respectful, give credit to the original source of content, and search for duplicates before posting. Learn more
community guidelines
Adobe Employee ,
Jul 05, 2021 Jul 05, 2021

Copy link to clipboard

Copied

Hello,


Can you scroll a bit in your properties panel so we can see the first parameters?


One thing to notice with the Sampler brush, is that the brush has always an hardness equal to 1. It's current limitation of our brush.

Votes

Translate

Translate

Report

Report
Community guidelines
Be kind and respectful, give credit to the original source of content, and search for duplicates before posting. Learn more
community guidelines
Enthusiast ,
Jul 07, 2021 Jul 07, 2021

Copy link to clipboard

Copied

kirkr5689_0-1625689233861.png

Not sure what parameter you need to see, Did another screen.


My guess the brusgh hardness is irrelevant actually since  there is "mask contrast"  that should blur it , right? 


At least it's what I  do  in Designer  or Affinity Photo  when do same kind of a height blend and it works just ok there without blurring the actual mask , doing just height fading around  edges.


Imo it looks like a bug.    We use parallax shader and it looks not good  with such sudden cliffs.


Votes

Translate

Translate

Report

Report
Community guidelines
Be kind and respectful, give credit to the original source of content, and search for duplicates before posting. Learn more
community guidelines
Adobe Employee ,
Jul 08, 2021 Jul 08, 2021

Copy link to clipboard

Copied

Hi,

Do you really need the normal recomputation? 
I think it is the cause of that cliff ...

Regards

Votes

Translate

Translate

Report

Report
Community guidelines
Be kind and respectful, give credit to the original source of content, and search for duplicates before posting. Learn more
community guidelines
Enthusiast ,
Jul 08, 2021 Jul 08, 2021

Copy link to clipboard

Copied

No, normal recomputation just makes  it more apparent in the vieport , nothing more  but  the cliff  still exists in height channel with recomputation off  .   It makes artifacts when perallax or  displacement are in use  in a shader.


I kind of puzzled why it's there  when we could  use paintable mask + blur in Designer  for example   and multiply it on one layer + multiply inverted on another one before depth blend node.   Works perfectly fine . 


   It's just  a tourture in Designer  to do any , often very necessary  manual touches.   I have switched  to Affinity Photo  with its layers  pixel content linking  and dynamic masks  to do so.   Still would be  really nice to  have a properly working material  blending in Sampler. My guess it is its main purpose.


Votes

Translate

Translate

Report

Report
Community guidelines
Be kind and respectful, give credit to the original source of content, and search for duplicates before posting. Learn more
community guidelines
Adobe Employee ,
Jul 08, 2021 Jul 08, 2021

Copy link to clipboard

Copied

I'm not sure what render you want to achieve, do you want a straight delimitation on the mask? 
Or just a smooth transition? like this:Screenshot 2021-07-08 at 17.06.00.png
In the first case we already made a fix that will come with the next updates!
In the second case you can use those parameters to achieve what you see above:

  • “Mask Blur Intensity” (that blurs the mask),
  • “Mask Contrast” ( higher the value more sharpened the mask will be),
  • “Mask Balance” (that helps you increase or decrease the mask depending on your other presets),
  • and finally the “Smooth Mask” (that smoothes the edges of the mask to get rid of any artefacts). 

As you can see with the same materials as yours, the normal recomputation on and the use of the height informations, we can achieve a smooth transistion in all maps.

Regards

Votes

Translate

Translate

Report

Report
Community guidelines
Be kind and respectful, give credit to the original source of content, and search for duplicates before posting. Learn more
community guidelines
Enthusiast ,
Jul 08, 2021 Jul 08, 2021

Copy link to clipboard

Copied

No. I want precise height blend based mask with resulting height be lighter (max) blending.   And getting accurate sharp mask for color blending  .    In your example with  lower "mask contrast"  it looks like just  simple alpha mix, non related to materials height  altogether  . Mask blur intencity  makes   edge shiftin   and "smooth"   also makes the mask heights  irrelevant .


What I need basically is a "Heght blend" mode   where evrything works perfect currently   + ability to manualy tweak heights by a brush , gradient etc . The way I could send dirt height gradually down in some local place and snow height up at the same time  producing accurate blending  without edge cliffs  .    Same way Max blending works in Substance Designer. 


Maybe some fading brush dab would help   but I do same with just blur node after  svg. in Designer


Votes

Translate

Translate

Report

Report
Community guidelines
Be kind and respectful, give credit to the original source of content, and search for duplicates before posting. Learn more
community guidelines
Adobe Employee ,
Jul 14, 2021 Jul 14, 2021

Copy link to clipboard

Copied

I better understand your goal. The "issue" isn't related to the brush or the mask then.
For now the blend option is just a way to blend two materials together in Substance 3D Sampler. 


I would suggest you to work on each material height separately, to height up the snow and height down the mud, and then blend them together. Or after your blend add the Height/normal adjustment filter and carefully adjust those with a mask. Or both!


We have a fix to get rid of the cliff rendering, ready for the upcoming updates!


In 3D Sampler we try to separate each need in separate filters to provide a better range of possibilities and better performances for our users (so it must have a way to achieve your goals, but you might use a certain quantity of filters depending on what you need). 
Although we'll keep in mind your interesting feedbacks!


Thank you. 


Votes

Translate

Translate

Report

Report
Community guidelines
Be kind and respectful, give credit to the original source of content, and search for duplicates before posting. Learn more
community guidelines
Enthusiast ,
Jul 19, 2021 Jul 19, 2021

Copy link to clipboard

Copied

Do we have an option to manyally modify  material heights  currently?   Like a hand paint layer that could add height to one materal and subtract from another?  

Votes

Translate

Translate

Report

Report
Community guidelines
Be kind and respectful, give credit to the original source of content, and search for duplicates before posting. Learn more
community guidelines
Adobe Employee ,
Jul 19, 2021 Jul 19, 2021

Copy link to clipboard

Copied

Yes,
the "Height/Normal Adjustement", it also have a mask option.
You can use it separately on each materials to be non-destructive, or on the blend (or both!). 

Votes

Translate

Translate

Report

Report
Community guidelines
Be kind and respectful, give credit to the original source of content, and search for duplicates before posting. Learn more
community guidelines
Enthusiast ,
Jul 20, 2021 Jul 20, 2021

Copy link to clipboard

Copied

Where it is?  I seems can't find this "Height/Normal Adjustement"

Votes

Translate

Translate

Report

Report
Community guidelines
Be kind and respectful, give credit to the original source of content, and search for duplicates before posting. Learn more
community guidelines
Adobe Employee ,
Jul 20, 2021 Jul 20, 2021

Copy link to clipboard

Copied

Not even under "Normal/Height Adjustment"? It should be in your Starter Assets.

Did you move Substance 3D Sampler folders? Or done any other manipulations with your folders?  

Votes

Translate

Translate

Report

Report
Community guidelines
Be kind and respectful, give credit to the original source of content, and search for duplicates before posting. Learn more
community guidelines
Enthusiast ,
Jul 21, 2021 Jul 21, 2021

Copy link to clipboard

Copied

I finally founf that    "normal/height adjustment"  but couldn't figure out  where should I place it.    In Substance Designer or  Affinity Photo  I could paint something and make it automatically add too one material height and subtract from anoher .         Here It looks like I can edit only bottom layer. Is it so  or I am missing something?

Votes

Translate

Translate

Report

Report
Community guidelines
Be kind and respectful, give credit to the original source of content, and search for duplicates before posting. Learn more
community guidelines
Adobe Employee ,
Jul 28, 2021 Jul 28, 2021

Copy link to clipboard

Copied

We just released an update (3.0.1) with a correction of the Custom Mask blend.


Would you have time to give it a try and tell us if it answers your needs?


Thanks

Votes

Translate

Translate

Report

Report
Community guidelines
Be kind and respectful, give credit to the original source of content, and search for duplicates before posting. Learn more
community guidelines
Enthusiast ,
Jul 29, 2021 Jul 29, 2021

Copy link to clipboard

Copied

LATEST

My trial is over.    So far I find Substance Designer more convenient.      Let me know please when I could be eligible for a new trial  .  Next year?  Next maijor version?

Votes

Translate

Translate

Report

Report
Community guidelines
Be kind and respectful, give credit to the original source of content, and search for duplicates before posting. Learn more
community guidelines