 Adobe Community
- Home
- Team Projects
- Discussions
- FAQ: How do I perform Media Management in Team Pro...
- FAQ: How do I perform Media Management in Team Pro...
FAQ: How do I perform Media Management in Team Projects?

Copy link to clipboard
Copied
Managing the media in Team Projects has not been the most used feature, as I could guess from our User Forum posts. There can be multiple reasons for that:
- The users are already using their media in such a way that they don't need to exercise this functionality at all.
- Users are very well aware of what this functionality is.
- Users don't exactly understand what could be done using this feature in Team Projects.
According to me, the third scenario seems to be the case with majority of users. In this post, this feature is explained in little bit more detail for those users.
In the screen capture above, there are multiple things to go through. You can open the Media Management dialog by going to Edit menu and choosing "Team Project -> Media Management".
Let's go through this dialog step by step.
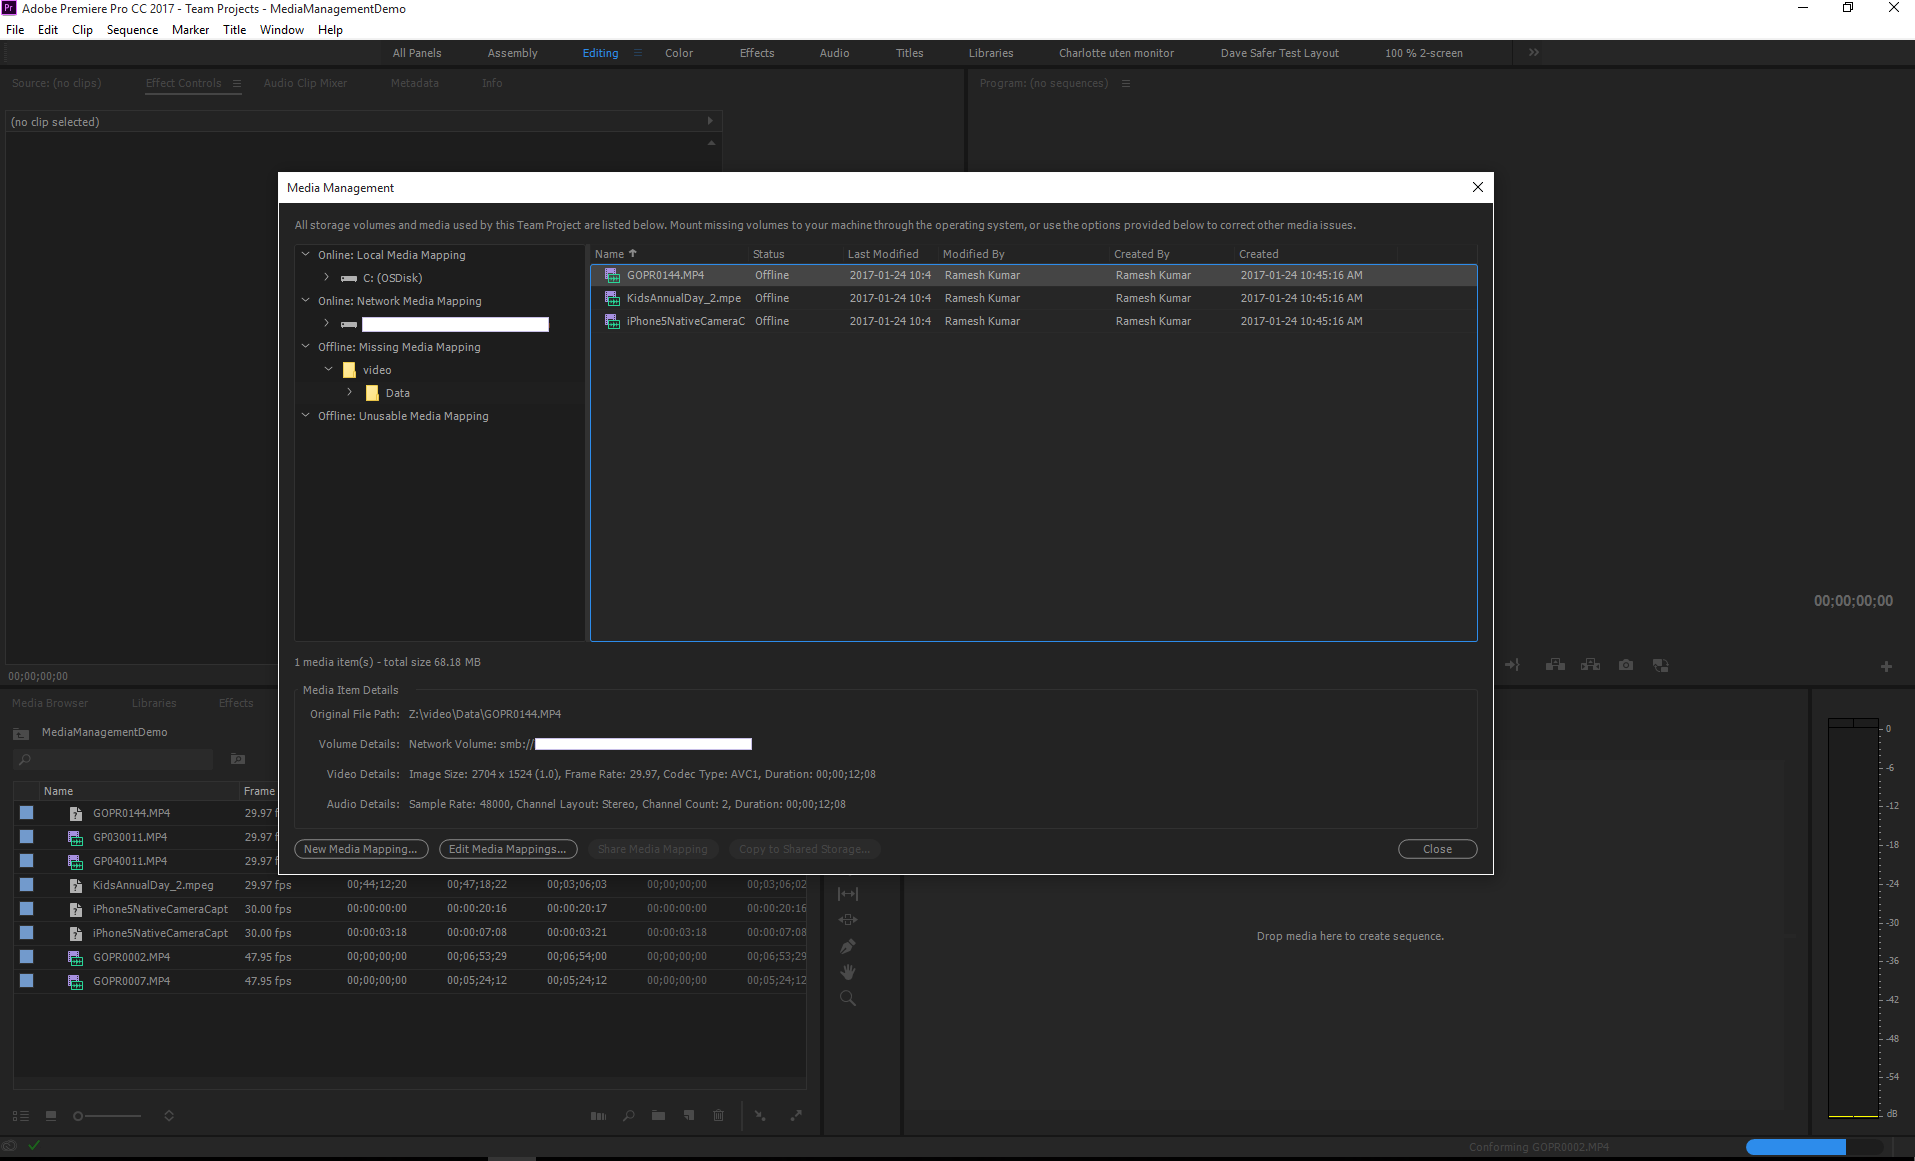
Left pane with four drop downs
We have four drop-downs in the left pane of this dialog.
Online: Local Media Mapping
This drop-down will list all the media which were imported by current user from local drives and are still accessible to the user (i.e. the media has not been moved or deleted from its location since it was imported in the team project). These mappings are all relative to the user's machine.
Online: Network Media Mapping
This drop down will list all the media which is present on any of the mounted network location and still accessible to the user (i.e. the media is still at the same location on the network drive from where it was imported in the team project and the network drive is still mounted on user's machine).
Offline: Missing Media Mapping
This drop down lists the media files which the client application can't locate neither locally nor on the network drive. If we look at the "Media Item Details" section after selecting the media, it will list all the necessary information to locate the files. It has four pieces of information out of which the top two are of importance to us in this case.
The first one is "Original File Path" which gives the original path of the media. This is the path from which any user imported this media. It might be the case that one user imported a media from a network location and then shared. Other users might not have access to that location. So "Original File Path" is the path of the mounted location on the user's machine who imported this media.
The next field is "Volume Details" which is very interesting. It gives you the actual mount point path from where the media was imported. So looking at this field, you can ask someone in your team who has access to this location to give you access or follow the process in your team. Basically looking at this detail, you know where to look for this particular media.
Offline: Unusable Media Mapping
This drop down will list the media files which can not be consumed by the current application. For example, if a Win user imports some wmv files and shares then all the Mac users should see wmv files under this drop down.
The Four buttons at the bottom
There are four buttons to exercise different functionalities. Let me talk about each one of those one by one.
New Media Mapping...
Let's consider two cases:
- There is a production house who hires freelancers to work on their team project for some time. There might be policy restrictions to allow free access to the media to freelancers. So what the production house can decide is to provide them media at some other locations (either a different network location or using a external hard drive). So the situation is that the in-house team of editors created a team project and imported media from the internal network drive (let's call this location INTERNAL_SAFE) to which the freelancers are not allowed the access but the same media is provided to them at some other location (let's call this location EXTERNAL_RESTRICTED). Now when freelancers will open that team project, they will find all the media offline as they don't have access to the location from which the media was originally imported.
- For performance point of view, some of the editors in the team want to use the media from their local drive instead of the mounted network drive. Here also the team project is created and media is imported from a network location (again it is INTERNAL_SAFE location). The in-house editor does have access to this location but wants to work with the media present on the local drive (lets call it INTERNAL_LOCAL) due to performance issues. This situation is a bit different. Here the media will not be offline for this editor but still the editor wants to work on media from different location.
In both the cases, user know about the different location of the media. In one case user has media offline and in other case the media is still online. Both the user can use this "New Media Mapping" feature to reference the media from some other location. This feature can be used on individual media file or on the entire folder depending on user's choice. So click on this button, browse to this new location (EXTERNAL_RESTRICTED or INTERNAL_LOCAL) and that's it. Once this is done, the first editor for which the media was offline, will see the media coming online and the second user will see a change in location of the media. All the newly mapped media will move from network location drop down to local drive drop down in the left pane as described above.
This "New Media Mapping" feature is not restricted to media mapping from "local to network" or "offline to online" workflow. Media can be mapped from one location to another and those location could be anything.
The thing to note here is that creating new media mapping itself changes nothing for other users. This mapping is local to the user and the machine only. Any other user won't notice any change in the media locations. But there is option to share this mapping with other users which I will explain later.
Also worth noticing is that this media mapping will persist until it is deleted. For example if the user created a media mapping from INTERNAL_SAFE location to INTERNAL_LOCAL location, this is as if the user is telling the application to look for media with original path INTERNAL_SAFE at INTERNAL_LOCAL location always in future. So if another user imports a media from INTERNAL_SAFE location and shares, then your application will search for that media at INTERNAL_LOCAL because you have created the mapping.
Edit Media Mappings...
This is a little misleading title for this button I would say. The only purpose of this button is to delete the existing media mappings created by using "New Media Mapping" feature. By deleting any mapping, you tell the client to ignore that mapping in future but it should not affect your existing media locations.
Share Media Mapping
As I mentioned in my informative note above, the mappings creating using "New Media Mapping" are local to the user. It does not affect any other user. But if there is a case where we want to share this mapping, we can use this button.
Consider a case where a team project was created by importing some media from network location. For some reason, the media was moved to some other location and now you open team project and find the media offline as it has been moved. But you know that the media was moved and it should be used from that location moving forward by everybody in the team. So you create a new media mapping for this new location and just share this mapping using this button. This way all other users will not have to map the media. All the user's will now be referring the media from this new mapping created by you.
User should be cautious while using this option as this will change the relative path of the media for all users. So all the mappings should not be shared until all users have access to new location.
Copy to Shared Storage...
In simple language, this is just copying your media from one location to another and telling the application to refer the media from the new location. Let's consider a simple case.
You created a team project and used some media which are on your local drive only. The media is not present anywhere else. So when you share your changes, that media will be offline to all other users in the team project. What you can do is you can select all these type of media files and use this feature to transfer those files to some other location which all the users have access to. Once you transfer that media to another location, you and all other users will be referring the media from that new location. Your local drive location will not be used for anybody.
I have tried to explain things in a simple, non technical way. I hope users can benefit from this and they are able to utilize Team Projects to its fullest.
Happy Collaborating!
Thanks,
Ramesh.


 AdChoices