 Adobe Community
- Home
- Premiere Pro
- Discussions
- Re: Import files look awful. Help! :)
- Re: Import files look awful. Help! :)
Import files look awful. Help! :)

Copy link to clipboard
Copied
Greetings! I recently acquired a Sony PXW-z450 and upon import (Premeire Pro, fully updated) and viewing of the mxf files it looks terrible. The video looks dark, flat, lacks saturation / good color, etc. Again, brutally ugly, nowhere close to what I'm seeing when I shoot. I assume I am missing something I need to be doing but I cannot figure it out. My current work around is to heavily adjust it in my color settings, but that should not have to be done to the degree I'm adjusting. Any suggestions? Hoping there is a "ah yes.....you're missing this step" or process etc.
Note: As I mentioned I have Premiere updated and I'm shooting XAVC-L. 3840 x 2160 at 59.94 fps
You all rock, thank you so much for any suggestions!
Scott


 14
Replies
14
14
Replies
14

Copy link to clipboard
Copied
Without knowing a lot more, "we" can only say you're missing color management steps somewhere.
So ... OS/CPU/GPU and GPU driver; are you working in SDR/Rec.709 or HDR, maybe HLG?
What are your current color management settings in the Color Workspace, Lumetri panel, Settings tab?
Copy link to clipboard
Copied
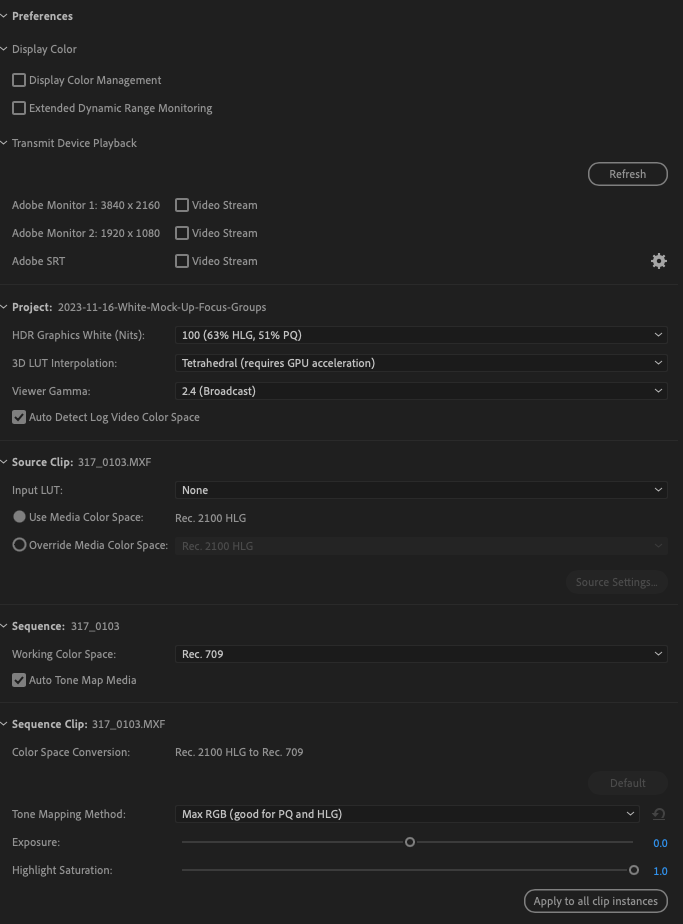
Here's two screenshots for reference that I should have included in the post. Probably goes without saying but the left is source, right is program and then I've attached a settings screenshot as well. As you can see I changed the timeline to Rec 709 (with no manual color correciton) and its better, but still looks really flat to me. Making further color correcting adjustments helps, but something isn't right before I get to that point.....I believe. Thanks for your response.

Copy link to clipboard
Copied
Right click your clip in the project panel and choose Modify>Color.
What colorspace are you shooting in? You may have to overide the colorspace to whatever Sony one you are using.
Copy link to clipboard
Copied
Copy link to clipboard
Copied
You've got a mish-mash of settings there ... so let's get that sorted.
First, you are apparently wanting to work in SDR/Rec.709 ... correct? That's your sequence CM setting.
Now going top down ... you've changed the Project graphics white to 100 ... this is a setting that only affects HDR sequences, and normally is professionaly set to the 203 nits level. Shouldn't be an issue here, but if you wanted to do an HLG or PQ sequence, that might not work too well.
You have auto-detect log on, good! ... which will catch most HDR clips, as ... virtually all actual HDR clips are log-encoded. HLG certainly is.
And if you have auto-detect log in the prefs section, and auto tonemap in the Sequence section, you normally can skip the clip section of setting a clip color space.
Did you make any changes in the tonemapping method section? Or is that what came up 'natively'?
Copy link to clipboard
Copied
Thank you Neil! Very helpful. New to learning these settings so I appreciate your patience. My intent is to edit in HDR so one of the the most confusing parts of this to me is actually preview. My raw looks dark and dull, which surprised me when I imported. Shouldn't it look as it is in the camera? Do I need to import those differently or modify to properly view them as intended? I can't imagine showing this raw footage to a coworker with it dark and lacking nice color. Its pretty distracting, even though I know I will adjust it in my project. Or am I approaching this all wrong and its a different process to go through? Again, very much apprecaite your help. I've edited a lot, not a newbie, but setting up a new camera and working through the import/edit process (settings) is fairly new to me.

Copy link to clipboard
Copied
Do you widh to edit for HDR output or SDR output?
If HDR, then GW should not matter if media and sequence color space are the same.
If SDR, then you should preferably use 203 nits since your media is HLG based.
Copy link to clipboard
Copied
Hi Mohan.
HDR ia the goal. My firsr issue is the raw looks awful, can't comfortably work with it looking so bad. That is what I need worked out before I edit. Should I modify all the raw clips or shoud they look fine already and sometihng else is going on?
Copy link to clipboard
Copied
Are your clips still dark in the 709 timeline with GW 203? Could you kindly set that once and share the output. I tried with a XAVC-I HLG file from same camera and GW 100 definitely seems to make things flat but you can improvise using GW 203 in Project section of Settings tab in Lumetri panel.
Copy link to clipboard
Copied
This clip needs more adjustment, but here it is with only the 709 timeline and 203 GW. Definitely workable, much better. My question is why does the preview videos look so bad? Why don't they come in looking close to what I'm seeing in my monitor as I'm shooting. I understand that of course my viewfinder/monitor on the camera is much different but this isn't even close to what I'm seeing when I shoot. That part of this is what is really hard to grasp. And then of course if I wanted to work in HLG all the way through I still can't figure out how to make the timeline look usable, even with some adjustments. It just seems like I'm missing a process or something. Again, very much appreciated!
Copy link to clipboard
Copied
If you're working for HDR output, you can't use a Rec.709 sequence setting. That should be set to the HLG option.
Next, make sure you have the option for Display Color Management set to on.
Then your OS and monitor settings make sure both are set to HDR.
And for simple terminology use, log and RAW are not at all the same thing. RAW would be like Arri RAW, or BRAW from BlackMagic cameras. It involves a level of processing tge file from closer to a sensor data state.
Log encoding doesn't involve any sensor data processing. It's just a different math form used to write the file data from "normal" video files.
Copy link to clipboard
Copied
Very helpful. Thanks. Learning alot, thanks to the great support of people like you all!
Copy link to clipboard
Copied
Quick question.....why does my preview (MXF files) look so bad when in my camera they look amazing? Rich, crisp, nice colors, etc. I have my work station set up and dialed in (monitor settings etc), and everything else I've ever shot until I got this camera looks pretty much just how I shot it.....but not now. I know the viewfinder settings cannot be compared to my editor, but the two are SO far apart that it is affecting me ahen I shoot now. In other words I am losing confidence in my quality because I know when I go to edit the video is not going to look near as good as what I'm seeing in the moment. Sorry for the long post, just trying to understand why I cannot view quality looking preview clips. They are terrible to view. Hope that makes sense.
Copy link to clipboard
Copied
The first thing to understand is no camera ever made has a fully calibrated, technically accurate monitor. Not even the $70,000 Red, Sony Venice, or Arri rigs. On set, even with those, if they need an accurate view, the DIT provides a field monitor that's calibrated with a hood and/or controlled viewing situation.
Second thing ... never ever trust that a monitor comes setup correctly. My 'main' reference monitor has a pretty certificate of how tightly it was calibrated for Rec.709 in -factory. Wasn't worth spit outta the box.
I had to run a probe and software calibration several times to get the the monitor settings down to the place where it would calibrate. And ran a profile then in Colourspace to check the results. When I finally got a low delta-E, well ... ok.
Check first by making a bars & tone image on your sequence ... how do the shadow tones come across on your monitor? Color, and the light/white sections? And hopefully, you've not messed with things like shooting Rec.709 video in "full" as some cameras allow these days ... or setting your monitor to 'full' also.
If you could dropbox a file, either posting a link or private message one, I could do some testing myself.
I've been doing digital imaging since 2002 professionally. I learned early on to sort of trust the histograms on the camera ... sort of. I found that the only way I could guarantee accurate exposures, or know exactly what my shadows or highlights were going to do, was ... to meter.
Now with video, my main rig is a BM pocket cinema 4k. Amazing image capablity for video ... and thankfully it has both zebra and false color options. After testing, and knowing what I can get in post processing compared to what false color indicated, that is a great additional tool.
My field monitor also has false color. I'll meter, check false color ... both.
So with your images, the key thing is what do the scopes show! In Premiere, bring up the color workspace, set the scopes to Vectorscope, Waveform (YC no chroma is my pref) ... then add RGB Parade.
Now study the image as shown on the scopes. That will tell you how your exposure, the out-of-camera image, is captured. And of course, any corrections you make will also show in the scopes.
I worked with a young dude a year or two back, his A7s3 was his Love ... and yet, though he supposedly checked exposure on a shoot, the images were to the low side of exposure when I went to work on things. In talking with him, well, he'd checked the zebras or whatever, but ... went with what looked good on the camera's little monitor.
I could rescue the file adequately with some Neat video noise removal ... but would rather have had a properly exposed file.
He was pretty shocked ... it looked great in the camera! But that actual file was at least a stop under exposed, probably more like 1 and 2/3rds under.

 AdChoices