


Copy link to clipboard
Copied
I'm attempting to add crop marks to an entire PDF document, but I keep getting a dialogue box that says:
"Printer marks may overlap artwork. You may need to expand the Crop box using the Crop dialogue."
This doesn't mean much to me... can anyone help? I don't really understand why pages with bleed graphics aren't getting the crop marks.
Thanks!!


Copy link to clipboard
Copied
What that message means is that although the crop marks have been added when you use "Add Printer Marks", they are not visible until you increase the page size of the document.
- Start by Opening Print Production tools
- Apply the trim marks, by clicking on Add Printer Marks, follow the default prompts as you've done previous, and click through that warning message.
- While still in Print Production tools, click on Set Page Boxes
- Below the preview of the PDF you'll see the current page size.
- Calculate what the new cropbox settings need to be and adjust the Page Size
- Set Page Range to All and click OK.
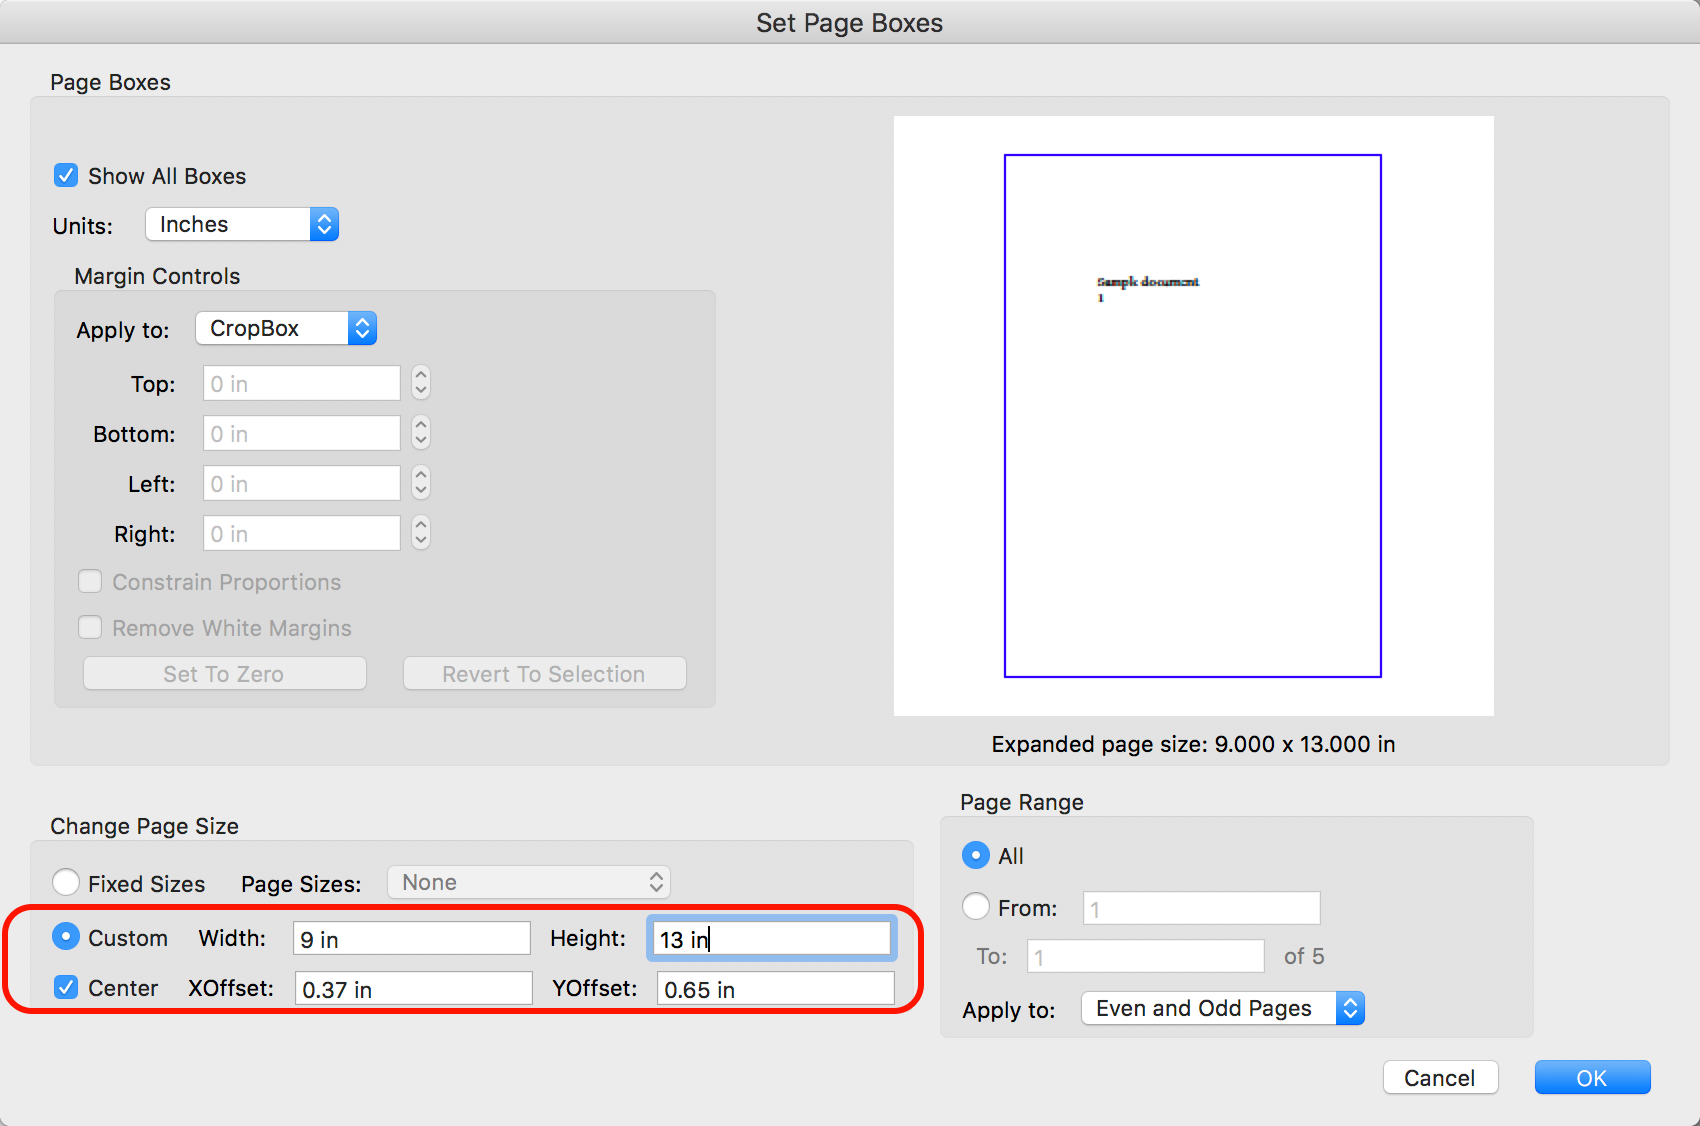
You should be able to see the crop marks you've added initially after doing this.
 6
Replies
6
6
Replies
6
Copy link to clipboard
Copied
What that message means is that although the crop marks have been added when you use "Add Printer Marks", they are not visible until you increase the page size of the document.
- Start by Opening Print Production tools
- Apply the trim marks, by clicking on Add Printer Marks, follow the default prompts as you've done previous, and click through that warning message.
- While still in Print Production tools, click on Set Page Boxes
- Below the preview of the PDF you'll see the current page size.
- Calculate what the new cropbox settings need to be and adjust the Page Size
- Set Page Range to All and click OK.
You should be able to see the crop marks you've added initially after doing this.
Copy link to clipboard
Copied
Very helpful! Thank you!

Copy link to clipboard
Copied
Thanks for the explaination. this is really clear.
I'm getting a error saying 'page size may not be reduced'.... any ideas?
My aim is to have the 3mm bleed within the images of the document...
document size is 200mm x 250
My aim is to have the document size 194 x 244 with 3mm bleed.
Is this the right way to do this? And what could be causing the error.
My adobe is up to date.

Copy link to clipboard
Copied
Hi @karenb27092164,
Hope you are doing well.
If you are still looking for a solution, you might want to try this:
Resize Using Adobe InDesign
- Export the PDF to InDesign where you can adjust the document size and bleed settings precisely.
- Re-export the file with the correct dimensions (194 x 244 mm with 3 mm bleed).
Resize Directly in Acrobat (Workaround)
If you need to adjust directly in Acrobat:
-
Preflight Tool for Scaling:
- Open the Print Production tool.
- Click Preflight > Fixups.
- Search for the fixup Scale pages to specific size
- Set the scaling factor to reduce the page size proportionally to fit the 194 x 244 mm size.
- Apply the fixup.
-
Crop Pages:
- After scaling, return to Set Page Boxes.
- Adjust the Bleed Box or Crop Box to add the 3 mm bleed.
Hope this helps.
-Souvik

Copy link to clipboard
Copied
Thank you. How do you export a PDF to Indesign?
Copy link to clipboard
Copied
Hope you are doing well. Thanks for writing in!
There's no separate process to do so. Simply open the file in InDesign.
You can learn more on how to do so from here: https://adobe.ly/3WZ9mzg
Hope this helps.
-Souvik

Find more inspiration, events, and resources on the new Adobe Community
Explore Now
 AdChoices