Copy link to clipboard
Copied
 Hi.
Hi.
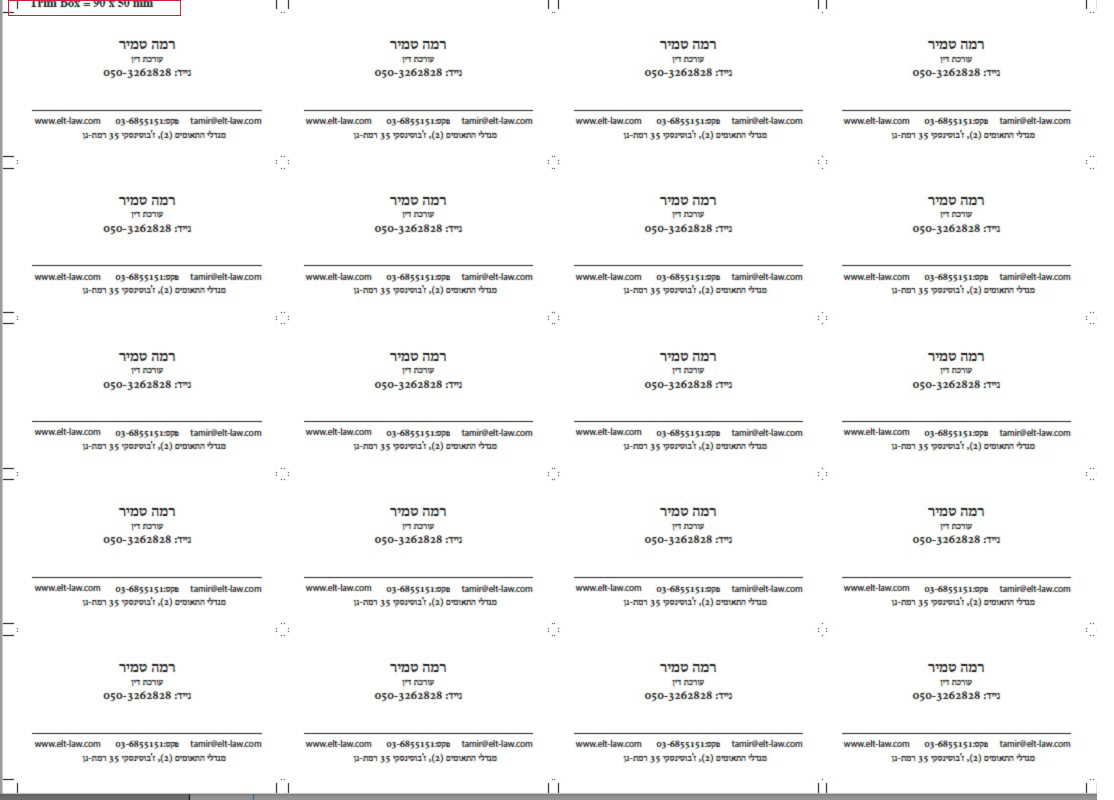
I have a 50 * 90 mm business card
And I want to duplicate it so that it goes into the page (through the "quite imposing" plug-in).
After the duplication I created a new sheet with 20 tickets,
I want the top corner of the sheet to say "trim size"
So that the employee who cuts the cards knows what final size he needs to cut it.
How can I do it?
Please note that I have licenses for pitstop and for quite imposing
But none of their support knew how to give me an automatic solution. (In pitstop you can paste the trim size on the document But after imputation the number is deleted.)
It's clear to me that I can always type manually but I'm looking for an automated script.
It is important to emphasize that each time the size of the card varies from work to work.
Attached file with the target.
Thanks!
 1 Correct answer
OK, it has taken me a while as I am new to scripting, however I now have a fallback plan. I originally wanted to add the trim info into document properties metadata using PitStop Pro, however there appears to be a maintenance issue which Enfocus are now aware of…
Step 1: So the fallback plan is to add the trim box info as metadata using an Acrobat Pro javascript. Before imposition, run the following script on the 1up file. The script could be run in any number of ways, I tested with an Acrobat Ac
...Copy link to clipboard
Copied
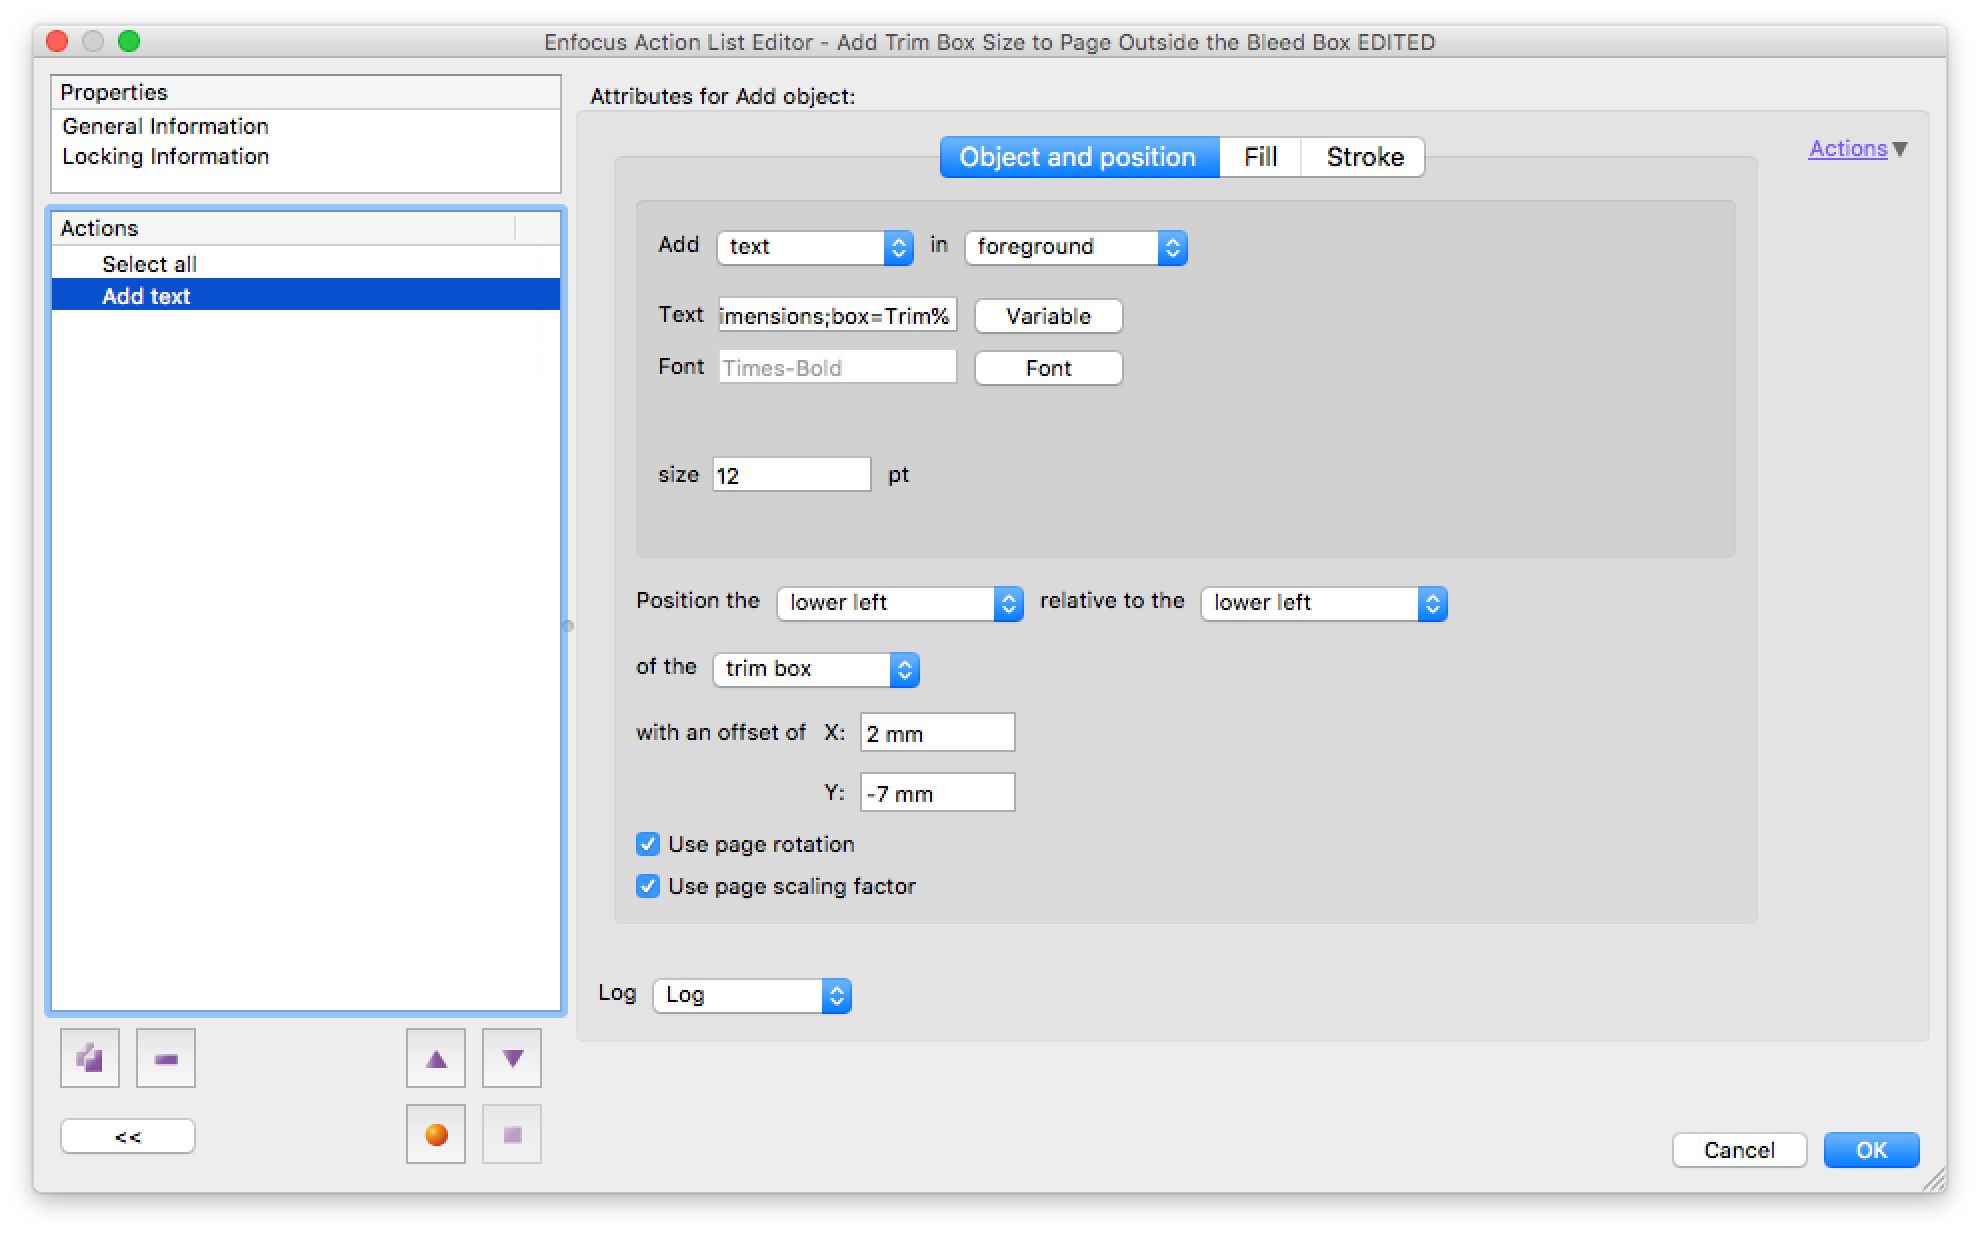
Later versions of PitStop Pro can add the trim size as a variable in an action list. Here is an example setup:

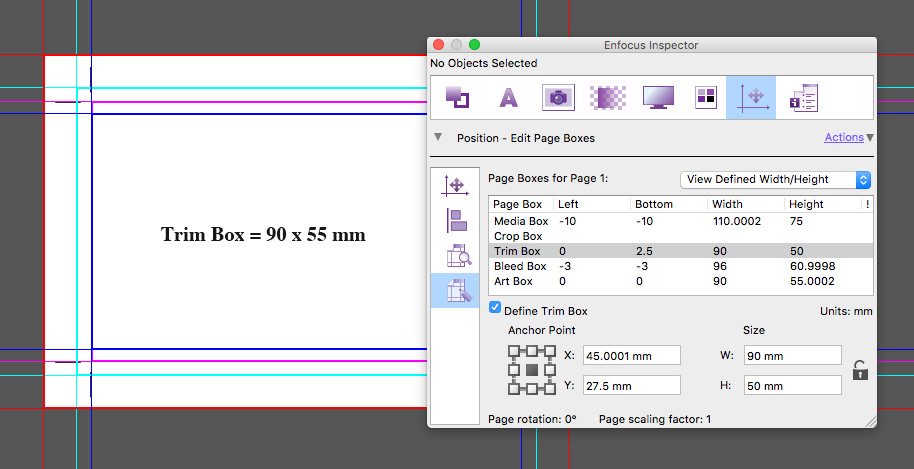
I have manually moved the text onto the card in this example so that you can see it, as it was originally placed off the card on the lower left.
After adding the text, I then changed the TrimBox from 55mm to 50mm to test that the variable text is not “live” and it only references the original trim size when the variable text was first added, after that it is just a static string of text and not a variable. So there is no need to worry that if QuiteImposing changes or removes the original trim info, it is still there if placed on the original 1up card. The ArtBox which is often unused can also be used as a temporary placeholder to store the TrimBox info, however it all depends on what is happening to the various PageBoxes after QuiteImposing has processed the original file.

As I mentioned in the other topic thread, the forum really needs links to the actual PDF files, the 1up and the imposed versions. I don’t know what QuiteImposing is doing to the various page boxes.
So the variable text could be added to the 1up or the imposed version, depending on what is going on with the unknown output from QuiteImposing.
Please download the following PDF and impose it, then provide a link to the imposed PDF version so that I can evaluate what has happened to the page boxes and the added text. I will then have a better idea on how to move forward.
Copy link to clipboard
Copied
Copy link to clipboard
Copied
Initial findings:
- Quite Imposing is removing the art/bleed/trim boxes and setting the media/crop boxes to the new imposed size.
- The trim box text slug that was added off the page on the 1up file is retained.
Copy link to clipboard
Copied
After looking into this the best place for this to be fixed is in Quite Imposing. QI knows what the trim box data is before imposition, as it removes/resets it. It could therefore hold this information in a variable and apply the information after imposing. QI offers a limited “stick on text and numbers” feature that could be extended to use the trim box info that is stored in the variable. This would become a single step/run feature.
____________
If your 1up images have “extra space” such as trim marks and a larger media box, then you could just use Enfocus PitStop Pro/Server to add the trim info onto the page in the upper left near the trim marks before running Quite Imposing (a two step workflow: PitStop > Quite Imposing). If you don’t like the duplicated elements, PitStop could delete the dupes based on a selection region after imposition (a three step workflow: PitStop > Quite Imposing > PitStop).

__________________
If your files were without marks/bleed and at final size and you were OK with adding extra marks or margin space to accomodate the text slug, then this could be incorporated into the action list for the same result as above (a two step workflow: PitStop > Quite Imposing).
__________________
If your files were without marks/bleed and at final size and you did not wish to add extra marks or margin space, you would need to work around Quite Imposing (a three step workflow: PitStop > Quite Imposing > PitStop).
Step 1: Using a script or Enfocus PitStop Pro/Server, apply the TrimBox data to metadata or an object on the 1up file before running Quite Imposing (sadly the PDF PageBoxes are not usable).
Step 2: Run Quite Imposing
Step 3: Using a script or Enfocus PitStop Pro/Server, apply the result of Step 1 to the imposed file.
Copy link to clipboard
Copied
Hey, I have an idea based on what you said. Only I can not actually do it.
It is performed in 3 stages:
1. Using the Pitsop: pasting the Trimsize on the side of the document, and copying the numerical data to the clipboard.
2. imposing through the quiteimosing.
3. Paste the numerical number in the document where the cards are duplicated, on the top left.
the result:
1. I managed to build an action where the Trimsize pasted on the side of the document, but I could not create an automatic command (which continues with the action of copying to the clipboard) I have this option in the action window (but it doesn't not copy - screenshot: 11).
Step 2 - I have no problem with it.
3. Similar to the problem in step 1, even in the paste - there is such a possibility in the action window, but that somehow does not work.
Even if you just paste a figure that was in the clipboard. (Screenshot: 22)
The big trouble I ran out of support for enfocus ... ..
If you are not successful but enfocus know it and you still have support - I would appreciate if you ask them.
I attach the 2 action I have built.
And 2 screenshots to step 1 and step 3.
please download the zip file:
Copy link to clipboard
Copied
There are some problems with your action list files. Not to worry, I’ll knock something up for you and share the steps and action list files (As an Enfocus Reseller/Channel Partner I use the latest version, in this case PitStop Pro 2017 and 2018, so you may not have all of the action list features in your version)…
_____________
OK, as described previously: PitStop Pro > Quite Imposing > PitStop Pro
Step 1: PitStop Pro action list to add the current TrimBox data as a text slug
Select all
Add text (the fill colour of the text is a spot colour named “Text_Slug” which will be referenced in step 3. The static prefix text and variable text “Trim Size = %Page Box Dimensions;box=Trim%”)

Download: Dropbox - Slug 1 of 2 - Pre Impo.eal
Step 2: Impose using Quite Imposing
Step 3: Optional PitStop Pro action list to tidy up and remove all “surplus” repeated text slugs except the one in the upper left. I have chained together multiple selection criteria using the AND logical operator so that only text that is filled with the spot colour “Text_Slug” outside of a specific region is removed.
Select all
Select fill color (“Text_Slug”)
Select text segments
AND
Select objects outside region (pictured below)
AND
AND
Remove selection

Download: Dropbox - Slug 2 of 2 - Post Impo.eal
Copy link to clipboard
Copied
Hey.
First of all I thank you very much for the help, although that still does not work well.
Step 1 - Works great.
Step 2 - Also.
Step 3 - The Trimsize information is not shown in the file.
I think there is no choice but to copy it to the board in step 1
And in the third stage paste it and then straighten it to the edge of the page.
That's what I tried to do
And I could not.
(I noticed there are tools like cut and paste
In the pitstop but it did not work)
If you're willing to help me
And I would appreciate it very much
You can download a demo of quite imposing
(There's a big X on the graphics but otherwise everything works)
http://www.quite.com/imposing/macdown.htm
I attached a card for Example:
Copy link to clipboard
Copied
It does work (otherwise I would not have posted the action lists) and I did test with Quite Imposing… However I am guessing that your source files and or my imposing settings are likely different to mine.
Can you post 3 or 4 screenshots of your exact imposing window settings so that I can duplicate your imposition?
I have downloaded your source 1up file, however without knowing your impo settings the final action will likely be different.
Copy link to clipboard
Copied
Please see the steps:
Copy link to clipboard
Copied
Yes, your impo settings were very different to mine and as the text slug was outside of the trim bleed area it was lost.
The step 1 .eal had to have the text positioned within the 3mm bleed area so that it would not get lost in the impo step.
Then the step 2 .eal repositions and sets the text to rego/all fill colour.
I have tested the following using the impo settings provided in your last post and all works as expected.
Dropbox - Slug 1 of 2 - Pre Impo v2.eal

Dropbox - Slug 2 of 2 - Post Impo v2.eal

You may wish to remove the last 4 steps in the second action list file as this may not be representative of real work and is only based on your sample file.
P.S. Just for your info, for the copy/cut and paste to work, you have to specify a page to paste onto in addition to the source clipboard name. I did not use cut and paste in this action list as there was no need to make things more complex than they already were.
Copy link to clipboard
Copied
Now it's working.
Really thank you!
I have 20 years of experience in graphics and impostion and I still do not know what this slug you said that caused me a problem.
If you can explain to me what the problem was with me and what Slag is (I know that indeisgn document setup also has something like this.)
Copy link to clipboard
Copied
I was just calling the added text a “slug”, I could have called it anything.
My original action list added the text slug more than 3mm outside of the trim on the 1up file. When imposed with your impo settings, the text slug was lost.
My revised action list adds the text slug within the 3mm bleed area of the 1up file, then moves the text slug to a new position in the second action list.
Copy link to clipboard
Copied
Hei.
Can I put the 2 actions in the top menu ?
(like the js code that you sent me)
Copy link to clipboard
Copied
No, PitStop Pro does not work that way.
Copy link to clipboard
Copied
Hey.
1. I checked what you prepared for me, but it does not always work well. I attach 2 files - prepared by our client in the Illustrator. I'd appreciate it if you saw what the problem was. And it's important for me to understand the principle of the problem so that I can deal with it alone.
I have a strong feeling that it has to do with the size of the bleed-size or the crop size in the original document. (And if so, it is important for me to know how this space is being raised) or it is related to the software in which the card was designed. Because in indeisgn files it works well. Even though the Illustrator settings same settings:
Trimsize = 5 * 9, bleed size = 9.3 * 5.3, and 1.5 bleeds on each side.
2. I have a file. The file has a bleed of 1.5 mm. I want the software to add crop marks to me exactly in Trimsize. That is, if the file is 53 * 93, the crop marks will appear according to the trimesize 5 by 9.
It is important to me that the command preserve the bleed size and crop size settings after the change.
I do not like you helping me for free. The business is very, very difficult, but if you want a nominal fee through PayPal, I will pay you. I'm out of support and the manufacturer wants a lot of money for support.
Copy link to clipboard
Copied
Quick answer: After running the action list on your two new files, the text is selected however it is not visible. A manual CMD/CTRL X or CUT and then a manual CMD/CTRL V or PASTE should make the text visible. Ensure that your PitStop preferences have a zero offset for paste.
I can’t get this to work via the action list as intended at this time which is why I am recommending the manual cut/paste step at the end.
Copy link to clipboard
Copied
Hey.
I understand that you are busy, so I tried to get by myself on all kinds of questions I had and problems.
First of all thank you for your advice with the cut and paste. I do not understand why this happens, but it's not so bad.
Now I have a question.
The manufacturer of Pitstop sent me a damaged action and I fixed it,
Though there is one thing I could not do.
My goal is to add bleed and cropmarks to a card that has neither one nor the other.
It works well, the problem that needs to be re-defined in the inspector window is bleed size.
Could you please help me add action (attached) to a command that defines 1.5 bleeds?
It is also important to fit a different size such as postcard, etc.
Copy link to clipboard
Copied
The manufacturer of Pitstop sent me a damaged action and I fixed it,
You should post your question only once! Now you will get answers here and with your other post. I would also suggest to ask the Pitstop support for this as it surly relates to their business.
Copy link to clipboard
Copied
This is an Adobe forum and PitStop Pro is a 3rd party plugin... Should we take this discussion offline? It may have value to other Acrobat Pro users of PitStop Pro or Quite Imposing, however I am happy to follow a moderator’s direction.
I’d like there to be an Acrobat script to add the text box info as a text mark on the PDF so that this topic thread was 100% on topic, however such a script is beyond my current capabilities.
Copy link to clipboard
Copied
Hey
1. Would you rather give me your email and the conversation would be via email?
2. I could not figure out if you could add to Action what I requested.
Thank you!
Copy link to clipboard
Copied
aviel222 wrote
Hey
1. Would you rather give me your email and the conversation would be via email?
This is a public forum, a lot of people will profit. I'm not suggesting to take this off-line. Just to keep it condensed at one point in these fora. Avoid asking the same question multiple times, as the answers will get spread.
Copy link to clipboard
Copied
Ok, Sorry!
Copy link to clipboard
Copied
Stephen_A_Marsh wrote
Should we take this discussion offline? It may have value to other Acrobat Pro users of PitStop Pro or Quite Imposing, however I am happy to follow a moderator’s direction.
No, keep the discussion alive. It's on-topic. I'm just asking to involve Pitstop as it is of their business too.
And OP asks the same question here and in a new post. Either it's a new question->new post or a continuous question->append here.
Copy link to clipboard
Copied
It works well, the problem that needs to be re-defined in the inspector window is bleed size.
Could you please help me add action (attached) to a command that defines 1.5 bleeds?
Add the following step to the action list after the existing change bleed box step (resize bleed box by 1.5 mm on all edges):

