
Automating e-signature journeys with ease: Adobe Acrobat Sign & Zapier
In today's fast-paced digital world, automation is the key to productivity. Zapier, a powerful no-code automation platform, enables you to connect different apps and services to create seamless workflows, called Zaps. These Zaps automate repetitive tasks by connecting two or more apps, performing actions like transferring data, triggering events, and sending notifications without the need for manual intervention.
Zapier has over 6,000 apps in its ecosystem, from everyday tools like Gmail, Slack, and Google Sheets to specialized apps like Salesforce, HubSpot, and Trello. The beauty of Zapier lies in its simplicity — you don’t need to be a developer to create a Zap, yet the possibilities are nearly limitless.
In this blog post, we will dive deep into what is possible with the new integration of Zapier and Adobe Acrobat Sign, an e-signature solution that helps businesses streamline agreements and contracts. This blog will explore the technical details, triggers and actions that are supported, and provide a step-by-step guide to setting up your own Zap.
Understanding Zapier: Triggers, Actions, and Workflows
Before diving into the setup process, let’s first clarify the key concepts that make Zapier work:
- Trigger: A trigger is an event in an app that starts a pre-defined workflow, called “Zap”. For example, when a new document is signed in Adobe Acrobat Sign, this could trigger an action in another app.
- Action: An action is the event that happens after the trigger. For example, after a document is signed, you can automatically upload the signed document to Google Drive or send a notification to Slack.
- Workflow (Zap): A Zap is the combination of a trigger and one or more actions. It's a workflow that automates repetitive tasks, so you don’t have to do them manually.
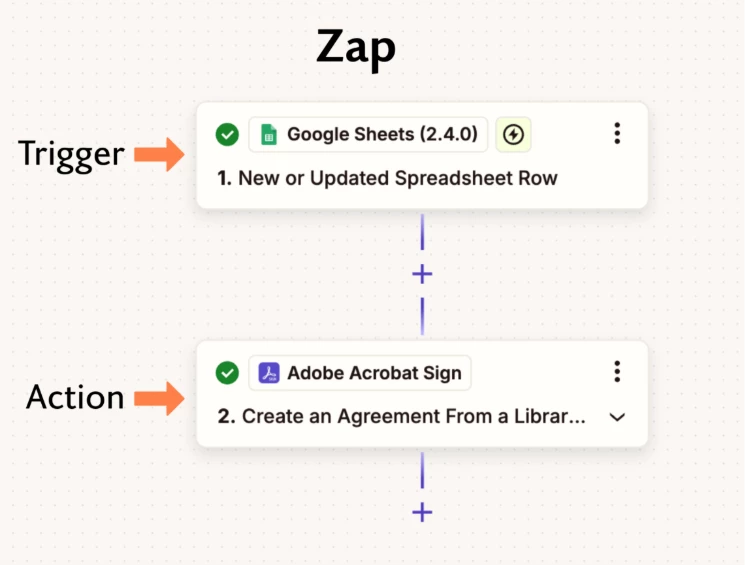
Each Zap begins with a trigger and is followed by one or more actions. For instance, you might create a Zap that triggers when a new email is added to Google Sheet which then performs an action like sending an agreement to the email added.
Automating e-Signature Processes
Adobe Acrobat Sign is one of the most widely used electronic signature platforms. It provides businesses with legally binding e-signature solutions that are both secure and compliant while offering document workflows that make it easier to manage contracts and agreements centrally. From small businesses to large enterprises, Adobe Acrobat Sign helps streamline business.
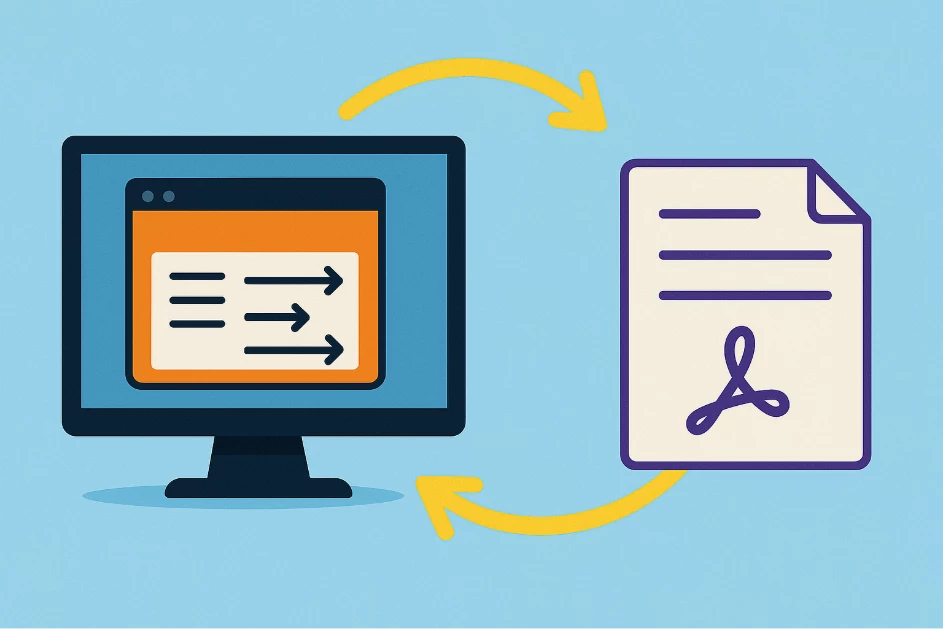
Integrating Adobe Acrobat Sign with Zapier opens almost endless possibilities. By connecting Adobe Acrobat Sign with other apps in the Zapier ecosystem, one can automate tasks like creating agreements, sending reminders, and managing documents without manual intervention. Naturally, signing the document remains a manual step by the individual.
How to Get Started
Trigger-based Automation
Users can utilise the available triggers and perform any actions in the subsequent steps in the automated workflow.
- Store completed agreements automatically in Google Drive.
- Update Google Sheets with signer info and agreement details.
- Trigger follow-up actions when an agreement is completed or cancelled.
- Streamline operations with event-based automation—no manual steps needed.
Automate the agreement creation process
Users can create the agreements based on any trigger and notify signers.
- Create agreements from library template.
- Upload document and create agreement from uploaded document.
- Choose authentication mechanism and add multiple users and define their roles in agreement
- Send signing URL via WhatsApp, SMS, slack etc to notify signers.
Check Agreement status
Users can check the status of an agreement and based on the status take some decision and build workflows. For example, if an agreement is SIGNED then trigger another action.
Import agreements/audit trials and sync as per your choice
After Signing ceremony gets completed one can download the signed agreement audit trail and upload it to choice of location like Google drive, one drive etc.
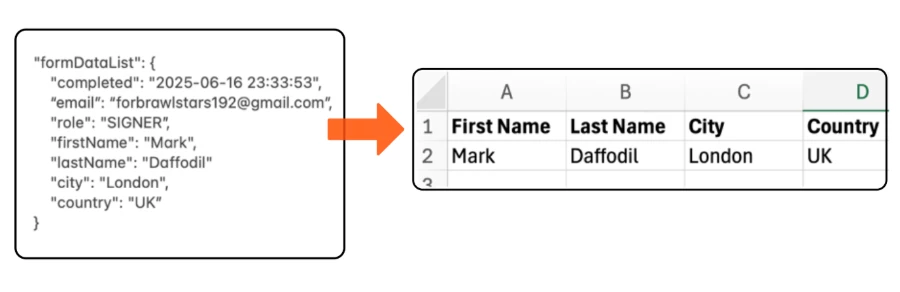
Import form fields and map it back as per your choice
Users can download the list of form fields placed in agreements. This enables mapping to other data sources. Let’s say an agreement contains the first name as a text field. A signer will enter their first name and sign the document. After signing, the sender can download the form fields, and first name can be saved back in an excel column. Or just automate it to automatically write new data into the designated place of choice.
What We Support in the Current Version 2.0.0
In the latest iteration of the Adobe Acrobat Sign app for Zapier, the most critical use cases that businesses meet when dealing with e-signatures are unlocked. Here’s an overview of what is currently supported:
Triggers
- Agreement Created
- Agreement Email Viewed
- Agreement Event Occurred
- Agreement Expired
- Agreement Recalled
- Agreement Rejected
- Agreement Reminder Sent
- Agreement Signed by a Participant
- Agreement Signed by All Participants
- Agreement State Changed
Actions
Actions are divided into 2 categories based on the use case
CREATE
- Create a PDF of a Signed Agreement
- Create a PDF of the Agreement’s Audit Trail
- Create an Agreement from a Library Template
- Create an Agreement from an Uploaded document
- Upload a Document to Get a Transient Document ID
- Create a document from an agreement ID
SEARCH
- Find list of All Agreements
- Find a list of all the documents IDs of agreement
- Find Form Field data of agreement in JSON format
- Find the Agreement Status
- Find the Signing URL
Unlock the power of Adobe Acrobat Sign and Zapier now to help automate manual steps in your document e-signature journeys. Find out more about Zapier here: https://zapier.com/apps/adobe-acrobat-sign/integrations
