Copy link to clipboard
Copied
Hi! I've been working on a webshow with a very small team of people, however I'm the only animator. Every so-often in I render an MP4 to check if animated symbols are showing properly since they don't play in previews, and that's all fine! But the problem comes in when it comes to one specific asset.
On it's own in the program, the symbol looks like this:

This is great to me. It looks exactly as it should and is the proper level of transparency.
However, when I actually render it into a video, the symbol shows like this.

At first glance it appears to have made one of my layers completely solid, but that isn't the case.
It's still transparent, just much less so.
Now, I'm still relatively new to Animate, I've only been using it for about 6 months, so I'm not sure if this is user error, a problem with Animate itself, or something else.
If this helps at all, the symbol's layers themselves look like this:
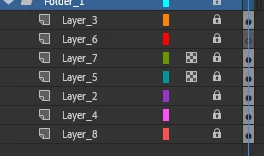
The problem layer in question is layer 5. Layer 7 is fine, despite also using layer opacity adjustments for transparency.
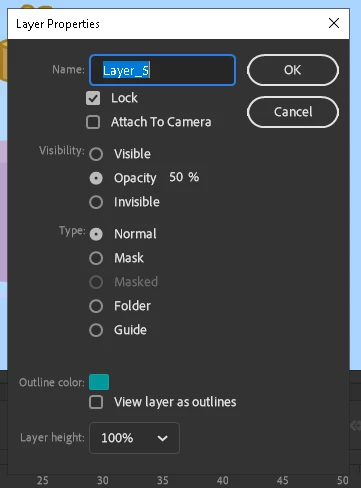
I also have several other symbols with transparency in them that use the same method, and they have had no problems whatsoever.
If anyone could give me pointers on what could be the issue here, I'd appreciate it as I do have a deadline.
The fastest way to add transparency now, when you already have some animation completed is to go inside your symbols and change the alpha value of the fills and strokes. This way you can have full control over what is semi-transparent and what is opaque.
If you prefer to do it to the symbol instances instead, lock all layers with the exception of the ones you would like to adjust the alpha for, enable Edit Multiple Frames for your whole timeline, Select All and from Properties > Color Effects ch
...Copy link to clipboard
Copied
If this helps as well, I'm using an ASUS laptop running windows 10. I'm not sure of the specs and unlike any other laptop I've had right out of the box it didn't have a model number printed on it anywhere, so I'm not sure of that.
Copy link to clipboard
Copied
That's a coincidence, I was having the same issue with the same lab top, while also making object show assets.
Copy link to clipboard
Copied
Hi mate,
I see two major problems in your post.
1. The layer transparency you have used is for View/Preview purposes only. It is to make your workflow easier and does not render. Instead, use either a Color Effect for the Symbol (Alpha value of less than 100%) or semi-transparent colours.
2. You say: "... to check if animated symbols are showing properly since they don't play in previews". This probably means that you are using Movie Clips and not Graphic Symbols. For animation, always use Graphic Symbols and they will play in timeline preview. You can switch the instance type easily from Properties, but you need to do it for every existing Keyframes. (Movie Clips are for interactive projects only and are meant to be controlled by code.)
Copy link to clipboard
Copied
I'm fully aware of the second part, I just prefer to use Movie Clips as my computer doesn't have a very strong processor and a Graphic Symbol's ability to play in previews would lag my laptop to hell and back, especially with the fact that I usually have a tween on them in the actual timeline, as I mostly use them for walk cycles and other moving loops. It was actually a suggestion from someone on a post another person made on suggestions of how to reduce lag since it doesn't affect the end product. As for your first point, how would I go about finding Colour Effect options? As I said in my own post, I'm still relatively new and haven't fully fleshed out all of my understanding of specific functions and how to use them.
Copy link to clipboard
Copied
The fastest way to add transparency now, when you already have some animation completed is to go inside your symbols and change the alpha value of the fills and strokes. This way you can have full control over what is semi-transparent and what is opaque.
If you prefer to do it to the symbol instances instead, lock all layers with the exception of the ones you would like to adjust the alpha for, enable Edit Multiple Frames for your whole timeline, Select All and from Properties > Color Effects choose Alpha and give those keyframes a value smaller than 100%.
(I'm very doubtful that using Graphic Symbols will increase the lag. Not being able to see what you do when scrubbing just makes your life more difficult. The best way to preview animation is to hit Ctrl+Enter and watch the SWF.)
Copy link to clipboard
Copied
Alright! I just wasn't sure what you meant by "Alpha Values" but I get it now. Thanks a bunch Nick!
Copy link to clipboard
Copied
Well done, mate 🙂
Good luck with your project!
Copy link to clipboard
Copied
Thanks for the help 🙂
Copy link to clipboard
Copied
Another tip I have is to combine your objects to see how they behave as a symbol. This worked for me.