

Detailed publish settings help?

Copy link to clipboard
Copied
Hi everyone!
Relatively new to Captivate 5 and was hoping someone might be able to direct me to a detailed doco/ article about the various Publish settings?
I am trying to work out what options might work for us, but trial and error doesn't seem to be producing any noticeable differences.
Thanks!
Nicole


 4
Replies
4
4
Replies
4

Copy link to clipboard
Copied
Hi Nicole
Welcome to Adobe Captivate family.
PUBLISH SETTINGS -->
Select Edit > Preferences.
In the Preferences dialog box, select Publish Settings from the Project menu.
- Set the various options according to your requirements.
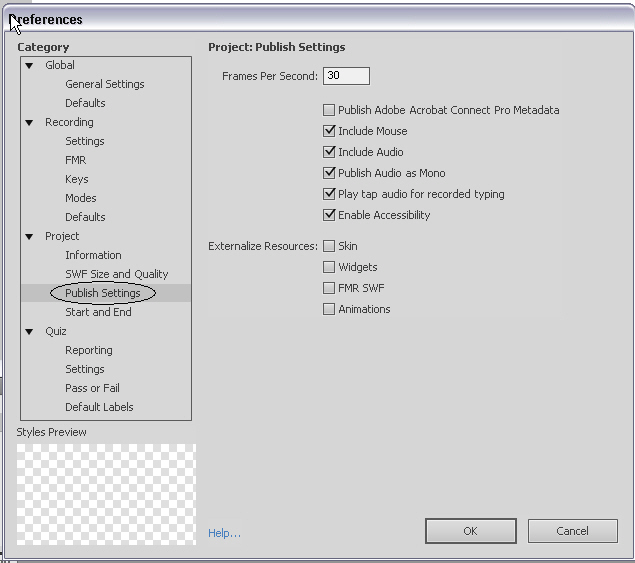
Now lets talk about the right side of this window
First one is Frames Per Second. The default setting is 30 frames per second and is appropriate in most cases. This option sets the number of Flash frames that appear per second.
For example, with the default setting, a caption that appears for 1 second requires 30 Flash frames. Dividing the number of frames in a project by 30 gives you the length of the project in seconds. You may need to change the rate if you are embedding your Adobe Captivate SWF file in another SWF file that has a frame rate other than 30.
- Publish Adobe Acrobat Connect Pro Metadata
- Adds information to your Adobe Captivate project file (SWF) that makes it easier to integrate the project into Adobe Acrobat Connect Pro. The embedded data links the Adobe Captivate CP file to the SWF file when you publish the project to Connect Server and makes it easier for the Adobe Captivate output file to be found during searches done in Adobe Acrobat Connect Pro.
- Include Mouse
- Includes any recorded mouse movement in the project.
- Include Audio
- Includes any audio files that have been added to the project.
- Play Tap Audio For Recorded Typing
- This option plays tapping sounds in the final project to represent recorded keystrokes. (For example, if you recorded an e-mail message being sent, you most likely typed an address to which the e-mail should be sent. The sound of the keys being pressed to enter the address was recorded, and using this option, a tapping sound can be played for each of the keystrokes.)
- Enable Accessibility
- Enable this option if you want to make your project accessible to visually impaired users. The text in your project is read aloud when users accept the help of a screen reader when viewing the project. In addition, any other accessibility options that you have configured in the project are also enabled.
- ActionScript Version
- If you are using Adobe Captivate projects within other applications like Adobe Flash, Adobe AIR applications, or Flex, it is important that you specify the version of ActionScript for the SWF file before publishing it. You cannot set variables within a Captivate movie if you publish it using an ActionScript version that is not supported by the application.
Adobe AIR and Flex support only ActionScript 3.0 whereas Adobe Flash supports both ActionScript 2.0 and ActionScript 3.0. Users must have Flash Player 9 or later installed on their computers to view Adobe Captivate movies created using ActionScript 3.0.
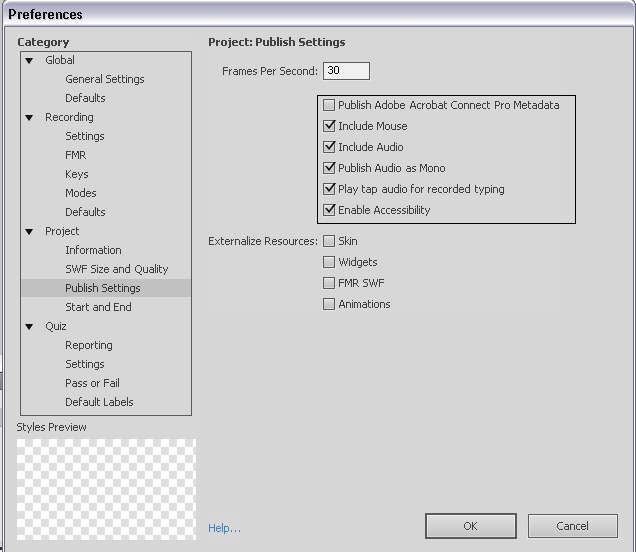
MOST IMPORTANT IS EXTERNALIZE RESOURCES

- Externalize Resources
- When you publish a project as a SWF file, a single SWF file is produced. To reduce the size of the SWF file, you can choose to externalize some of its objects (skin, widgets, FMR SWF file, animations). After publishing, the externalized resources reside outside the SWF file, and are referenced by it.
Copy link to clipboard
Copied
Hi Vishal,
Thank you for the information - greatly appreciated (you're obviously not a new-be!).
Do you have any tips with the SWF Size and Quality as well by any chance?
Thanks again,
Nicole
Copy link to clipboard
Copied
Hi Nicole,
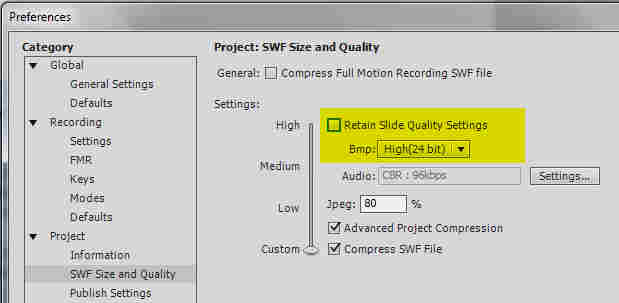
SWF size and Quality depends a lot on the kind of project. The default settings for Slide Quality is 'Low - 8-bit' which leads to the smallest filesize for the published SWF, can be OK for simple Text slides but is mostly insufficient if you are using graphics, images etc. You have 2 possibilities to change the slide quality, again the choice depends on the project itself:
- You can change the slide quality per slide using the Properties of the slide (General accordion); this allows you to increase the quality only for slides where it is really necessary and you will see the quality while editing on the stage.
- You can override the slide quality settings before publishing by deactivating the 'Retain Slide Quality' in the Preferences screenshot and choosing the wanted quality (but here you only have 2 choices).
Solution 1 takes more time, but is suited if you want the published filesize as small as possible by only incrementing the quality for those slides that need it.
Lilybiri
Copy link to clipboard
Copied
Hi Nicole,
If you looking for information as to how to achieve optimum output file size then you may want to have a look at these forum posts:
http://blogs.adobe.com/captivate/2010/07/balancing-image-quality-and-swf-output-size-in-cp-5-1.html
http://blogs.adobe.com/captivate/2010/07/balancing-image-quality-and-swf-output-size-in-cp-5-2.html
-Manish
blogs.adobe.com/captivate

 AdChoices