 Adobe Community
- Home
- Character Animator
- Discussions
- Re: New to CH and STRUGGLING. Arms and Sets/props ...
- Re: New to CH and STRUGGLING. Arms and Sets/props ...
New to CH and STRUGGLING. Arms and Sets/props for CH
Copy link to clipboard
Copied
So I'm trying to design a custom character for CH and for the life of me I can't figure out how to do what I'm trying to accomplish. I can't find any tuts on youtube so here I am, reaching out the the community here for some help/suggestions.
2 images included to try and explain my dilema
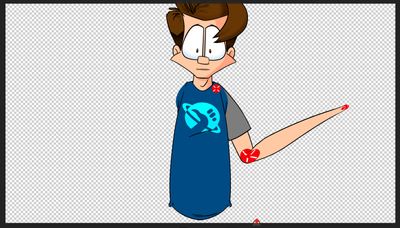
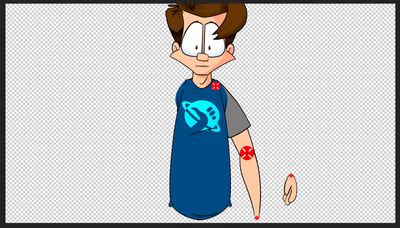
Fig 1: I'm building the arms as 3 different pieces. Upper arm, forearm and hand. I'd like there to be a way to "hinge" them (hinge not working) so that they pivot around 1 point. The Upper arm pivots around the shoulder, and the forearm pivots around the elbow. I move the hand/wrist (with a dragger) and the whole arm bends/follows with it.
Is that possible? Along with that, there's the "stretching" that goes along with it. I'd really like to turn that off and near as I can tell you CAN'T do that with IK LIMB because the arms in this case are 3 separate pieces. and it won't rig right.
I DO NOT LIKE the idea of just having one single piece for the arm because as it bends at the elbow it's beyond ugly if your arms are anything but a straight shape. Is there's a way to have the arm be 3 separate pieces and work this way like AN ACTUAL PUPPET? I'm going out of my mind trying to figure this out.
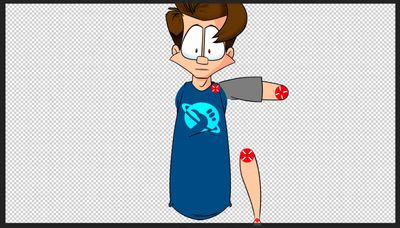
Fig 2: I'd like to have my character sitting at a desk. Easy enough, I can put the desk in as a separate layer in the scene. BUT I'd like for the character to be able to rest his arms ON TOP of the desk that he's SITTING BEHIND. Is there any way to do this? I've put the desk top INSIDE of the puppet itself, but then I can't move it around the scene to place it where I want it to be. Is there any way to do this or am I just trying to do something this program wasn't meant for?
I can't for the life of me figure out what I'm doing wrong. It almost seems easier to go to school for 4 years and get a degree in traditional animation than go through all the difficulty I'm dealing with trying to do what seems like should be a simple thing to do.
Images enclosed, any help would be greatly appreciated.
Copy link to clipboard
Copied
There are a few things here to respond to (!), so I would take this reply as a source of inspiration rather than a straight solution.
- Separate bits of artwork have been talked about in the forums before (and some people have got it to work). Its not quite as nice as you might think though - you still have to get the arwork right so moving one around in front of the other always gets a black outline correct. You can practice with real bits of paper cut out with a black outline on the edge. One needs to be in front of the other. (If there is no black outline, its much easier.)
- One approach to keep one arm but get less mess near the elbow is to split the arm artwork into upper and lower arm groups. If you cut the artwork just right, what it will do is have one outline in front of the other artwork. I don't think you will be happy with it from your description. So on to the next approach!
- To cut an arm into multiple segments, the easiest approach has been to nest them. By default, meshes (independent layer groups) can only attach to PARENT meshes. This means the forearm artwork needs to be nested INSIDE the upper arm artwork as a separate group, then marked independent. If you do this, you can attach the two layers at the elbow. You will need to put a dragger on the elbow however - putting a dragger on the wrist will only move the lower arm (not the upper arm) - because the lower arm is "independent" it won't affect the parent upper arm.
- With the new Body Tracking support, this is not as bad as it sounds if you use body tracking to move the elbow and wrist. Just tag them both, and the body tracking webcam support will control the elbow and wrist for you. (But that, you had to keyframe / record both the wrist AND elbow, which worked, but was annoying.)
- There is a Leader behavior now in CH which I have not tried for arm joints yet. With the behavior you can attach two independent objects so one follows the other (like "re-parenting" in other engines). I have not tried that on arms. Note that I think one point on one layer will follow the other one (not like a rope joining two things equally), so I am not sure this will work. But could be interesting....
On to figure 2 and the desk (I noticed you "liked" another post recently for this too).
- Furniture is a puppet - a very simple one, but its a puppet too. Background images are puppets too.
- A puppet cannot be in front of and behind another puppet at the same time.
- That is why the trick of basically considering the desk like "pants" for the character. You put the desk inside the artwork so the arms can be in front.
- There are tricks (like the other thread) - e.g. have a separate puppet for walking around the scene, and another puppet when sitting at the desk. Use cameras and cuts to avoid seeing the character sitting down half way between the two states. (E.g. zoom in on the face, then zoom back out again.) The switch puppets during the transition so the viewer does not notice.
- If you put the desk inside the character, you can try making it independent and marked as "free". I think "free" will mean it won't move with the character (but not sure) - sorry, its been a while since I have played with "free". You might need to put a dragger on the desk, then record a one frame drag for the desk to lock it down to stop it moving. Drag recordings are absolute to the scene, not relative to the character.
Sorry, I have not tried all the above to see which works - a bit busy at the moment. But hopefully it might inspire some experiments of your own.
Copy link to clipboard
Copied
Thank you.
This whole process has been very frusterating for me. I look forward to trying your suggestions and seeing the results.
Copy link to clipboard
Copied
I was going to ask if you could take a look at my puppet and tell me what I'm doing wrong but wouldn't ya know it, the adobe forum doesn't support their own filetypes. I tried to follow your instructions the best I could, but I'm assuming I'm just not doing it right.
Copy link to clipboard
Copied
If you get desperate, you can export the puppet, upload to Google Drive or Dropbox or similar, then share a link here (if copyright not a problem).
For the arm, the nesting approach is to have something like
+Character
. Head
. Body
. . Torso
. . +Left Arm
. . . +Lower Arm
. . . . +Left Hand
. . . . . hand artwork
. . . . lower arm artwork
. . . upper arm artwork
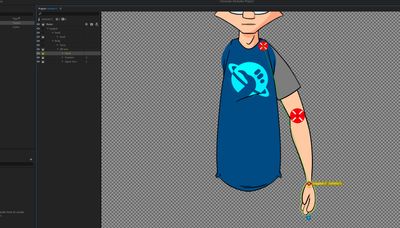
So each layer is nested more deeply inside the other. The screenshot shows you have them as next to each other, which will not let them attach to each other.
Copy link to clipboard
Copied
I made a tutorial video about them before.
It's in Japanese, but I think it will be helpful.
Case 1
https://youtu.be/yCKxTdkqxys
Case 2
https://youtu.be/dgKTC9bpSM8
You can also download the Character Animator project files by following the links in the overview column.
Copy link to clipboard
Copied
I'll give them a watch and see what I can learn. Thank you.


