Copy link to clipboard
Copied
Is there a way to adjust an image by a specific RGB amount ?
I want to, for instance, adjust the blue value by 5 units across the whole image.
Most of the advice involves making a curves adjustment and checking the result but that is trial and error.
Any other options ?
 1 Correct answer
Hi Stevem,
You write:
Hi Neil,
It was not my intention to denigrate or demean the creative process. I have spent, literally, hours trying to get the colour where I want it and still end up with purple skies and yellow grass - this was the basis for my "trial and error" comment. A lot of guides refer to curves, hue & saturation etc adjustments but my (in)experience makes this difficult. What some consider as general knowledge, others do not, such as your comment about setting a permanent eyedropper.
...Copy link to clipboard
Copied
Hi
Generally, rather than aiming for specific numbers, we tend to colour correct images until they please us. That's not normally thought of as trial and error, rather a creative process.
Sometimes, though, it's useful to match the numbers, to adjust blue areas globally, I'd suggest you might try a hue and saturation layer and select blues in the pull down menu before tweaking the sliders.
However, if you want to adjust the blue component throughout then it's probably best approached via adjusting the entire blue curve. (In a curves adjustment layer).
To assist you, why not set a permanent eyedropper in a representative spot and watch the info pallet numbers as you tweak.
Once you've learned how to use curves you'll be on here recommending others do the same.
I've often recommended the book "Photoshop Artistry" for this and other basics. There's also "Getting Colour Right" which I contributed to. The former includes a cd with the images which I rather like as a teaching aid.
Please report back how you get on.
Neil B / colourmanagement
Copy link to clipboard
Copied
Hi Neil,
It was not my intention to denigrate or demean the creative process. I have spent, literally, hours trying to get the colour where I want it and still end up with purple skies and yellow grass - this was the basis for my "trial and error" comment. A lot of guides refer to curves, hue & saturation etc adjustments but my (in)experience makes this difficult. What some consider as general knowledge, others do not, such as your comment about setting a permanent eyedropper. How do you do this ?
I can certainly sample colours but I haven't been able to set a fixed reference point.
What I thought were simple questions are proving unanswerable.
I simply want to match the colours from the in-camera JPG algorithm across to the corresponding RAW file without impacting on the quality of the RAW file.
Not so simple.
Copy link to clipboard
Copied
stevem38895022 wrote
I simply want to match the colours from the in-camera JPG algorithm across to the corresponding RAW file without impacting on the quality of the RAW file.
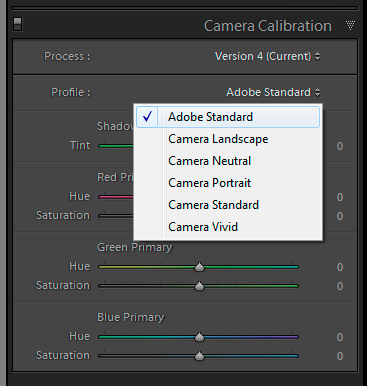
The camera-matching profiles should at least get you a lot closer. These were in their time added precisely because of requests like this.
Just note that these profiles are strictly reverse-engineered for visual appearance. They should generally match well, but obviously there will be instances where they miss.

Copy link to clipboard
Copied
Hi Stevem,
You write:
Hi Neil,
It was not my intention to denigrate or demean the creative process. I have spent, literally, hours trying to get the colour where I want it and still end up with purple skies and yellow grass - this was the basis for my "trial and error" comment. A lot of guides refer to curves, hue & saturation etc adjustments but my (in)experience makes this difficult. What some consider as general knowledge, others do not, such as your comment about setting a permanent eyedropper. How do you do this ?
I can certainly sample colours but I haven't been able to set a fixed reference point.
What I thought were simple questions are proving unanswerable.
I simply want to match the colours from the in-camera JPG algorithm across to the corresponding RAW file without impacting on the quality of the RAW file.
Not so simple.
Agree, it’s not at all.
Sorry about that, I wasn’t at all suggesting that you were somehow demeaning the creative process. Of course not. Meaning can be rather hard to transmit in writing unless it becomes an essay.
I’m afraid I think that for personal input to images (to get “just” what you want not a programmers idea of a “solve all” automation), which I am confident you’ll grow to love, curves and levels (using adjustment layers ideally) are irreplaceable. Any automated process is just that, it may get you closer but not always where you want to be. Like an auto car or auto exposure, its not always just right but in some cases it can get you where you’re going.
I realise that may read as flippant when we are recommending you throw out all the camera maker’s auto processing that goes into making their “optimised” JPEG and start from scratch (the basic capture) with the RAW, but that’s what the pro’s do unless they are in a hell of a rush and the job allows for a “quick” JPEG, journalists come to mind.
DFosse gave a good tip with his recommendation to try the “camera - matching” profiles when processing your RAW.
I did recommend some good books for you to look at, that’s definitely the approach I'd recommend. I like books for this because you can so easily go back to them if a process is forgotten.
Or get some one to one tuition perhaps if you’ve the budget.
Again, not to make the process sound “superior” but in my days as an advertising photographer pro retouchers used to charge $600 an hour, it was considered to be a very highly skilled job. Moving picture “colourists” (who basically do just what you are doing but to video) still get paid that in some cases. Or more.
Of course, Photoshop has democratised the process, but it’s still hard to use it right, so I definitely feel your pain getting started.
You’ve made a great decision to start with the RAW, not the JPEG, don’t give up man, you’ll get there.
When I worked on that book [getting colour right] with Michael, I spent 12 months (yep) teaching him the processes so he could write them up and test the effectiveness. You can benefit from that for a few $. Getting colour right is out of print and will seem a little dated but the levels and curves and image optimisation process hasn’t much changed since Photoshop was launched.
We are all volunteers here on this forum just hoping we can help out a fellow Adobe software user. Most of us who work the Photoshop and colourmanagement forum have spent years learning how to optimise images and, in some cases, how to teach it to others too.
When forum contributors advise that what’s being attempted is something that takes some learning, that’s a fair statement of truth. Honestly.
It’s a horrible transition, I know, going through the purple skies and yellow grass period, but you will get there. We all started out there.
I hope you’ll come to enjoy it.
Start with a good book.
I hope this helps
thanks
neil barstow, colourmanagement
Copy link to clipboard
Copied
Thanks Neil,
Started with DFosse's tip and got a little closer, then used curves and saturation to get a bit closer.
Not perfect but better. I can see why the professionals get the big bucks !.
Still a bit galling (as an engineer) that I can't just do *something* to get from where I am to where I want to be but that's the way it is.
It's still a little bit foreign to "do a bit here, a bit there until it looks right" - makes reproduciblity a bit tough.
Anyway, thanks for the help - just need to work with the tools we have.
Copy link to clipboard
Copied
Hi stevem,
I am pleased that you appreciate that this is a learning curve.
I know what you mean by ”as an engineer” but that you’ll now appreciate that we are not making a machine, what we are doing's closer to making a sculpture.
There is art involved in this craft.
Each image may differ in it’s mood and desired appearance. Ansel Adams used to write about pre-visualisation, he thought over the desired result from his images when printed and applied specific changes to each to achieve what he had visualised. Automated processing cannot do this.
Of course, if you were a Hollywood red-carpet photographer with 100 shots to submit, you’d come up with a formula and likely apply it to all images from a session.
Thats volume processing and is more like making nuts and bolts ‘;~}. That’s what Lightroom was developed to do, you make your own job specific "fix all".
The JPEG processing is designed as a universal "fix all" to accentuate the attributes of an image that the developers expect you’d want to push that way. Your own taste for appearance will develop as you work.
I encourage you to think of it more as making individual brushstrokes as you move towards a masterwork, than as trial and error.
Happy image making, enjoy your trip through the looking glass
thanks for the feedback and the "helpful"s
neil barstow, colourmanagement
Copy link to clipboard
Copied
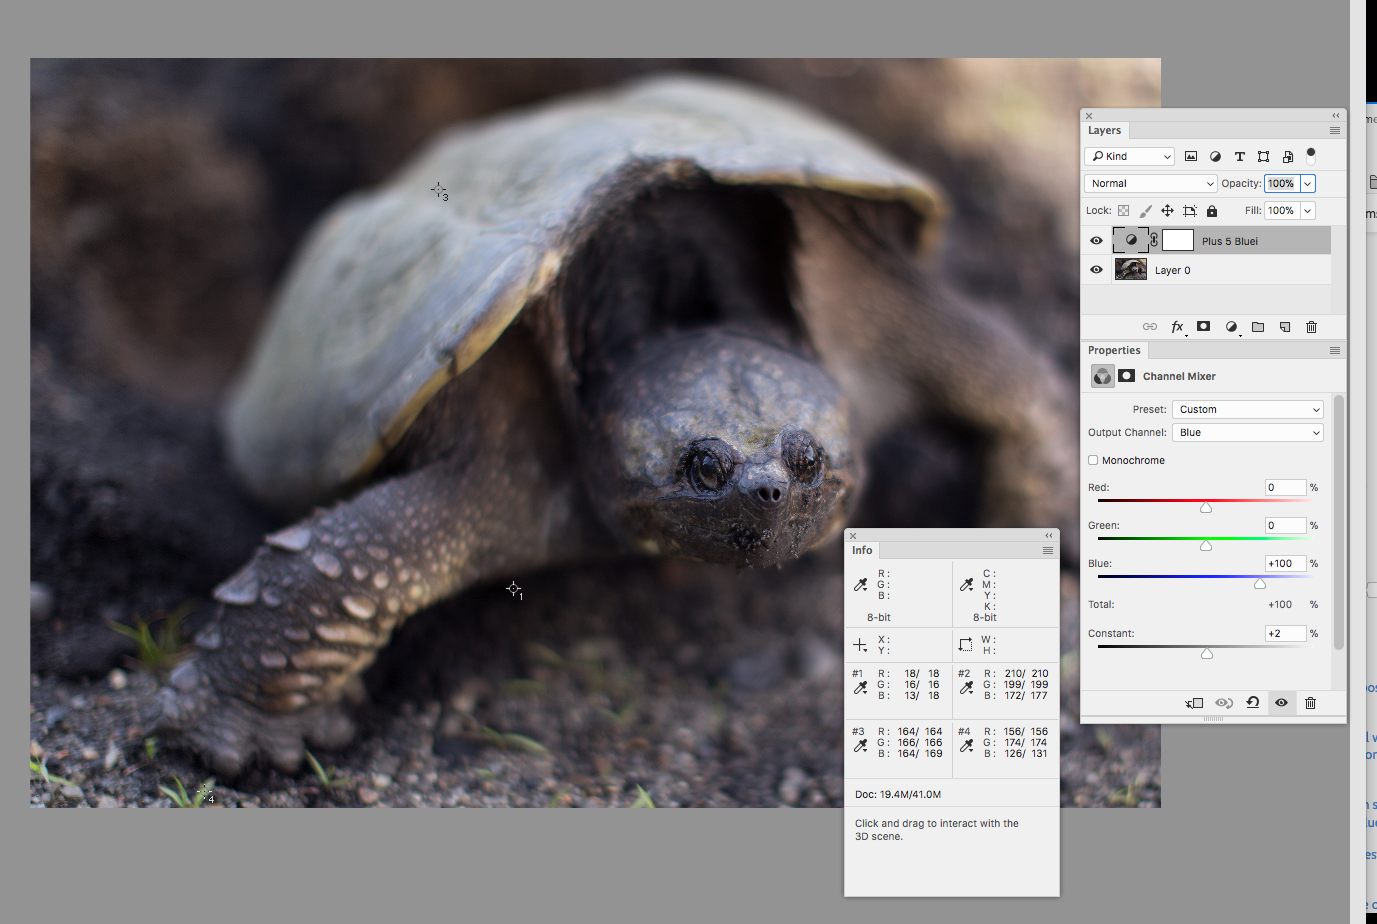
I want to, for instance, adjust the blue value by 5 units across the whole image.
If you mean literally move every pixel's blue value by a constant amount there's the Channel Mixer's Output Channel Constant. The amount is a percentage, but here I've added 2% to the blue channel and you can see the 4 samples I've added to this image all have their blue amounts showing as +5

Copy link to clipboard
Copied
Thanks Rob,
This is probably the closest I've got to what I had in mind and gives me another tool to try.
Regards
Steve
Copy link to clipboard
Copied
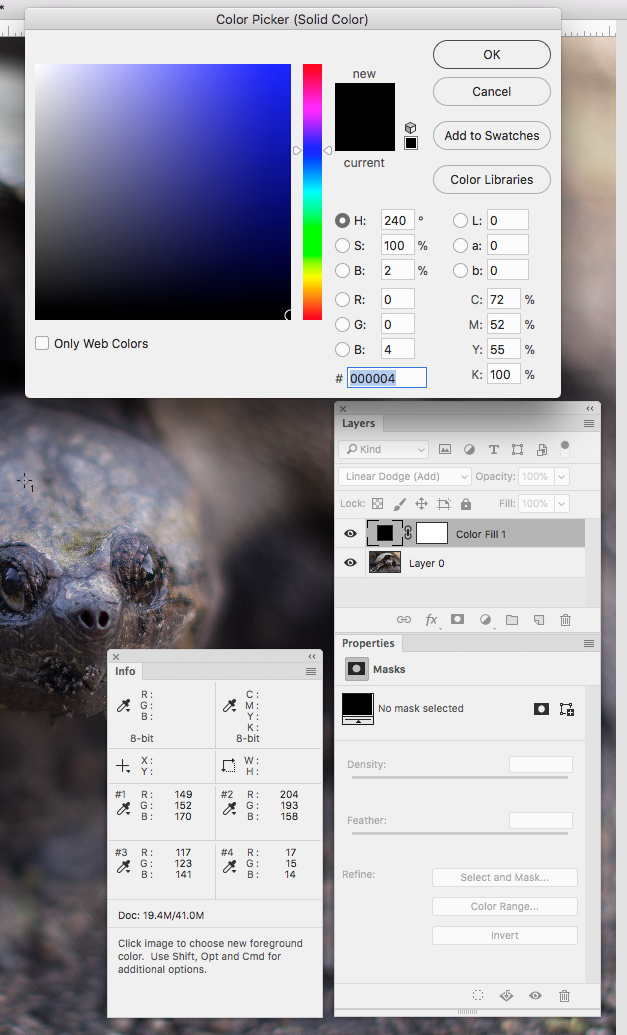
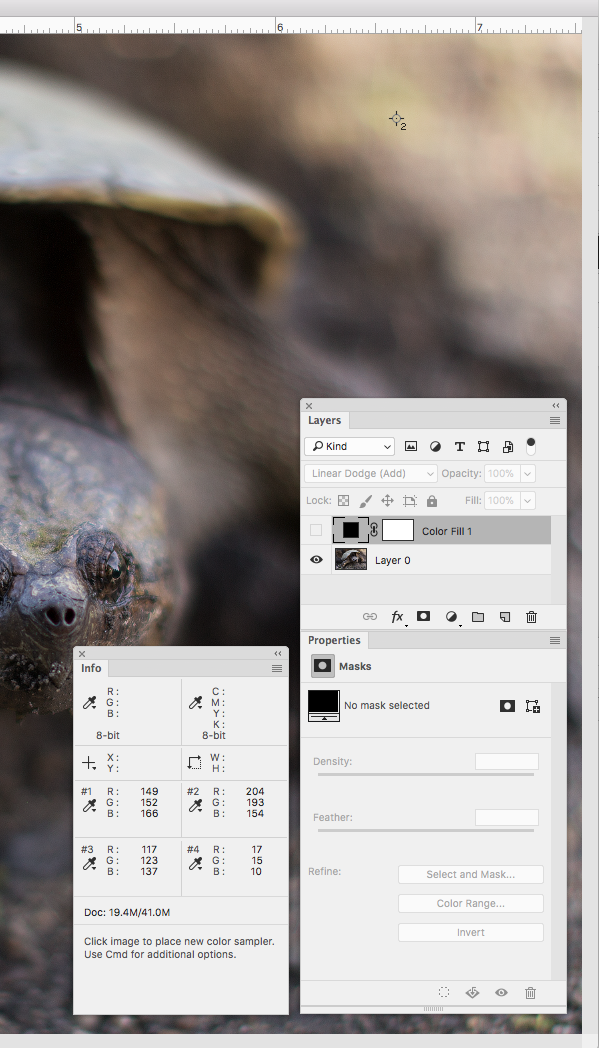
Another way to do it is with a solid color adjustment layer with its blend mode to Linear Dodge (Add). In this case you can set the adjustment to an RGB value rather than a percentage. Here the color fill is set to 0|0|4, which adds 4 blue levels to all of the pixels. Use Subtract to subtract the amount


Find more inspiration, events, and resources on the new Adobe Community
Explore Now
