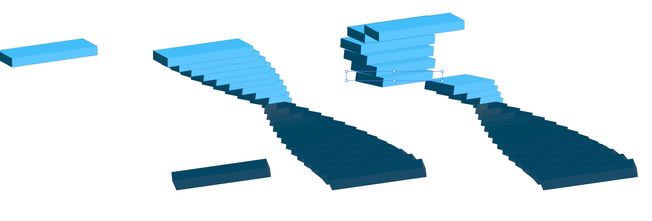
3D spiral stair case
Copy link to clipboard
Copied
Hello,
Looking for advice on how to build a 3D spiral staircase.
Any help/tips/directions is greatly appreciated.
Basic reference attached.
Final look and feel will be similar to what I've created here - only the steps would be spiraling.
Explore related tutorials & articles
Copy link to clipboard
Copied
WIth the 3D-effects you can build this, but it won't be 3D, only 2,5 D. Every 3D object in Illustrator lives in its own 3D space. So you can of course move the objects around to create the illusion of a staircase, but as soon as you want to edit anything, you will get in trouble.
It's easier with the perspective grid, but still has its limits.
Copy link to clipboard
Copied
Hi and thank you, I've tried this tutorial prior to jumping on here...not truly the effect I'm looking for.
Copy link to clipboard
Copied
You want to take a look at a real 3D application.
You could try whether you can do it in Adobe Dimension. If you can't then it's time to learn Blender.
Copy link to clipboard
Copied
- 3D Extrude on rectangle
- option drag a copy to the bottom
- use appearance to change the rotation 180
- set your blend step amount to a manual amount
- create a blend between both
- expand the blend
- ungroup
- relayer if you must
- set cursor key distance
- use cursor key to move them around (I stopped at 5th block to give you an idea of process)
Copy link to clipboard
Copied
Do you still need assistance?
Copy link to clipboard
Copied
Since it looks like you're already using Blender as a reference and already have the staircase modeled, you can actually export grease pencil outlines to SVG(another vector format)!
You will need to first create line art from an object, the entire scene, or collection if it's multiple specific objects you want to be outlined with add>grease pencil> (scene/collection/object) line art. The grease pencil can be tweaked to only project to where you want them if needed in the modifier settings (it's pretty good by default usually).
Next, set up your camera to where you want it, change lens characteristics, etc.
Lastly, You will go to file>export>SVG and it will export an SVG file to your computer which can then be imported to Illustrator.
Some things to note:
The grease pencil projects from the camera, but the exported SVG will be from the actual viewport, not just where you place the camera, so make sure you are viewing the active camera before export.
The paths may not be connected, so it might not always be as simple as drag>drop>color, and if not, selecting paths then right-click>join can sometimes work but more often than not, it won't, so using the grease pencil as a guide for your color blocks in a secondary color layer underneath the lineart is usually the best route. Also, locking the grease pencil line art layer to prevent accidentally connecting to incomplete paths is a lifesaver and will save you from so many headaches.
Just because the grease pencil lines within Blender are small or large relative to the object, doesn't mean the paths will be that way in Illustrator, so when you set up the grease pencil, the thickness scale should remain around 1.00 (equates to about 1pt stroke), but it can be changed later on in Illustrator itself, so it's not the end of the world if the stroke is too big or small in illustrator.
I've attached an SVG I have previously exported from Blender and used as a guide in a project, check it out if you'd like, there are some imperfections, but makes an excellent jumping-off point, especially if you're well-versed in Blender!
I hope this isn't too late and this helps you out!
Find more inspiration, events, and resources on the new Adobe Community
Explore Now


