• Global community
    • Language:
      • Deutsch
      • English
      • Español
      • Français
      • Português
  • 日本語コミュニティ
    Dedicated community for Japanese speakers
  • 한국 커뮤니티
    Dedicated community for Korean speakers
Exit
0

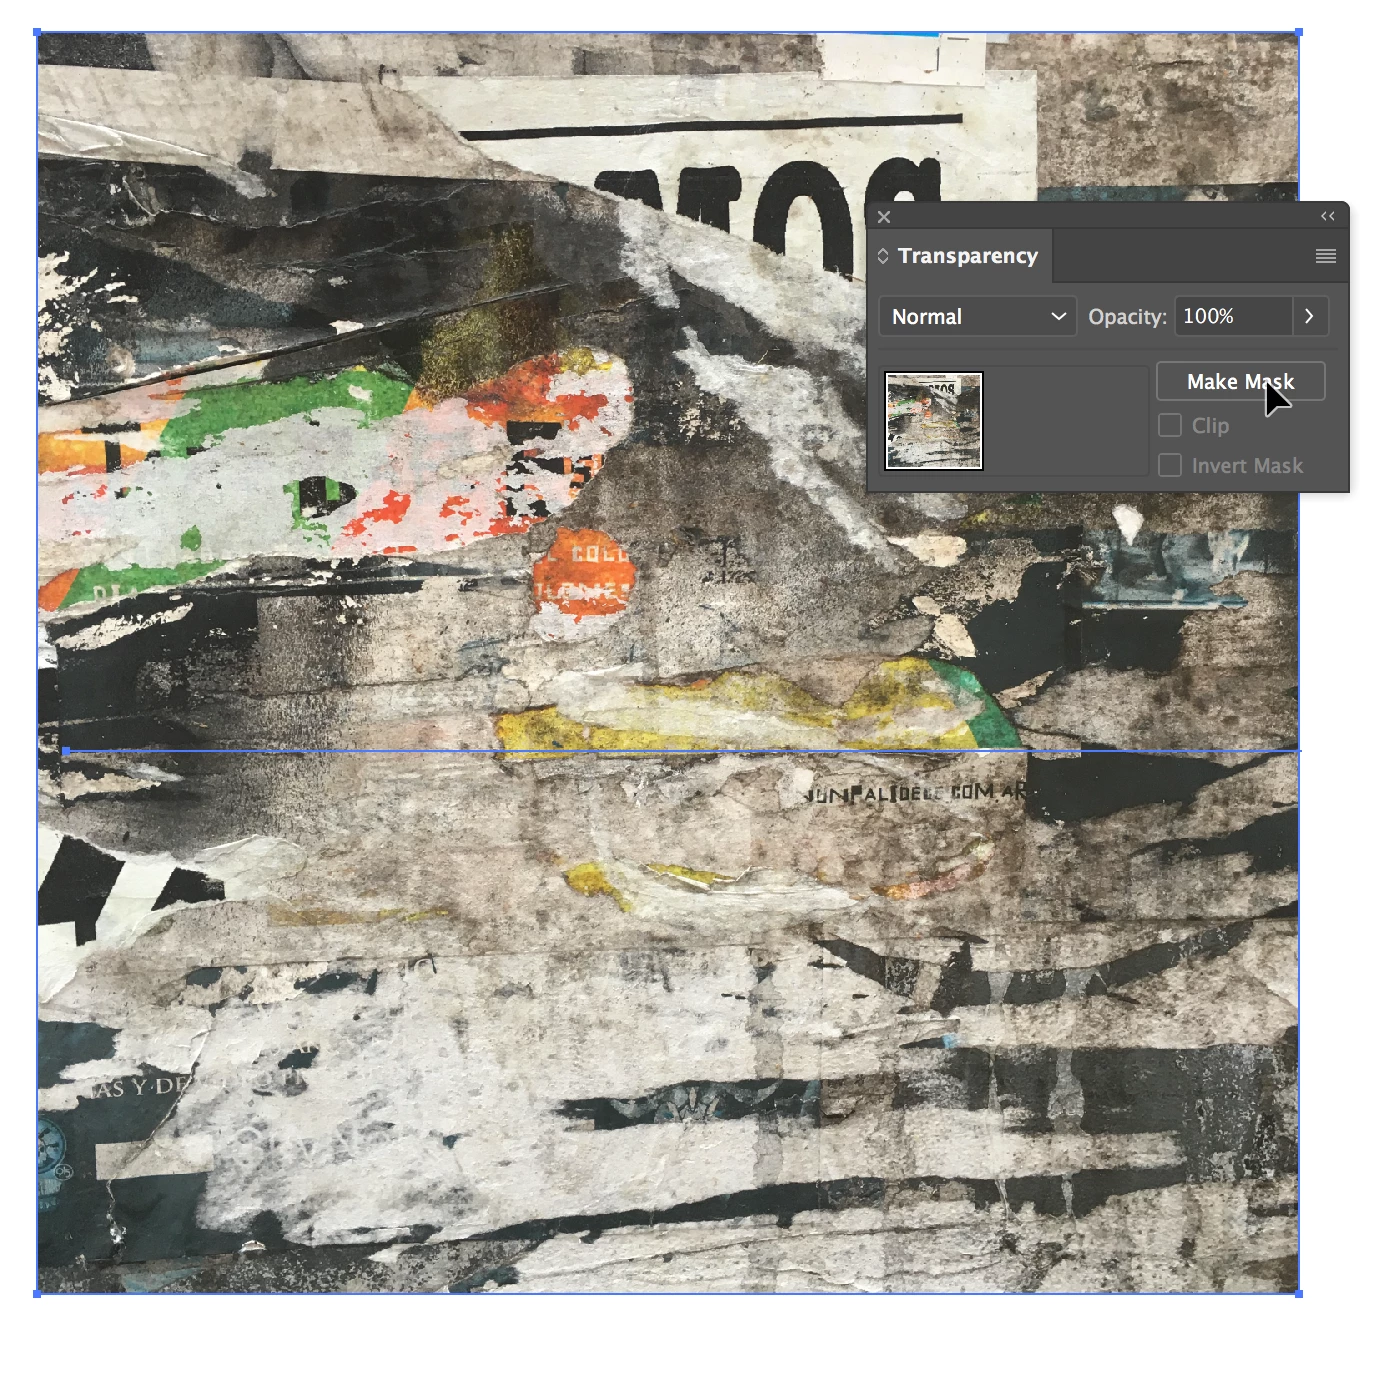
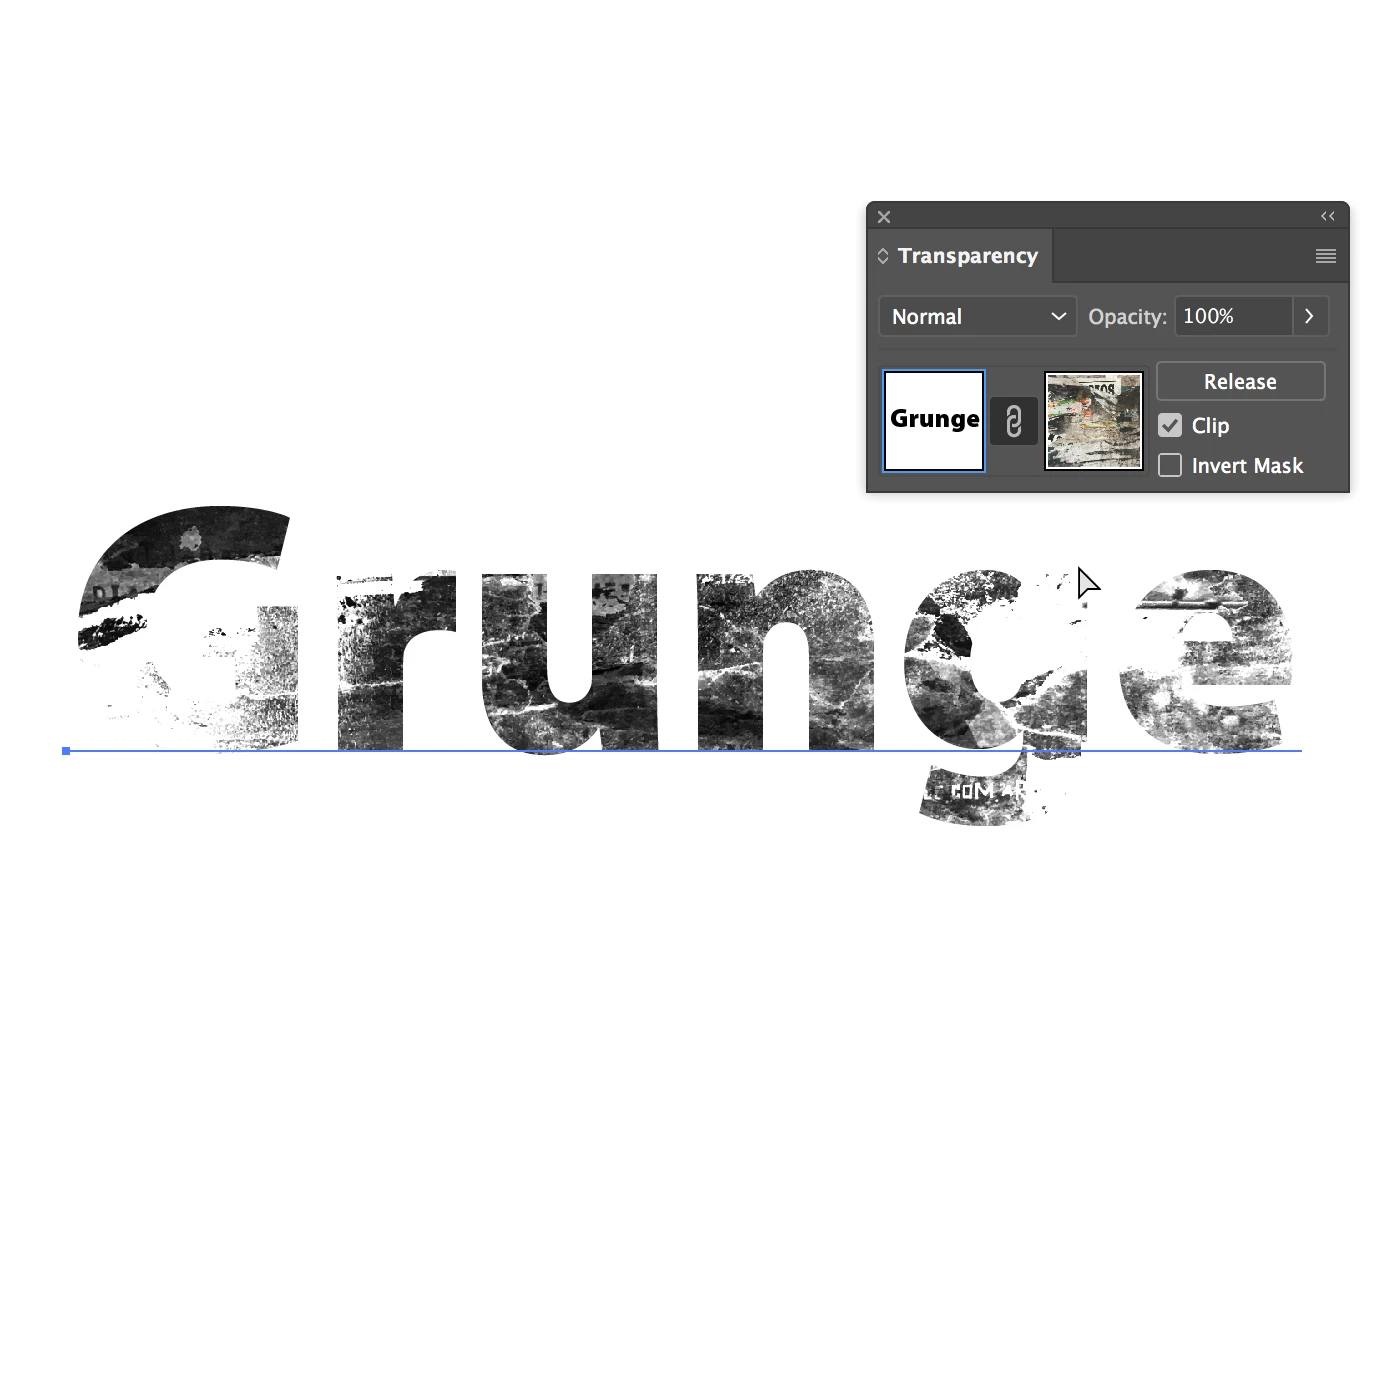
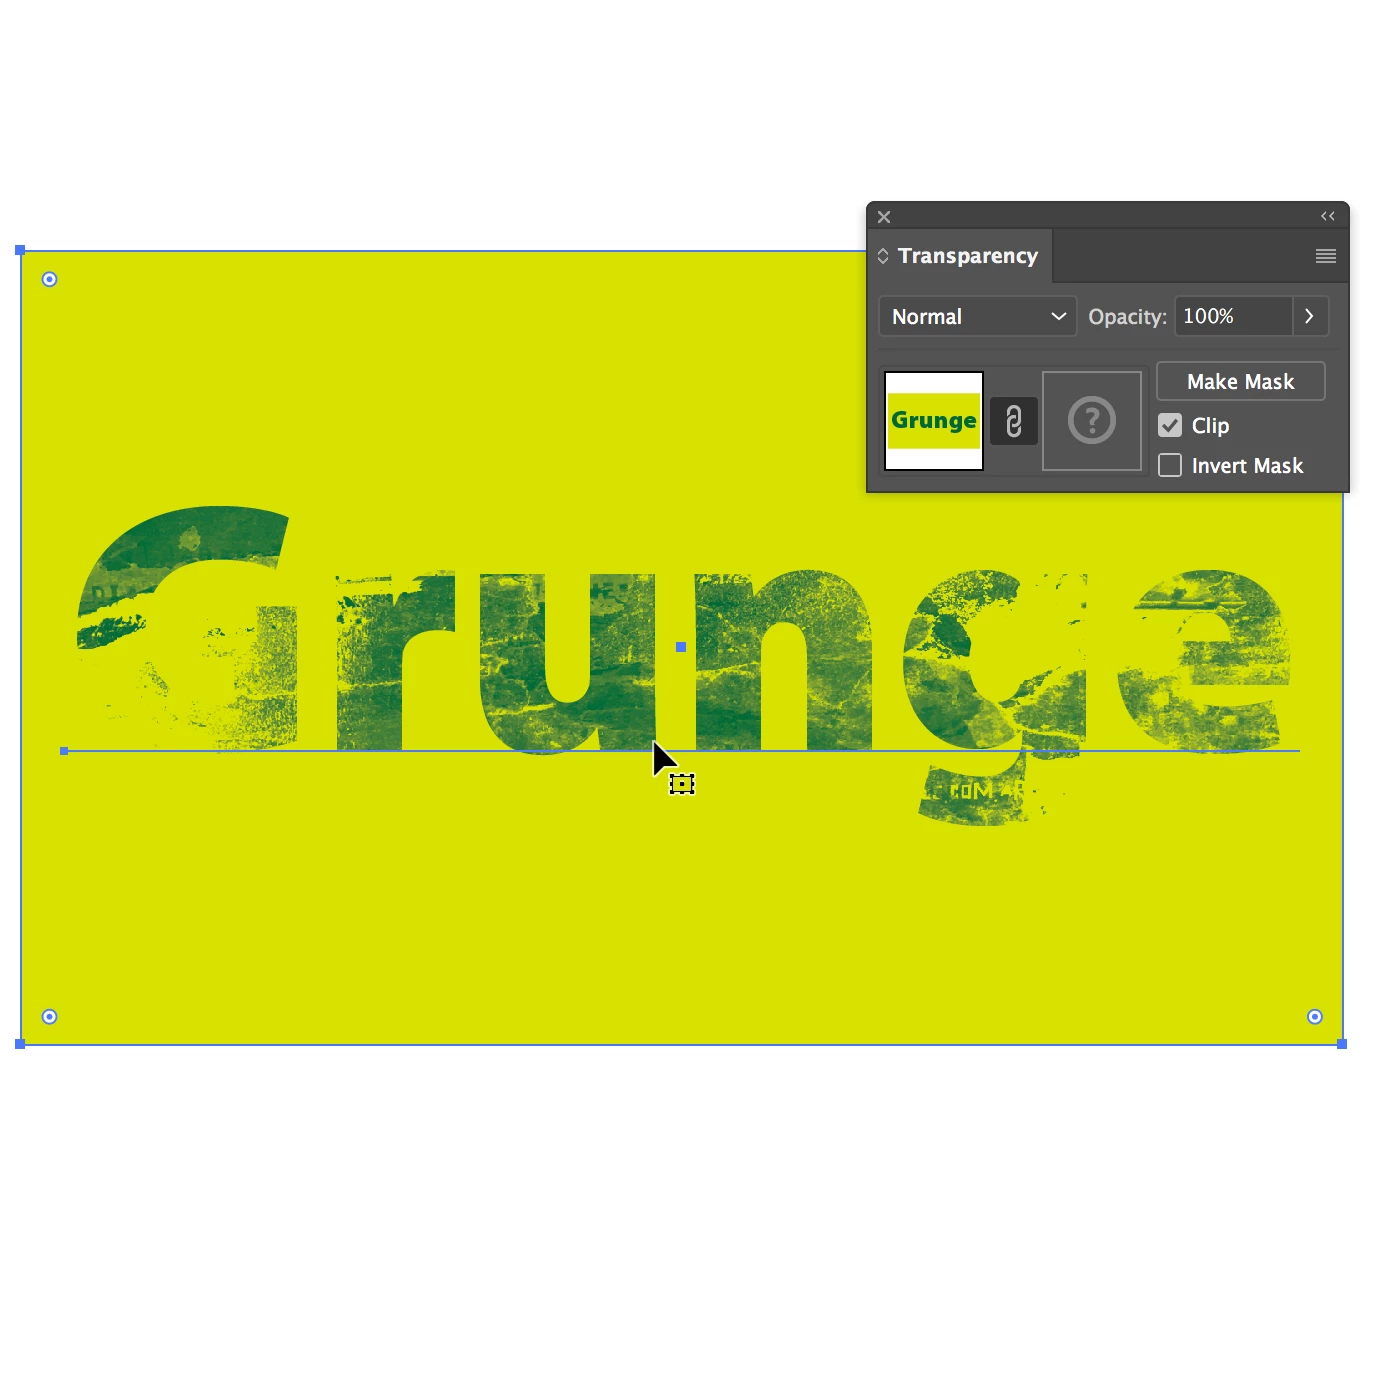
Creating a stamped grainy appearance

New Here ,
Apr 19, 2017 Apr 19, 2017

Copy link to clipboard

Copied

Hi guys! Ok I am looking to make a simple object that is currently filled with black.....To be specific a black silhouette of a wombat. I am creating a repeating pattern but I need my black wombat image to look like a stamped effect.....So that it has some transparent holes etc that allows the bottom colour of the fabric to come through. Like a washed out texture. I have experimented with the effect gallery grain texture but it puts a white speckled overlay and not transparent. I also tried using a charcoal brush that made a scattered speckle look but once again this was over the top of the wombat and you cannot make a transparent brush! I then tried manually to make a scattered of holes throughout the image with the eraser...It looked awful. I wish I could attach a picture of the effect I am after. I basically want the wombat to appear washed out or like it has been stamped with the fabric colour showing through randomly throughout the wombat object.  My other option would be to create a rubber stamp myself of the wombat....Dip it in stamp ink....Stamp away until the third or fourth stamp looks faded etc with not enough ink....Then scan that in! But I don't have a stamp!! Want to create this look digitally. Even a washed out water colour look......But it needs to add transparency to my current object.....Not a wash over the top. My goodness this sounds so confusing. Good luck people!!

Views

3.4K

Translate

Translate

Report

Report
Community guidelines
Be kind and respectful, give credit to the original source of content, and search for duplicates before posting. Learn more
community guidelines

correct answers 1 Correct answer

Community Expert , Apr 19, 2017 Apr 19, 2017

Also, you can use an image as an opacity mask.

I place this image

01_Grunge.png

Then I moved the text behind the photo >>

02_Grunge.png

Select both objects and in the Transparency Panel click the "Make Mask" buttom.

03_Grunge.png

You can change the color of the text without problem

04_Grunge.png

Highly recommend this plug-in to control textures in Illustrator: Texturino - Astute Graphics

Best Regards

Votes

Translate

Translate
Adobe
Advocate ,
Apr 19, 2017 Apr 19, 2017

Copy link to clipboard

Copied

to do this i normally use what would be called a 'grunge' texture, you can find plenty of free ones online. there will be some free vector textures, that will be really heavy work for Ai to use, but if youre design is small you can use that to directly fill your shape, or use your shape and the vector grunge texture along with the path finder tools, to chop out your design from the grunge.

you may get better results by using your ai vector design and taking it into photoshop, you'll have more control over the rough look and blotchy appearance etc.

if you can't find a decent texture, you can place an image (you'll definitely find a good grunge texture as jpeg online) then you can use the image trace function to create your own vector grunge.

all in all, test your design and cutting / fill results using a simple shape first to ensure you are using the right option, 'minus back' 'intersect' etc from the pathfinder palette, hen you won't be waiting ages for it to process, only to see it chopped the wrong part and left the waste behind for you.

Votes

Translate

Translate

Report

Report
Community guidelines
Be kind and respectful, give credit to the original source of content, and search for duplicates before posting. Learn more
community guidelines
Community Expert ,
Apr 19, 2017 Apr 19, 2017

Copy link to clipboard

Copied

Also, you can use an image as an opacity mask.

I place this image

01_Grunge.png

Then I moved the text behind the photo >>

02_Grunge.png

Select both objects and in the Transparency Panel click the "Make Mask" buttom.

03_Grunge.png

You can change the color of the text without problem

04_Grunge.png

Highly recommend this plug-in to control textures in Illustrator: Texturino - Astute Graphics

Best Regards

Votes

Translate

Translate

Report

Report
Community guidelines
Be kind and respectful, give credit to the original source of content, and search for duplicates before posting. Learn more
community guidelines
Advocate ,
Apr 19, 2017 Apr 19, 2017

Copy link to clipboard

Copied

And that's why you're an ACP!

I've used the opacity mask before but usually to use a vector gradient as a mask, never thought to use an image before! Awesome.

Votes

Translate

Translate

Report

Report
Community guidelines
Be kind and respectful, give credit to the original source of content, and search for duplicates before posting. Learn more
community guidelines
Community Expert ,
Apr 19, 2017 Apr 19, 2017

Copy link to clipboard

Copied

Thanks!

Votes

Translate

Translate

Report

Report
Community guidelines
Be kind and respectful, give credit to the original source of content, and search for duplicates before posting. Learn more
community guidelines
New Here ,
Apr 24, 2017 Apr 24, 2017

Copy link to clipboard

Copied

Thank you so much....I used this approach and found a nice marble water colour texture in the end. It looks amazing on my animals.....But then as I zoomed in on the images I realise there are actually no holes in the image....It's actually just the black colour with less and less transparency.....Making it look lighter or like there are holes. I don't think the screen printer will handle this....They will need to either print the black spit or the no fill spot. I am sure this prob does not make sense. I am going to try some other textures grains now and see if I can actually make one with holes throughout the wombat. If you have ideas please let me know. Maybe it was just my watercolour texture as your grunge image above definitely looks like it has holes!!!

Votes

Translate

Translate

Report

Report
Community guidelines
Be kind and respectful, give credit to the original source of content, and search for duplicates before posting. Learn more
community guidelines
Community Expert ,
Apr 24, 2017 Apr 24, 2017

Copy link to clipboard

Copied

when i need something like this, i'd image trace the image you want to use as an opacity mask in just black & white.

Votes

Translate

Translate

Report

Report
Community guidelines
Be kind and respectful, give credit to the original source of content, and search for duplicates before posting. Learn more
community guidelines
New Here ,
Apr 24, 2017 Apr 24, 2017

Copy link to clipboard

Copied

thank you Doug. Sorry and then make clipping mask?

Votes

Translate

Translate

Report

Report
Community guidelines
Be kind and respectful, give credit to the original source of content, and search for duplicates before posting. Learn more
community guidelines
Community Expert ,
Apr 24, 2017 Apr 24, 2017

Copy link to clipboard

Copied

If you want to use an image, you can play with the contrast to create more "holes"

100% White = Hole (100% transparency)

100% Black = No Hole (100% opacity)

Check the example:

At the right, you can see the image that I use as a mask

Grunge02.jpg

Thanks

Votes

Translate

Translate

Report

Report
Community guidelines
Be kind and respectful, give credit to the original source of content, and search for duplicates before posting. Learn more
community guidelines
New Here ,
Apr 24, 2017 Apr 24, 2017

Copy link to clipboard

Copied

Hi there! Your ge on the bottom row might work for my purposes. Can I ask what the texture is called and I will find something similar...And what you set the % as for transparency? Appreciate your help.

Votes

Translate

Translate

Report

Report
Community guidelines
Be kind and respectful, give credit to the original source of content, and search for duplicates before posting. Learn more
community guidelines
New Here ,
Apr 24, 2017 Apr 24, 2017

Copy link to clipboard

Copied

Sorry Carlos.....And do I need to image trace that texture? Or simply bring it into illustrator and pop it on top of my image to make the mask and adjust transparency?

Votes

Translate

Translate

Report

Report
Community guidelines
Be kind and respectful, give credit to the original source of content, and search for duplicates before posting. Learn more
community guidelines
Community Expert ,
Apr 24, 2017 Apr 24, 2017

Copy link to clipboard

Copied

Hi Angie:

It is not necessary to trace the image, you can use it as it is.

Just place the image.

The texture I used is from old flyers on the wall...

Feel free to use it >> Dropbox - Grunge_Texture.jpg

Best Regards

Votes

Translate

Translate

Report

Report
Community guidelines
Be kind and respectful, give credit to the original source of content, and search for duplicates before posting. Learn more
community guidelines
New Here ,
Apr 26, 2017 Apr 26, 2017

Copy link to clipboard

Copied

Hi Carlos....I cannot seem to adjust the contrast under transparency tab. When I move it below 100% it just makes all of wombat lighter. Where are you adjusting the contrast of that texture and has it been image traced or just paste in as is....Then make transparency clipping mask? Sorry struggling here.

Votes

Translate

Translate

Report

Report
Community guidelines
Be kind and respectful, give credit to the original source of content, and search for duplicates before posting. Learn more
community guidelines
Community Expert ,
Apr 26, 2017 Apr 26, 2017

Copy link to clipboard

Copied

Hi Angie:

Use Photoshop to play with the contrast

Just add an adjustment layer like curves or levels >>

Before

05_Grunge.png

After

06_Grunge.png

Hope this works for you!

Best Regards

Votes

Translate

Translate

Report

Report
Community guidelines
Be kind and respectful, give credit to the original source of content, and search for duplicates before posting. Learn more
community guidelines
New Here ,
Apr 27, 2017 Apr 27, 2017

Copy link to clipboard

Copied

https://www.instagram.com/p/-4L7tDnL0t/

Any tips On achieving this simple texture? Can you see fox print in link above?  My grunge textures are creating too many holes and my water colour textures are not making any holes. Its hard being an amateur....am sure there is simply way to get this simple look? My background will be blue and needs to show through the tiny holes. Sorry everyone. ..I know I have been painful. Angie

Votes

Translate

Translate

Report

Report
Community guidelines
Be kind and respectful, give credit to the original source of content, and search for duplicates before posting. Learn more
community guidelines
Community Expert ,
Apr 27, 2017 Apr 27, 2017

Copy link to clipboard

Copied

Please show your results and your textures.

Votes

Translate

Translate

Report

Report
Community guidelines
Be kind and respectful, give credit to the original source of content, and search for duplicates before posting. Learn more
community guidelines
New Here ,
Apr 27, 2017 Apr 27, 2017

Copy link to clipboard

Copied

Well I cannot even work out how to post a picture here...which is why I sent previous link sorry.

Votes

Translate

Translate

Report

Report
Community guidelines
Be kind and respectful, give credit to the original source of content, and search for duplicates before posting. Learn more
community guidelines
Community Expert ,
Apr 27, 2017 Apr 27, 2017

Copy link to clipboard

Copied

LATEST

You need to use the forum's web interface to post an image.

Votes

Translate

Translate

Report

Report
Community guidelines
Be kind and respectful, give credit to the original source of content, and search for duplicates before posting. Learn more
community guidelines
Community Expert ,
Apr 24, 2017 Apr 24, 2017

Copy link to clipboard

Copied

and then make an opacity mask, usually.

Votes

Translate

Translate

Report

Report
Community guidelines
Be kind and respectful, give credit to the original source of content, and search for duplicates before posting. Learn more
community guidelines