 Adobe Community

Copy link to clipboard
Copied
Hello everyone!
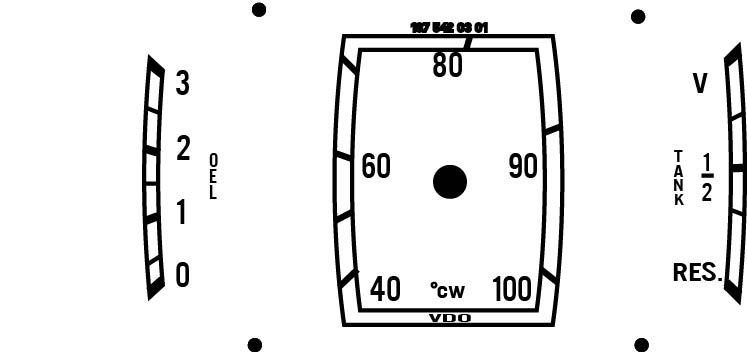
I have this dial is from a 1952 Mercedes Benz and the only part that I am having trouble with is the right and left side areas (Oel and Tank). There is a slight bend that I cannot figure out how to recreate. I can do this with straight lines, but can't manage the bend. I'm thinking that it would pretty much be done like the center area which was covered in a previous discussion. But.... the small top and bottom parts of the rectangle are at a slant and if looking at the left side (Oel) note that the right side of the vertical/rectangle is bent in the same direction as the left side of the vertical/rectangle, which is not the case for the center dial.
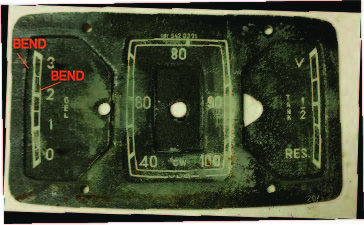
I would appreciate some help with this.
Thanks!!!


 1 Correct answer

Do a Blend between the largest and smallest circles with appropriate steps.
Explore related tutorials & articles
 12
Replies
12
12
Replies
12
Copy link to clipboard
Copied
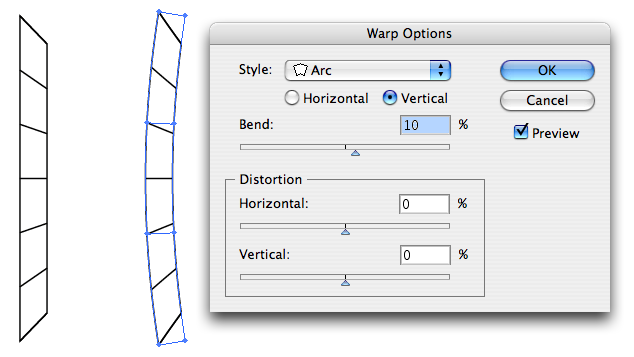
Try experimenting with Object > Envelope Distort > Make with Warp.
Copy link to clipboard
Copied
Steve Fairbairn wrote:
Try experimenting with Object > Envelope Distort > Make with Warp.
Thanks Steve, I actually ended up doing as you suggested and I dealt with the thickened ends by drawing a second line directly against the original line. As soon as I figure out the center dial of this dial panel I will put up a finished picture of the work.

Copy link to clipboard
Copied
jber,
Without my having digged up the old one, the Oel and the Tank look much as mirrors of one another.
You might start out as if there were a top and bottom part as in the centre dial and use the old solution, then remove the top and bottom parts.
I will have a look for the old one.
Edit: Hi Steve.
Copy link to clipboard
Copied
Hi Guys and thanks!
Jacob, I looked at the previous discussion, but this one is a bit different in that (looking at the oel on the left) the top, bottom horizontal parts and the right vertical part are differing thickness' and the previous discussion, all sides had the same thickness.
Hi Steve and thanks, I did think about using the Arc tool, but it also didn't allow for the differing thickness' of the sides. Most (if not all) of these old antique car dial/gauges were hand drawn and that is where my challenge sprouts from, how to apply modern tools to recreate something that was as individual as a thumbprint.
Copy link to clipboard
Copied
Jber,
differing thickness'
You can, after creating the overall shape:
A) Cut the paths and change the thickness of the new paths as desired; there may be a bit of adjustment concerning the end parts, depending on the Cap style chosen;
B) Object>Path>Outline Stroke, then move the relevant Anchor Points by ClickDragging with the Direct Selection Tool (after deselecting, you can Click the relevant path/segment outside the Anchor Points to see them clearly).
View>Smart Guides are your friends.
a series of very thinly drawn circles. Is there a way to quickly or easily draw these circles?
Depending on the regularity and exact pattern, you may create one circle, then use Effect>Distort & Transform>Transform with the right Moves, first horizontally and then vertically (or the reverse).
You may move the circles round and you may create too many, then use a (rectangular) path and make a Clipping Mask to limit their extension.
You may also consider a Pattern Brush with the circles.
Copy link to clipboard
Copied
I actually have 2 challenges within the same dial set with this 1952 Mercedes. This is the Speedometer dial and at first glance, it looks like there is a white or off white background behind the numbers on the speedo face, Zoom in (as much as possible, it's a jpeg) and it becomes apparent that this is not a white background but rather a series of very thinly drawn circles. Is there a way to quickly or easily draw these circles? I know that I can do it individually but that would take eons. 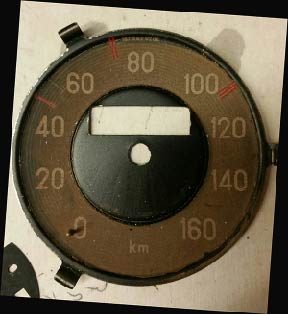

Copy link to clipboard
Copied
Jber505 wrote:
Zoom in (as much as possible, it's a jpeg) and it becomes apparent that this is not a white background but rather a series of very thinly drawn circles.
Make a blend.
Please provide larger images, the detail you're referring to is barely noticeable.
Copy link to clipboard
Copied
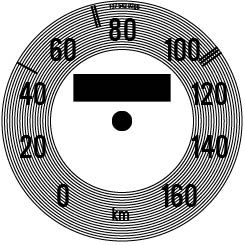
Do a Blend between the largest and smallest circles with appropriate steps.
Copy link to clipboard
Copied
Thanks for the idea of using a blend, it worked perfectly for the numerous circles. Here is the finished dial (speedo).
Copy link to clipboard
Copied
ok, thanks everyone! Going to give this a try now and I will post the finished dial (assuming I can pull this off lol) and far as bigger image desired, your right and I will try to keep that in mind next time, especially with details such as these.
Copy link to clipboard
Copied
I did it! got it all done and here is the finished dial panel
Thanks everyone, I really appreciate the help!
Copy link to clipboard
Copied
Very nice, Jber.

 AdChoices