


Copy link to clipboard
Copied
I'm trying to follow this Envato tutorial. In it, the author has a simple radial gradient from white to 0% opacity. Somehow she's set it up so that the white obscures everything below creating a nice vignette. I have the source file but I can *NOT* figure out how she did it. I've tried every different blend mode, checked appearances, masking mode, etc.
I've been using AI for 20+ years and this issue has me completely stumped. =[
Thanks in advance.


 1 Correct answer
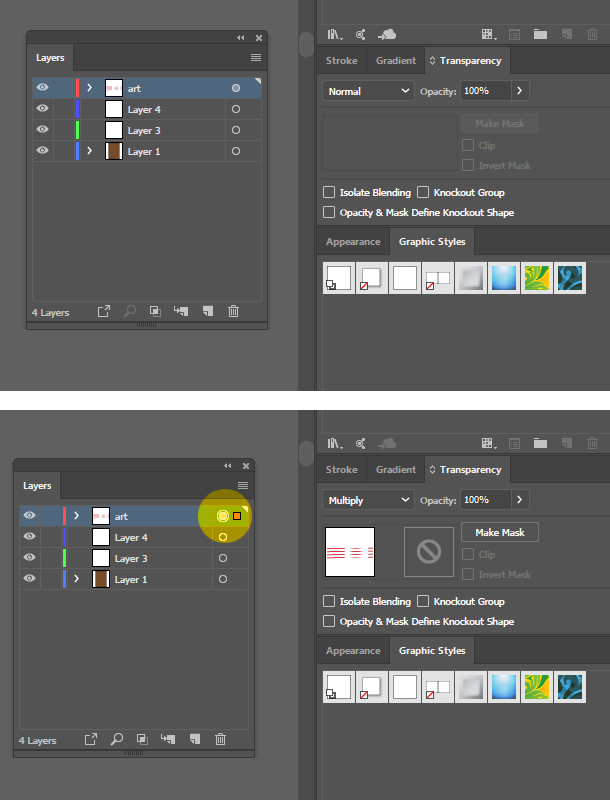
I figured it out - tho I can't explain how to describe this technique.
The LAYER Blending Mode is set to "Normal. But when you select the little radio button to the right of the layer name ("art"), THERE you change the Blending Mode to "Multiply". Now everything below the radial blur IN THAT LAYER will be masked off. This is different behavior from Opacity Masks.
Thanks for all the suggestions.
Explore related tutorials & articles
 7
Replies
7
7
Replies
7

Copy link to clipboard
Copied
And in which part of this tutorial do we find the technique?
Have you checked the layers panel in the source file?

Copy link to clipboard
Copied
Other than the first 2 tutorials, these are not free, so I don't know what tutorial you are talking about and couldn't see it anyway. Can you provide a screenshot of the effect you want so we can see what you are trying to achieve? Or post a screenshot of the source file with the layers panel expanded and the appearance panel showing with the gradient selected.

Copy link to clipboard
Copied
Guessing:
https://forums.adobe.com/people/Arn+Sweatman wrote
a simple radial gradient from white to 0% opacity. Somehow she's set it up so that the white obscures everything below creating a nice vignette.
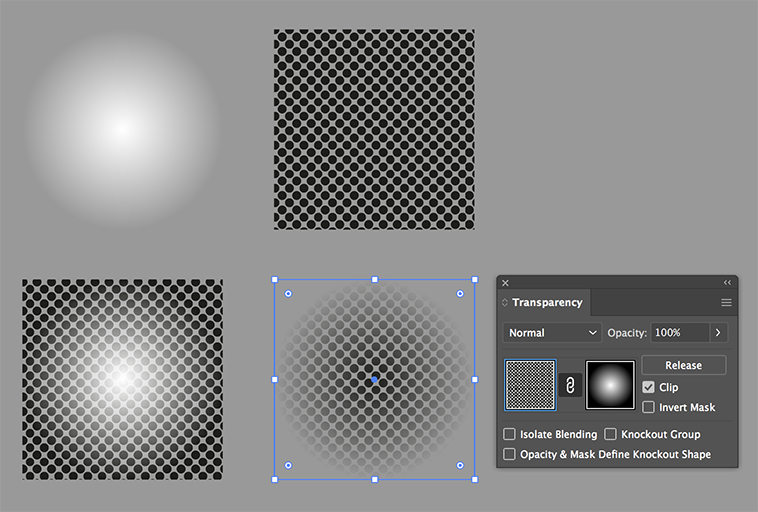
Fill an object with the gradient and put it on top of everything you want to obscure.
Select both the object with the gradient and everything you want to obscure.
Go to Window > Transparency and click: Make Mask
Depending on the direction of your gradient, check Clip or Invert Mask
Copy link to clipboard
Copied
Copy link to clipboard
Copied
I figured it out - tho I can't explain how to describe this technique.
The LAYER Blending Mode is set to "Normal. But when you select the little radio button to the right of the layer name ("art"), THERE you change the Blending Mode to "Multiply". Now everything below the radial blur IN THAT LAYER will be masked off. This is different behavior from Opacity Masks.
Thanks for all the suggestions.

Copy link to clipboard
Copied
That is not a mask, but a Layer Blending Mode.
It is not a gradient mask, it blends with all layers below it.
It may look like a mask when you have a white layer below it, but it will be different with colored objects below it.
Copy link to clipboard
Copied
The layer blending mode ended up being the solution to the *gradient mask* to which it was applied.

 AdChoices