

How to add different bleed size to any direction

Copy link to clipboard
Copied
Good day guys!
Beforehand, thanks a lot for your time and I am truly sorry for this question because it involves a lot of steps. Probably the title of my question is not that clear, here is my situation. I work in a large format printer company and we install print jobs in buildings where normally I have to cut an image in several pieces in order to have every single panel for each window plus mullions, the problem is when I have all the panels ready I have to add bleed in different ways depending on the material and the job specification, for example, some times I need to add bleed all around a panels, which is not a problem because I could offset the path, now, there are a lot of times when panels are different in size and I am requested to add bleed only on the right and at the bottom, or just one side, this is a really hard task when I have to prepare 60 panels plus mullions. There is another problem, some times bleed will be different on each side, for example: 2" on the right and 6" at the bottom. Panels are always squares, I don't think this script will work on a different shape, in that case, I think the panel should be treated separately.
Is there any way to create a script, after selecting all the panels, that could give me the opportunity to introduce the data needed in which side I need the bleed and the amount in inches of each side, the result should be similar to "offset path" (create new shapes) and automatically paste all these new shapes in a new layer. There is a script that found two years ago that I use everyday and it has an awesome interface I would like to share with you in order to give you an idea how I am picturing the new script in question. The script is "MakeCropMarksAI_v_1_4", https://sites.google.com/site/dtpscripting/illustrator-scripts/makecropmarksai
You will find bellow something that I did that could help to understand what I have in mind, just as a reference.
I am working on PC, Illustrator CC and windows 7.
Once again, thanks for your time, and I hope there is a good Samaritan available to create this master piece not only for me but for too many people I know they need it. I am creating a new youtube channel where I am planing to share all I know and I would like to give this script to everybody.
Walfred Candiales


Explore related tutorials & articles
 6
Replies
6
6
Replies
6
Copy link to clipboard
Copied
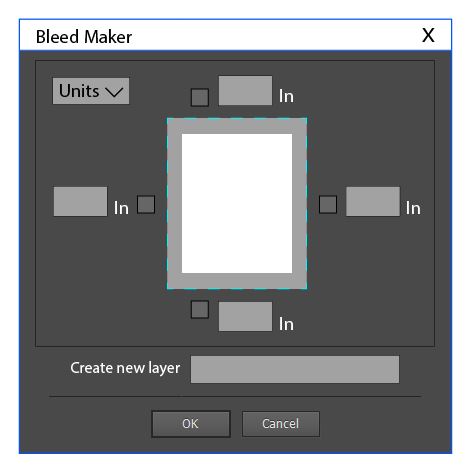
You need different bleeds on each of the 4 sides of the paper?
Maybe ask the author of the script to add this feature?
Copy link to clipboard
Copied
Hi o-mart!, well, files are prepared in just one document where you will find the actual artwork scaled down. The bleed in question will be applied to shapes inside of the document and some times we need to add an even bleed all around or with some variations depending on the job, some times in three or two sides, is never constant as you can see. After the panels are finally done, we delete all the inverse and then we select from the "presets" tab the option "fit to selected art", that will be the final document size for printing. Just imaging doing this to 50 different panels in one document, very exhausting task.
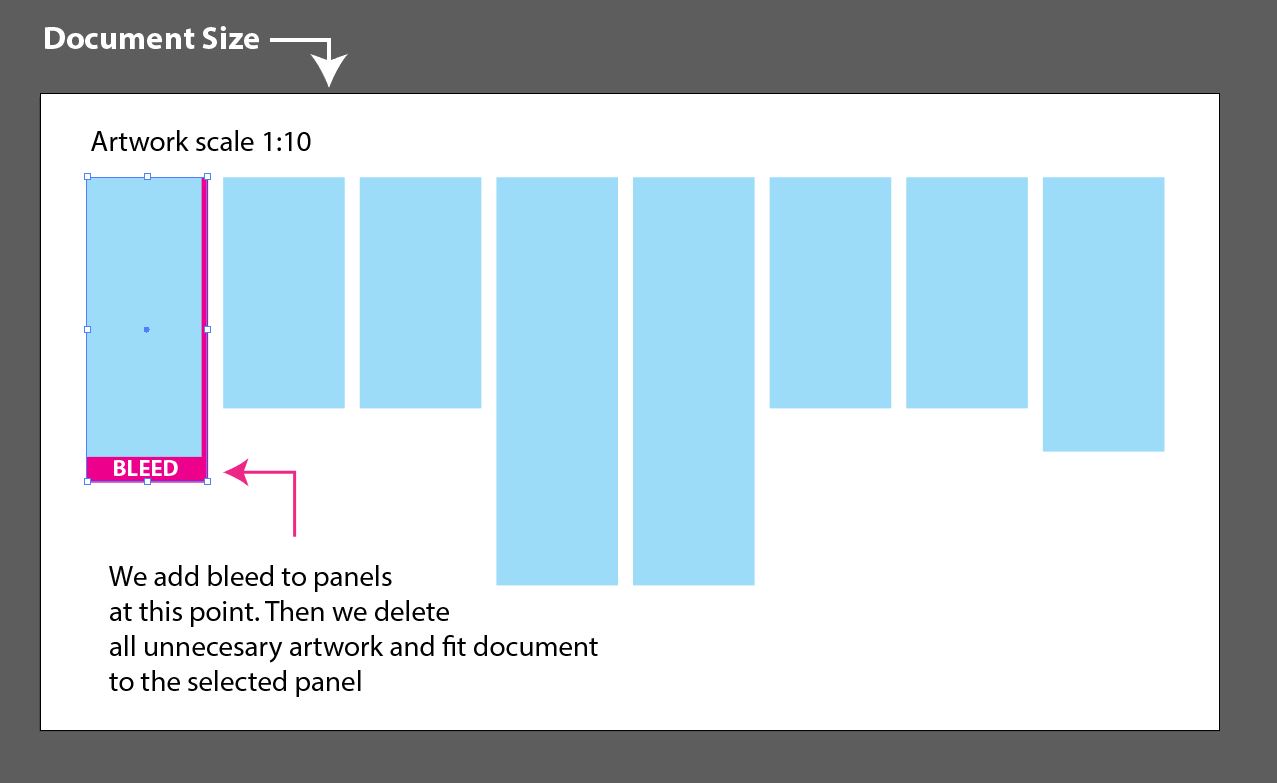
Here is a visual example:
Did you mean the author of the MakeCropMarksAI_v_1_4 ?, not sure how he/she could add this to a crop marks plugging, maybe asking him/her won't hurt. Let me see if I can find some information about him/her.
Thanks !
Copy link to clipboard
Copied
Can you give me the .ai file, which goes to print? More complex file.
Then it will be clear how the script should look like, and its interface.
Thank you!
Copy link to clipboard
Copied
Awesome!, tomorrow morning will be the first thing to do as soon as I get to my office, I will save a low res file of a good example showing you the different layers used in order to prepare for printing, very basic but straight to the point.
Thanks a lot o-marat !
Walfred.
Copy link to clipboard
Copied
Good day o-marat!
Yesterday I did what you suggested, I contacted the author of MakeCropMarksAI_v_1_4 and he has another script very close to what I need, lets wait for him to see if he finds spare time to work on the new features that need to be added.
In the mean time, I am going to leave a more complex file for you, without obligation of course, so you can probably have something working on your head just in case Sergey is not able to work on that. I will keep you updated.
https://www.dropbox.com/s/zvn6j7gsyswwevw/Store%20492%20Appleby%20Crossing_mock-up.ai?dl=0
Thanks a lot man!
Walfred.
Copy link to clipboard
Copied
Walfred, hello!
Thanks, now everything is very clear!
Now became apparent why the different fields (and now I know what mean the term "mullion"  ).
).

 AdChoices