


Copy link to clipboard
Copied
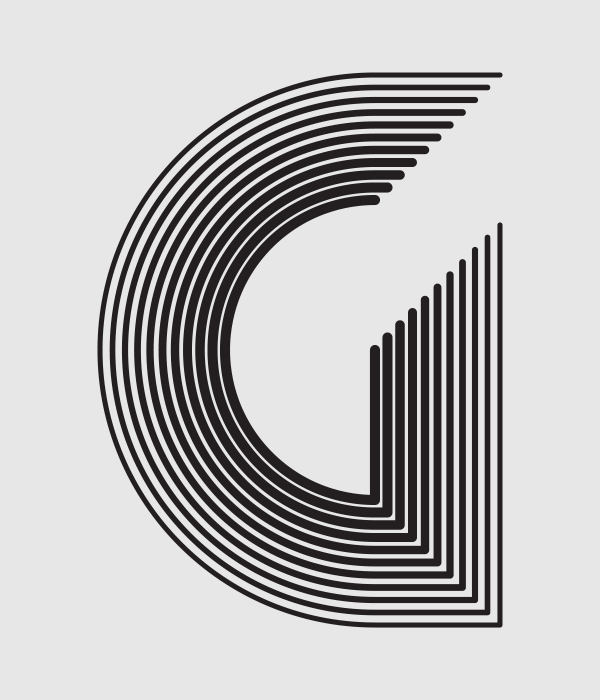
I am looking to create a design that has the same look as a logo I saw but I can't seem to find out how it was made. Most of my searches have led me to videos on "Stroke Offset" & "Offset Path" but I don't think either of these are what was done. If anyone could please help me I'd really appreciate it! Below is the logo. Does anyone know the steps on how to make this? .png)


 1 Correct answer

clevelandb,
You could use a Blend, for each letter shape, presuming stroke/nofill (Round Cap/Join):
1) Copy the original and scale up to the desired outer size (about 4 2/3 times in the image), you can also set the copy Stroke Weight if you wish to have linear decrase, see under 3);
2) Select both original and copy and Object Blend>Options>Spacing, set the desired number of intermediate steps (9 in the image);
3) Object>Blend Make, the Object>Blend>Expand and change the strokes as desired, colour an
...Explore related tutorials & articles
 6
Replies
6
6
Replies
6
Copy link to clipboard
Copied
clevelandb,
You could use a Blend, for each letter shape, presuming stroke/nofill (Round Cap/Join):
1) Copy the original and scale up to the desired outer size (about 4 2/3 times in the image), you can also set the copy Stroke Weight if you wish to have linear decrase, see under 3);
2) Select both original and copy and Object Blend>Options>Spacing, set the desired number of intermediate steps (9 in the image);
3) Object>Blend Make, the Object>Blend>Expand and change the strokes as desired, colour and Stroke Weight if not set through 1), and for the outer ones further work to get the stipple appearance which is different from simple dashed lines).
You can go back and forth (Object>Blend>Release) to get it right.

Copy link to clipboard
Copied
The method I would use:
The "D" and "G" start out as half circles with line strokes added to them. Then the path offset command is used to create the farthest objects away from the originals. The paths are cut open to create the open "D" and "G" shapes. The blend tool is used to fill in the 9 objects between the "D" and "G" shapes. Adjust the line strokes, end caps and stroke patterns for the desired look. The example image looks like the person actually went in and sliced and diced each path manually for the dashed patterns for a more random look than an even repeating pattern.

Copy link to clipboard
Copied
Looking at this logo - I don't believe you can achieve this specific look with an offset path and maintain the proportions.
I'm guessing it was built by hand with separate strokes for each item. Especially looking at the angle for the lower back of the D and upper front of the G.
Copy link to clipboard
Copied
It's not about maintaining the proportions. It's about maintaining an even distance between the line strokes. If you just scale the "D" and "G" objects proportionately and then perform a blend operation you will end up with uneven amounts of spacing between the line strokes. Look at Jeff's example above. The spacing between the line strokes is fairly even in the mid curve part of the "G". Get to the top and bottom of the curve and the space between line strokes gets wider.
The path offset command is one way to maintain even spacing between the line strokes for all the increasingly larger objects.
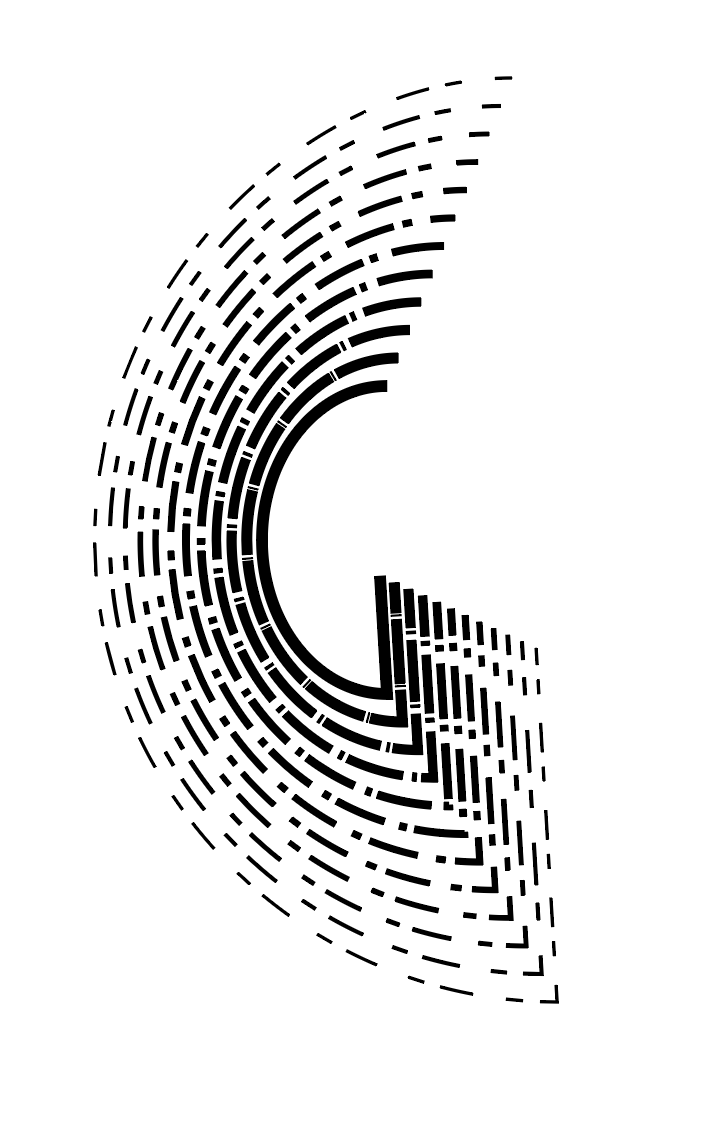
I wish Illustrator had an additional function for the path offset command for multiple copies. Since the "D" and "G" both start with half circle elements it's actually necessary to create two path offsets and blend between those two new objects to get the right look. It's either do that or manually create new offset objects one at a time for 10 times. Below is an example using the path offset process. I didn't bother with all the dashed line effects in order to preserve the obvious look of the even distance between the line strokes.

Copy link to clipboard
Copied
Using a Blend in a way that is similar to what Jacob suggested.

Copy link to clipboard
Copied
you can add a multiple stroke by using appearance panel, but in this case you will not achieve what you want, you can do it manual or. by using blend tool.

 AdChoices