 Adobe Community
- Home
- Illustrator
- Discussions
- How to make dropshadow-like effect on stroke drawi...
- How to make dropshadow-like effect on stroke drawi...

Copy link to clipboard
Copied
Hi,
I have got 1pt stroke line art drawing without fill color. I'd like to add to it dropshadow with one solid light grey to its right side. no blurs, just around 5px lenght solid color. here's a example, not very good but hopefully you'll get the idea: Printable Color Page Digital Coloring Sheet by PurpleDaizieArts
The dropshadow is easy to do for a filled object, just copying and coloring it with color, then sending it back. But I can't do that because lineart is not filled and I need to leavethe inner cells empty. using effects and choocing dropshadow is not an option because I need the shadow to be a vector object.
Thank you in advance.


 1 Correct answer

But you can solve that by adding a Fill instead of a Drop Shadow Effect.
Which may be a better, more flexible solution.
Explore related tutorials & articles
 17
Replies
17
17
Replies
17

Copy link to clipboard
Copied
Tsuya,
As I (mis)understand it, regardless of version you may Direct Select and copy the/each path segment(s), then move it/them by a small increment in the shadow direction, then move copies further until done to your satisfaction. Undo may be your friend.

Copy link to clipboard
Copied
You offset the contour using the respective path commands and fill it. Again, same as in your other post: You need to adapt your thinking and not simply try to apply pixel drawing techniques.
Mylenium

Copy link to clipboard
Copied
Maybe I misunderstand the complexity or your request. It seems an Appearance with offset stroke, saved as a Graphic Style, would fit your needs.

Copy link to clipboard
Copied
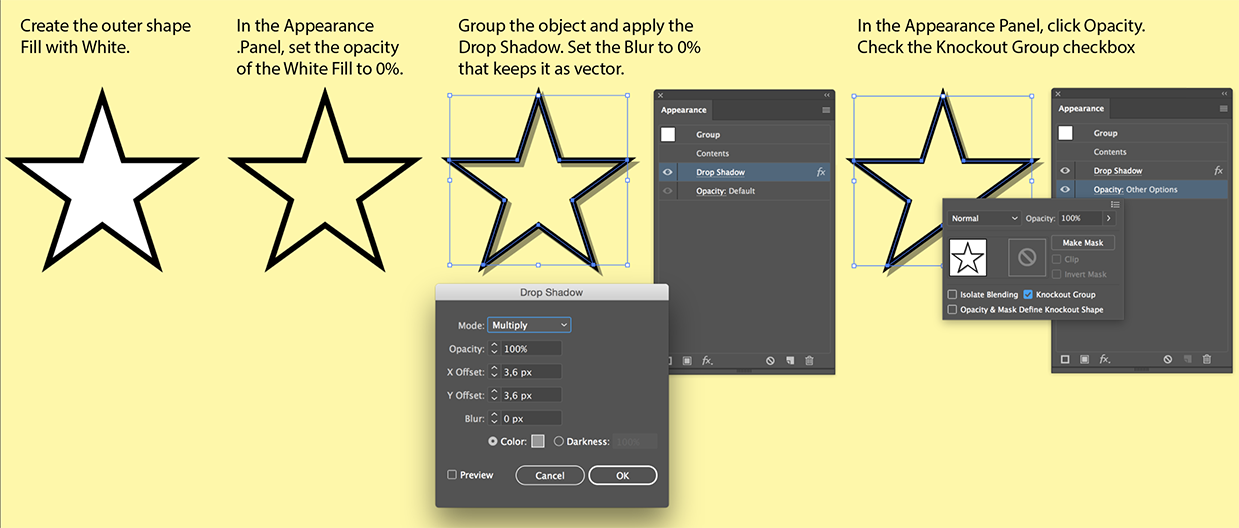
Here's one way that could work for you.
Duplicate the shape.

Effect > 3D > Extrude and Bevel. Position needs to be Front, Bevel: Classic, and Height will determine how thick the edge will be.


Position the original shape on top of the 3D extruded shape and slightly offset. Make sure that the original shape is on TOP. Below is Outline view so you can see the two shapes better.

Select both shapes. Object > Clipping Mask > Make.
Copy link to clipboard
Copied
Try this:
Copy link to clipboard
Copied
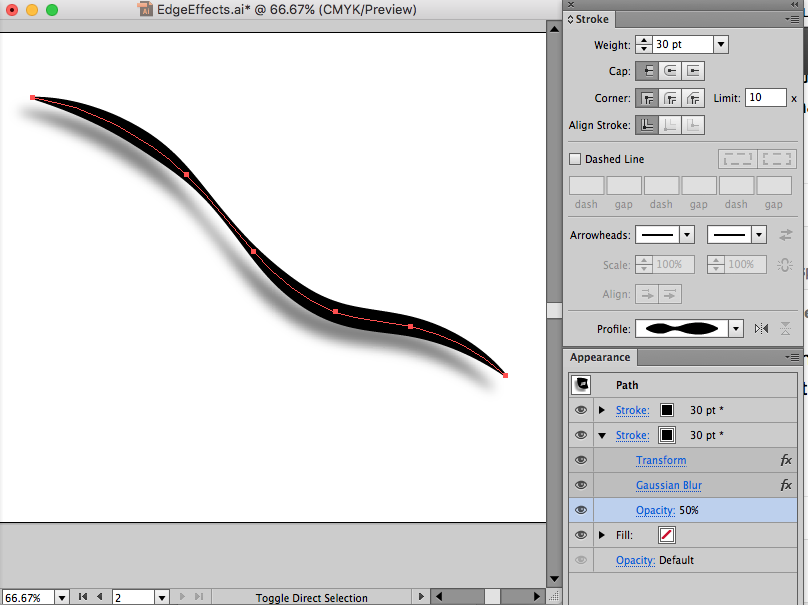
Clever solution! It seems dependent on having the stroke weight the same as the thickness of the drop shadow.
Copy link to clipboard
Copied
Thanks, the thickness of a drop shadow effect on a stroke is always the same as the stroke weight.
Copy link to clipboard
Copied
But you can solve that by adding a Fill instead of a Drop Shadow Effect.
Which may be a better, more flexible solution.

Copy link to clipboard
Copied
Thank you for so many answers!
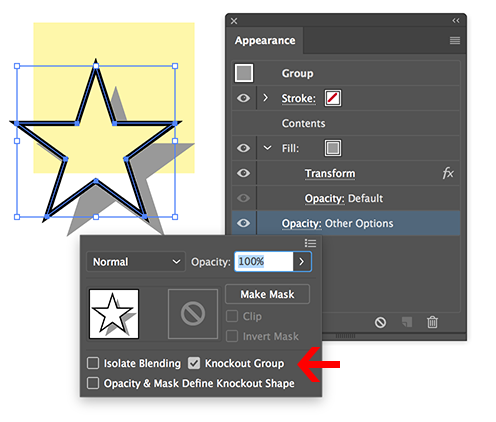
^^That was the answer I was looking for. dropshadow needs to be fill as well. I don't understand how do you add that fill under the stroke object. Grouping the star and...?
Copy link to clipboard
Copied
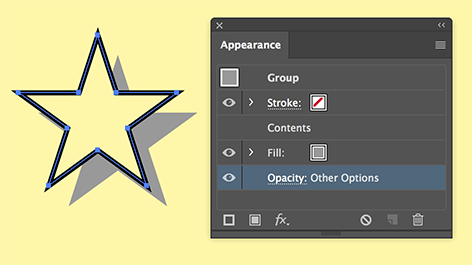
In my first example a fill was added and set to 0% opacity.
Then the object was grouped (it is a single object made into a group).
In my second example I added a new grey fill in the Appearance Panel below the group and moved it with the Distort & Transsform > Transform Effect.
To show the new fill only outside the group, Knockout Group was selected in the Opacity options.
Copy link to clipboard
Copied
Hey wow,
Thanks a lot! this was helpful. That was exactly the solution I needed. Btw, is grouping necessary? I use it for different things and never imagined that could be used for some other methods as well. Just weird, in a good way 
Thank you.
Copy link to clipboard
Copied
Good to hear that worked for you.
Yes, grouping is necessary it Knocks out Groups.
Copy link to clipboard
Copied
Ah, of course! What a silly question .

Copy link to clipboard
Copied
not so silly. you don't actually need to group to use knockout group.
Copy link to clipboard
Copied
Now I am silly 
Yes, if it is a single object with multiple fills and strokes in the Appearance Panel than the Opacity option at the bottom works too.
Copy link to clipboard
Copied
Thank you.
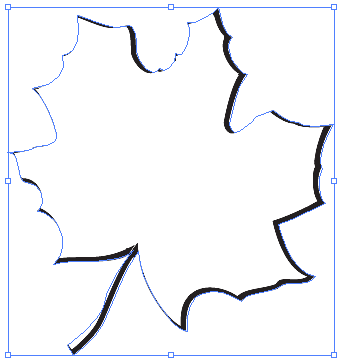
Btw, I have got an another question. How about if the object is a complicated fill without strokes? Like some line art drawing, but the lines are fills. here's some example of a line art image https://m.shutterstock.com/images/376286884
Any quick suggestions?
Copy link to clipboard
Copied
That looks like the result you get when you autotrace an image.
Duplicate the layer in the Layers panel and Hide the top layer.
I would choose Object > Compound Path > Release
Make it into a single shape the resulting objects with the Pathfinder panel > Unite
Ungroup the result and apply the same technique as above (make the fill Transparent, add a new fill below, Transform the fill and use the Knockout Group).
Show the top layer.

 AdChoices