- Home
- Illustrator
- Discussions
- I've enabled "Display All Blacks Accurately" but n...
- I've enabled "Display All Blacks Accurately" but n...
Copy link to clipboard
Copied
I am creating artwork for a foil wrapper for a trading card pack. The background color (a large rectangular path) will be blended with the foil in a sort of multiplicative printing pass, but there are several other elements which we want to appear true to color. In order to do this, our printer is having us create a white layer, where any assets in black will receive a white pass before the color pass, to make them print accurately and not in that multiplicative way previously described.
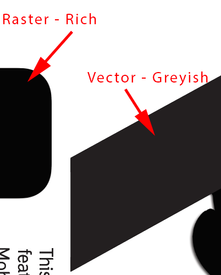
The color layer is composed of raster images (character art and company logos) and vector elements (text, paths, ec). I have a duplicate of all these color elements for the white layer, where all the mentioned elements are black. Herein lies my issue!
I have the project settings set to: "Display All Blacks Accurately" and "Output all Blacks Accurately." I am setting my paths not to 0C 0M 0Y 100K black, but rather to a Rich Black setting of 70C 50M 30Y 100K. However, all my paths in the white layer appear greyish, as you would expect from 100K black. The raster elements in the white layer are appearing rich black, as intended.
I tried to do this also by making a spot color swatch in rich black, but no luck there. If I change my output to Output as Rich Black, that doesn't seem to do the trick either when I actually output to PDF.
I'm fairly new to this and am totally lost as to the proper way to set this up. Can someone point me to the right way to set up such a white layer? How can I get all these blacks to look the same, for the purpose of this white layer?
Thanks!
ps - I'm using Illustrator 2020 (21.4.3) and OSX Catalina 10.15.5
 1 Correct answer
What file format are you using for your placed file?
You need to create your white plate in photoshop using
https://helpx.adobe.com/photoshop/using/printing-spot-colors.html
Name your global spot swatch EXACTLY the same in Illustrator. I recommend using "WHITE".
Then select all of your colored items, and use transparency palette blend mode of multiply.
Forget about using overprinting in attributes, that is a very outdated way. You need to use View >> Overprint Preview with that and has more
...Explore related tutorials & articles
Copy link to clipboard
Copied
What file format are you using for your placed file?
You need to create your white plate in photoshop using
https://helpx.adobe.com/photoshop/using/printing-spot-colors.html
Name your global spot swatch EXACTLY the same in Illustrator. I recommend using "WHITE".
Then select all of your colored items, and use transparency palette blend mode of multiply.
Forget about using overprinting in attributes, that is a very outdated way. You need to use View >> Overprint Preview with that and has more chance to make mistakes.
To see the white, I put a tint of 22m in there. Does not matter as will print in a channel in the end.
Use window >> Separations preview to proof your work. Turn on overprint preview there, and play around with option clicking the eyeballs there for solo-ing the visibility of plates.
Copy link to clipboard
Copied
Thanks much for the reply, Mike. I'll give this a shot.
With regards to your question, all of my source raster imagery are PNGs. I'm saving them in a PSD and then opening that in illustrator. I didn't use the spot color method initially, but these images all seem to be appearing and exporting from AI as I'd expect, at least in terms of apparent black tone. My final format is PDF.
The main issue I'm having is that the vector paths I've created in AI are not appearing rich black, but hopefully this spot color process you describe will be the ticket. Going to try that now.


