- Home
- Illustrator
- Discussions
- Re: I want to make a brick-like pattern that follo...
- Re: I want to make a brick-like pattern that follo...
Copy link to clipboard
Copied
There is a brick-like pattern on a geological cross section:
I could draw this in manually but am wondering if anyone knows a way to do it automatically so there is a uniform horizontal distance between vertical separators? I tried creating a brick type swatch, but this created horizontal lines which did not follow the curve of the stratum:
 2 Correct answers


JET
Strata
elfengoura,
I am afraid that James has been away from the forum for some time, but you can still see and use the screenshots, so a new upload would give nothing new.
You can also use some of the other suggestions here, including the links to pattern construction, just as they are.
It may be better to carry on here with so much to refer to than in your new thread here,
and mayb
...Explore related tutorials & articles
Copy link to clipboard
Copied
Just make a pattern. Then you can fill any shape with the pattern.
http://www.creativepro.com/article/easy-pattern-creation-illustrator
http://vector.tutsplus.com/tutorials/text-effects/letter-brick-art/
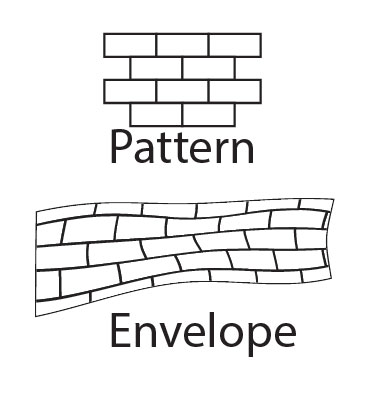
Then use Object > Envelope Distort > Make with Mesh to create a mesh which can then be altered to any shape and the pattern inside will change as well.
Copy link to clipboard
Copied
The second sounds better I tried the first and u can c result above. Ta
Copy link to clipboard
Copied
It should be pretty easy....
Quick and dirty.....

Copy link to clipboard
Copied
Ok, I've got the distort working with a mesh...
Only thing is I'm not seeing how I can use this in strata too readily but i'll keep playing. Thanks for your help. The reason for this is when you draw a grid using the grid tool it asks for how many dividers you want. I'm more wanting a standard vertical divider distance which is applied whereever I set up this brick pattern in the strata. Otherwise I'm not going to get a standard appearance.
What I am going to try to do is set up a brick pattern across the whole cross section, then I will start out with a standard vertical divider distance. Then I can warp it and cut it at faults any way I like.
Copy link to clipboard
Copied
Ok, I've gotten the grid set up, and managed to delete the bottom line of the bottom row of cells, but also first copy the bottom line of this row and join it so I get a line of equal length of the whole group of cells to which I can apply a zig zag transform to get the effect mentioned in the previous post.
Only thing is, and this is apparent in the above image too, the cells have little slivers between them when I apply a mesh distort, possibly because I divided them using pathfinder. Is there a way to merge adjacant cells back together again so there will be no slivers with a mesh distort?
This is the problem I get. How did you make your pattern so it is seamless?
Copy link to clipboard
Copied
it's basic pattern construction. Follow the links I posted earlier.
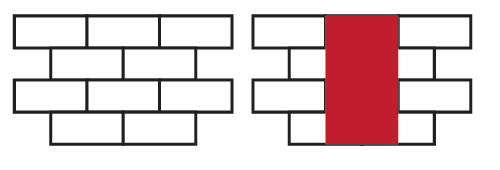
The left side of this image shows the basic pattern artwork.
The red rectangle on the right artwork show where a no-fill, no-stroke rectangle was added, then moved behind all other artork. Then everything was selected and dragged to the Swatch Panel to create a pattern swatch.

Teh no-fill, no-stroke rectangle defines the boundaries of the pattern. It must be behind all other artwork.
Once you have a pattern swatch, simply draw a rectangle (or any shape) then fill it with the pattern. Then apply the Envelope to distort.
Copy link to clipboard
Copied
One other thing:
Object > Envelope Distort > Envelope Options: check Distort Pattern Fills.
You can easily get that wavy bottom edge by applying a smooth zig-zag to a path that matches the bottom edge of the envelope.
Create the rest of the shape with the Pen tool and (clipping) mask the distorted pattern with it.
Then give the mask a stroke.
Copy link to clipboard
Copied
Hi Steve,
Thanks, really helpful!
I'm still getting a sliver between horizontal layers of the pattern when I distort it though. Is there a way to ensure this doesn't happen?
Copy link to clipboard
Copied
Since I'm ultimately trying to use this to create a stratum in a geological cross section I thought I'd try it out:
Honestly it's not what I really wanted. This is because the vertical dividers need to be perpendicular to the curve of the stratum, as manually drawn here:
Since the swatch is made of perfectly vertical and horizontal dividers, it wants to fill my rectangle, or live paint selection, with same. I am able to achieve some perpendicularity of vertical dividers to the curve of the strata by pushing the mesh points around, but nothing what I'm looking for. Surely someone in geology circles has figured this out?
Copy link to clipboard
Copied
You're somewhat looking for CAD type fills in Illustrator. That's not going to happen. AI isn't CAD.
Copy link to clipboard
Copied


JET
Strata
Copy link to clipboard
Copied
amazing. amazing, thank you. Adobe Illustrator is good!
Copy link to clipboard
Copied
Hi, Would you mind uploading these pictures agian!
Copy link to clipboard
Copied
elfengoura,
I am afraid that James has been away from the forum for some time, but you can still see and use the screenshots, so a new upload would give nothing new.
You can also use some of the other suggestions here, including the links to pattern construction, just as they are.
It may be better to carry on here with so much to refer to than in your new thread here,
and maybe post your image here too.
Here is the part of my answer from the new thread, that still applies:
Your first image shows highly irregular stonework. If that is what you want, you can create an Art Brush and use that. The Art Brush will give one instance of the artwork, whereas other will give tiles that are repeated.
You can read (more) about the different kinds of Brushes here (and search for specific ones).
Each of the two pattern tiles in the post by James (JETalmage) shows a simple repeatable tile in a regular stonework, only made (softly) irregular by adaptation, as James showed.
You can make a more varied one with more stones, such as the courses of higher and lower stones you have (still with a bond pattern), but it must be made from a part of the stonework that will fit seemlessly if you repeat it.
I am afraid that James has been away from the forum for some time, but you can still see and use the screenshots here.
In any case, if you have a raster image you will have to start over.
Copy link to clipboard
Copied
This is awesome. Thank you!

