Copy link to clipboard
Copied
So, I really have know idea how to phrase my question in text, so here is a video link
https://youtu.be/f_jWJVRMNBo
*Please know tht in the video I have white grunge image and black grunge image in Illustrator. Please forgive me if I say "Black" when it's clearly White, or visa versa.
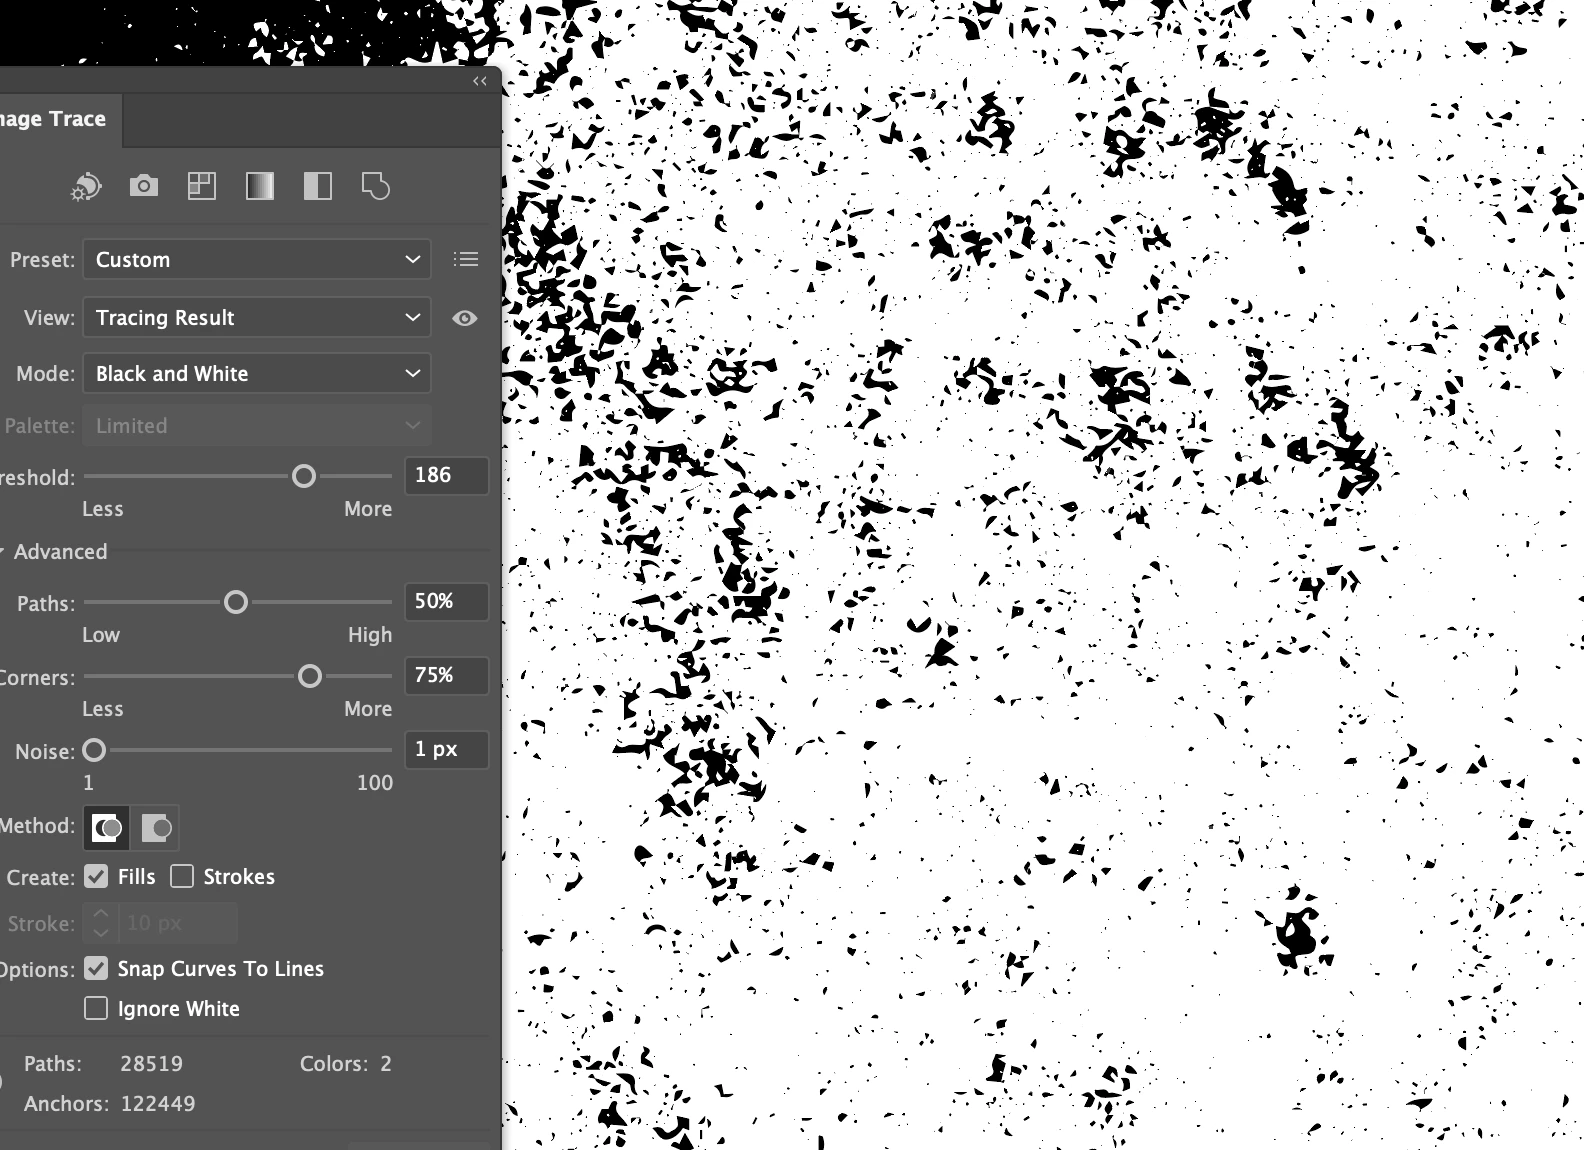
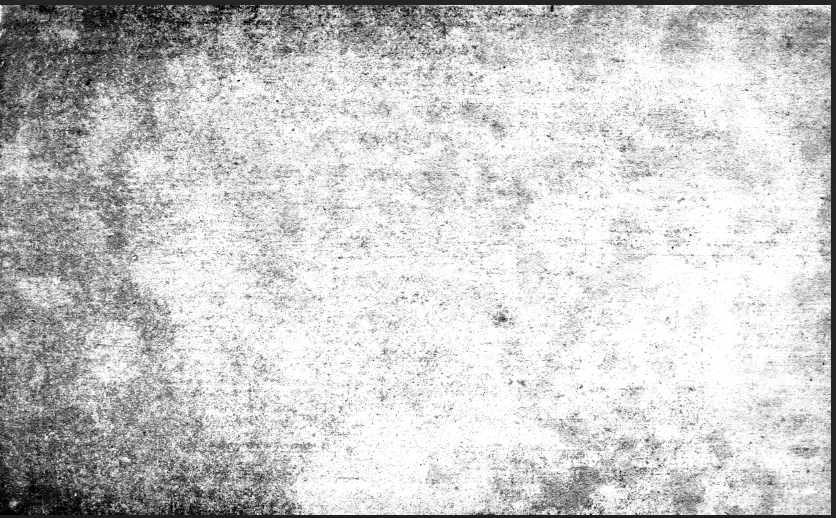
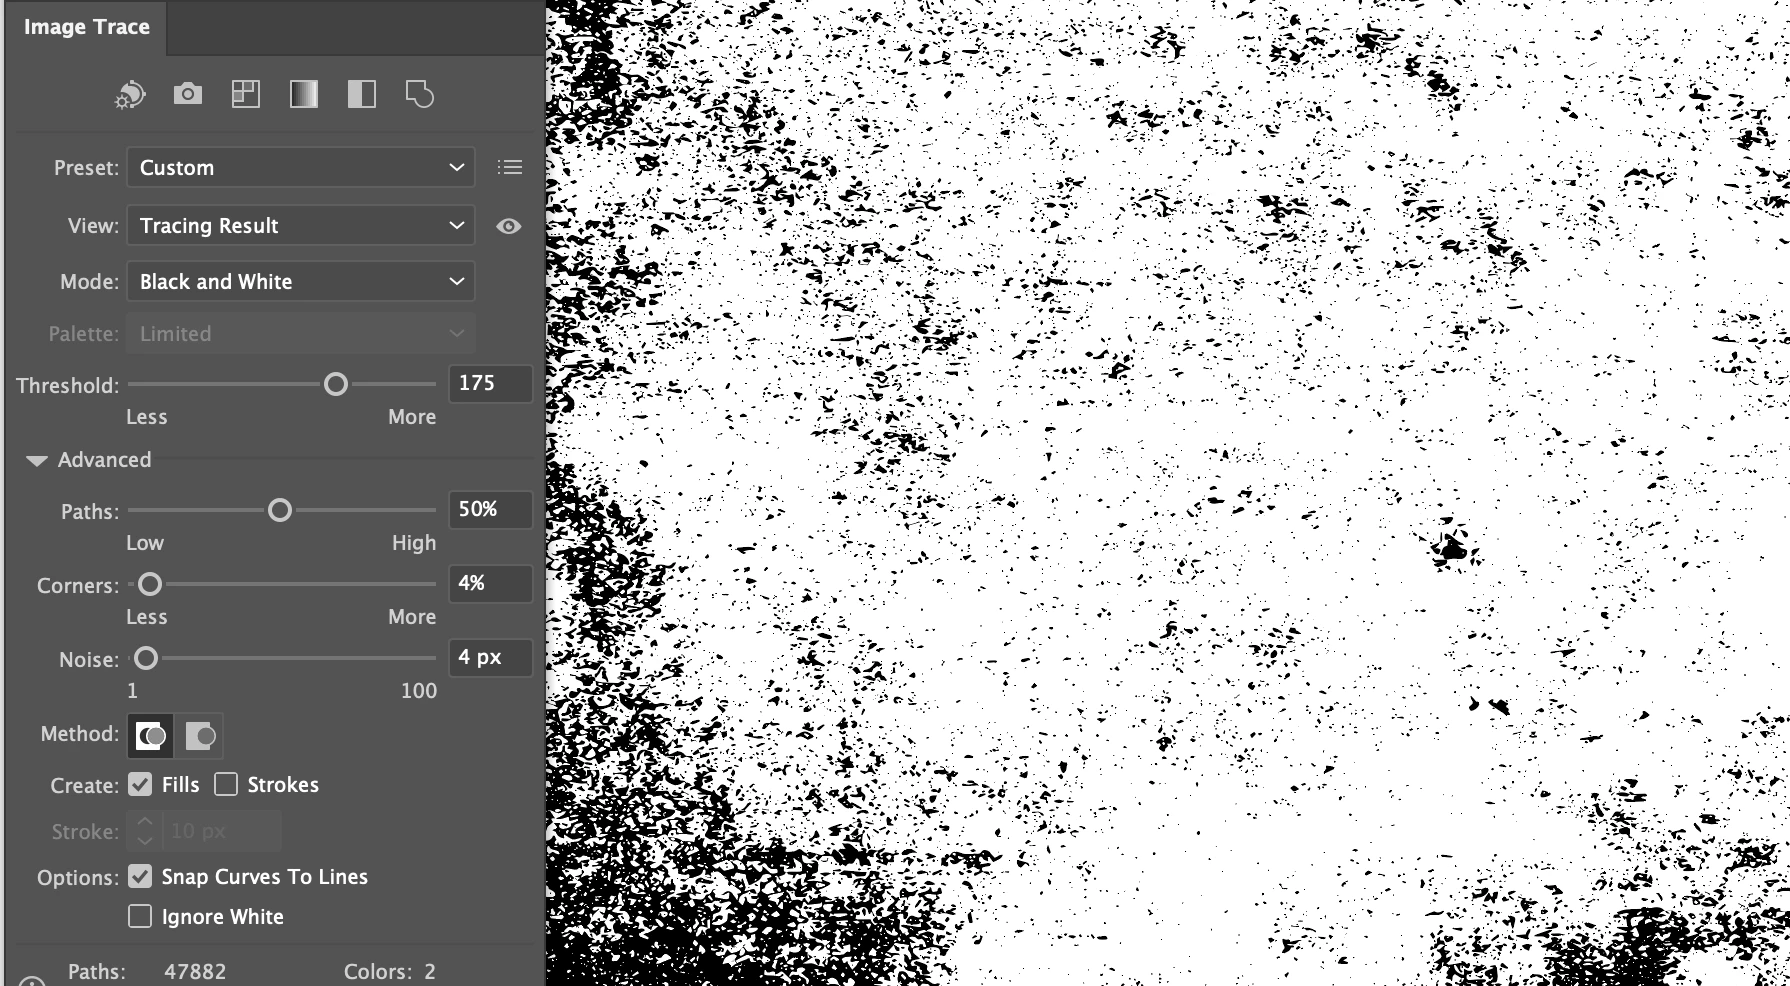
Basically, Im wanting to take a grunge texture image that has transparency, and convert it to vecter, where every thing white/black in the texture is converted, but everything transparent is left out, or seperate somehow for deletion. Ive tried image trace using high and low fidelity, as well as shades of gray. Ive also tried to impor the image as a solid image, no transparency, and used "ignore White". No matter what I do, the Transparent/White sections remain overlapped and mixed in with the rest of the shapes, being nearly impossible to weed out and retin the orginal grunge look. I start deleting too many chunks.
1 Correct answer
The issue with this image is there is very little contrast between values - its a poor source file to start with.
However you can get some results with adjusting your advanced settings.
To achieve better results, I would adjust the contrast in Photoshop first:
Then Image Trace the adjusted image. You'll get a much more detailed result.
Explore related tutorials & articles
Copy link to clipboard
Copied
Can you share the image you're trying to use?
Copy link to clipboard
Copied
 
Copy link to clipboard
Copied
The issue with this image is there is very little contrast between values - its a poor source file to start with.
However you can get some results with adjusting your advanced settings.
To achieve better results, I would adjust the contrast in Photoshop first:
Then Image Trace the adjusted image. You'll get a much more detailed result.
Copy link to clipboard
Copied
Wow! not only was I able to easily remove the white by choosing black and white, Making the adjustments you suggested, the quality was so much better. Reducing corners made a huge difference! Thank you!
Copy link to clipboard
Copied
So sorry, I did have one more question. It actually is an issue Ive run into manyy timeswhen doing Image Trace.
Is there a way to avoid this issue where shapes that intersect do almost an "Exclude" effect (referring to Pathfinder) when expanding?
Is there any way to avoid or correct this?
Copy link to clipboard
Copied
Normally after I Expand I release any compound paths to avoid overlaps.
Copy link to clipboard
Copied
Heres another video. I know that some work places don't allow the viewing of Youtube videos. Im not in any hurry though.
Edit: Is there a big difference between Live Trace and Image Trace? Is Live Trace part of Illustrator 2023? I can't find it under "Object" drop-down.
Ultimately, even after expanding all the compound shapes and then uniting, there are weird inverted artifacts in the shapes. Since there are hundreds, if not thousands of shapes, theres no way I can go through and delete/correct them all. Even with some of the super small shapes, they arn't independant shapes, but rather paths that are part of a larger shape, just twisting and intersecting. Releasing coumpound and uniting doesn't fix this.
I recognize that I may be having far too much in the way of expectations, or even hopes... Maybe Illustrator just isn't capable of these things, but an additional issue is the sharp edges of the shapes. These are meant primarily for Laser engraving projects, so the incredibly small details probably wouldn't be noticeable, but the bigger ones definitely will. Even just graphically speaking, I feel like it'd be important to address this. I need them to be a bit rounder, more fluid/organic. I own Astute Graphics, and some of their powerful tools have saved me big time, but there doesn't seem to be a tool for this particular issue, on a mass level. Just adressing inividual paths.
Wondering if both or either of this issues can be adress during or post image trace.
Copy link to clipboard
Copied
It would be better if you could post a package that contains the original raster image, your AI file with the live Image Trace and the expanded version where you have highlighted the problem zones.
So far I'm seeing grungy structues - which are meant to be chaotic - so complaining about some irregular details in them sounds somewhat contradictory. How do you determine which parts should be chaotic and which parts shouldn't?
Copy link to clipboard
Copied
"Complaing"? *sniffle* that hurts 😞
All joking aside, Im sorry. I really am. To me, "complaining" is an extention of self centerdness and not respecting or appreciating. Im very sorry for being like that (no sarcasm, no snideness). I have nothing but deep appreciation for you Monika, as well as Kevin, Doug, and other pros here. Youve helped me on many occassions, and I never bring anything to the table.
My inquiries were just ment as adendems to my initial goal. To fine tune, not to dismiss or undermine the help given.
You ever lose your car keys, or something that should be in a very scpecific place? You search and search and search, Pockets of other clothes, retracing steps, refrigerator, toaster, everywhere. You go your a family member and ask for help, and in 10 seconds they say "you mean these?", pointing to them on the dresser... 2 inches from where they are supposed to be. Thats me. I struggle to find the right answer and somehow I frequently overlook them when they were right in front of me the whole time.
As you say, Grunge is chaotic. Usually "grunge" is meant to reflect a passage of time, by decay. Its fluid and organic. A memory. The accumilation of rust, dirt, and moisture. The specific "grunge" I am looking to acheive is the image I posted above, which to me is more of a moisture and grime type. These do not generally have sharp edges as they are more of a bleed than anything else. And for this we are not talking about scrapes or scratches. Given how Illustrator doen't covert shades (bleeds) it doesn't do greate about naturually translating shades into either black or white. In most cases, this results in sharp corners. The pink image is an example of how the corners I have been getting are much more sharp, where the second image is an improvement in making the corners more curved, round, and organic.
Tweaking the settings took a while, but I have seen a lot of improvement. It was also a matter of playing with the original image, its contrast and such. Spent 3 and a half hours playing with it, and still not exactly how I want it. But as you can see, its making decent progess in improving the corners, making them more rounded.
Copy link to clipboard
Copied
One - Thanks for the comments. Much appreciated. Two - I commend you for spending 3.5 hours tweaking trying to get a better results. I probably would have started a coping mechanism by hour 2. Hopefully you're saving these as presets for future use!
One huge suggestion I can give when I started making my own texture files is to keep doing what you're doing with tweaking and saving presets. However I would also be looking at better source files to start with and creating/saving presets in Photoshop for creating higher contrast, better resolution starting files.
Copy link to clipboard
Copied
Thank you! Definitely been saving presets. I appreciate the advice.
I started noticing pretty early on that Illustrator can only produce certain result based on the source material, so I've obsessively beeen going back and forth between Photoshop and Illustrator, finding that goldielocks "perfect" balance. That was half of the 3.5hrs lol. I love love love that you can save presets. Helps make comparing between result between source a lot easier.
I kind of wish I knew how actual "grunge" images are made initally. What do the use to get it on paper/canvas (hypothetical question). I made some really cool High Res textures using paint, brushes and roller, then scan. Ive been having a blast using those too since you taught me the ways of Image Trace. Also did a bunch of paint splotches, spatters, sprays, and drops. Can look like paint or blood.
Thank you so much for helping. Its been great.
Copy link to clipboard
Copied
A lot of times its a combination of Illustrator vector art brought into Photoshop to "grunge" it up. It doesn't always have to be start to finish in one application.
Copy link to clipboard
Copied
Edit: Is there a big difference between Live Trace and Image Trace? Is Live Trace part of Illustrator 2023? I can't find it under "Object" drop-down.
By varxtis
'Live Trace' was the name for Image Trace pre-CS6.
Copy link to clipboard
Copied
In Image Trace make sure you are using Black and White logo and then click "Ignore White".
That will give you only a black trace result.
Copy link to clipboard
Copied
I had done this too (sorry for not listing it. My bad), but it resulted in very blotchy shapes. A lot of the imge, even the black portions were left out. I posted the image Im working with in the reply to @Doug A Roberts if that helps.
Copy link to clipboard
Copied
Did you adjust the threshold and other advanced controls?
I use this method almost weekly to create texture overlays for my AI work.
Copy link to clipboard
Copied
Im definitely newish to image trace, which is why I figured Imight be overlooking something obvious. But I feel pretty confident I experimented with all the settings.
Copy link to clipboard
Copied
Hello @varxtis,
Thanks for reaching out. I hope the suggestions shared by Monika, Kevin, and Doug helped with your queries.
Feel free to reach out if you have more questions or need assistance. We'd be happy to help.
Thanks,
Anubhav

