Participant
March 3, 2019
Answered

Need Help w/ Erasing Part of a Circle

  • March 3, 2019
  • 3 replies
  • 20576 views

Okay so I'm new to Illustrator and I'm having a problem with erasing parts of my logo, please help.

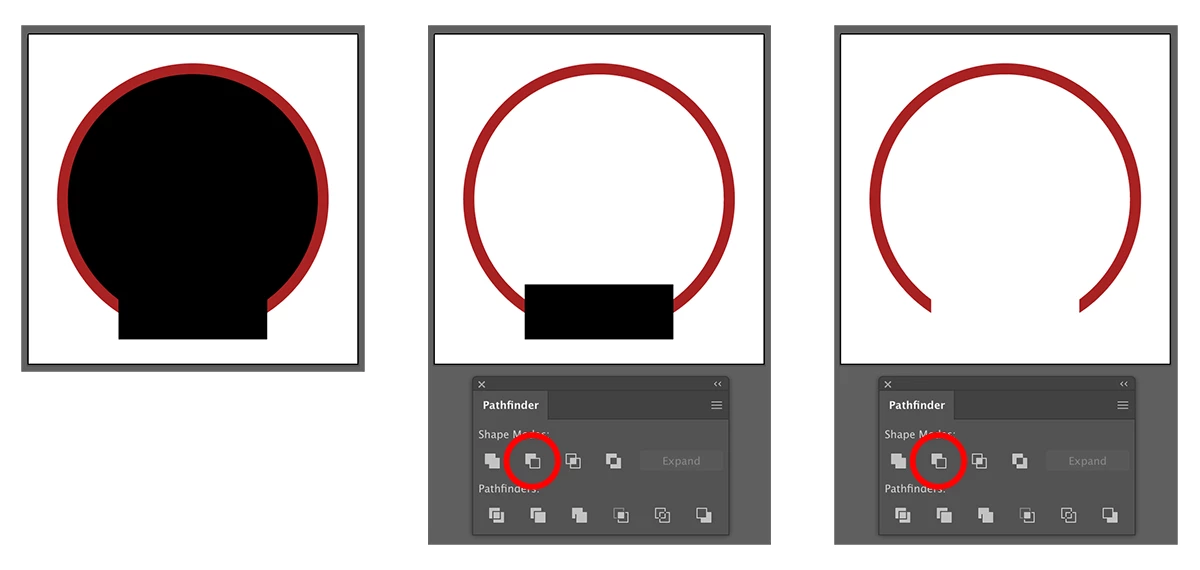
I want to make this a transparent logo so no matter what background color I put it on it will work.  As shown below, I have a filled in red circle, and over that is a filled in black circle, and over that one is another filled in circle with the opacity lowered.  My problem is the filled in black circle.  I need that to be erased so if the background was pink, inside of the circle would become pink.  But, when I delete the inner black circle, the red circle is now showing in place of the black one (shown in 2nd pic).  Basically, I want a red ring around the outside with no fill on the inside.  But another problem I am having is that I want the ring to be cut at the bottom where it says "MASON THE DJ", to create some space from the "MASON THE DJ" and the ring (like how it is in 1st pic).  In the 1st pic I didn't cut the ring, I placed black rectangles near it to create that effect, but I need to cut it completely instead of using the rectangles.  For some reason I cannot cut the ring.  When I try to erase it, it just pushes the circle in, but doesn't actually get rid of the piece.

I know this is confusing, but if someone is willing to video chat or something similar then please let me know because this seems like it should only take a minute and it is taking me FOREVER!!!

This topic has been closed for replies.
Correct answer Michael Bullo

Select the red circle and overlapping black circle. From the Pathfinder panel select the Minus Front option.

Select the red ring and overlapping black rectangle and select the same button.

3 replies

Participant
March 3, 2019

Wow. Thank you so freaking much! I knew it had to be simple but I just couldn't find any easy answers until now. Thank you!

barbara_a7746676
Community Expert
Community Expert
March 3, 2019

As far as cutting out the center of the circle, you could either use Pathfinder or Shape Builder.

Starting with a circle:

Drawing another circle on top of it.

Select both circles. In the Pathfinder panel, click on Minus Front.

OR, you could choose the Shape Builder tool.

Hold down Alt or Option and you'll see a minus sign next to the icon for the tool. Click the area you want to delete.

To remove the bottom piece, you can use similar technique.

Draw a shape over the area you want to delete.

Select both objects and either use Pathfinder Minus Front or hold down Alt/Option with Shape Builder tool and click the object you want to delete.

Participant
March 3, 2019

Thank you very much.  Another question, how would I punch out the black dots that are inside the red ring to also make that transparent? The dots are a Path by the way, not sure if that matters.  I tried selecting the red ring and selecting the dots and clicking Minus Front, but it didn't work.

barbara_a7746676
Community Expert
Community Expert
March 3, 2019

Did you make the dots using a dashed stroke with settings like this -- round cap and zero dash?

If so, next step is to select the dotted stroke and choose Object > Path > Outline Stroke.

Now you can select the dots and the circle and use Pathfinder > Minus Front.

Michael Bullo
Community Expert
Michael BulloCommunity ExpertCorrect answer
Community Expert
March 3, 2019

Select the red circle and overlapping black circle. From the Pathfinder panel select the Minus Front option.

Select the red ring and overlapping black rectangle and select the same button.