Answered
How do I make a diagonal lines fill?
I want to fill a simple box with diagonal lines. How do I make a fill style with varying line width?

I want to fill a simple box with diagonal lines. How do I make a fill style with varying line width?
I need to fill many different boxes.
Thanks.
JOSE PEREZ
Gibbons | Peck Marketing Communication
7 South Laurens St. Suite 200
Greenville, SC 29601
Phone: 864.232.0927 x110 • Fax: 864.232.2213
jperez@gibbonspeck.com • http://www.gibbonspeck.com
http://www.facebook.com/gibbonspeck
ok. so what you want to do is create a pattern fill. i'll try my best to explain this in cs5 terms as patterns have changed since then.
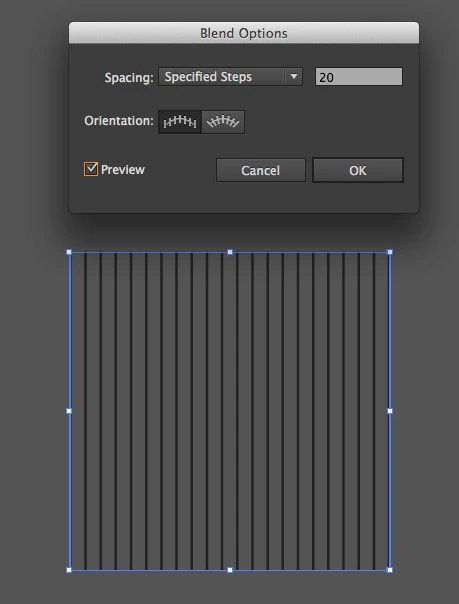
first you need to create the lines. draw two vertical lines 1" tall andv 1" apart. select both lines and click Object > Blend > Make. after you've made the blend, click Object > Blend > Blend Options. check the "preview" checkbox in the lower left corner. click the flyout menu (i believe the default value is "smooth color"). select "specified steps" and enter different values in the dialog until the lines look the appropriate distance from one another. click ok when finished.
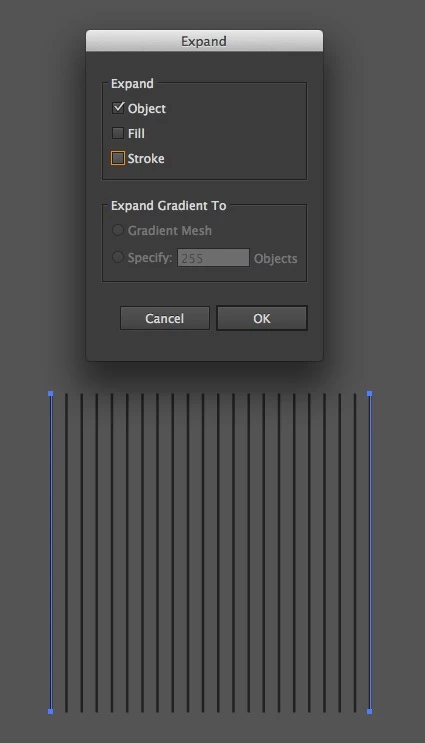
select the blend object and click Object > Expand. In the dialog make sure that only the "Object" tick box is selected. Click Expand.
at this point you have a group of vertical lines selected. rotate the group by 45* draw a box around the outside edges of the diagonal lines.
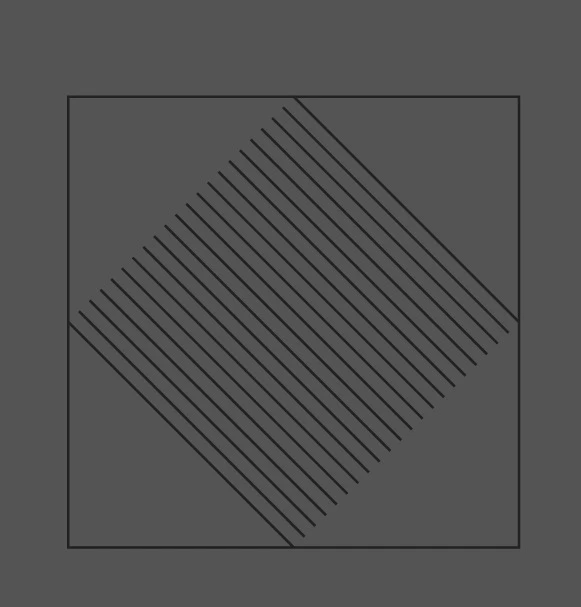
now scale that down so that the entire box is inside of the diagonal lines.

select both objects and click Object > Clipping Mask > Make

duplicate this object and keep it off to the side (because if you need to adjust stroke width in the future, you'll need this). now select the original one and go to your Pathfinder palette and click "Crop". this gets rid of the clipping mask so you're just left with the expanded diagonal lines.
now drag the expanded/cropped object into your swatches panel and voila. make sure to name the new pattern fill so you can identify it (you don't want to have several different patterns called "New Pattern Swatch 1" and "New Pattern Swatch 2" etc etc.)
if you need to adjust the stroke width for a different pattern, refer to the duplicate you made before and isolate the strokes to adjust the stroke width and repeat the above steps to crop.
Already have an account? Login
Enter your E-mail address. We'll send you an e-mail with instructions to reset your password.