

- Home
- Lightroom Classic
- Discussions
- Camera White Balance seems to be ignored by LR
- Camera White Balance seems to be ignored by LR
Camera White Balance seems to be ignored by LR

Copy link to clipboard
Copied
I have two Olympus cameras, an OM-D EM10 and an older E-PM1.
Both cameras have an Auto white balance setting, several presets and custom options.
It seems to me that LR is not aligned completely with the WB temperature as per the manual.
For example, just take four settings by way of example. Both cameras as per the manual will set WB as follows:
Sun: 5300K
Shade: 7500K
Cloud: 6000K
Flash: 5500K
This is confirmed by the Olympus Viewer program.
When I import into LR and go immediately to Develop, no Develop presets, and look at the WB I get under As Shot I see:
Sun: 5000K (EM10) 5100K (E-PM1)
Shade: 7250K (EM10) 7600K (E-PM1)
Cloud: 5700K (EM10) 5850K (E-PM1)
Flash: 6500K (EM10) 5850K (E-PM1)
Why are these values adrift from the Kelvin values that Olympus have defined for these settings, when it is As Shot? I could understand it if I were using one of the Lightroom settings.
What is weirder is that if I set a Custom White Balance of say 8200K then do the same thing and look at the As Shot figure, I see 8300K for the EM10 and 8800K for the E-PM1.
Is LR ignoring, or at least re-evaluating the WB settings on import? As it is RAW I know it isn't a big deal but it is slightly annoying if you have set a Custom WB in camera to reduce workflow only to find it has been "tweaked" without your knowledge.
Any ideas?


 9
Replies
9
9
Replies
9

Copy link to clipboard
Copied
White balance data is an interpretive system. While most UI will show you a "temperature and tint" system, the data is not actually stored that way. Olympus interprets the WB data one way, Adobe interprets it slightly differently.
Copy link to clipboard
Copied
LR shows "As Shot" because it is As You Shot It. The other settings in the LR WB drop down list is to Change the WB from what the camera was set to.

Copy link to clipboard
Copied
To further clarify, if you see 8300K for the EM10 while you set 8200 in the camera, it actually IS the same white balance setting. This has to do with what kind of reference system Lightroom uses vs what your camera uses. There is no agreed upon system and all kind of cameras uses different systems even within one manufacturer ecosystem and Lightroom uses a single reference throughout so the value you see in Lightroom is a direct translation of your in-camera value and a result of the calibration Adobe does in house of all the cameras it supports.
Copy link to clipboard
Copied
Thanks. So that's why if you look at the EXIF in the RAW file using an EXIF viewer, you can't see the WB data stored as a neat parameter anywhere? I do think it is a little misleading of Adobe to have an As Shot option on the WB setting as it isn't, according to this, really As Shot. If you shot on 5300K for example you might reasonably expect As Shot on LR to come up with the same figure. Something like Unadjusted might be closer to the truth and less confusing.

Copy link to clipboard
Copied
So that's why if you look at the EXIF in the RAW file using an EXIF viewer, you can't see the WB data stored as a neat parameter anywhere?
The White Balance parameters are not recorded in the EXIF, but they are recorded in another section of the metadata called Maker Notes and it is there that LR finds them. But they are not recorded as temperatures but because, to tell the truth, temperatures are actually only a convenient fiction. When the photographer sets a temperature in his camera it is immediately translated into the parameters that the camera firmware needs in order to process Raw data to an RGB Jpg, RGB level adjustments. And these same numbers are the parameters read by LR when it is set to As Shot.
I don't know what the parameters are in Olympus Raw metadata, but here is what ExifTool shows for a Sony ARW:
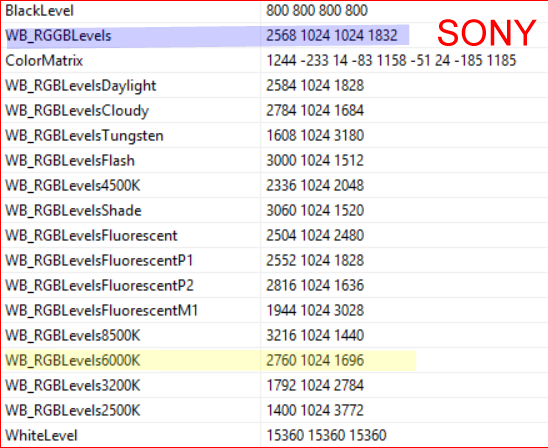
And this one is for a Canon CR2. Notice the Canon Maker Notes also show the correspondence between temperatures and RGB levels:

The operative numbers for each Raw photo are the ones highlighted in blue, but compare the yellow highlighted lines, the RGB adjustments that would have been set if the camera had been set to Cloudy or 6000K. 2760/1024/1696 for Sony and 1942/1024/1644 for canon. Very different, because each maker calculates what RGB level adjustments would be needed for its Raw data to provide WB grey neutrality for 6000K illumination.
LR can only accept the numbers supplied by the metadata and if it must then translate that back to a temperature, it can't always arrive at a precise temperature.
Copy link to clipboard
Copied
That's really helpful - thanks very much!
Copy link to clipboard
Copied
antonyr72067109 wrote
I do think it is a little misleading of Adobe to have an As Shot option on the WB setting as it isn't, according to this, really As Shot. If you shot on 5300K for example you might reasonably expect As Shot on LR to come up with the same figure. Something like Unadjusted might be closer to the truth and less confusing.
But it is As Shot. It is using parameters read from the file metadata. That is what As Shot means. It is not Unadjusted.
Copy link to clipboard
Copied
antonyr72067109 wrote
I do think it is a little misleading of Adobe to have an As Shot option on the WB setting as it isn't, according to this, really As Shot. If you shot on 5300K for example you might reasonably expect As Shot on LR to come up with the same figure. Something like Unadjusted might be closer to the truth and less confusing.
As Shot is "AS SHOT", What the camera was set to and or what the camera used to set the WB figures.
Copy link to clipboard
Copied
In addition to the three excellent answers above, I can add a few clarifying points:
1. WB comes in the processing workflow after the application of the unique camera profile. Olympus uses the profile it has made based on the manufacturing specifications for their sensor/micro-filter array. Adobe has made the profile based on the results of the testing of one or, at best, a few units. Inevitably the profiles are different and these differences will affect calculations further down the workflow.
2. The WB instructions carried in the Raw file's metadata is in the form of RGB channel multipliers. In most lighting conditions the multipliers boost the Red and Blue channels while the Green channel multiplier is 1.0, i.e. "as is". This is because the photo-sensitive silicon sub-stratum of the sensor is most sensitive to green light and the brightness boosts of the R and B also have the purpose of compensating for those inequalities, of leveling the playing field.
3. If LR's interface indicated the reality of what is happening by displaying RGB channel shifts directly and numerically, amateur users would be mystified and unable to relate that to in-camera settings and even knowledgeable professionals who are used to thinking of illumination in terms of temperature would find it inconvenient. So the multiplers-to-temp conversion algorithm in affect asks itself this question, "What illumination temperature would require these channel adjustments for a (hypothetical) real-world neutral grey in the scene to be neutral grey in the image?"
4. But black-body color temperatures do not refer to a single discrete color, but rather a range of colors. So any display of a particular temperature in the UI is a best guess estimate. It doesn't really matter, however. The important thing is that a neutral grey (if present) is processed to neutral grey, or tolerably close to it.

Find more inspiration, events, and resources on the new Adobe Community
Explore Now
 AdChoices