- Home
- Lightroom Classic
- Discussions
- Different color handling RAW - PSD?
- Different color handling RAW - PSD?
Different color handling RAW - PSD?
Copy link to clipboard
Copied
Hello,
I have developed RAWs (.CR3 from Canon EOS R5) of a recent shooting, basic exposure adjustments as well as HSL and color grading. Now I wanted to do a detail retouch of one of the photos in Photoshop (skin retouch mainly), so I made a snapshot in order to preserve the settings, then reset the development settings to have the original RAW, and exported it to Photoshop via Edit in -> Edit in Photoshop 2021. Did my skin retouch (mainly patch tool, color matching, dodge & burning) and then hit save, so the PSD was saved back to Lightroom. So far, so good.
Then, I wanted to synchronize settings between the developed non-retouched RAW and the PSD, in order to give the retouched PSD the same exposure/contrast/color as the RAW. Strangely, the tonality and colors are slightly off.
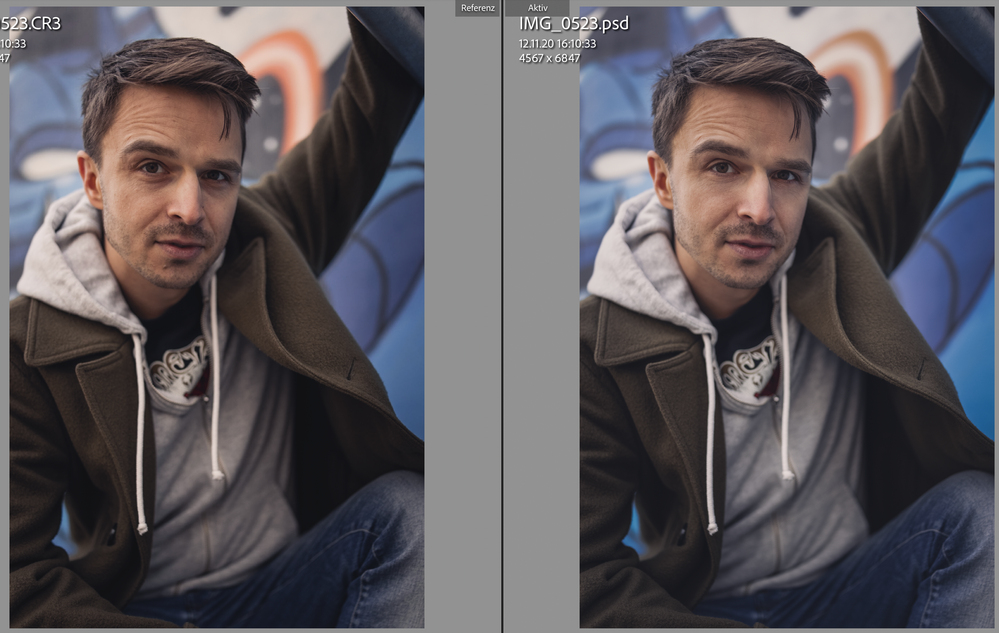
I have tried it with different photos, getting the same result over and over again: the tonality and color between RAW and PSD does not match. As long as I have not done any development adjustments, tonality and color is the same between RAW and PSD (i checked it with the reference view), but when I do adjustments, both files are handled differently.
Is there any setting in Lightroom or PS that might be causing this, or is this just the way it is?
I wonder how I should handle this when I do a shooting of which I retouch only a few of the photos (--> PSD!) and leave the rest untouched (--> RAW!). They don't match in tonality in color then, which is not really what I'm looking for in a series of photos from a shooting.
I have included an example. I hope it is visible that they do not match exactly. It's best visible in skin tone and the background (especially the orangey arc thing behind his head to the right).
Thanks in advance for your help!
Thomas
Copy link to clipboard
Copied
Please embed screenshots using this icon so that others do not have to download them to see them.
The reason why you see differences is probably because you sync the raw profile too, but PSD files cannot have a raw profile.
Copy link to clipboard
Copied
Hi Johan,
thank you very much for your response.
I will add the photo here as you described it.
I have tried it without syncing the raw profile (deactivating "Treatment & Profile" in sync settings, I guess?), but the result was even more off...
I really hope this is a mistake that I make (and that I am going to find out about) and not the way things are because that makes it very fiddly to have the same look through a whole series of photos when there are some RAWs and some PSDs.
Thanks again.
Thomas
Thomas
Copy link to clipboard
Copied
"Then, I wanted to synchronize settings between the developed non-retouched RAW and the PSD, in order to give the retouched PSD the same exposure/contrast/color as the RAW. Strangely, the tonality and colors are slightly off."
You cannot do that. The anatomy of a raw file and a rendered RGB file are very different. The same numerical adjustments will mean different things.
You see the same thing in Photoshop when you apply the very same adjustment to an sRGB file, an Adobe RGB file and a ProPhoto file. It means different things, so the results are different.
Copy link to clipboard
Copied
@D Fosse Thank you for your response.
I am curious, how would one handle this in order to have a consistent look within a series of photos? As described, most of them are RAWs, but when I do skin retouch, I do it in PS, so the retouched files are PSD.
I use ProPhoto RGB.
Copy link to clipboard
Copied
You need to send the Edited RAW file to Ps. Re-add your LrC edits then send to Ps and do your skin touch ups.
Copy link to clipboard
Copied
@Just Shoot Me Thanks for your response.
I have to try if that works, but, to be honest, for me it would make more sense to do the skin retouch BEFORE I do color-grading. In the example above, the tone and color shifts are not too drastic, but when I have a more drastic color grading, I wouldn't want to do a retouch on that.
Or, another reason, if the model (or me, for that matter) is not happy with the color grading, it can be easily changed if all the color grading is done AFTER retouching. But if I, as suggested, retouch an already color graded file and I need to change color grading thereafter, I have to do the whole retouch again after applying a new color grading... I don't know, but to me, that doesn't make much sense, as retouching takes quite some time, compared to doing some color and tonality adjustments.
Copy link to clipboard
Copied
The way you are now doing it you are dealing with 2 totally different image file and not only that but 2 different File Format. RAW and PSD, Never will they be the same. Adding LrC (Adobe Camera RAW) edits to a PSD file will never look the same as adding them to the RAW file the PSD came from unless you make those ACR/LrC edit before you send the file to Ps for further editing.
That is the Whoile point of both LrC and ACR (along with simply PS can't READ RAW files it must always go through a RAW file Editor).
Copy link to clipboard
Copied
I do see your point. But how would you do it? Say, you had a photoshooting, 40 photos to be delivered (exposure adjusted, color graded, ... typical RAW development) and 3 of those are selected by the customer to get a detailed retouch (which requires PS for me).
That makes 37 RAWs and 3 PSDs. Would you save all the RAWs to PSDs just to have 40 files of the same type? That's a factor 5-10 increase of disk space required...
Copy link to clipboard
Copied
Sorry I have no idea what you are asking.
I would Develop the 40 RAW images in LrC Develop module then send the 3 chosen by the customer to PS for further editing and then Export the other, 37, RAW images and the 3 PSD files as JPG files to send to the cutomer.
I personally would never send either RAW or PSD files to a customer. Unless that was a stipulation of the contract I had with that customer and I got paid to do that.
That is like turning over all the negatives to a customer in the Film Days. That rarely if ever happened. Not unless the photographer got paid Extra to do that.
Copy link to clipboard
Copied
I think that was a misunderstanding. I don't intend to hand the RAWs/PSDs to the customer. He or she get's JPGs, of course.
I am just talking about my own file handling. For the two reasons I stated in my initial response to you, I'd rather do the retouch on the non-color-graded file and after the retouch, adjust tonality and color grade all the files (retouched PSDs and non-retouched RAWs). But it seems as if there is no possibility getting tonality/color accuracy this way 'round.
Thanks for your input!
Copy link to clipboard
Copied
You will not get the same result applying the same edits in LrC to a RAW file and a PSD.
No matter what you do they will always look different.
What you are doing is backwards. A PSD or TIF file should be the FINAL Image file and you should not be adding LrC or ACR edits to it.
I really don't undserstand why you don't understand that.
Copy link to clipboard
Copied
I have understood that already. Seems as if I have to retouch a photo each time again I want to put a different style tonality/color adjustment on it.
Thank you anyways.
Copy link to clipboard
Copied
"Seems as if I have to retouch a photo each time again I want to put a different style tonality/color adjustment on it."
You can use Edit In> Open as Smart Object in Photoshop. This allows you to change or apply different LR settings to the original raw file AND the PS edits separately on top of that rendering. This allows you to go back and change the LR settings directly in the original raw file and not the PS edited rendering.
Copy link to clipboard
Copied
Hello Todd,
thank you very much on joining in and contributing help. I love using Smart Objects and I have thought about this option, too. Unfortunately, it creates the same problem as retouching an already color graded RAW: all my retouches are put ON TOP of the RAW/Smart Object (where the color grading etc. happens).
A few reasons why this wouldn't work for my workflow:
- I use the patch tool to remove blemishes - this can't be done on a smart object, so I have to render it (which makes it impossible to do some RAW adjustments thereafter).
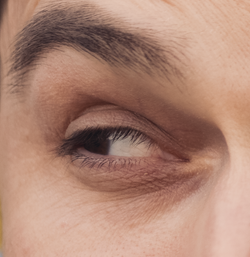
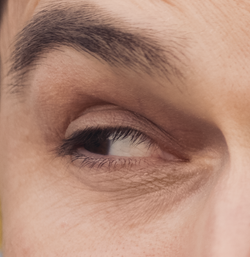
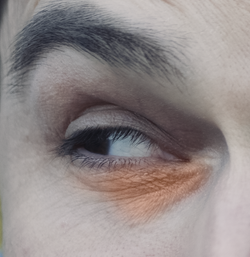
- I use color matching to match areas of different hue (e.g. matching the blueish tint of eye bags to the rest of the face) by adding a layer on top with blending mode "color". When I, thereafter, want to change color grading of the underlaying Smart Object/RAW, the two don't fit together any more. To illustrate this, please have a look at the following photos.
not retouched:
retouched:
retouched with different white balance/color grading of the underlaying Smart Object:
In my opinion, something like color grading or styling a photo should be the last step in order to bake together all the retouches below. But, as I have learned, this is only possible by color grading the PSD (= the retouched photos) afterwards in LR, which gives me a different tone than when I do the same thing with RAW files (= photos which are not retouched) directly in LR. Guess I have to live with that, was just curious how other portrait photographers handle this.
Greetings from Vienna
Thomas
Copy link to clipboard
Copied
Here's a video by Julieanne Kost that explains what you can and can't do using Smart Objects.
https://jkost.com/blog/2017/12/working-with-smart-objects-in-photoshop-cc.html
Copy link to clipboard
Copied
What kind of skin retouching do you do? If it is fairly simple skin blemish removal, Lightroom Classic itself can do it just fine. Not as nice and smooth in interface as in Photoshop but it allows you to stay in raw entirely. If you are doing more complex smoothing and liquify-style clean up that is a photoshop only thing.
The problem really is that Lightroom does not have the concept of layers where you can layer a set of edits on top of everything else. Edits are always global and so their effect does depend on the source and you can't simply put on a layer of color/grading on top of everything else and expect it to look consistent.
Copy link to clipboard
Copied
Retouch depends on the subject... liquify is something I might use sometimes, but not alway... but generally it starts with blemish removal (which would be possible in LR, I know), then I use dodge&burn to smoothen out the skin (sometimes it looks a bit "stainy") and reduce eye bags, remove unwanted shadows and enhance face features. Then I do some color matching, most of the time it's matching the eye bags to the color of the surrounding skin, sometimes teeth whitening, ... it really depends on the subject and what the goal is. But all in all, this is something I prefer to do in PS with layers.
It's just that in a series of photos, not all get retouched, so I have a mix of RAWs (the non-retouched photos) and PSDs (the retouched ones) from one shooting, and to me, color grading and styling is something that is a finishing touch, which I like to do in the end and use the convenient tools of LR (I color grade one photo to the desired styling, save it as a preset and then put this preset on all of the photos and just do some minor exposure/highlight/shadow tweaks as each photo requires).


