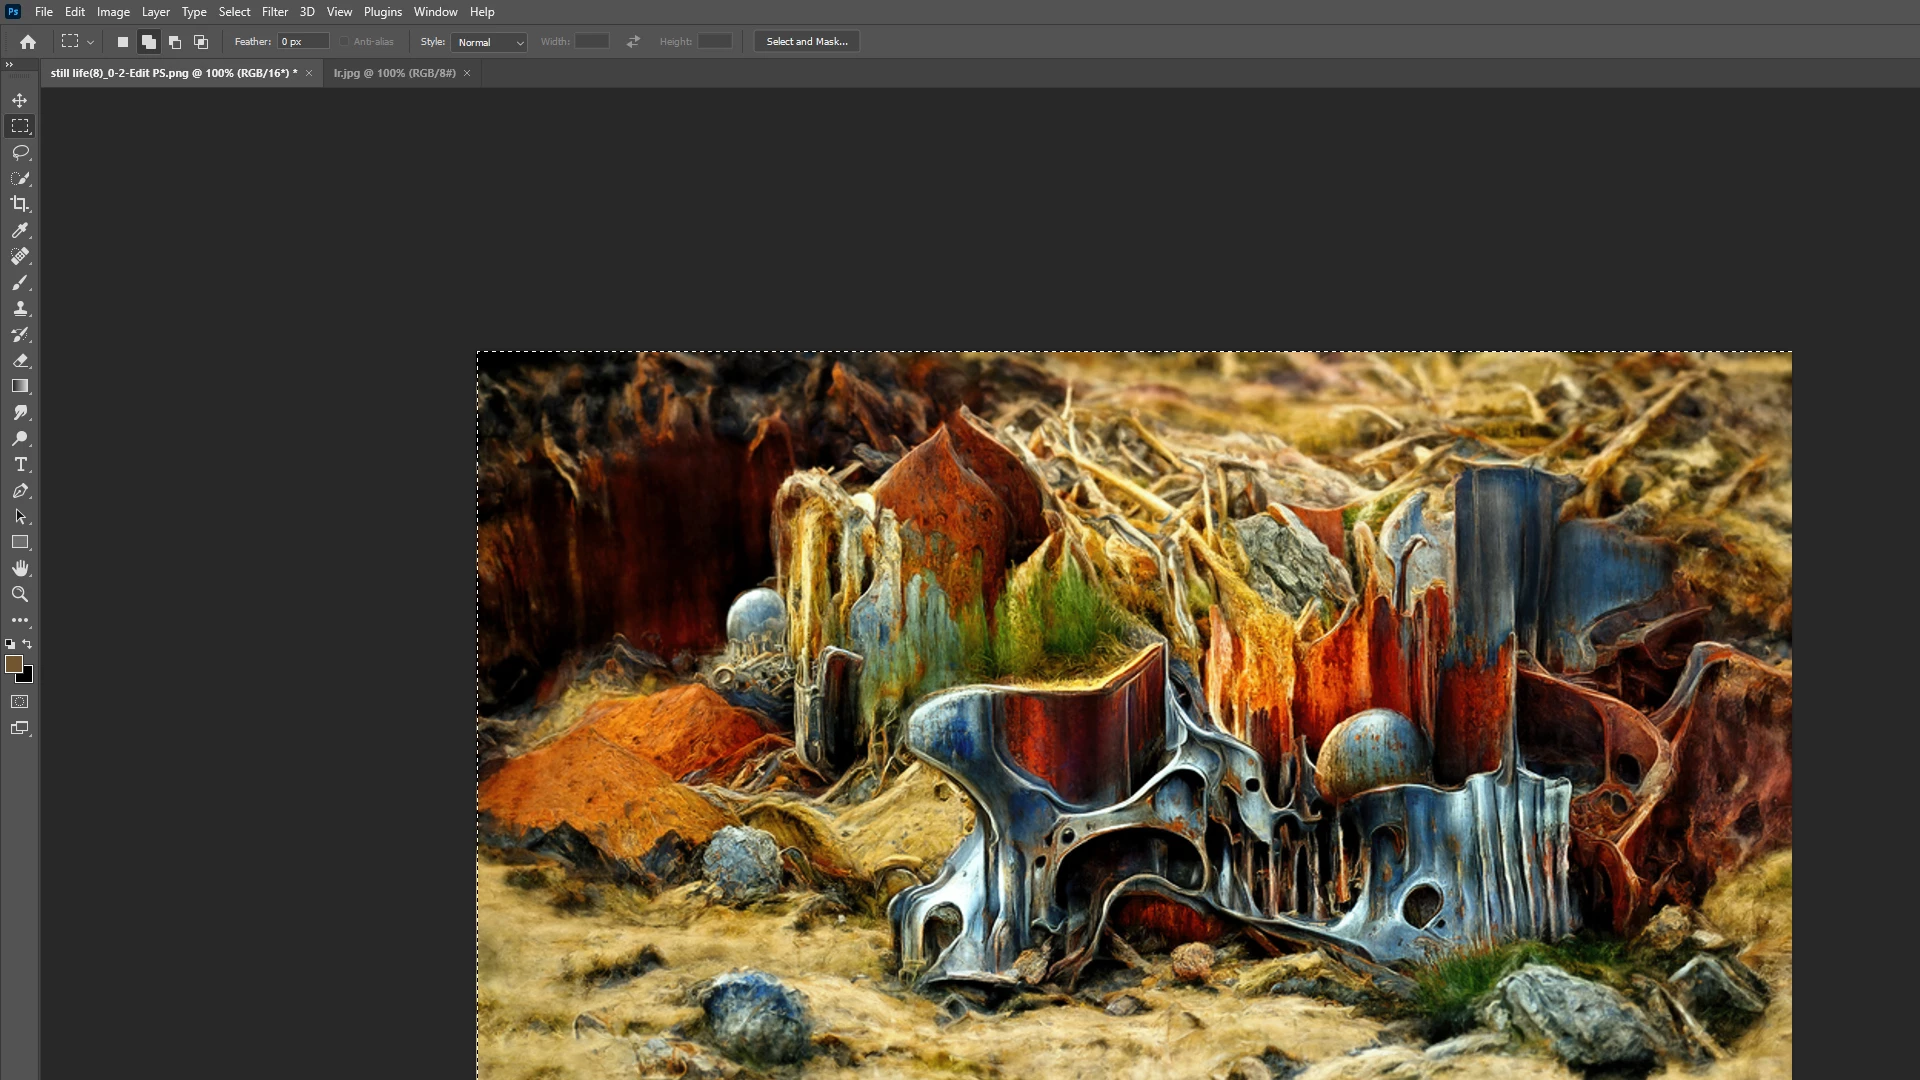
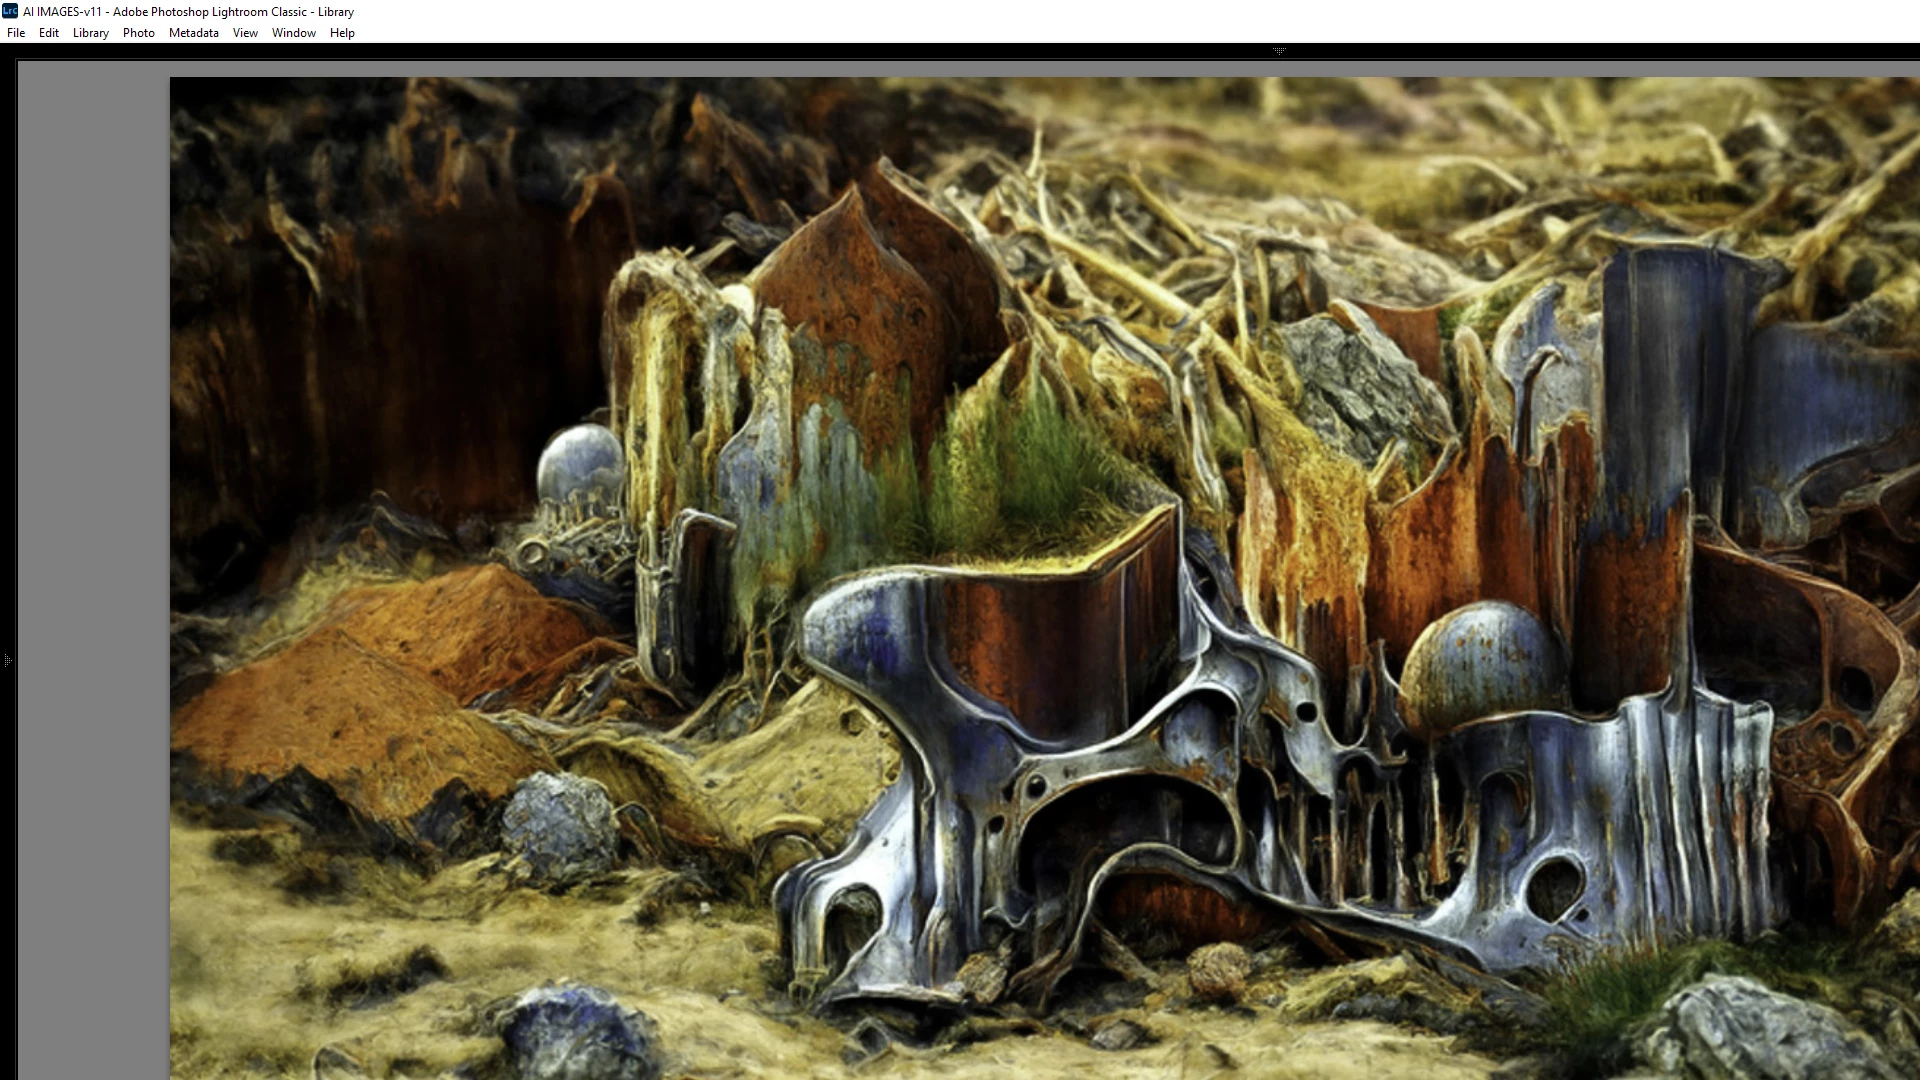
Lightroom Classic and Photoshop display different colors
Copy link to clipboard
Copied
I've read a dozen posts about this, but cannot find a solution. The image as it appears in PS (top) and LR is completely different. Can anyone offer a solution that I might try? Thanks for any assistance.
Copy link to clipboard
Copied
The odd thing is, they look fine in LR <before> they are imported to PS.. so LR (good) - PS (good) returned to LR (not good). I'm sticking with sRGB round trip..
??
Copy link to clipboard
Copied
Show us your Photoshop Color Settings too; it's possible you could be converting on open automatically.
I don't understand what you mean by " they look fine in LR <before> they are imported to PS."
Copy link to clipboard
Copied
I open the file in LR and it looks as expected. I Edit In PS and it looks fine in the PS interface. I make a change - dodge and burn a slight amount (or even none at all - no change) and "save (it) as" to create a copy (typically adding the suiffix PS to the file name), and when it reloads back into LR it has lost the colors of the original, ie., what you see in the images above. The change is happening with the saving in PS. In my experience (surely not as extensive as yours ;-)), simply changing a Profile would not create this dramatic a difference, yet when asked if I want to retain the profile the file had when I sent it to PS from LR, I also choose Keep Original...
Copy link to clipboard
Copied
In your color settings, you really want all the warning checkboxes on.
The important settings (Preserve for all options) is on, and that's good.
When you do a round trip from LR to PS and back using Edit in Photoshop, you need to use the Save command not Save As in case that's what's going on. Save will add the new image to the catalog with the edits seen in Photoshop.
Copy link to clipboard
Copied
Thanks for your note. When I am in PS, I am making changes to the image but I always want to retain the original. So I use Save As routinely. This has been my practice for a decade. I am on a new computer and am seeing this discrepancy for the first time, so there must be some setting that is changing the way the image appears when it returns to LR after the tweaks in PS. Maybe that would narrow it down??
Copy link to clipboard
Copied
Again, if you're round tripping, you Save (not Save As) what came (from raw) to Photoshop to go back into LR.
If you have an existing TIFF or PSD etc in LR, it's cataloged and you can open it from LR into Photoshop and a Save again will place your edits into that document and LR will honor that.
Maybe we need a step by step descripton of exactly what you're doing from LR to Photoshop and back from the original (raw? TIFF, PSD?).
Copy link to clipboard
Copied
I've done a little work on this based on your suggestions - upgraded the GPU drivers, and now I'm getting a slightly differnt result. Here is an image as it is first opened in LR, and another when it first opens in PS following an Edit in PS command. The differnce is already stricking. So is there some way to set/edit the "color mode" that each of the program uses in order to synch them? I don't even have to save the file in PS for the difference to appear. Thanks again for any thoughts.
Copy link to clipboard
Copied
There was a bug in Photoshop not long ago causing something similar to your issue, so make sure that you're running the very latest versions of both PS (23.4.2) and LR (11.4.1).
If you have an nVidia graphics card, try installing the Studio driver (if available) rather than the Game ready driver. Studio drivers are more thoroughly tested, and have fewer bugs.
If the suggestions above don't help, my guess is that you have a defective monitor profile.
You can easily check for that by setting the monitor profile to sRGB.
If this fixes the issue, you should ideally calibrate the monitor with a hardware calibrator. This will also create and install a custom monitor profile that contains an accurate description of your monitor's color response.
As mentioned by @TheDigitalDog , make sure to create a version 2 (not version 4), Matrix (not Lut) profile.
With LR and PS closed, press the Windows key + R, type colorcpl in the box and press Enter.
Add the sRGB profile, then set it as default.
Copy link to clipboard
Copied
OK, I have the Color Management window open and chose sRGB as indicated. I then chose Add and it opened a File Open window asking me for the location of the profile.. (Install Profile/Files of Type: Color Profile). Where would I find that profile? Is it the one in Windws... Spool... Drivers... Color? Thanks again.
Copy link to clipboard
Copied
That's very strange. The profile should be added without any need for you to locate it.
It should be in C:\Windows\System32\spool\drivers\color
In the unlikely event that it's not there, you should also find it in
C:\Program Files (x86)\Common Files\Adobe\Color\Profiles\Recommended
Note that the file name is sRGB Color Space Profile.icm
Copy link to clipboard
Copied
I found the correct profile and added it. Everything look ok here? It may have already been the default - didn;t check, but there was never anyplace to "set is as default" during the process I just completed.
Copy link to clipboard
Copied
You're in the wrong tab of the color management dialog.
My screenshot shows the Devices tab, you're in the Advanced tab, which is not relevant in this context.
Go to the Devices tab, and try again. (see my post and screenshot above)
And please don't attach images, use the Insert Photos icon in the toolbar, like you did previously.
Copy link to clipboard
Copied
I think I've got it - chnaged the default to SRGB as advised and now when I open an image in PS by using Edit in PS from LR, it looks the same. Need to do some testing going round trip,, but I hope this has solved the problem. Thanks much for all the help hre- very much appreciated.
Copy link to clipboard
Copied
Except at some point, you want this match using your display profile (hence the suggestion it may be corrupted).
Copy link to clipboard
Copied
@dennishmiller – do images display identically in Lr and Ps now?
You can use sRGB for now, but if accurate colors are important to you, use a calibrator.
Note to moderator: Please change the title of this thread to something more descriptive, like
"Lightroom Classic and Photoshop display different colors"
Copy link to clipboard
Copied
Right, good point. The switch to sRGB is simply to load another "display" profile to see if this fixes the issue. You do not want sRGB to be used thereafter, it doesn't define your display conditions.
Since you now have a match, we know it was that older display profile, however, made or supplied was corrupted. It needs to be replaced with a true display profile that defines your actual display conditions.
Copy link to clipboard
Copied
Color is very important (these are fine art images), but I would have guessed that if I want to share them on the Inet, then using a "least common denominator" color profile would insure that the most people would see them in the way I intend, similar to the way I mix my music, never including very high or very low frequencies, since most people will have not audio playback equipment that can handle those. Does that mnake sense?
Copy link to clipboard
Copied
You cannot control how others see your images on the web (or elsewhere). Yes, saving as sRGB is a good start but you have no control over others who may or may not be using color managed applications (without, sRGB is meaningless), if or how they calibrate their displays, etc. The best you can do is control your images on your end using color management.
See:
sRGB urban legend & myths Part 2
In this 17 minute video, I'll discuss some more sRGB misinformation and cover:
When to use sRGB and what to expect on the web and mobile devices
How sRGB doesn't insure a visual match without color management, how to check
The downsides of an all sRGB workflow sRGB's color gamut vs. "professional" output devices
The future of sRGB and wide gamut display technology
Photo print labs that demand sRGB for output
High resolution: http://digitaldog.net/files/sRGBMythsPart2.mp4
Low resolution on YouTube: https://www.youtube.com/watch?v=WyvVUL1gWV
Copy link to clipboard
Copied
Got to compare the two this way: Always use Develop module at 1:1 zoom and compare to Photoshop at 100%. This is the only accurate way to compare the two.
Now the difference seen is pretty large, there could indeed be an issue.
First, disable GPU in each product (in Preferences > Performance): do they match?
If not, in Photoshop, go to Preferences > Technology Previews... and check "Deactivate Native Canvas" - then restart Photoshop. Better?
If not, recalibrate and build a new ICC display profile, the old one might be corrupted.
If you are using software/hardware for this task, be sure the software is set to build a matrix not LUT profile, Version 2 not Version 4 profile.
If turning OFF GPU works, it's a GPU bug and you need to contact the manufacturer or find out if there's an updated driver for it. On the Mac, that's part of the OS update(s) so if this is the latest OS version, you may need to roll back a release.
Also see: https://helpx.adobe.com/photoshop/kb/acr-gpu-faq.html
Copy link to clipboard
Copied
Thanks very much for your help. Win 10, Nvidia A6000 GPU for what it's worth. It would seem that saving in PS alters the color balance/profile, as files look fine in LR and when first loaded into PS. But when reloaded in LR after PS changes, they go south. I did a 100% comparison and they are still noticeably considerably different. I"ll work on your suggestions and see where they lead. Thanks again.
![](/skins/images/DAB90319B8FCC6914FB48BF3A053A8A8/responsive_peak/images/icon_anonymous_message.png)