 Adobe Community
- Home
- Lightroom Classic
- Discussions
- P: New AI-powered Lens Blur (Early Access) availab...
- P: New AI-powered Lens Blur (Early Access) availab...
P: New AI-powered Lens Blur (Early Access) available across all surfaces.

Copy link to clipboard
Copied
This post applies to Camera Raw, Lightroom Classic & the Lightroom Ecosystem products.
- Lens blur applies a depth-based blur effect, similar to what can be achieved with real-world optical lenses, by using AI-generated or device-captured depth data (when available).
- Lens blur will automatically prioritize focus for the detected subject, but you can also interactively adjust the focus distance. Precise focus range tuning is also available (currently desktop only: Lightroom Desktop, Lightroom Classic, and Camera Raw).
- You can also further customize the Bokeh shapes, highlight Boost (desktop only), and make depth map refinements (desktop only).
- Yes, all edits will sync. To revert settings, you can go back to previous versions or history steps, or un-apply Lens Blur settings.
- No, presets and copy + paste workflows are not currently enabled for Lens Blur during Early Access.
Stop by and give them a vote if they're of interest to you!
Posted by:


 1 Pinned Reply

Please report your system info via Lightroom>Help>System Info...
If you encounter GPU driver issues while using ML features in LrClassic/LrD/ACR, please try to update to the latest macOS version or if you are on a Windows machine, follow https://helpx.adobe.com/lightroom-classic/kb/troubleshoot-gpu.html to update your machine to the latest GPU driver and see if the problem resolves itself.
If the OS or the driver is not available or possible and the problem persists, then try the following
... 1965
Replies
1965
1965
Replies
1965

Copy link to clipboard
Copied
It would be nice and simple if we could pick the subject plane to fix (and it was labelled) then we could pull & push the foreground and rear.

Copy link to clipboard
Copied
Have tried this on a few photos of woods and Owl.. It works great.. Really love the feature.. Thanks for working to continue to make lightroom better and better..
Copy link to clipboard
Copied
Used it for the first time (OS 13.14.1 c), LR 13.1 on a portrait of a boy jumping against a woodsy background. Some odd results around the boys head, possibly smearing of sunlit leaves. See attached close-ups. Let me know if you need to see an unedited file.


Copy link to clipboard
Copied
You can mask out those areas very easily using the brushes available. Click the 'Refine' button then select either the Focus or the Blur brush. In your case use the Blur brush, adjust the parameters shown below it to your liking and paint over those areas you feel are 'odd'. Only takes a few seconds per image to do that cleanup.

Copy link to clipboard
Copied
Sadly, it's nigh impossible to match the background's focus level. Currently, Focus is "white" and Blur is "black", with no way to pick "gray" as brush color - so the best you can do with the Amount and Flow dials is set its opacity - but if the background isn't ENTIRELY out of focus, just in a slightly further plane, you'll overblur it when trying to blur the border of the subject.
Copy link to clipboard
Copied
I remember having some just like that and the blur brush, made very small and with a hard edge, resolved the issue. After I blurring with the brush I played around with the depth range using the view depthdialed the opacity back just a bit and it looked fine. Here's a quick example I just did.
Before:

After:

Actually the filter is working so well now I didn't have to do any additional brushing to this one at all.
The other thing you can do is go Healing and just use the Heal brush to clean it up.

Copy link to clipboard
Copied
Full mask tooling support, please.
Copy link to clipboard
Copied
incredible off the bat

Copy link to clipboard
Copied
First time using it when the distance from the subject to the background wall was only about a metre. I worked very well after a bit if refinement. Well done to the engineers!

Copy link to clipboard
Copied
Lens blur effect seems to be negated by the AI denoise feature for me, anyone experiencing this?
By negated i mean the "depth map" becomes nonsesical if I apply AI denoise after all the edits including lens blur are done. Subject is lost and the depth maps seems to be almost random.
I am attaching one photo with all of the edits including lens blur and another where ai denoise has been applied to that photo, and nothing else changed. I did not try to come up with a solution yet, if Ill manage to circumvent this, ill reply.
Copy link to clipboard
Copied
If the Lens blur tool is ran for the first time on an already denoised photo the tool works fine. It means that after AI denoise is applied, LR need to reanalyze the lens blur tool before proceeding. The workaround nou is to completely reset the development and then redo the tool.

Copy link to clipboard
Copied
I really like it! Lots of great things like the Bokeh feature! Adding Bokeh can make the difference between a so-so picture and 1 that is VERY good, especially shaped Bokeh! Just add more shapes like hearts, stars, dog paws, and maple leaves! These are shapes in the homemade Bokeh filters I created for myself, and they add visual interest! Mitch
Copy link to clipboard
Copied
Quick reaction - I'm pretty impressed. I upvoted the add noise feature as working with converted negs that have grain, the boken wipes it out. Also would like to resue the mask with other tools - it should add to masks created elsewhere

Copy link to clipboard
Copied
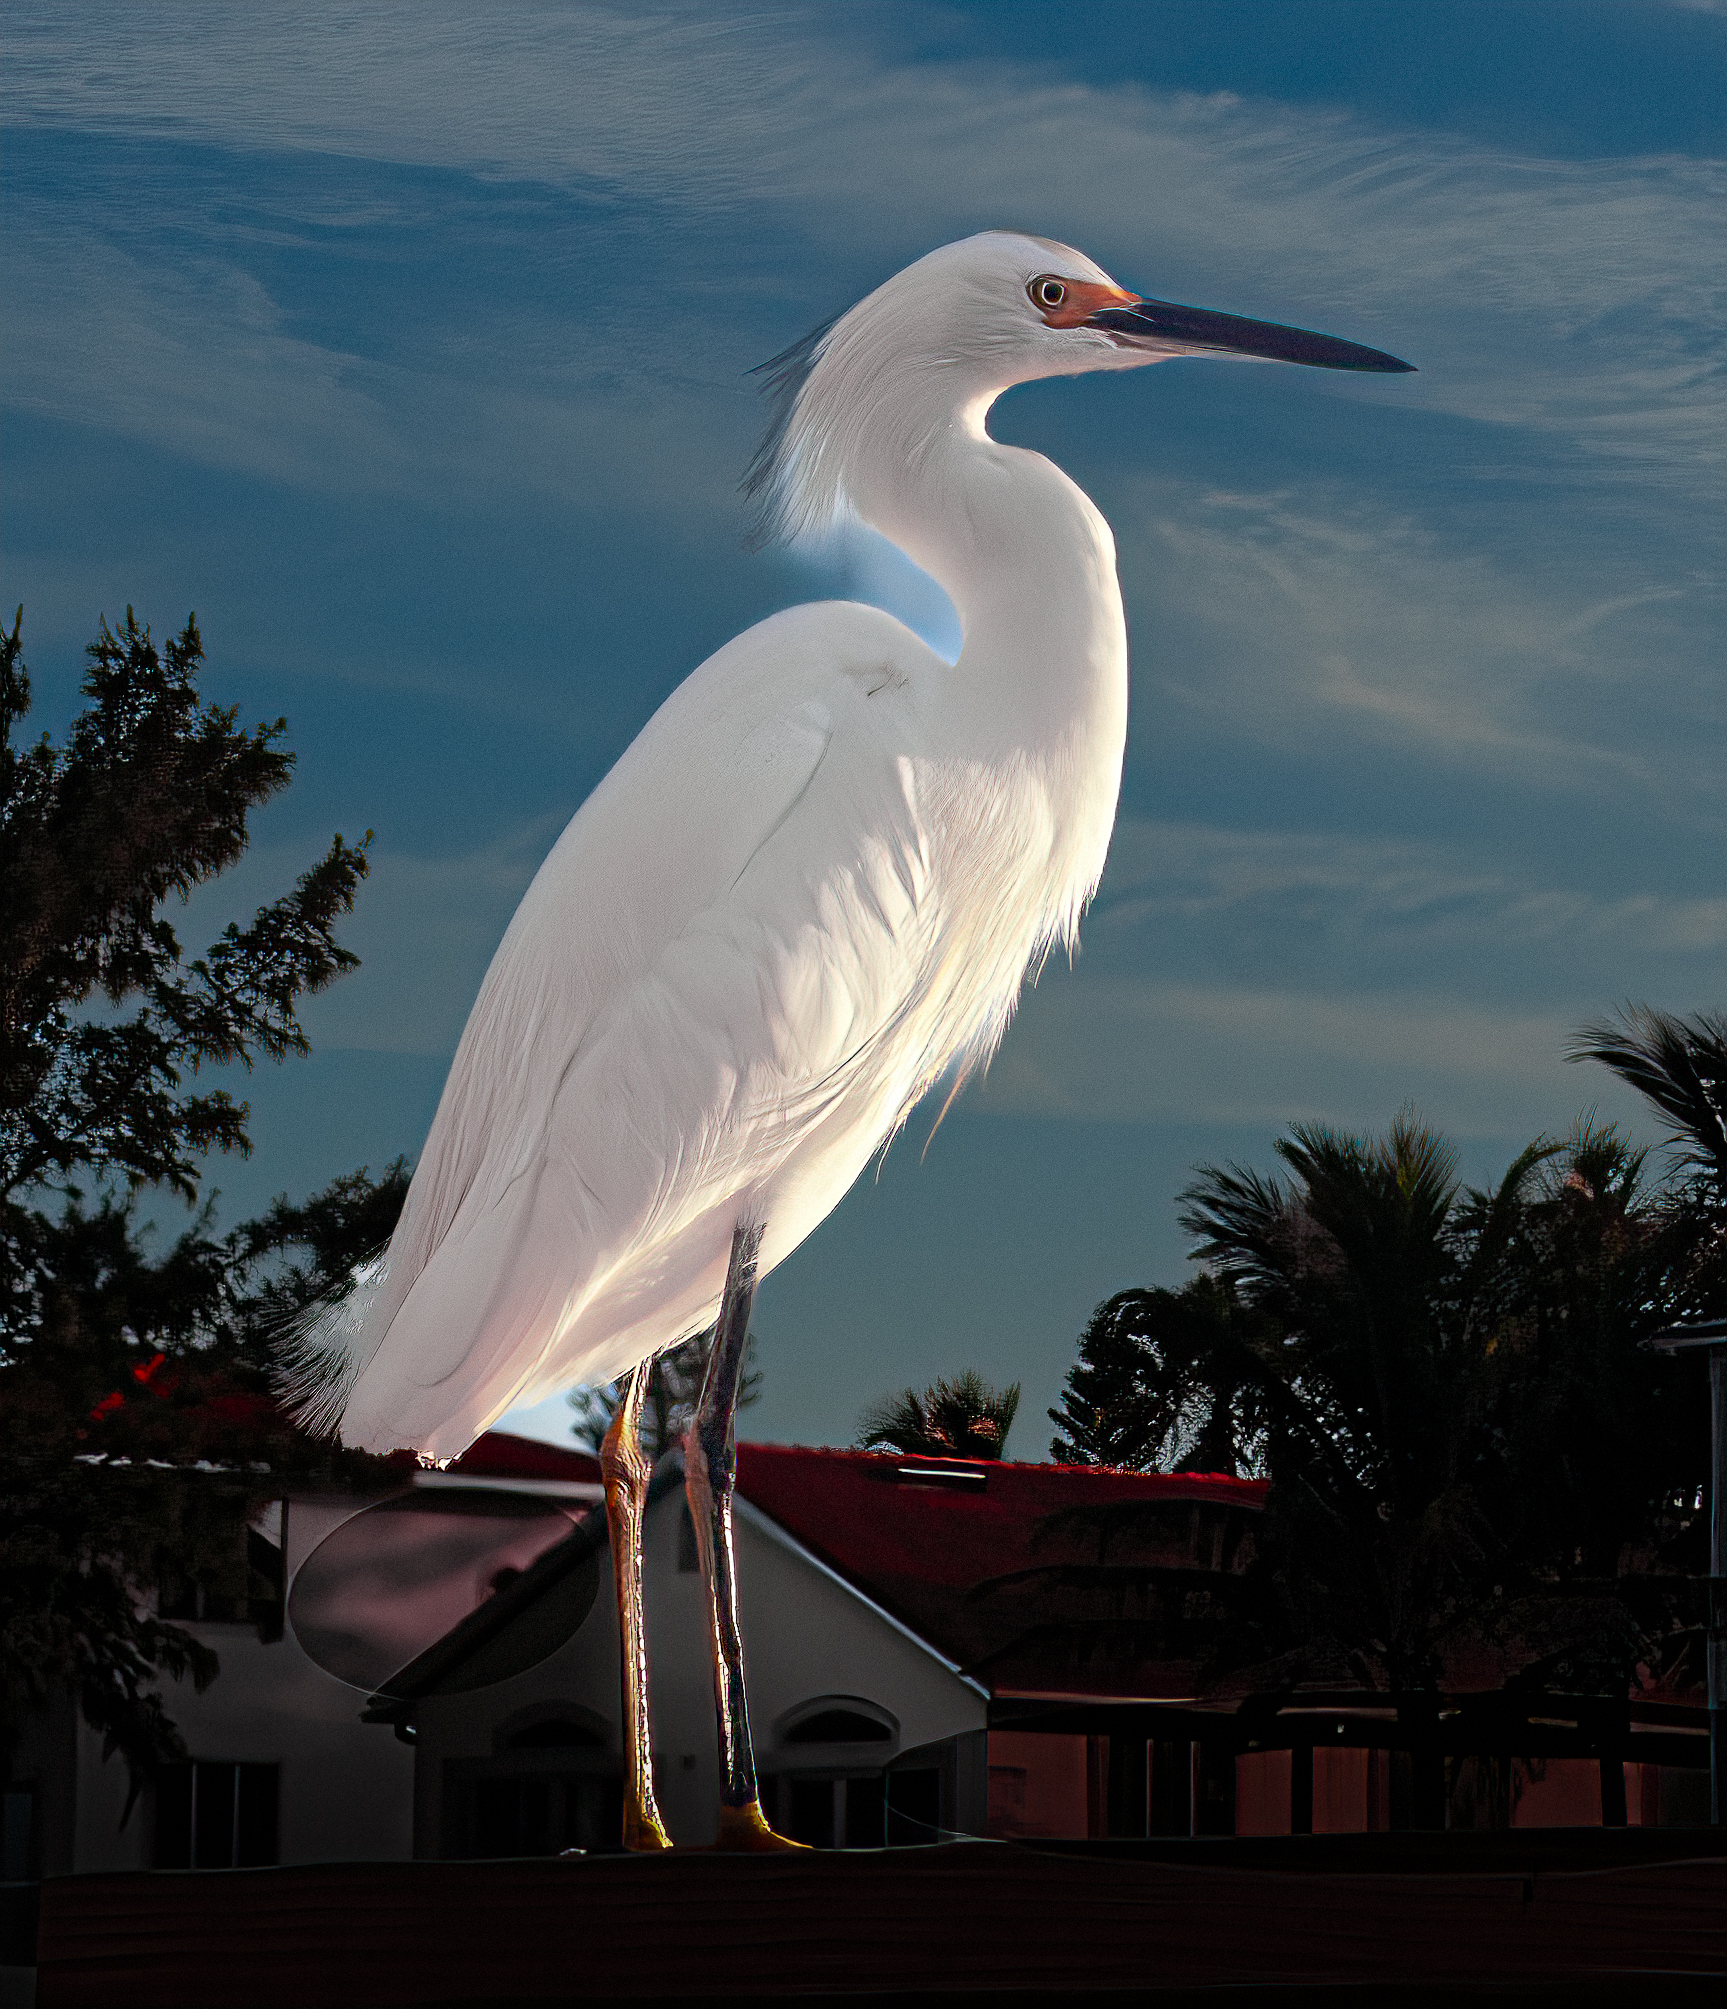
The blur effect appears to be quite a boon to my objective in the egret photo which I think you have access to. Although I'm at a complete loss to understand your dashboard controls, the AI seemms to have done a reasonable job of picking out the background and applying blur to the background which I wish to de-emphasize. There have been a number of errors in all of the LRC AI selections of areas of interest....ie: some of the subtle areas around the neck and tail have been confused with sky background. The mask illustrator with its multi-colored fields gives some idea of which areas are affected but how can I make fine adjustments. The adjustment strip leaves me at a loss. I would greatly appreciate a demo video of all the controls.
Also I notice that my attempts to use your denoise option return an error message, claiming I am using JPEG or TIFF when I am simply using raw material loaded into LRC from my Mac Powerbook (fully updated). LRC converts all raw images to DNG (whatever that means....is this the source of the error message? I often have no alternative but to use the Topaz AI tools when I get these "error 1" messages, They are no help.
I look forward to your responses to my, possibly amateur, issues. Otherwise LRC has been a wonderful tool for my progress in photography.
(Adobe, please feel free to look through my latest download and modifications to see where I have tried to work out these issues.)

Copy link to clipboard
Copied
My first time trying it, have been avoiding it. It gave me a slight blur of the background which I liked. Will try it again.

Copy link to clipboard
Copied
Hi - Seems very effective. It would be good to add the 'Add' / 'Subtract' mask if possible - as this would help fix where the software is not quite picking up the actual depth and blurring some things that are aligned with the 'in focus' subject.
Peter Cox

Copy link to clipboard
Copied
My system crashes every time I try to use this feature. ??

Copy link to clipboard
Copied
Love this feature so far. Feedback thus far would be to allow a masking option so we can fix where the AI might've missed certain spots or gone too far on others
Copy link to clipboard
Copied
Ive played with it quite a bit and what I find is:
Performance is fine. I have a I7-9700K with 80 GB ram and more storage space than Nasa, and the load is nothing like the noise reduction that keeps telling me 56 minutes to process.
However I have the following two issues. I get the feeling that they process remains aware of the original image frame to some extent. Like the vignetting, there seems to be an attempt to wrap itself into the original photo borders and not the panorama that I present to it. Also I would like to be able to have more control over the field, including using layers to apply it

Copy link to clipboard
Copied
Quite surprising how 'intelligent' it is .
But at the transition between a clear blue sky and snowwy mountains or trees it creates an unnatural shadow.
Also the lowest setting with vey minimal blur is still ... a lot of blur .
Otherwise - very impressive !
Jacob in Australia

Copy link to clipboard
Copied
I've been using Blur for a couple months now and it seems to be getting slower and slower. I'm running an MBP M1 Pro with 16GB memory and it has basically become unusable because it is so slow. I basically can't edit a photo with blur applied because it takes minutes to see the changes, and stops me from doing anything else in the app.
Deleted/Cleared my preferences, tried changing the GPU settings, updated to MacOS 14.2.1, cleaned up my disk to have > 100GB available, updated LR Classic. I'm not sure what else to try at this point.
Lightroom Classic version: 13.1 [ 202312111226-41a494e8 ]
License: Creative Cloud
Language setting: en-US
Operating system: Mac OS 14
Version: 14.2.1 [23C71]
Application architecture: arm64
Logical processor count: 10
Processor speed: NA
SqLite Version: 3.36.0
Built-in memory: 16,384.0 MB
Real memory available to Lightroom: 16,384.0 MB
Real memory used by Lightroom: 2,121.5 MB (12.9%)
Virtual memory used by Lightroom: 431,034.2 MB
Memory cache size: 269.6MB
Internal Camera Raw version: 16.1 [ 1728 ]
Maximum thread count used by Camera Raw: 5
Camera Raw SIMD optimization: SSE2
Camera Raw virtual memory: 5386MB / 8191MB (65%)
Camera Raw real memory: 6216MB / 16384MB (37%)
Standard Preview Size: 4112 pixels
Displays: 1) 4112x2658
Graphics Processor Info:
Metal: Apple M1 Pro
Init State: GPU for Export supported by default
User Preference: Auto
Application folder: /Applications/Adobe Lightroom Classic
Library Path: /Users/user/Lightroom/Main Lightroom Catalog-v13.lrcat
Settings Folder: /Users/user/Library/Application Support/Adobe/Lightroom
Installed Plugins:
1) AdobeStock
2) Aperture/iPhoto Importer Plug-in
3) Canon Print Studio Pro
4) Flickr
5) LR/Enfuse
6) Nikon Tether Plugin
7) ON1 Resize AI 2023
8) Show Focus Points
9) SmugMug
10) Topaz Photo AI
Config.lua flags: None
Copy link to clipboard
Copied
Importing/exporting the depth map image would help a lot, for those preferring to use external tools.
Copy link to clipboard
Copied
acho que ele poderia se tornar algo mais rapido, assim como as outras funções. por ele ser demorado para analisar e acabar travando o Lr, iremos ter um tempo muito maior de trabalho por conta da espera.
Copy link to clipboard
Copied
Olá, a funcionalidade de desfoquue de lente ficou simplesmente incrivel, adorei o resultado final e a maneira de usa la ficou muito boa, intuitiva e fácil.

Copy link to clipboard
Copied
Yes, I can see where it can be used. I just used it. keep up the work.

 AdChoices