Exit
  • Global community
    • Language:
      • Deutsch
      • English
      • Español
      • Français
      • Português
  • 日本語コミュニティ
  • 한국 커뮤니티
0

How to create a silhouette from a photo in photoshop elements

New Here ,
Jan 14, 2012 Jan 14, 2012

I am trying to create a silhouette from a photo in photo elements need some urgent steps.  I tried a method from ehow.com and mommywords.com but its only nonsense Im coming up with.  I have the trial version and would like to purchase but if I can't use it then it wil make no sense.

36.3K
Translate
Report
Community guidelines
Be kind and respectful, give credit to the original source of content, and search for duplicates before posting. Learn more
community guidelines
Guest
Jan 14, 2012 Jan 14, 2012

You'll need to post a sample of your photo, as well as an example of the effect you're trying to achieve.

Ken

Translate
Report
Community guidelines
Be kind and respectful, give credit to the original source of content, and search for duplicates before posting. Learn more
community guidelines
LEGEND ,
Jan 14, 2012 Jan 14, 2012

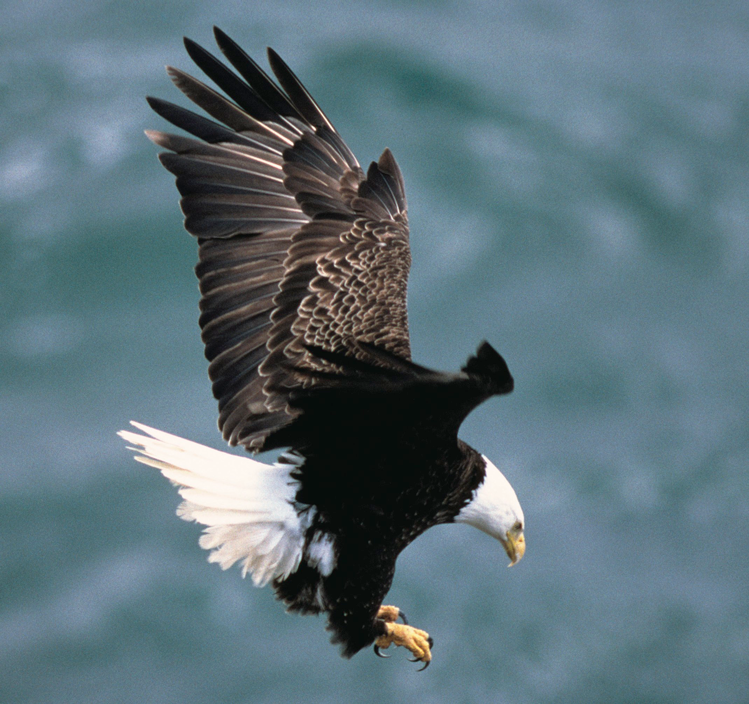
Make a good selection of the subject that you want the silhouette of. This is key.

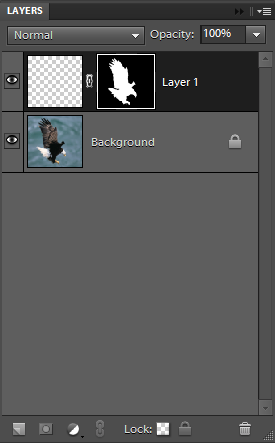
Go to Layer>new>layer via copy. This puts the selection on its own layer

Press CTRL+left click the layer thumbnail of this layer to make the selection active

Go to Edit>copy to put it on the clipboard

Create a new canvas - File>new>blank file

Layer>new>layer and name it color cutout

Again, Layer>new>layer and name it silhouette cutout. This layer will be at the top of the stack of the 3 layers

Fill the background layer with color - for example 9369BF

Paste the cutout selection into both the color cutout and silhouette cutout layers (Edit>paste)

Set your foreground color chip to black, then fill the silhouette cutout layer with black (Edit>fill selection>black)

If you want to refine it a bit by showing a tad of color, access the eraser tool with 8-10% opacity to erase the black color around the edges or at a  special location

Translate
Report
Community guidelines
Be kind and respectful, give credit to the original source of content, and search for duplicates before posting. Learn more
community guidelines
Guest
Jan 14, 2012 Jan 14, 2012

Another way to create a silhouette is to use Layer Masks.

Here's the original:

eagle original.png

  1. Make a selection of your object:
    eagle selection.png
  2. In the Layers Panel, use the icon at the bottom to create a new layer.
  3. With that new layer selected, use the icon at the bottom to create a mask.  It will automatically use your selection:
    eagle selection layer 01.png
  4. Click on the mask area and use Ctrl+I to invert the colours of the mask.
  5. Use Ctrl+J to duplicate that layer.
  6. Click on the mask image of that new layer to highlight it, and use Ctrl+I to invert the colours of the mask.
  7. Click on the image area of the top layer to activate it and use the Paint Bucket tool to fill it with black.
  8. Click on the image area of the lower layer to activate it and use the Paint Bucket tool to fill it with white.
  9. Your layers will look like this:
    eagle selection layer 02.png

The final result:

eagle silhouette.png

Ken

Translate
Report
Community guidelines
Be kind and respectful, give credit to the original source of content, and search for duplicates before posting. Learn more
community guidelines
Guest
Jan 15, 2012 Jan 15, 2012

Now that I'm getting into this...

The most versatile method is to use a Clipping Mask.

  1. Make your selection:
    eagle selection.png
  2. Hit Ctrl+J to copy the selection onto its own layer:
    eagle selection layer.png
  3. Create two new layers, one above and one below the previous layer:
    eagle 3 layers 01.png
  4. Hold down the Alt key and click the dividing line between the top layer (Layer 3) and the middle layer (Layer 1).  This will create a Clipping Mask from the middle layer (Layer 1):
    eagle clip layer.png
  5. Now, you can fill the top layer (Layer 3) and the bottom layer (Layer 2) with anything you want -- solid colours, gradients, other images, etc.:
    eagle layers final.png

The final result:
eagle silhouette.png

The beauty of this method is that you can easily change the silhouette shape on Layer 1 by erasing or painting with any colour and the changes are automatically revealed in the silhouette and its background.  The clipping layer (Layer 1) only uses transparent and non-transparent information to do its work, which is why you can paint on it with any colour.

Ken

Translate
Report
Community guidelines
Be kind and respectful, give credit to the original source of content, and search for duplicates before posting. Learn more
community guidelines
LEGEND ,
Jan 15, 2012 Jan 15, 2012
LATEST

to dolor123

Many ways to make a silhouette using Elements, as you can see. You need to become familiar with the program.

There are galleries available on PBase to get some ideas.

[Link removed... at least one picture at the link is of a full frontal nude woman... which is not suitable for this forum... Mod]

Translate
Report
Community guidelines
Be kind and respectful, give credit to the original source of content, and search for duplicates before posting. Learn more
community guidelines