

- Home
- Photoshop Elements
- Discussions
- Re: How to duplicate layer (that has mask) and kee...
- Re: How to duplicate layer (that has mask) and kee...

Copy link to clipboard
Copied
When I duplicate a layer that has a layer mask, the new layer keeps the edit/effect of the original layer in all areas (i.e. ignores the mask). How do I duplicate a layer in a way that keeps the original mask's effects, but then allows me to then enhance and mask this new layer independently?
For example, on a layer called "original"...
1. I darken highlights (via Enhance > Adjust Lighting > Shadows/Highlights).
2. I create a mask, then mask out certain areas at <100% opacity.
3. I duplicate this "original" layer (via right-click > duplicate layer), which produces a "new" layer that includes the "original" mask.
4. The "new" layer has the darkened highlights in the entire layer, as if the "original" layer had no mask at all. (If I delete the "new" mask, it makes no difference.)
I use Photoshop Elements 14. Wasn't sure if this was my error or a PSE error (as far as choosing topic for this post).
Thank you kindly,
Kyla
p.s. I believe this is not possible, but if there's a way to do shadows/highlights non-destructively (like adjustment layers) in PSE 14, please let me know!
p.p.s. Again, don't think it's possible, but if there's a way to crop non-destructively in PSE 14, please let me know!


 1 Correct answer

If you have multiple (ordinary) layers that have information on them, you will see the content of the top layer in the work area. If you reduce the layer opacity of the top layer, then you can visualize the content of the layer below.
 15
Replies
15
15
Replies
15
Copy link to clipboard
Copied
Kyla,
You can accompish this readily with the following work-flow:
1. Open your picture file
2. Activate the selection brush, or the lasso tool, or the magnetic lasso tool to select the object that you wish to change the brightness on, and place it on a separate layer (press CTRL+J)
3.Open a Brightness/contrast adjustment layer above this, and group the top 2 layers (press CTRL+G). At this point you should have 3 layers: a. Background layer, b. Layer 1 in the middle, c. The adjustment layer at the top
4. Work the sliders on the adjustment layer to suit.
If you wish to utilize a mask, do the following:
1. Open the picture file
2. Open a Brightness/contrast adjustment layer above this and work the sliders to suit. This will change the entire picture
3. Left click on the mask in the adjustment layer (not the name) and paint with a black brush to hide (mask) where you wish to retain the original brightness/contrast. If you go too far, correct with a white brush (" Black hides, white reveals")
Copy link to clipboard
Copied
Thank you for the reply. However, my question is "How do I duplicate a layer in a way that keeps the original mask's effects, but then allows me to then enhance and mask this new layer independently?"
My specific example was shadows/highlights (not brightness/contrast), but my question applies to other enhancement/adjustments too.
Copy link to clipboard
Copied
You can create a "stamp visible" layer, which is a combination or amalgam of all the layers,
To do that, open a blank layer at the top of the stack of layers, and press CTRL+SHIFT+ALT+E
Now you can "enhance and mask this new layer independently." The subjacent layers remain.
My apology about the mix up re shadow/highlights & brightness/contrast.
Copy link to clipboard
Copied
Neat trick, but my issue persists. It's as if the other layer masks don't exist (and therefore the effects of the other layers are applied to the entire new layer).
I'm wondering if this is a PSE error in my software? Or is this just how duplicates work?
Copy link to clipboard
Copied
Please post a representative picture here on the forum via the "Insert Photos" icon at the top of the reply box, and point to what you wish to change/mask/enhance.
Copy link to clipboard
Copied
Perhaps my issue is not understanding how layers work...
If I change my workflow:
1. I darken highlights in the "original" layer.
2. I duplicate "original" layer (without making a mask yet).
3. I can edit/mask "new" layer as I please.
4. Go back to "original" layer to make a mask.
... then all the layer effects are doing what they're supposed to be doing... just seems illogical work-flow...
So maybe my confusion is how the layers work with each other. My understanding was that they are like transparent sheets, each with whatever enhancements I add. So I should be able to re-order the layers. With adjustment layers, I can re-order them with no issue. But with duplicate layers this does not work. If I move a layer above its duplicate in the layers panel, then the duplicate is no longer visible. I figure this is because the duplicate layer is more like an opaque object, which is "fine." BUT if I want to go back and further enhance a layer, some duplicated layers I can continue to alter the enhancement, while other won't show the new enhancement... Please help!
Copy link to clipboard
Copied
If you have multiple (ordinary) layers that have information on them, you will see the content of the top layer in the work area. If you reduce the layer opacity of the top layer, then you can visualize the content of the layer below.
Copy link to clipboard
Copied
Thanks for your reply.
Although your answer is technically a correct statement, it still has not answered my confusion about why I can continue to edit some previous duplicated layers and not others (nor my original question about how to duplicate a layer with the original mask's effect still in effect).
But I don't want to take more of your time. So thanks anyway.
Kyla
Copy link to clipboard
Copied
I think that what you are missing is that the area covered by the '<100%' mask is partly transparent.
If you duplicate the layer, the areas not covered by the mask show only the top layer. The masked areas of both layers show the combination (blending) of the pixels in normal mode. That means that this area is still partly transparent and shows the combined effect of the layers underneath. So what you are seeing is the combination of not only the two top layers, but also of the bottom layers. Another parameter in your setup is the 'blend mode' of the two masked layers. For instance, try 'multiply' or 'screen'.
You also asked about 'non destructive cropping in Elements: you need to use a non destructive workflow, which is available with the ACR plugin. To be able to edit raw files, it has to use a 'parametric' edit workflow which does not change anything in the raw pixels, but records the edits (slider settings = the 'recipe') you are doing in ACR. That parametric workflow works with jpegs or psds, tiffs... as well as with raw data. The crop tool in ACR is totally parametric and non destructive.
Edit:
Also, shadow and highlight corrections are much, much more powerful and flexible in the ACR workflow. Especially if you shoot raw, but also with jpegs.
Copy link to clipboard
Copied
Thank you, MichelBParis! That is exactly what I needed to know to understand why duplicating a layer with a mask doesn't look quite right! I knew the masked areas are transparent (depending on my choice of opacity), but I thought they were only transparent to that specific layer. But, if I now understand correctly, apparently masks are transparent to any other layers below it?
And so if I want two layers with different effects to each have a mask, how do I get each mask to only be transparent to their respective layer? If it helps to know, a typical work-flow for me may be... duplicate background, sharpen, duplicate sharpen layer, improve highlights +/- mask, duplicate highlights layer, improve shadows +/- mask, add adjustment layers +/- masks, then the dreaded destructive crop LOL...
I always keep blending mode normal (I had tried others, but they didn't look right).
I was aware of ACR non-destructive cropping and ajustments (including highlights/shadows). The difficulty is I need more editing than what ACR allows. For example, if I have a decent photo, I can get away with just a few minor adjustments in ACR and save image. But as a complete newbie photographer, I unfortunately do rely on editing my photos sometimes a lot more than I'd like to admit to make up for my rookie mistakes (for now). So if I want to use masks, or my Topaz Sharpen AI plug-in, or even just improve highlights/shadows beyond ACRs limits, then I open the image and start working with layers. I save PSD and JPEG at that point. But then as I look through the final JPEGs, I'll notice some differences that I need to adjust a little to keep their overall appearance consistent. When I re-open PSD, I cannot re-open ACR in PSE 14 to my knowledge (Googled it a lot). I can see the adjustments in ACR if I re-open the original file, but then I'd have to re-do all the other layer edits...
Furthermore, I don't like cropping in ACR since I cannot figure out how to keep original photo ratio as I crop. And since I cannot figure out how to toggle each effect on/off (or toggle the original vs final). And since I cannot figure out how to "undo" my actions (sometimes I like to undo/redo an effect to help me decide between choices). Hence, I prefer to just open images as they are and then do all my edits in layers. But I am open to learning if I'm missing these options in ACR!
I did find another thread where the original poster was using Elements XXL from The Plugin Site that provided a checkbox to choose whether to delete cropped pixels. But I was too nervous to try the plug-in because I wasn't sure if it'd mess up my PSE, and because their site literally says, "Trial Limitation: After 14 days you cannot use its features anymore" So what's the point if I can't crop non-destructively after 14 days, LOL.

Copy link to clipboard
Copied
@Kyla22401176ece0, to answer your postscript questions, you can effectively alter shadows and highlights non-destructively by using a brightness contrast adjustment layer, or perhaps a levels adjustment layer, both of which are available in Elements 14.
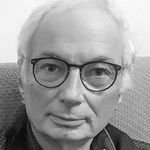
In the following screenshot, I have an original flower photo and added two brightness/contrast adjustment layers.

- First, I added an adjustment layers to brighten the flower. I used the brush tool to paint black over the background area on the mask so the brighten adjustment only affected the flower.
- I then duplicated the adjustment layer and inverted the mask by clicking on the mask and using the Ctrl+I command. Any brightness/contrast adjustment now only affects the background which I wanted to darken. You can see the cumulative effect in the following gif:

Since I used adjustment layers, I can always go back and make further adjustments to each layer.
It is not clear to me where your misunderstanding arises. Perhaps if you could be more specific about what you are trying to do with each layer and why you are moving the mask layers around, we may be able to clear it up for you.
As for your second PS, you are correct that you cannot crop non-destructively in Elements 14. However, you can always undo a crop.
Copy link to clipboard
Copied
Thank you Greg_S.
Although I do like the brightness/contrast and levels adjustment layers a lot, I often find I specifically want to improve highlights/shadows, which is unfortunately not an adjustment layer (i.e. it would be destructive).
As a newbie photographer, I've really only taken a few photos of friends and volunteered at the Zoo's Halloween and Christmas events. So my photos are mostly people.
Let's say I want to improve shadows (under eyes, or background trees) or highlights (parts of face overexposed). Since the rest of the photo is properly exposed, adjusting brightness affects all the areas of the photo that don't need adjusting. And the photo is too complex to mask in such detail to make brightness work as a "highlight" tool. Similarly, levels affects the whole photo, and the black/white/gamma input sliders and the two output sliders aren't quite the same effect as the highlights/shadows tool anyway.
I don't actually need to re-arrange the layers. I was just moving things around to see if I could get the effects right, since I wasn't understanding that masks are transparent to multiple layers beneath (as opposed to just the one layer I put it on).
So really, the only other thing I haven't quite figured out, is why when I further enhance effects in a lower duplicated layer, I can sometimes see the effects in the image and sometimes not (even though I can see the effect in that layer's thumbnail, or if I toggle upper layers off)...
Copy link to clipboard
Copied
To Undo/Redo commands in ACR, you can use Ctrl+Z and Shift+Ctrl+Z to cycle backwards and forwards through your changes. This works for the crop tool too.
Pressing the Alt key also changes the Cancel button to Reset so you can revert a raw file to the condition it was opened in without closing (Canceling) the file.
Copy link to clipboard
Copied
I had found that keyboard shortcut for ACR (which is difficult when I have cats laying on my arms, LOL), but it only does a single undo.
Thanks again Greg!
Copy link to clipboard
Copied
@Kyla22401176ece0 said:
I had found that keyboard shortcut for ACR . . . but it only does a single undo.
The shortcuts work for multiple changes in Elements 2022 ACR. Maybe a reason for you to upgrade. 😁

 AdChoices