Community Manager
August 16, 2023
Question

[Released] Now in Beta: New Color Settings Panel with a refreshed user experience

  • August 16, 2023
  • 12 replies
  • 7675 views

Edit: This feature is now shipping in Premiere Pro v24. Thanks to everyone who provided feedback while it was in beta!


We released a new color settings panel a few months back which consolidates the color settings in one place for discoverability and ease of use. Thanks to our users who gave us feedback on the feature and spoke up about their concerns. With this update, we are updating the settings pane’s user experience based on feedback we had received post Beta. The new settings pane experience groups the settings and helps you interact with them in a more intuitive manner.


Below are key new changes in the settings tab -


  1. Intuitive grouping of settings into sections in line with terminology used in settings across dialogs in the app today for an easier learning curve for our users.

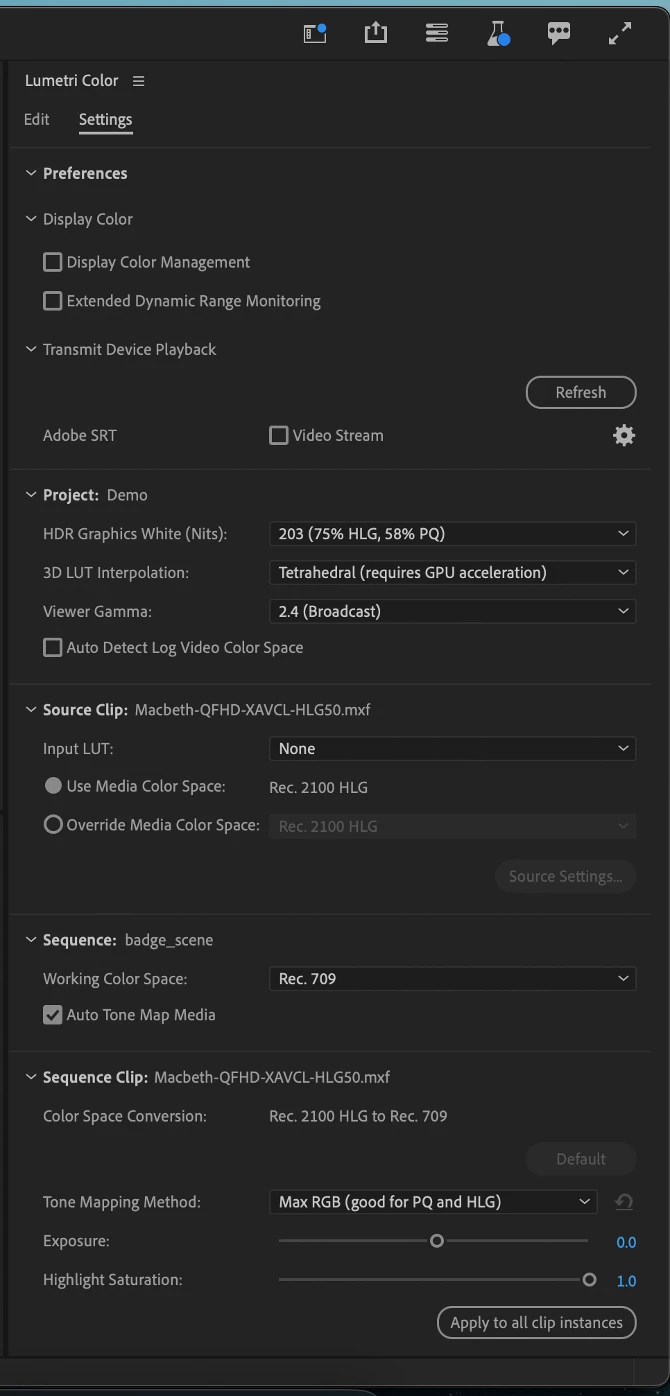
a) Preferences: This section allows you to choose ‘Display Color Management’ settings or ‘Transmit Device’ settings. The settings under this section will apply to all clips and projects within Premiere.

b) Project: This section allows you to select all project level color settings like ‘HDR Graphic White Nits’, ‘3D LUT interpolation’, ‘Viewer Gamma’, ‘Auto detect log video color space’. The settings in this section will apply to the project in focus.

c) Source clip: The color settings under source clip settings allow you to override the default color space and specify the media color space manually. The source clip setting in this section will apply to the source clip from the sequence selected in the timeline or the source clip selected in the project bin.

d) Sequence: The color settings under this section will allow you to modify the sequence settings like ‘Working Color Space’ or ‘Auto Tone Map Media’ for the sequence for the clip selected in the timeline or sequence selected in the project bin.

e) Sequence clip: The color settings here will apply to the clip selected in the timeline and will allow you to update the ‘Tone Mapping Method’.


  1. More Intuitive source clip selection behavior: Our users reported that it was not intuitive for them to click on the source clip in the project bin to enable the setting for source clip which was in line with modal settings dialog behavior, hence, we updated the behavior to enable source clip section for the sequence clip selected in the timeline. Any change to the source clip setting will make the change for the source across projects and sequences. You can still choose a different source clip than the sequence clip selected by going to the project bin.


  1. Help text for non-color managed media: Users reported confusion around being unable to edit certain sections like sequence or source when certain clips were selected. We explicitly call out media as ‘Not color managed’ next to the section titles to make it easy for you to understand why a section is disabled.


  1. Project, Sequence and Clip names next to section titles: To help you easily correlate the sections with the selected media or section on the left, we now call out section names against each section based on the selection.


  1. New styling to identify indents: For better usability, section titles have an expand/collapse icon next to them.  


Please try the refreshed settings experience and share your feedback!

This topic has been closed for replies.

12 replies

Legend
January 14, 2024

It's been a while since we got the Settings panel, but is there really STILL no way to change the Tone Mapping Method on multiple clips? Any plans to fix this?

It seems that the team thinks they have this done, because the Apply to All Instances button is there. But my clips are not instances of the same file, they are separate files. So I have to click-click-click-click-click-click-click-click-click-click-click-click-click-click-click-click-click-click-click-click-click-click-click-click-click a lot to change the Tone Mapping Method. This feels like going back to the late 90's, when it comes to user friendliness and efficiency. 

Please fix this very soon! Pretty please!

R Neil Haugen
Legend
January 14, 2024

AMEN Jarle ... ! That's a right pain.

Everyone's mileage always varies ...
Rustic Media
Known Participant
January 12, 2024

Great improvement! My feedback so far is that if you work with a Proxy Workflow and Offline OCF in a Production Project, I can lose the ability to manage Source Clip. As an example, I have Alexa footage in LogC3, and made proxies also in LogC3. An AE imported attached proxies, and offlined full-resolution media. I am referencing and cutting with LogC3 Proxies. I want to apply a LogC3->Rec709 LUT as an Input LUT but have no way of doing that when media is set to Offline. Further, when Onlined media, Input LUT assigned, I get a Rec709 image as expected. Offline the media, Rec709 Input LUT still applies to the attached Proxy but is greyed out at the Input LUT level. I do not understand why I cannot have the option to designate the Input LUT when full-resolution media is Offline but Proxy is attached.

Rustic Media
Known Participant
January 12, 2024

*An AE imported the Alexa OCF full-resolution media, attached the proxies, and offlined the OCF full-resolution media. I am cutting the offline media with Proxies attached.

Known Participant
October 17, 2023


Can the EXR source settings be added to the Lumetri panel.

Community Manager
October 19, 2023

Adding @eric escobar @9698999 @Fergus Kousha to help on this

Legend
October 4, 2023

I imported around 50 clips shot with the FiLMiC Pro app on a Samsung Galaxy S2021 Ultra yesterday, which all looked best with Per Channel as the Tone Mapping Method. I could not find a method to batch-change this setting, which meant more than 100 clicks where I'd expected to do it with one or two. 

Is there really no way to change the Tone Mapping Method on multiple clips?

Also, the footage (shot with the FiLMiC Extreme setting) was very hard to edit, probably because there's no hardware acelaration (it's h.265 422, so not an uncommon thing). So I used the Project Manager to Transform the sources into ProRes 422 HQ. When I open that project, the highligts are totrally out of whack, and everyhting looks different from the original project. The ProRes clips have Tone Mapping Method disabled, because they are Rec.709. Why? All the footage was Rec.2100 PQ. Why was Rec.709 clips created? 

Modyfying the ProRes clip color to PQ does not fix the problem, btw. 

Legend
October 4, 2023

I shold probably add that the Transcode setting in ProJect Manager was set to Individual Clips.

Amitzi Photography
Known Participant
September 14, 2023

I've been using this for a week. It seems like if I sync some footage and audio (using create Multi Camera Sequence), the footage inconsistently shows the auto color grading.

Windows 10 PPro 24.1.0 

R Neil Haugen
Legend
September 14, 2023

More details of your exact steps would be needed to even try and replicate. So ... please post additional details. Especially the particular media and what it came from, and the OS and hardware you are using.


Plus ... what is "inconsistent" in detail also. Thanks!

Everyone's mileage always varies ...
Amitzi Photography
Known Participant
September 14, 2023
My footage is Sony 10-bit 4:2:2 60p S-log 3.
With the first few releases the auto-detect log didn't work at all, once
the clips and the audio got synced. Now, sometimes they work, mostly they
don't.
Windows 10, Intel i7 12700KF Nvidia RTX 3080
64GB DD4
Shebbe
Community Expert
Community Expert
September 13, 2023

I have more feedback.

I can understand that you want to explain/guide complex terminology for beginners but is it really a good idea to put it in the name rather than a mouse over tooltip?


Apple premiered it's new iPhone that will presumably shoot in true log.

You will have to add support for this eventually. But this will likely look better with Per Channel tone mapping.

However you see iPhone in the Hue Persevation model which may throw off the beginner?... What if more phones start to film in the same way those models do in HLG HDR with DV metadata? Would you add them too in the description?


If you make mouse over tool tips you can place much more text explaining the recommendations and keeps the options themselves clean from any specific data.

If one field is too small, you could also split the tooltip into separate ones that only show respectively when hovering over one of the methods.


The other reason I'm suggesting this is because Per Channel isn't always better for log. And what if later down the line Adobe invents a new tone mapping algorithm. That is also very pretty for log. It just gets messy with the text in the choices...


R Neil Haugen
Legend
September 12, 2023

You would think a clear, precise description of the color processing pipeline would be a good thing for users to know. But getting a full, public description is not that easy in my experience.


At NAB this April, I asked very carefully and directly about the color space of the processing pipeline. From ingesting media through timeline through export. Including whether media was transformed to the timeline working space prior to processing color controls from Lumetri or some other color control.


The answer I finally got, in some detail, from a very senior staffer, was that the sequence color space setting actually only sets the display space. This is a major piece of information!


From that staffer, he said very clearly the clips are not transformed to that display color space, then Lumetri applied. Lumetri is applied to the clip data ... with the transform to display space processed after Lumetri.


While a couple others were more than a bit hesitant to give any answer on this, for some reason I don't understand, none said that information was wrong.


I posted about that on the forum here a few months back ... and again, though staffers participated in that thread, none contradicted that information. If any staffer has a clarification of this, I would love to see it posted here!


What this indicates is we are at least working from the original data when applying color corrections, not modified pixels from the smaller display space if Rec.709 is the chosen display space.


While that would be better than having the data transformed prior to Lumetri, still ... many of us would like a unified space to do corrections within. Such as Baffy's request for the Arri wide.


I would happily take a choice to transform to Arri-wide for timeline data. Or even P3-D65. Something wide but unified. As that does tend to make color corrections more predictable across clips. Speeding and simplifying the user workflow.

Everyone's mileage always varies ...
R Neil Haugen
Legend
September 12, 2023

I know we all complain about the non-specific information from the PrPro devs on the precise color processing steps from ingest through timeline through display through export.


But there's also a long thread on a BM forum with some major colorists involved, trying to sort out what the heck the Resolve devs mean about some color tools being "color space aware".


As no one can take the information from the Resolve manual, test through an either ACES or RCM workflow, and get results that they would expect to achieve if this was the case. There are always  ... puzzlements.


So I suppose some slack to the Adobe devs is warranted. But I still want that information nailed down, personally.

Everyone's mileage always varies ...
Legend
September 12, 2023

👉Stop, stop, stop.

And where is the letter "F" that I asked about? As a colorist, I want to work in the Arri color space in real time, as the widest in the supported Adobe system. This is very necessary for professional work with color. And to display the material in the color space for the client's tasks - REC.709, 2020, 2100, PCI D3. Where will this be implemented, on the export page? Or you'll pass by again.

Shebbe
Community Expert
Community Expert
August 21, 2023

Hi,


The color management is slowly getting somewhere but I can see that it's mostly targeted to editors not wanting/needing to spend much time tweaking color for their deliverables. The fact that the pipeline still is display referred is what gives it away. Nonetheless for those people this is a good way to have them not fall into confusion hoops with different LUTs for each type of footage.

Based on that I will provide some feedback..


- It looks like different clips or tone map types have different default settings? This is weird and especially for exposure it should never start with something other than 'no adjustment' / 0. Otherwise it means that Premiere is already changing the look of the source without artist touching it. If the different tonemap models produce different exposure between eachother there's something wrong in the math but I don't think they do so default should be able to remain 0 for all.


- Great that there are 3 tonemap models now which we can choose from!

Not fully sure about this but isn't it called "Per Channel" instead of "By Channel"?


- Not all files can have color management enabled. ARRI mxf files don't get read properly although metadata is present.


- Management is still not enabled for any file type making management for non metadata files impossible. If you have FX9 footage for example, but one of the clips gets VFX treatment you lose management on that clip. All file types should have the option to be set to anything from the colorspace list present in the software. Also images of which some are treated as 709 but others converted from sRGB to 709 because of profile embedding working on some files but not on others.


- Some thoughts for future development in line with the above. What about dynamic links? AE's colormanagement is not in line with Premiere. (Adobe color managed) so VFX roundtripping is not possible at the moment. We'd need the same colormanagement type system on AE (for linearizing and viewing) and it should auto forward the data back to Premiere keeping the dynamic link comp in SLog3 for example and then Premiere still tone maps it.

Basically at some point the old icc profile based AE management should be thrown out the window 🙂


Community Expert
August 18, 2023

How do I get Premiere to add the HDMI HDR flag so that my LG OLED will switch to HLG using a BM UltraStudio 4K?

Community Manager
August 18, 2023

Hi Richard,
Does the response on this thread help? - https://community.adobe.com/t5/premiere-pro-discussions/hdr-using-bm-ultra-studio-4k/m-p/12913393 
Also adding @eric escobar for insights on HDR workflow. 

Thanks,
Neerja

Community Expert
August 18, 2023

It seems to send the flag when the sequence is set to 25fps but not at 50. The BM UltraStudio should cope with HDR at the higher framerate. As expected Resolve has no issues with HDR at 50fps UHD but they make the hardware!