
Premiere Rush Guided Workflow — Effects and Color Grading
Effects and Color Grading
You can create transitions, color effects, and transformation effects in Adobe Premiere Rush. Combine these effects for even greater creative control. You can create titles and speed effects, as well.
Transitions
Transitions are used as an alternative to a cut when changing from one picture to another in video editing. A Cross Dissolve, Dip to Black, and Dip to White transitions are the choices you have for standard transitions.
Add a transition
Creating a Cross Dissolve, Dip to Black, or Dip to White transition is easy. Do the following:
- Click the Transitions button
- Locate the transition you want
- Drag the transition between two clips
Add a transition to fade up from black, or to fade to black:
- Locate the Cross Dissolve transition
- Do one of the following:
- Drag the transition before the first clip to fade up from black.
- Drag the transition to the end of the last clip to fade to black.
Remove a transition:
- Select the transition
- Press the Delete key
Replace a transition
- Drag a transition on top of an existing transition
- The transition is replaced with the new one
Change transition length
- Drag the edge of the transition left or right
- The transition lengthens or shortens
Fade audio up or down
Create a Cross Dissolve, Dip to Black, or Dip to White transition. Do the following:
- Locate the Cross Dissolve transition
- Drag the transition to the beginning, end, or between two audio clips
Color
Adding color effects to clips can be done by adding preset color effect to them. You can also create custom color effects.
Adding a preset color effect
Creating a color effect by doing the following:
- Click the Color button
- Locate the filter you want
- Drag the filter to one or more selected clips
Adding a custom color effect
Creating a custom color effect preset to a selected clip by doing the following:
- Click the Color button. Preset filters appear by default.
- Click any filter
- Click the Edit button in the top left of the panel
- Create any custom color looks by moving the sliders
- Save the Preset by clicking the "Options" shortcut menu and then naming the preset.
Tip: The Intensity slider at the bottom of the panel can make the colors appear more or less brighter and colorful with any adjustments you make.
Transform
Transform
Basic options allow you to reposition, rotate, change opacity, or scale (resize). To so so:
- Click the Crop and Rotate tool to expand the transform properties
- Move sliders to change the following:
- Horizontal position
- Vertical position
- Rotation
- Opacity
Crop
Advanced options allow you to crop and feather edges of that crop. To so so:
- Expand Advanced options by clicking the arrow.
- Move sliders to change the following:
- Crop Top
- Crop Bottom
- Crop Left
- Crop Right
- For Edge Feather
- Expand Appearance options by clicking the arrow in Advanced Options.
- Drag Edge Feather right for more feathering. Left for less feathering.
Create a Picture in Picture Effect
You can create a cool picture in picture effect. Check out the tutorial here.
Titles
You can create a simple title or an animated title by using a motion graphics template. You can easily trim or delete the title clip. You can add a cross dissolve to the title to fade the title either up or down, as well.
Create a simple title
- Click the "Add Media" button, and then choose "Title."
- A new title appears in the Preview Monitor
- Begin typing to customize the title
- Stylize your title further by clicking the "Title" button, then click the Edit button inside the panel
- Change the font
- Change the style of the font
- Change size
- Change the Character Spacing
- Change the Line Spacing
- Change the Baseline Shift
- Change the Color Fill
- Change the Outline
- Change the Shadow
- In the Options menu (the one with three dots), choose "Save Template As" to save this text style for future use
Create a title using a motion graphics template
- In the Titles panel, under "Styles," click the "More Titles" button at the top of the panel.
- Select a motion graphics template
- For a text overlay, drag the template to a track above any clip
- Click the "Edit" button to stylize the template
Delete a title
To delete a title, select the title and press Delete.
Additonal Resources:
Speed up or slow down video
- In the timeline, select the clip you want to speed up or slow down.
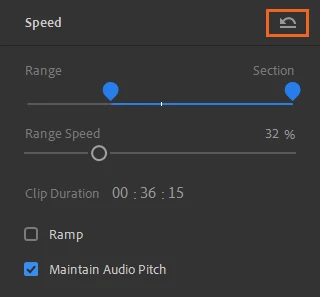
- To show the speed controls, click the Speed button on the right bar.
- (Optional) To speed up or slow down only a portion of the clip, set the start and end points to select a specific range.
- Set the start and end points using the Range slider in the Speed panel, or
- Set the start and end points directly using the blue range handles on the clip in the timeline.
-
Move the Range Speed slider right to increase the playback speed of a clip. Move it to the left to slow it down. As you move the slider:
- The clip duration changes (under the Range Speed slider)
- A sped up clip becomes shorter in the timeline. A slowed down clip becomes longer.
- If the clip contains audio, playing the clip more slowly lowers the pitch of the audio, and playing the clip faster raises the pitch. To preserve the original pitch of the audio, the Maintain Audio Pitch check box in the Speed panel is enabled by default. If you don't want to preserve the pitch, disable this check box.
- Tip: If the audio isn't essential, mute the audio track and add background music to the clip.
- To smooth the transition into your speed range, select Ramp and adjust the ramp duration.
Additional Resources:
Edit clip duration to set a specific duration for your clip
- In the timeline, select the clip to which you want to apply speed changes..
- To show the speed controls, click the Speed button on the right bar.
- In the Clip Duration field, click the minutes, seconds, or frames values and type in your changes.

Remove speed adjustments from a clip
- Click the Reset button to reset the range section to the default speed.
Additional Resources:
Change speed on mobile version
Best practices
New to video editing? Here are a few guidelines to help you understand when to speed up or slow down your video.
When to speed up video
Often videos benefit from a faster pace in scenarios where you want to:
- Create a short video that might otherwise take a long time to watch, or is a good length for social media.
- Speed up slower moments in a video, but you don't necessarily want to edit it out.
Examples: Arts and crafts videos, vlogs, make up tutorials
When to slow down video
Slowing down a video is a great idea if you’re looking to:
- Create a mood that’s thoughtful or dreamy.
- Emphasize details in fast-moving content that may otherwise be too quick for viewers to appreciate.
Examples: Sports videos
Next up, we'll check out how to export your movie. More on that here.
Mobile Guide:
Details from the User Guide:
- Add and edit transitions
- Adjust a clip's color
- Transform a clip's properties
- Picture in Picture effect
- Titles
- Speed up or slow down video
Home: Editing Overview