

All Dropdown Content Lost After Upgrading to RH15

Copy link to clipboard
Copied
All Dropdown Content Lost After Upgrading to RH15
I have upgraded from RoboHelp 9 to RoboHelp 15, and in the process, I have lost ALL content from ALL expandable dropdowns. Where once there used to be text and images in those dropdowns (expandable in the chm output), now after the upgrade there is nothing left. In my RoboHelp project, all dropdown text editor boxes are now empty. How do I restore the content in the dropdowns? Please help.
Thank you,
Gabriela


 11
Replies
11
11
Replies
11
Copy link to clipboard
Copied
Hi there
Perhaps try clicking the Tools tab followed by Update DHTML and see if things improve.
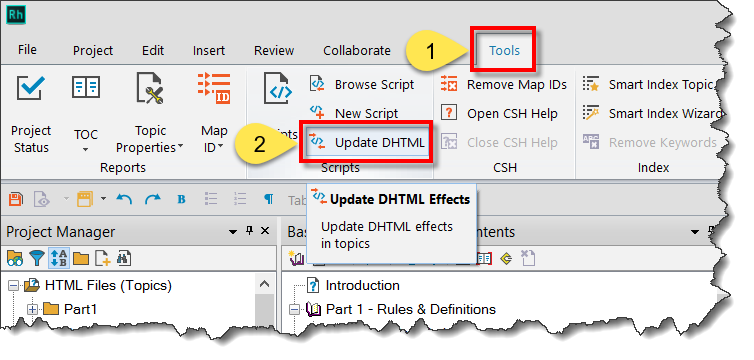
Cheers... Rick 
Copy link to clipboard
Copied
Rick, thanks for the suggestion. I have followed these steps, but my project's dropdown content has not been restored.
Gabriela
Copy link to clipboard
Copied
Sorry to hear that. Have you tried Peter's suggestion? If so, does that resolve things?
What about creating a new topic and adding a drop-down? Same issue or does a new topic work?
If you are still kind of stuck after trying Peter's suggestion, please consider sharing all the HTML code of one topic with the issue. Just go to HTML view and copy all the text you see (pressing Ctrl+A usually does this nicely) then paste it into the forum post here. That way we could copy it from here and paste into a topic to examine.
Cheers... Rick 
Copy link to clipboard
Copied
Hi Rick,
The project does allow me to add new dropdowns (however, given that my project is comprised of a very high number of topics, rewriting the content for all the popups would be humanly impossible).
Here is an instance of lost dropdown content:
 :
:
Below is a sample of the HTML code for a topic:
<?xml version="1.0" encoding="utf-8" ?>
<!DOCTYPE html PUBLIC "-//W3C//DTD XHTML 1.0 Transitional//EN" "http://www.w3.org/TR/xhtml1/DTD/xhtml1-transitional.dtd">
<html xmlns="http://www.w3.org/1999/xhtml">
<head>
<meta name="template" content="Help Master Page.htt" />
<meta http-equiv="Content-Type" content="text/html; charset=utf-8" />
<meta name="topic-priority" content="0" />
<meta name="topic-time-estimate" content="0" />
<meta name="topic-comment" content="" />
<meta name="topic-id" content="dispatch\dcall\TM4WINDriver_Call_In_Overview.htm" />
<meta name="topic-status" content="Complete" />
<meta name="generator" content="Adobe RoboHelp 2015" />
<title>Driver Call In Overview</title>
<link rel="StyleSheet" href="../../TM4WIN_HTML_Help.css" type="text/css" />
</head>
<body>
<?rh-placeholder type="header" ?>
<a name="<bc=36"></a> <a name="<bc=18"></a>
<p style="color: #000000;"><img src="../../_ref/images/TMW_Trimble-01.gif"
alt="" style="border: none;" width="112"
height="56" border="0" /></p>
<p> </p>
<script src="../../ehlpdhtm.js" type="text/javascript" language="JavaScript1.2"></script>
<h1><b style="font-weight: bold;">Driver Call In</b></h1>
<h2><b style="font-weight: bold;">Program Overview</b></h2>
<p>The Driver Call In program offers dispatch information on a per Driver
basis. This allows your dispatchers to manage dispatch-related Driver
information such as Driver Hours, Driver Position, free-form Notes and
the remaining hours in a Driver's Cycle. You can also reposition Drivers
and change Trip status in the Driver Call-In program. The Trip Grid displayed
in the Driver Call-In program is shared with the <a href="../dispatch/index.htm">Dispatch
program</a>, so changes made in either program will affect the other.</p>
<p class="Notes" style="margin-left: 60px; text-indent: -24px;"><b><span
style="font-weight: normal;"><img src="../../images/notes.gif" alt=""
style="border: none;" width="25"
height="25" border="0" /></span></b>The
Driver Call-In program has added support for more than one Mobile device
per resource, so that DCALL.EXE mirrors the 'Load Offer' functionality
in the Dispatch and City Dispatch programs.</p>
<h4 style="font-style: normal;"><a href="tm_DCALL.htm"><img src="../../_ref/images/81CONTROLSntkh.gif"
alt="" style="border: none;"
width="24"
height="24"
border="0" />Need
to know how?</a></h4>
<p> </p>
<h4>Where Is It?</h4>
<p>To open the Driver Call-In program click:</p>
<p>Start <img src="../../images/TM4WIN00090000.gif" alt="images/TM4WIN00090000.gif"
title="images/TM4WIN00090000.gif" width="10" height="10"
border="0" /> Programs <img src="../../images/TM4WIN00090000.gif"
alt="images/TM4WIN00090000.gif"
title="images/TM4WIN00090000.gif"
width="10" height="10" border="0" />
TruckMate <img src="../../images/TM4WIN00090000.gif" alt="images/TM4WIN00090000.gif"
title="images/TM4WIN00090000.gif" width="10" height="10"
border="0" /> Dispatch <img src="../../images/TM4WIN00090000.gif"
alt="images/TM4WIN00090000.gif"
title="images/TM4WIN00090000.gif"
width="10" height="10" border="0" />
Intermodal <img src="../../images/TM4WIN00090000.gif" alt="images/TM4WIN00090000.gif"
title="images/TM4WIN00090000.gif" width="10" height="10"
border="0" /> Driver Call-In</p>
<p><a href="../../_ref/tm_basics/imaging_over.htm" title="Document Imaging"><img
src="../../_ref/images/81CONTROLSdocumentImagingHelp.gif" alt="" style="border: none;"
width="48" height="48" border="0" /></a> <a href="../../_ref/tm_basics/kybd.htm#07_DCall"
title="Keyboard Short-Cuts"><img
src="../../_ref/images/81CONTROLSkeyboardShortsHelp.gif" alt="" style="border: none;"
width="48" height="48" border="0" /></a></p>
<h2>Program Details</h2>
<p><img src="../images/81DCALLmain1.gif" alt="" style="border: none;" width="806"
height="598" border="0" /></p>
<p>The program screen offers controls and information in the following
areas: Driver and Power Unit selection, Dispatch information, Driver information,
and Messaging information.</p>
<h3>Menu Bar / Toolbar</h3>
<p><?rh-dropspot_start class="dropspot" href="javascript:TextPopup(this)"
id="a20" ?><span class="glosstext">File Menu</span><?rh-dropspot_end ?></p>
<p><?rh-dropspot_start class="dropspot" href="javascript:TextPopup(this)"
id="a1" ?><span class="glosstext">Multi-Company
Menu</span><?rh-dropspot_end ?></p>
<p><?rh-dropspot_start class="dropspot" href="javascript:TextPopup(this)"
id="a25" ?><span class="glosstext">Navigate Menu</span><?rh-dropspot_end ?></p>
<p><?rh-dropspot_start class="dropspot" href="javascript:TextPopup(this)"
id="a26" ?><span class="glosstext">Tools Menu</span><?rh-dropspot_end ?></p>
<p><?rh-dropspot_start class="dropspot" href="javascript:TextPopup(this)"
id="a28" ?><span class="glosstext">Window Menu</span><?rh-dropspot_end ?></p>
<p><?rh-dropspot_start class="dropspot" href="javascript:TextPopup(this)"
id="a27" ?><span class="glosstext">Help Menu</span><?rh-dropspot_end ?></p>
<h3><a name="00Header<bc=5"></a><a name="00Header<bc=23"></a><a name="00Header<bc=41"></a><a
name="00Header"></a>Header Information</h3>
<p><b style="font-weight: bold;">Unit ID</b></p>
<p>You can display records in the Driver Call In program by selecting a
Power Unit ID in this field or a Driver ID in the Driver ID field below.
If you look up a Driver by entering a Power Unit ID, the Driver that is
currently assigned to any active legs as the Power Unit will be displayed.
If the Power Unit is not assigned to any active legs, the Driver that
is displayed in the 'Last Driver 1' field in the <a href="../dispatch/dispatch_resources.htm#02_03_PUnitTab">Dispatch
program > Power Unit Tab</a> will be displayed. You must click the
<span><img src="../images/81DCALLpopulateInfoButton.gif" alt="" style="border: none;"
width="20" height="19" border="0" /></span> button to the
right of the Driver ID field to display the record. Click the search button
for a search form.</p>
<p class="Notes" style="margin-left: 71px;"><img src="../../images/notes.gif"
alt="" style="border: none;"
width="25" height="25"
border="0" /> You can
navigate between Power Units using the <span style="font-weight: bold;"><Alt><Left
arrow></span> and <span style="font-weight: bold;"><Alt><Right
arrow></span> hot key combination.</p>
<p><b style="font-weight: bold;">Driver ID</b></p>
<p>Use this field to select a Driver. Click on the search button to the
right of the field to select a Driver code. After you have selected the
code, click the <span><img src="../images/81DCALLpopulateInfoButton.gif"
alt="" style="border: none;" width="20" height="19"
border="0" /></span> button to retrieve the
selected Driver's record, which will be displayed in the Grid to the right.
Driver codes are configured in the <a href="../../profile/driver/driver_over.htm">Driver
Profiles program</a>. Drivers will not be available for selection unless
the 'Show In Dispatch' box on the <a href="../../profile/driver/driver_over.htm#02detl">Detail
Tab</a> of the Driver Profile program is checked.</p>
<p class="Notes" style="margin-left: 71px;"><img src="../../images/notes.gif"
alt="" style="border: none;"
width="25" height="25"
border="0" /> You can
navigate between Drivers using the <span style="font-weight: bold;"><Alt><Left
arrow></span> and <span style="font-weight: bold;"><Alt><Right
arrow></span> hot key combination.</p>
<h4 class="HeadingCM" style="margin-left: 52px;">Context Menu</h4>
<p style="margin-left: 64px;">While in the Header section, you can right-click
either the '<span style="font-weight: bold;">Unit ID</span>' or '<span
style="font-weight: bold;">Driver ID</span>' field to access some
Resource Filters, which are pulled from the Dispatch program's Filter
Setup page (the 'Driver' and 'Power Unit' Tabs, specifically). For more
information on creating Dispatch Filters, see the <a href="../dispatch/tm_dispatchprogram_adv.htm#filtersetup">Dispatch
User Manual > Filter Setup</a> section.</p>
<h4 style="margin-left: 52px;">Header Grid</h4>
<p style="margin-left: 64px;">The fields that appear in this Grid are dependant
on which Resource you populate information from the Header fields ('Unit
ID' or 'Driver ID'). There are specific fields that will appear in the
Grid depending on which Resource you are working with:</p>
<p style="margin-left: 64px;"><?rh-dropspot_start class="dropspot" href="javascript:TextPopup(this)"
id="a32" ?><span class="glosstext">Driver
Grid</span><?rh-dropspot_end ?></p>
<h3><b style="font-weight: bold;">Dispatch Information</b></h3>
<h4 style="margin-left: 52px;"><b style="font-weight: bold;">T</b>rip Summary</h4>
<p style="margin-left: 64px;"><b style="font-weight: bold;"><a name="02stat<bc=16"></a><a
name="02stat<bc=34"></a><a name="02stat<bc=52"></a><a name="02stat"></a>Trip
Status</b></p>
<p style="margin-left: 64px;">If the selected Driver is currently assigned
to a Trip, the Trip will display in the <a href="#01trip">Trips Assigned
Grid</a>. You can change the Trip status by clicking on this button, or
by double clicking on the Trip Number in the Grid. The fields at the top
of the <?rh-dropspot_start class="dropspot" href="javascript:TextPopup(this)"
id="a3" ?><span class="glosstext" style="font-weight: bold;">Trip
Status Change window</span><?rh-dropspot_end ?> will pre-populate depending
on the equipment and details of the Trip. The fields on the bottom of
the form are where you will update the Trip Status.</p>
<p style="font-weight: bold; margin-left: 64px;"><a name="13repo<bc=15"></a><a
name="13repo<bc=33"></a><a name="13repo<bc=51"></a><a name="13repo"></a>Reposition</p>
<p style="margin-left: 64px;">The Reposition function is used to move a
Driver or piece of equipment from their Current Location to a new location.
<p style="margin-left: 64px;">For example, …if you wish to reposition a Driver or equipment without assigning them
to a Trip with a freight bill, you can use the Reposition option, which
opens the <?rh-dropspot_start class="dropspot" href="javascript:TextPopup(this)"
id="a4" ?>T<span class="glosstext" style="font-weight: bold;">rip
status change and equipment repositioning window</span><?rh-dropspot_end ?>.</p>
<h4 style="margin-left: 52px;"><b style="font-weight: bold;"><a name="01trip<bc=17"></a><a
name="01trip<bc=35"></a><a name="01trip<bc=53"></a><a name="01trip"></a></b>Trips
Assigned</h4>
<p style="margin-left: 64px;">The <?rh-dropspot_start class="dropspot"
href="javascript:TextPopup(this)"
id="a2" ?><span
class="glosstext" style="font-weight: bold;">Trips Assigned Grid</span><?rh-dropspot_end ?>
will display all Trips assigned to the Driver who is currently selected.
Most of the details here will pre-populate based on the Freight Bill information
of the Trip, but some of the fields in the Trips Assigned Grid can be
used to enter leg and Trip information or invoke menu functions. Use your
Context Menu to view more options. <span><b style="font-weight: bold;"> </b></span></p>
<h4 class="HeadingCM" style="margin-left: 116px;"><b style="font-weight: bold;">Context
Menu</b></h4>
<p class="ContextMenu" style="color: #000000; margin-left: 128px;"><b style="font-weight: bold;">Trip
View</b></p>
<p class="ContextMenu" style="color: #000000; margin-left: 128px;">The
<?rh-dropspot_start class="dropspot" href="javascript:TextPopup(this)"
id="a14" ?><span class="glosstext">Trip View window</span><?rh-dropspot_end ?>
displays a form that provides exhaustive information about a Trip. The
Trip View is organized in a hierarchy:</p>
<p class="ContextMenu" style="color: #000000; margin-left: 124px;"><b style="font-weight: bold;">Print
Load Card</b></p>
<p class="ContextMenu" style="color: #000000; margin-left: 124px;">Selecting
this option brings up the Report Selection dialog box where you can select
the recommended report of 'LOADCARD.RPT' or scroll to a report of your
choosing.</p>
<p style="margin-left: 124px; font-weight: bold;"><span style="font-weight: bold;">Expert
Fuel Optimization</span></p>
<p style="font-weight: bold; margin-left: 124px;"><span style="font-weight: normal;">Selecting
this option will display the <a href="../../xtra/idsc/IDSC_overv.htm#Expert_Fuel_Opt">Expert
Fuel Optimization window</a></span><span style="font-weight: normal;">,
which allows the Driver Call In program to connect to the IDSC Fuel Expert
Server and receive a list of fuel stops and route.</span></p>
<p style="font-weight: bold; margin-left: 124px;">Attach / Open Related
Files</p>
<p style="margin-left: 124px;">Selecting this option will open the <a href="../../_ref/tm_basics/program_control.htm#Attach_Open">Attach
/ Open Related Files window</a>.</p>
<h4 style="margin-left: 52px;"><a name="Freight_Bills_Assigned" id="Freight_Bills_Assigned"></a>Freight
Bills Assigned Grid</h4>
<p style="margin-left: 64px;">If the user has set the <a href="../../util/configexplorer/cfgexp_dispatch.htm#dcall">Application
Configurator program > DCALL.EXE</a> <span style="font-weight: bold;">></span>
'<span style="font-weight: bold;">Show Freight Bills</span>' option to
'True', an additional section (pane) will appear at the bottom of the
Driver Call-In program window. This pane will show all Freight Bills that
are on Trips assigned to the selected Driver. It will show the top section
of CServ right here in Driver Call-in. This will, in effect, populate
much of the information from the Customer Service program > Header
section directly within the Driver Call-In program, for ease of viewing.</p>
<h3>Driver Information</h3>
<h4 style="margin-left: 52px;"><a name="03posi<bc=13"></a><a name="03posi<bc=31"></a><a
name="03posi<bc=49"></a><a name="03posi"></a>Position Tab</h4>
<p style="margin-left: 64px;">The <?rh-dropspot_start class="dropspot"
href="javascript:TextPopup(this)"
id="a5" ?><span
class="glosstext" style="font-weight: bold;">Position Tab</span><?rh-dropspot_end ?>
is used to display a history of the selected Driver's geographical position.
You may manually enter a position for a Driver. Position updates occur
when status changes are assigned to Trips in the <a href="../dispatch/index.htm">Dispatch
program</a>, in the Driver Call In program, and by messages sent through
the Mobile Dispatch module. Driver positions are also updated by incoming
mobile dispatch messages.</p>
<p class="Warning" style="margin-left: 100px;"><img src="../../images/warning_4.gif"
alt="" style="border: none;"
width="16" height="16"
border="0" />Warning:
if the entry made here is the most recent position entry, the Driver's
current zone will be updated, but no Trip will be created to account for
the movement</p>
<h4 style="margin-left: 52px;"><a name="04hist<bc=14"></a><a name="04hist<bc=32"></a><a
name="04hist<bc=50"></a><a name="04hist"></a>Status Tab</h4>
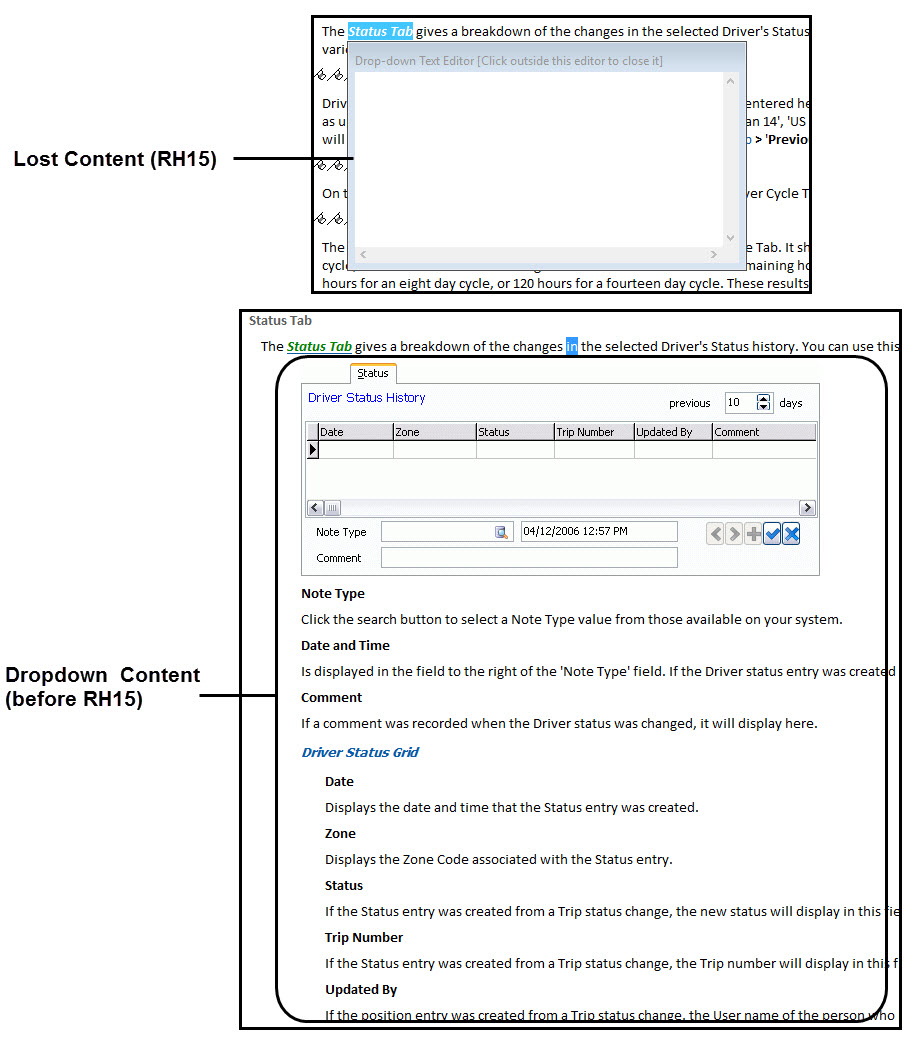
<p style="margin-left: 64px;">The <?rh-dropspot_start class="dropspot"
href="javascript:TextPopup(this)"
id="a6" ?><span
class="glosstext" style="font-weight: bold;">Status Tab</span><?rh-dropspot_end ?>
gives a breakdown of the changes in the selected Driver's Status history.
You can use this Tab to quickly see the various Trips that brought a Driver
to his / her current Zone Code.</p>
<h4 style="margin-left: 52px;"><a name="05hour<bc=7"></a><a name="05hour<bc=25"></a><a
name="05hour<bc=43"></a><a name="05hour"></a>Hours Tab</h4>
<p style="margin-left: 64px;">Driver on-duty hours can be recorded on the
<?rh-dropspot_start class="dropspot" href="javascript:TextPopup(this)"
id="a7" ?><span class="glosstext" style="font-weight: bold;">Hours
Tab</span><?rh-dropspot_end ?>. Information entered here will update the
summary on the <a href="#06cycl">Cycle Tab</a>, as well as update the
various Driver Cycle Duty Hour fields ('Can 7', 'Can 8', 'Can 14', 'US
7', etc.) on the <a href="../dispatch/dispatch_resources.htm#02_01_DriversTab">Dispatch
program > Drivers Tab</a>. Entries will display based on the number
of days specified in the <a href="#03posi">Position Tab</a> <span style="font-weight: bold;">></span>
'<span style="font-weight: bold;">Previous Days</span>' field.</p>
<h4 style="margin-left: 52px;"><b style="font-weight: bold;"><a name="06cycl<bc=4"></a><a
name="06cycl<bc=22"></a><a name="06cycl<bc=40"></a><a name="06cycl"></a>Cycle
Tab</b></h4>
<p style="margin-left: 64px;">On the <?rh-dropspot_start class="dropspot"
href="javascript:TextPopup(this)"
id="a8" ?><span
class="glosstext" style="font-weight: bold;">Cycle Tab</span><?rh-dropspot_end ?>
in the Driver Call In program you're able to view Driver Cycle Time Remaining.</p>
<h4 style="margin-left: 52px;"><b style="font-weight: bold;"><a name="07hist<bc=6"></a><a
name="07hist<bc=24"></a><a name="07hist<bc=42"></a><a name="07hist"></a>History
Tab</b></h4>
<p style="margin-left: 64px;">The information entered on the Hours Tab
is summarized on the Cycle Tab. It shows how many hours are available
for each standard cycle, and the number of remaining hours for the selected
Driver. Remaining hours are based on 60 hours for a seven day cycle, 70
hours for an eight day cycle, or 120 hours for a fourteen day cycle. These
results are summarized on the <?rh-dropspot_start class="dropspot" href="javascript:TextPopup(this)"
id="a9" ?><span class="glosstext"
style="font-weight: bold;">History Tab</span><?rh-dropspot_end ?>.</p>
<h4 style="margin-left: 52px;"><a name="08note<bc=12"></a><a name="08note<bc=30"></a><a
name="08note<bc=48"></a><a name="08note"></a>Notes Tab</h4>
<p style="margin-left: 64px;">You can enter free-form Driver notes on the
<?rh-dropspot_start class="dropspot" href="javascript:TextPopup(this)"
id="a10" ?><span class="glosstext" style="font-weight: bold;">Notes
Tab</span><?rh-dropspot_end ?>. These are only visible on this Tab and
are not used elsewhere in the system.</p>
<h4 style="margin-left: 52px;">Last Trip Tab</h4>
<p style="margin-left: 64px;">The <?rh-dropspot_start class="dropspot"
href="javascript:TextPopup(this)"
id="a11" ?><span
class="glosstext" style="font-weight: bold;">Last Trip Tab</span><?rh-dropspot_end ?>
allows you to view details regarding the selected Driver's last Trip.
This Tab is for informational purposes only, as you cannot modify the
details of a completed Trip or Freight Bill.</p>
<h4 style="margin-left: 52px;"><a name="09mile<bc=11"></a><a name="09mile<bc=29"></a><a
name="09mile<bc=47"></a><a name="09mile"></a>Mileage Tab</h4>
<p style="margin-left: 64px;">The <?rh-dropspot_start class="dropspot"
href="javascript:TextPopup(this)"
id="a13" ?><span
class="glosstext" style="font-weight: bold;">Mileage Tab</span><?rh-dropspot_end ?>
displays a graphical breakdown of the mileage totals accrued by the selected
driver over a range of date periods, including the 'Last 7' days, 'Last
14' days, 'Last 30' days, 'Last 60' days, 'Last 90' days and a 'YTD' (Year
to Date) graph.</p>
<p class="Notes"><b><span style="font-weight: normal;"><img src="../../images/notes.gif"
alt="" style="border: none;"
width="25"
height="25"
border="0" /></span></b>
The mileage values are determined by a SUM of those available for the
driver in the LEGSUM table.</p>
<h4 style="margin-left: 52px;">Special Event Tab</h4>
<p style="margin-left: 64px;">The <?rh-dropspot_start class="dropspot"
href="javascript:TextPopup(this)"
id="a29" ?><span
class="glosstext">Special Event Tab</span><?rh-dropspot_end ?> displays
a grid containing Special Events information for the selected Driver.</p>
<p style="margin-left: 64px;"> </p>
<h2><a name="Messaging<bc=8"></a><a name="Messaging<bc=26"></a><a
name="Messaging<bc=44"></a> <a name="Messaging" id="Messaging"></a>Messaging
Functions</h2>
<h3>Overview</h3>
<p>Messages sent from the TruckMate system (using the <a href="../dispatch/index.htm">Dispatch
program</a> or Driver Call In program) to remote devices are called '<span
style="font-weight: bold;">Forward</span>' messages. Messages sent
from Drivers (via the Mobile Communications equipment in the Power Units)
are called '<span style="font-weight: bold;">Return Messages</span>'.</p>
<p style="font-weight: bold; margin-left: 64px;">F</p>
<p style="margin-left: 64px;">In the main Driver Call In screen, the '<span
style="font-weight: bold;">F</span>' button allows the User to access
the <a href="#10fwdm">Forward Messages</a> form. The <?rh-dropspot_start
class="dropspot" href="javascript:TextPopup(this)" id="a15" ?><span
class="glosstext" style="font-weight: bold;">Browse / Create Forward
Messages window</span><?rh-dropspot_end ?> will display, where you select
the Driver, Power Unit, or group to whom you want to send or view forward
messages. Remote devices are assigned to Power Units in the <a href="../../mc/cfgcomm/cfgcomm_over.htm">Mobile
Device Maintenance program</a>.</p>
<p style="font-weight: bold; margin-left: 64px;">R</p>
<p style="margin-left: 64px;">In the main Driver Call In screen, selecting
the '<span style="font-weight: bold;">R</span>' button in the 'Return
Messages (All Drivers)' section will allow the User access to the <a href="#11retm">Return
Messages</a> form. The Unread Return Message window will display any messages
that have recently been received by TruckMate from your Drivers/Power
Units.</p>
<p style="font-weight: bold; margin-left: 64px;">All Message View</p>
<p style="margin-left: 64px;">Selecting the '<span style="font-weight: bold;">All
Message View</span>' button will open the <a href="#12allm">All Message
View</a> window of the Driver Call In program.</p>
<p style="font-weight: bold; margin-left: 64px;">Driver <Driver Name></p>
<p style="margin-left: 64px;">Selecting the '<span style="font-weight: bold;">Driver
<Driver Name></span>' button will open the <a href="#12_2_Return">All
Message View > Return Message Tab</a> with only the messages sent from
the selected Driver displayed.</p>
<h3><a name="10fwdm<bc=9"></a><a name="10fwdm<bc=27"></a><a name="10fwdm<bc=45"></a><a
name="10fwdm"></a>Forward Messages</h3>
<p>The <?rh-dropspot_start class="dropspot" href="javascript:TextPopup(this)"
id="a16" ?><span class="glosstext" style="font-weight: bold;">Forward
Message Tab</span><?rh-dropspot_end ?> is used to create and view forward
messages for the selected Driver, Power Unit or group. To create a free
form message (rather than a macro), click the Add button on the navigator
bar under the macro / message display area, and enter the text of the
message in the macro / message display area above. When you click the
Post button on the navigator bar, the message will be released to the
<a href="../../mc/commgr/commgr_over.htm">Communication Manager program</a>
for transmission. To send a macro, see the Macro section below. The Summary
section at the top of the screen displays information about the Driver
or the Power Unit's current Trip and location, or the group (depending
on the recipient type selected above).</p>
<h4 class="HeadingCM" style="margin-left: 76px;">Context Menu</h4>
<p class="ContextMenu" style="color: #000000; margin-left: 88px;"><b style="font-weight: bold;">Print
Message</b></p>
<p class="ContextMenu" style="color: #000000; margin-left: 88px;">Will
send the message or macro that is currently displayed to the printer that
is configured as the default for the workstation.</p>
<p class="ContextMenu" style="color: #000000; margin-left: 88px;"><b style="font-weight: bold;">Print
Preview</b></p>
<p class="ContextMenu" style="color: #000000; margin-left: 88px;">Will
display print preview of the message or macro that is currently displayed.
Click the 'Printer' button to select a printer other than the workstation's
default. The 'OK' button will send message or macro to the selected printer.</p>
<p class="ContextMenu" style="color: #000000; margin-left: 88px;"><b style="font-weight: bold;">Show
Message History</b></p>
<p class="ContextMenu" style="color: #000000; margin-left: 88px;">Will
display a form that displays the date and time of the message's status
changes.</p>
<h3><a name="11retm<bc=10"></a><a name="11retm<bc=28"></a><a name="11retm<bc=46"></a><a
name="11retm"></a>Return Messages</h3>
<p>Messages sent from remote devices to the TruckMate system are called
'Return' messages. The Return Messages button will display text in green
that says 'New Messages' if there are unread Return messages from any
Driver. To view unread Return messages, click the button labeled '<span
style="font-weight: bold;">R</span>' in the Return Messages section.
A list of Drivers for whom there are unread messages will be displayed.
Double click to select a Driver, and the <?rh-dropspot_start class="dropspot"
href="javascript:TextPopup(this)" id="a17" ?><span class="glosstext"
style="font-weight: bold;">Return
Messages Tab</span><?rh-dropspot_end ?> will appear for that Driver.</p>
<p class="Notes" style="text-indent: -19px; margin-left: 60px;"><b><span
style="font-weight: normal;"><img src="../../images/notes.gif" alt=""
style="border: none;" width="25"
height="25" border="0" /></span></b>You
can view all messages, regardless of their direction or status, using
the 'All Message View' function.</p>
<h4 class="HeadingCM" style="margin-left: 76px;">Context Menu</h4>
<p class="ContextMenu" style="color: #000000; margin-left: 88px;"><b style="font-weight: bold;">Print
Message</b></p>
<p class="ContextMenu" style="color: #000000; margin-left: 88px;">Will
send the message or macro that is currently displayed to the printer that
is configured as the default for the workstation.</p>
<p class="ContextMenu" style="color: #000000; margin-left: 88px;"><b style="font-weight: bold;">Print
Preview</b></p>
<p class="ContextMenu" style="color: #000000; margin-left: 88px;">Will
display print preview of the message or macro that is currently displayed.
Click the 'Printer' button to select a printer other than the workstation's
default. The 'OK' button will send message or macro to the selected printer.</p>
<p class="ContextMenu" style="color: #000000; margin-left: 88px;"><b style="font-weight: bold;">Show
Message History</b></p>
<p class="ContextMenu" style="color: #000000; margin-left: 88px;">Will
display a form that displays the date and time of the message's status
changes.</p>
<h3><a name="12allm<bc=1"></a><a name="12allm<bc=19"></a><a name="12allm<bc=37"></a><a
name="12allm"></a>All Message View</h3>
<p>The All Messages View window displays all 'Forward' (from the TruckMate
system to the remote device) and 'Return' (from the remote device to the
TruckMate system) messages based on the message status that you select.
Click on the <a href="#12_1_Forward">Forward</a> <a href="#12_1_Forward">Tab</a>
or <a href="#12_2_Return">Return Tab</a> to view messages of either type.
The contents of the message (Forward or Return) will display in the bottom
left portion of the form.</p>
<h4 style="margin-left: 52px;"><b style="font-weight: bold;">Common Functions</b></h4>
<p style="margin-left: 88px;"><b style="font-weight: bold;">Days to Show</b></p>
<p style="margin-left: 88px;">Enter the number of days for which you want
to view messages.</p>
<p style="font-weight: bold; margin-left: 88px;">Search History</p>
<p style="margin-left: 88px;">Clicking the 'Search History' button will
open a window where you may search for Forward / Return Messages (depending
on which Tab you are working with). The search window will allow you to
search by: 'Network', 'Device', and / or 'Macro', and will allow you to
specify the number of 'Days' back you would like to include in the search.
Click the 'Search' button  to generate a list of Messages based on
your chosen criteria.</p>
<p style="font-weight: bold; margin-left: 88px;">Sensor Information</p>
<p style="margin-left: 88px;">This button will only display if you are
viewing a Driver with an installed Omnitracs Device. Shows a history of
SensorTracs readings. SensorTracs is an optional cable that Omnitracs
devices use to gather engine control data such as odometer, fuel and reefer
temperature.</p>
<p style="font-weight: bold; margin-left: 88px;">What Happened?</p>
<p style="margin-left: 88px;">This button will only display if you are
viewing a Driver with an installed Omnitracs Device. Shows the state of
various resources that are associated with the selected message. For instance,
it'll display a few pieces of information for the Driver, Power Unit and
Mobile Communications Device. It'll also show Dispatch information available
at the time the message was processed. The 'What Happened' feature is
basically for digging deeper into a message to see how a message was processed
and what environment it was being processed in.</p>
<p style="margin-left: 88px;"><b style="font-weight: bold;">Location</b></p>
<p style="margin-left: 88px;">Is only available for Return messages. This
button will display a form that shows the Power Unit's position at the
time that the message was sent, and the unit's current position.</p>
<h4 style="margin-left: 52px;"><a name="12_1_Forward<bc=2"></a><a name="12_1_Forward<bc=20"></a><a
name="12_1_Forward<bc=38"></a><a name="12_1_Forward"></a>Forward
Messages Tab</h4>
<p style="margin-left: 64px;">The <?rh-dropspot_start class="dropspot"
href="javascript:TextPopup(this)"
id="a18" ?><span
class="glosstext" style="font-weight: bold;">Forward Messages Tab</span><?rh-dropspot_end ?>
displays messages that have been <span style="font-style: italic;">sent
from</span> the TruckMate system to the Power Unit's Mobile Device.</p>
<h4 class="HeadingCM" style="margin-left: 116px;"><b style="font-weight: bold;">Context
Menu</b></h4>
<p class="ContextMenu" style="color: #000000; margin-left: 128px;"><b style="font-weight: bold;">Cancel
All Late Sent Messages</b></p>
<p class="ContextMenu" style="color: #000000; margin-left: 128px;">If a
message has been sent to the communication network but not yet received
by the remote unit, you can use this option to cancel the message. This
option is only available with messages whose status is 'Sent'.</p>
<p class="ContextMenu" style="color: #000000; margin-left: 128px;"><b style="font-weight: bold;">Resend
All Late Sent Messages</b></p>
<p class="ContextMenu" style="color: #000000; margin-left: 128px;">If a
message has been sent to the communication network but not yet received
by the remote unit you can use this option to cancel the original message,
and re-generate and re-submit a duplicate to the communication network.</p>
<p class="ContextMenu" style="color: #000000; margin-left: 128px;"><b style="font-weight: bold;">Print
Message</b></p>
<p class="ContextMenu" style="color: #000000; margin-left: 128px;">Will
send the contents of the message to the printer that is identified as
the default for the workstation.</p>
<p class="ContextMenu" style="color: #000000; margin-left: 128px;"><b style="font-weight: bold;">Print
Preview</b></p>
<p class="ContextMenu" style="color: #000000; margin-left: 128px;">Is used
to preview the message before sending it to a printer. In the preview
form, you have the option to select a different printer than the default.
You can send the message to the selected printer by clicking the 'OK'
button.</p>
<p class="ContextMenu" style="color: #000000; margin-left: 128px;"><b style="font-weight: bold;">Show
Message History</b></p>
<p class="ContextMenu" style="color: #000000; margin-left: 128px;">Will
display a form that shows the date and time of the message's status changes.</p>
<p class="ContextMenu" style="color: #000000; margin-left: 128px;"><b style="font-weight: bold;">Send
Forward Message</b></p>
<p class="ContextMenu" style="color: #000000; margin-left: 128px;">Will
bring you to the dialog box where you can specify the 'Driver', 'Power
Unit', or 'Mobile Communications Group' that you wish to send the forward
message to. Use the Database Search buttons to pick an associated resource
from your system, then select the green check button to proceed to the
freeform Forward Message window.</p>
<h4 style="margin-left: 52px;"><a name="12_2_Return<bc=3"></a><a name="12_2_Return<bc=21"></a><a
name="12_2_Return<bc=39"></a><a name="12_2_Return"></a>Return Messages
Tab</h4>
<p style="margin-left: 64px;">The <?rh-dropspot_start class="dropspot"
href="javascript:TextPopup(this)"
id="a19" ?><span
class="glosstext" style="font-weight: bold;">Return Messages Tab</span><?rh-dropspot_end ?>
displays messages that have been <span style="font-style: italic;">received
by</span> TruckMate from the Power Unit's Mobile Device.</p>
<h4 class="HeadingCM" style="margin-left: 116px;"><b style="font-weight: bold;"><span
style="font-weight: bold;">C</span>ontext Menu</b></h4>
<p style="margin-left: 128px;"><b style="font-weight: bold;">Select All
'NR'</b></p>
<p style="margin-left: 128px;">To select all messages of the status '<span
style="font-weight: bold;">NR</span>' (Not Read), use this menu function.
This can be used to change the status of a group of messages to 'Read'.</p>
<p style="margin-left: 128px;"><b style="font-weight: bold;">Select All
'Unowned'</b></p>
<p style="margin-left: 128px;">When a message comes in that may not be
addressed to the current user, but access is still desired, these messages
would be referred to as 'not owned'.</p>
<p style="margin-left: 128px;"><b style="font-weight: bold;">Clear Selection</b></p>
<p style="margin-left: 128px;">To de-select a group of selected messages,
use this menu function.</p>
<p style="margin-left: 128px;"><b style="font-weight: bold;">Print Message</b></p>
<p style="margin-left: 128px;">Will send the contents of the message to
the printer that is identified as the default for the workstation.</p>
<p style="margin-left: 128px;"><b style="font-weight: bold;">Print Preview</b></p>
<p style="margin-left: 128px;">Is used to preview the message before sending
it to a printer. In the preview form, you have the option to select a
different printer than the default. You can send the message to the selected
printer by clicking the OK button.</p>
<p style="margin-left: 128px;"><b style="font-weight: bold;">Show Message
History</b></p>
<p style="margin-left: 128px;">Will display a form that shows the date
and time of the message's status changes.</p>
<p style="margin-left: 128px;"><b style="font-weight: bold;">Send Forward
Message</b></p>
<p style="margin-left: 128px;">Will bring you to the dialog box where you
can specify 'Browse/Create Forward Messages For'.</p>
<h2>Other Functions</h2>
<h3><b><span style="font-weight: bold;">Keyboard Shortcuts</span></b></h3>
<p>The Driver Call In program has numerous functions that can be invoked
by combinations of keystrokes. These were designed to make data entry
faster by replacing mouse usage with keyboard usage. In most cases, as
with all TruckMate programs, the underscoring of a letter in a field label
indicates 'hot keys'. When you see an underlined letter, it means that
you can use the <ALT> key in combination with that letter to invoke
the function. Some 'hot keys', however, cannot be indicated by underscores.
These are listed below:</p>
<ul style="list-style: disc;">
<li class="p"><p><b style="font-weight: bold;">'<Ctrl><left>'</b>
and <span style="font-weight: bold;">'<<b style="font-weight: bold;">Ctrl><right></b></span><b><span
style="font-weight: bold;">'</span></b> are hotkeys for the main navigation
bar.</p></li>
<li class="p"><p><b style="font-weight: bold;">'<Ctrl><insert>'</b>
(or '<span style="font-weight: bold;"><C<b style="font-weight: bold;">trl><add>'</b></span>)
and <span style="font-weight: bold;">'<</span><b>Ctrl><delete>'</b>
(or <span style="font-weight: bold;">'<</span><b>Ctrl><subtract>'</b>)
apply to the position or hours Grid navigation bar (if that Tab is
showing).</p></li>
<li class="p"><p><b style="font-weight: bold;">'<Ctrl><Enter>'</b>
and <span style="font-weight: bold;">'<Ctrl><</span><b>Esc>'</b>
apply to the position, hours or notes Grid navigation bar (if that
Tab is showing).</p></li>
<li class="p"><p>Use the Alt key to switch between Tabs (<span style="font-weight: bold;">'<</span><b>Alt><P>'</b>
= Position, <span style="font-weight: bold;">'<</span><b>Alt><H>'</b>
= Hours, <span style="font-weight: bold;">'<</span><b>Alt><Y>'</b>
= Cycle, <span style="font-weight: bold;">'<</span><b>Alt><I>'</b>
= History,<span style="font-weight: bold;"><br />
'<</span><b>Alt><N>'</b> = Notes).</p></li>
</ul>
<p>The previous day's spin edit control on the position Tab determines
which days to show on both the Position Tab and the Hours Tab. There is
now a duplicate control on the hours Tab so that you can see (without
flipping Tabs) the display setting. Changing one automatically changes
the other.</p>
<h3><b><span style="font-weight: bold;">Mileage Context Menu</span></b></h3>
<p>You can access a menu of mileage-related options by clicking the right
mouse button anywhere in the grey area that surrounds the Grids.</p>
<p class="Notes" style="margin-left: 60px; text-indent: -24px;"><b><span
style="font-weight: normal;"><img src="../../images/notes.gif" alt=""
style="border: none;" width="25"
height="25" border="0" /></span></b>The
Driver Call-in program, and <a href="../dispatch/index.htm">Dispatch program</a>
are now configured to use more than one <a href="../../util/mileserv/mileserv_over.htm">Mileage
Server program</a> per database.</p>
<p><b style="font-weight: bold;">Refresh Mileage Settings</b></p>
<p>If your Mileage Server setup changes, or if the Mileage Server has stopped
running and had to be re-started, right-click on the Mileage button and
select Refresh Mileage Settings to re-connect with the <a href="../../util/mileserv/mileserv_over.htm">Mileage
Server program</a>.</p>
<p><b style="font-weight: bold;">Interactive Mileage</b></p>
<p>Displays a form where you can manually enter points and perform mileage
lookups. See the <a href="../../util/mileserv/mileserv_over.htm">Mileage
Server program</a> for information about this function.</p>
<p><b style="font-weight: bold;">Maintain Flat Pay</b></p>
<p>This option is only functional in the Customer Service program.</p>
<h4 style="margin-left: 52px;"><b style="font-weight: bold;">Message Checking</b></h4>
<p style="margin-left: 64px;">The message checking setup, previously found
in Customer Service, Trip Traces, Dispatch, and Driver Call-in programs
has been moved to the Security Setup program. This gives you greater flexibility
over your message checking functions. Follow the steps found in the 'Security
Tab' of the Security Setup program to set up 'Users' and even, 'Groups'
of users with the same security settings.</p>
<h4 style="margin-left: 52px;">This Program Supports Document Imaging</h4>
<p style="margin-left: 64px;">To access Document Imaging within a TruckMate
program, place your cursor in the recommended screen area (refer to the
online help topic entitled <a href="../../_ref/tm_basics/imaging_over.htm">Document
Imaging Overview</a> for further information), and select 'View Images'.
Depending on your setup in the <a href="../../profile/code/codes_imaging.htm">Codes
Maintenance program > Imaging Tab</a>, and the program you're currently
in, you'll see prompts that will take you through the rest of the process.</p>
<p style="margin-left: 64px;"> </p>
<p style="margin-left: 64px;"> </p>
<p style="margin-left: 64px;"> </p>
<p style="margin-left: 64px;"> </p>
<p style="margin-left: 64px;"> </p>
<p style="margin-left: 64px;"> </p>
<p style="margin-left: 64px;"> </p>
<p style="margin-left: 64px;"> </p>
<p style="margin-left: 64px;"> </p>
<p style="margin-left: 64px;"> </p>
<p style="margin-left: 64px;"> </p>
<p style="margin-left: 64px;"> </p>
<p style="margin-left: 64px;"> </p>
<p style="margin-left: 64px;"> </p>
<p style="margin-left: 64px;"> </p>
<p style="margin-left: 64px;"> </p>
<p style="margin-left: 64px;"> </p>
<p style="margin-left: 64px;"> </p>
<p style="margin-left: 64px;"> </p>
<p style="margin-left: 64px;"> </p>
<p style="margin-left: 64px;"> </p>
<p style="margin-left: 64px;"> </p>
<p style="margin-left: 64px;"> </p>
<p style="margin-left: 64px;"> </p>
<p style="margin-left: 64px;"> </p>
<p style="margin-left: 64px;"> </p>
<p style="margin-left: 64px;"> </p>
<p> </p>
<script type="text/javascript" language="JavaScript1.2">//<![CDATA[
if( typeof( TextPopupInit ) != 'function' ) TextPopupInit = new Function();
TextPopupInit('a20','POPUP411556981');
TextPopupInit('a1','POPUP411554029');
TextPopupInit('a25','POPUP473142472');
TextPopupInit('a26','POPUP473122221');
TextPopupInit('a28','POPUP473138702');
TextPopupInit('a30','POPUP419154974');
TextPopupInit('a27','POPUP473129078');
TextPopupInit('a32','POPUP411408329');
TextPopupInit('a3','POPUP411690873');
TextPopupInit('a4','POPUP471251949');
TextPopupInit('a2','POPUP472975189');
TextPopupInit('a14','POPUP472985121');
TextPopupInit('a5','POPUP411277086');
TextPopupInit('a6','POPUP411289291');
TextPopupInit('a7','POPUP411288429');
TextPopupInit('a24','POPUP419175329');
TextPopupInit('a8','POPUP472599093');
TextPopupInit('a9','POPUP472597737');
TextPopupInit('a10','POPUP472600645');
TextPopupInit('a11','POPUP472611253');
TextPopupInit('a12','POPUP476050727');
TextPopupInit('a13','POPUP472584970');
TextPopupInit('a29','POPUP472600457');
TextPopupInit('a15','POPUP470859440');
TextPopupInit('a16','POPUP470855123');
TextPopupInit('a17','POPUP470852094');
TextPopupInit('a18','POPUP470852951');
TextPopupInit('a23','POPUP506106149');
TextPopupInit('a21','POPUP506083106');
TextPopupInit('a19','POPUP470868563');
TextPopupInit('a22','POPUP506079535');
//]]></script>
</body>
</html>
Copy link to clipboard
Copied
Hello again
Appreciate your inclusion of the text I requested.
One thing I know is that when you have a DHTML drop-down, all that content is actually stored inside the topic code. My hope was that it would still be present and there was some odd issue with maybe CSS or an errant character that was preventing it from showing. But in this case it would seem the actual content has indeed been deleted. Bummer
Hopefully you have a backup copy of your project. Assuming you do, I would suggest as a next step to see if you are able to simply import one of the topics and see if things survive the import process.
My gut says that if we experiment enough we may find something simple that is causing a failure. But we won't know for certain until we try.
As Peter suggested, it's best to ensure RoboHelp is fully updated before proceeding.
Cheers... Rick
Copy link to clipboard
Copied
Rick, I think we are on the right track. Here's the situation:
I have imported an old topic -- from the 2014 version of my project -- into my current project, and the dropdown content of that specific topic is visible.
The problem is that since 2014, there have been many content changes done to the project, so reverting to that version would mean losing a lot of content. Also, there is no proper version control applied to this project.
What would be the best way for me to retain my current content but enable the dropdowns?
Regarding updating the project: I used Help > Updates, which seems to have applied the update to my project. Is there anything else that I need to do on that front?
Thanks,
Gabriela
Copy link to clipboard
Copied
So your only backup is from two years ago? Yikes
I was hoping you had made a backup copy from immediately before upgrading the project.
Note that clicking Help > Updates only updates the RoboHelp application. Once you have updated RoboHelp, you open older projects and the process of opening the older project using the updated RoboHelp causes the project to be updated.
Cheers... Rick
Copy link to clipboard
Copied
Thanks, Rick.
In my current project, there are a few topics which have retained dropdown content. I am wondering if -- by comparing a topic that has lost dropdown content (the sample provided in the earlier posting) with one that has retained it (the sample below) -- we could identify what is causing the loss of dropdown content. Any insights would be tremendously apreciated.
Here is a topic that has retained the content in the dropdowns:
<?xml version="1.0" encoding="utf-8" ?>
<!DOCTYPE html PUBLIC "-//W3C//DTD XHTML 1.0 Transitional//EN" "http://www.w3.org/TR/xhtml1/DTD/xhtml1-transitional.dtd">
<html xmlns="http://www.w3.org/1999/xhtml">
<head>
<meta name="template" content="Help Master Page.htt" />
<meta http-equiv="Content-Type" content="text/html; charset=utf-8" />
<meta name="generator" content="Adobe RoboHelp 2015" />
<title>eManifest Overview</title>
<link rel="StyleSheet" href="../../TM4WIN_HTML_Help.css" type="text/css" />
</head>
<body>
<?rh-script_start ?><script src="../../ehlpdhtm.js" type="text/javascript"
language="JavaScript1.2"></script><?rh-script_end ?>
<?rh-placeholder type="header" ?>
<a name="<bc=88"></a> <a name="<bc=66"></a> <a name="<bc=44"></a>
<a name="<bc=22"></a>
<h1>eManifest</h1>
<h2>Program Overview</h2>
<p>The eManifest program handles the generation and maintenance of electronic
manifests required for EDI and the Canadian Border Protection Agency's
'ACE' US border crossing requirements.</p>
<p class="Notes" style="margin-left: 71px;"><b><span style="font-weight: normal;"><img
src="../../images/notes.gif" alt="" style="border: none;" width="25"
height="25" border="0" /></span></b>For some general rules regarding
EDI Transactions and Transaction Sets, as well as some typical usage scenarios
for the eManifest program, see the 'Need to know how?' link below.</p>
<h4 style="font-style: normal;"><a href="tm_emanifest.htm"><img src="../../_ref/images/81CONTROLSntkh.gif"
alt="" style="border: none;" width="24" height="24" border="0" />Need
to know how?</a></h4>
<p> </p>
<h4>Where Is It?</h4>
<p>To open the eManifest program click:</p>
<p>Start <img src="../../images/TM4WIN00090000.gif" alt="images/TM4WIN00090000.gif"
title="images/TM4WIN00090000.gif" width="10" height="10"
border="0" /> Programs <img src="../../images/TM4WIN00090000.gif"
alt="images/TM4WIN00090000.gif"
title="images/TM4WIN00090000.gif"
width="10" height="10" border="0" />
TruckMate <img src="../../images/TM4WIN00090000.gif" alt="images/TM4WIN00090000.gif"
title="images/TM4WIN00090000.gif" width="10" height="10"
border="0" /> EDI <img src="../../images/TM4WIN00090000.gif"
alt="images/TM4WIN00090000.gif"
title="images/TM4WIN00090000.gif"
width="10" height="10" border="0" />
eManifest</p>
<h2>Program Details</h2>
<h3><a name="Menu_Bar<bc=17"></a><a name="Menu_Bar<bc=39"></a><a
name="Menu_Bar<bc=61"></a><a name="Menu_Bar<bc=83"></a><a name="Menu_Bar<bc=105"></a>
<a name="Menu_Bar" id="Menu_Bar"></a>Menu Bar / Toolbar</h3>
<p style="font-weight: normal;"><?rh-dropspot_start class="dropspot" href="javascript:TextPopup(this)"
id="a19" dataid="POPUP444741587" ?><span
class="glosstext">File Menu</span><?rh-dropspot_end ?></p>
<?rh-droptext_start class="droptext" id="POPUP444741587" style="display: none;" ?>
<p style="font-weight: bold; margin-left: 64px;"><span><span style="font-weight: bold;">Print
Reports</span></span></p>
<p style="margin-left: 64px;"><img src="../../fm/images/80CARDIMPORTprintButton.gif"
alt="" style="border: none;" width="16"
height="16" border="0" /> Selecting
the Print Reports button will bring up the report selection window,
common to many TruckMate applications. Here, you will select a report
file from those available in your system and a Crystal Report will
be generated.</p>
<p style="margin-left: 64px;">For more information on Report functionality
in TruckMate, see the <a href="../../_ref/tm_basics/_rwr_over.htm">Crystal
Reports Reference</a>.</p>
<p style="font-weight: bold; margin-left: 64px;">Exit</p>
<p style="margin-left: 64px;"><img src="../../util/images/80SQLEXECexitButton.gif"
alt="" style="border: none;" width="16"
height="16" border="0" /> Selecting
this option will close the eManifest program.</p><?rh-droptext_end ?>
<p style="font-weight: normal;"><?rh-dropspot_start class="dropspot" href="javascript:TextPopup(this)"
id="a18" dataid="POPUP444744794" ?><span
class="glosstext">Multi-Company</span><?rh-dropspot_end ?></p>
<?rh-droptext_start class="droptext" id="POPUP444744794" style="display: none;" ?>
<p style="margin-left: 64px;">For more information on the Multi-Company
options available from the Menu Bar, see the <a href="../../_ref/tm_basics/Multi-Company.htm#Prog_Integration">Multi-Company
documentation</a>.</p><?rh-droptext_end ?>
<p style="font-weight: normal;"><?rh-dropspot_start class="dropspot" href="javascript:TextPopup(this)"
id="a20" dataid="POPUP496340166" ?><span
class="glosstext">Navigate Menu</span><?rh-dropspot_end ?></p>
<?rh-droptext_start class="droptext" id="POPUP496340166" style="display: none;" ?>
<p style="margin-left: 64px;">The Navigate Menu contains the standard
TruckMate Navigation Bar, used to browse your Database records, as
well as the following options:</p>
<p style="font-weight: bold; margin-left: 64px;"><span style="font-weight: bold;">Find</span></p>
<p style="margin-left: 64px;"><img src="../../util/images/80CONFIGEXPLORERfindButton.gif"
alt="" style="border: none;" width="17"
height="15" border="0" /> Click
this button to search for a specific manifest record using a variety
of criteria.</p><?rh-droptext_end ?>
<p style="font-weight: normal;"><?rh-dropspot_start class="dropspot" href="javascript:TextPopup(this)"
id="a21" dataid="POPUP496357075" ?><span
class="glosstext">Tools Menu</span><?rh-dropspot_end ?></p>
<?rh-droptext_start class="droptext" id="POPUP496357075" style="display: none;" ?>
<p style="font-weight: bold; margin-left: 64px;"><span><span style="font-weight: bold;">TruckMate
Monitor</span></span></p>
<p style="font-weight: bold; margin-left: 64px;"><img src="../../util/images/80MILESERVtmMonitorButton.gif"
alt="" style="border: none;"
width="16"
height="16"
border="0" />
<span style="font-weight: normal;">Click the down arrow next to this
button to access the various functions of the new</span> <a href="../../_ref/tm_basics/truckmate_monitor.htm">TruckMate
Monitor</a>.</p>
<p style="font-weight: bold; margin-left: 64px;"><span style="font-weight: bold;">Remember
Position / Size</span></p>
<p style="margin-left: 64px; font-weight: normal;">Selecting this option
will maintain the program window position and size upon close. When
the program is re-opened, it will appear the same.</p>
<p style="font-weight: bold; margin-left: 64px;">Notes</p>
<p style="margin-left: 64px; font-weight: normal;">The Notes option
allows free-format capture of notes on each manifest. These Notes
do not affect the validation status of a manifest.</p>
<p style="font-weight: bold; margin-left: 64px;">Defaults</p>
<p style="margin-left: 64px; font-weight: normal;">Selecting this option
will open the <a href="#Defaults_Settings_Window">eManifest Defaults
and Settings window</a>, which allows you to configure the program
defaults for a number of eManifest functions.</p><?rh-droptext_end ?>
<p style="font-weight: normal;"><?rh-dropspot_start class="dropspot" href="javascript:TextPopup(this)"
id="a22" dataid="POPUP496341493" ?><span
class="glosstext">Help Menu</span><?rh-dropspot_end ?></p>
<?rh-droptext_start class="droptext" id="POPUP496341493" style="display: none;" ?>
<p style="font-weight: bold; margin-left: 64px;"><span style="font-weight: bold;">TruckMate
Help</span></p>
<p style="margin-left: 64px;"><img src="../../util/images/80MILESERVhelpButton.gif"
alt="" style="border: none;" width="16"
height="16" border="0" /> Selecting
this button will open the eManifest topic in the TruckMate Online
Help file (the page you are currently viewing).</p>
<p style="font-weight: bold; margin-left: 64px;"><span style="font-weight: bold;">Service
Portal</span></p>
<p style="font-weight: bold; margin-left: 64px;"><img src="../../util/images/80MILESERVservicePortalButton.gif"
alt="" style="border: none;"
width="16"
height="16"
border="0" />
<span style="font-weight: normal;">Selecting this button will open
an instance of your default Internet browsing software, with the</span>
<a href="http://truckmate.tmwsystems.com" target="_blank">http://truckmate.tmwsystems.com</a>
<span style="font-weight: normal;">login page displayed.</span></p>
<p style="font-weight: bold; margin-left: 64px;">About</p>
<p style="margin-left: 64px;"><img src="../../util/images/80MILESERVaboutButton.gif"
alt="" style="border: none;" width="16"
height="16" border="0" /> Selecting
this button will open the standard TruckMate 'About' dialogue, which
contains important information about the application you are currently
using, including it's version number (important for support calls).</p><?rh-droptext_end ?>
<p style="font-weight: normal;"><?rh-dropspot_start class="dropspot" href="javascript:TextPopup(this)"
id="a23" dataid="POPUP496348508" ?><span
class="glosstext">Toolbar</span><?rh-dropspot_end ?></p>
<?rh-droptext_start class="droptext" id="POPUP496348508" style="display: none;" ?>
<p style="font-weight: bold; margin-left: 64px;"><span style="font-weight: bold;">Status
Filter</span></p>
<p style="margin-left: 64px; font-weight: normal;">Use this drop-down
menu to filter the manifest records by Status. The available options
are 'Active' records or 'All' records.</p>
<p style="font-weight: bold; margin-left: 64px;">User Filter</p>
<p style="margin-left: 64px; font-weight: normal;">Use this drop-down
menu to filter the manifest records by the User that entered them.
You may select a specific 'User ID' or select 'All' to view all records.</p><?rh-droptext_end ?>
<h3><a name="Header<bc=15"></a><a name="Header<bc=37"></a><a name="Header<bc=59"></a><a
name="Header<bc=81"></a><a name="Header<bc=103"></a> <a name="Header"
id="Header"></a>Header</h3>
<p>The <?rh-dropspot_start class="dropspot" href="javascript:TextPopup(this)"
id="a7" dataid="POPUP496353807" ?><span class="glosstext">Header
Section</span><?rh-dropspot_end ?> allows you to create new Manifest records
while working in the eManifest program, and to view the status of the
Manifest record as it is processed, including a quick summary of any EDI
messages received during its generation / approval process.</p>
<?rh-droptext_start class="droptext" id="POPUP496353807" style="display: none;" ?>
<p style="margin-left: 64px; font-weight: bold;"><img src="../images/80EMANheader.gif"
alt="" style="border: none;"
width="898"
height="193"
border="0" /></p>
<p style="margin-left: 64px; font-weight: bold;">Manifest Number</p>
<p style="margin-left: 64px;">This field will automatically populate
when the User selects the '+' button on the TruckMate Navigation Bar
to create a new Manifest record.</p>
<p style="margin-left: 64px; font-weight: bold;">Trip Number</p>
<p style="margin-left: 64px;">When creating a new Manifest record,
the User will first be asked if they would like to create a new Manifest
record from an existing Dispatch Trip.</p>
<p style="margin-left: 64px;">If the User selects '<span style="font-weight: bold;">Yes</span>'
to this question, this field will populate with the Trip number from
the <a href="../../dispatch/dispatch/index.htm">Dispatch program</a>.
Other fields throughout the eManifest program will automatically populate
based on the Trip information from Dispatch.</p>
<p style="margin-left: 64px;">If the User selects '<span style="font-weight: bold;">No</span>'
in response to this question, another dialogue will appear prompting
to generate a new Trip number for the Manifest. Selecting 'Yes' at
this dialogue will create a new Trip number in this field and create
a blank Manifest record. Selecting 'No' at this point will cancel
the creation of the Manifest.</p>
<p style="margin-left: 64px; font-weight: bold;">Trading Partner</p>
<p style="margin-left: 64px;">Use the Database search button to choose
a Trading Partner code from those available on your system. Trading
Partner codes are created using the  <a href="../edicommgr/edicommgr_over.htm">EDI
Communication Manager program</a>. <a href="../edicommgr/tm_EDICOMMGR.htm#CreateProfile">Need
to know how?</a></p>
<p class="Notes" style="margin-left: 111px;"><b><span style="font-weight: normal;"><img
src="../../notes.gif" alt="" style="border: none;" width="25" height="25"
border="0" /></span></b> If you have entered eManifest program Defaults
for the selected Trading Partner on the <a href="#Defaults_A_Tab">Defaults
A Tab</a> or <a href="#Defaults_B_Tab">Defaults B Tab</a>, those defaults
will apply when the User creates entries in the various eManifest
program Tabs.</p>
<p style="margin-left: 64px; font-weight: bold;">SCAC Filer</p>
<p style="margin-left: 64px;">Enter the Standard Carrier Alpha Code
(SCAC) of the Company generating the Manifest. This field has been
added to support Third Party Manifest filing. Most typical Manifests
will have the same value in both this field and the 'SCAC Carrier'
field, but those companies who have their Manifests created by a Third
Party can enter that Third Party's SCAC code here, as this field is
mandatory for proper Manifest Validation.</p>
<p style="margin-left: 64px; font-weight: bold;">SCAC Carrier</p>
<p style="margin-left: 64px;">Enter the Standard Carrier Alpha Code
(SCAC) of the Carrier who will be crossing the border with the shipment
detailed in the Manifest.</p>
<p style="margin-left: 64px; font-weight: bold;">Port of Entry</p>
<p style="margin-left: 64px;">If the Manifest details an international
shipment, use the Database search button to select the Port of Entry
from the Port codes available in your system.</p>
<p style="margin-left: 64px; font-weight: bold;">ETA</p>
<p style="margin-left: 64px;">Double click this field to open the Calendar
Menu. Select the expected time of arrival for the shipment at the
selected Port.</p>
<p style="margin-left: 64px; font-weight: bold;">Time Zone</p>
<p style="margin-left: 64px;">Use the drop-down menu to select the
Time Zone related to the Port that will be receiving the shipment.</p>
<p style="margin-left: 64px; font-weight: bold;">Daylight</p>
<p style="margin-left: 64px;">If Daylight Savings Time is applicable
for the selected Port/ETA/Time Zone, select this flag.</p>
<p style="margin-left: 64px; font-weight: bold;">Preferred Manifest</p>
<p style="margin-left: 64px;">This flag will set the current Manifest
record as a 'Customs Preferred' Manifest.</p>
<h4 style="margin-left: 52px;">EDI Messages</h4>
<p style="margin-left: 64px;">The EDI Messages section will populate
with data when you begins sending EDI Messages to the Canadian Border
Protection Agency via the <a href="../edicommgr/edicommgr_over.htm">EDI
Communications Manager program</a>.</p>
<p style="margin-left: 104px; font-weight: bold;">Last Process Status</p>
<p style="margin-left: 104px; font-weight: normal;">This field displays
the latest Status of the currently displayed Manifest record. This
field will update automatically as the Manifest record is taken through
the various steps toward completion. This field cannot be edited.</p>
<p style="margin-left: 104px; font-weight: bold;">Inbound Messages</p>
<p style="margin-left: 104px;">These messages are sent to the CBP by
the <a href="../edicommgr/edicommgr_over.htm">EDI Communications Manager
program</a>.</p>
<ul style="list-style: disc;">
<li class="p"><p style="margin-left: 104px;"><span style="font-weight: bold;">309
- Customs Manifest</span>: used if sending information on Driver,
PUnit, Trailer and Freight Bill (Shipment and Trip).</p></li>
<li class="p"><p style="margin-left: 104px;"><span style="font-weight: bold;">353
- Customs Events Advisory Details</span>: used if needing to complete
the transaction to CBP.</p></li>
<li class="p"><p style="margin-left: 104px;"><span style="font-weight: bold;">358
- Customs Consist Information</span>: used if sending information
just on Driver, PUnit or Trailer (Trip).</p></li>
</ul>
<p style="margin-left: 104px; font-weight: bold;">Return Messages</p>
<p style="margin-left: 104px;">These messages are received by the Client
from CBP.</p>
<ul style="list-style: disc;">
<li class="p"><p style="margin-left: 104px;"><span style="font-weight: bold;">350
- Customs Status Information</span>: states a notification from
CBP (can be many different types of notifications: maybe Driver
detained, or your Customs Broker has not filed their paper-work
yet, etc.).</p></li>
<li class="p"><p style="margin-left: 104px;"><span style="font-weight: bold;">355
- U.S. Customs Acceptance/Rejection</span>: states whether or
not CBP accepted or rejected whatever transaction set was sent
to them.</p></li>
<li class="p"><p style="margin-left: 104px;"><span style="font-weight: bold;">997
- Functional Acknowledgment</span>: states that CBP received whatever
transaction set was sent to them.</p></li>
</ul>
<h4 style="margin-left: 52px;">EDI Transaction Set</h4>
<p style="margin-left: 64px;">Select the radio option that corresponds
to the selected Manifest's message type. The EDI Transaction Set choose
will determine the available options in the 'Transaction Set Purpose'
drop-down menu, as follows:</p>
<ul style="list-style: disc;">
<li class="p"><p style="margin-left: 64px; font-weight: bold;">309
- Shipment & Trip</p></li>
<li class="p"><p style="margin-left: 64px; font-weight: bold;">353
- Manifest Status</p></li>
<li class="p"><p style="margin-left: 64px; font-weight: bold;">358
- Trip Information</p></li>
</ul>
<p style="margin-left: 104px; font-weight: bold;">Transaction Set Purpose</p>
<p style="margin-left: 104px; font-weight: normal;">Select the Transaction
Set Purpose code that you wish to use for the selected EDI Transaction
Set. Only certain options will be available depending on the EDI Transaction
Set radio option you have selected:</p>
<ul style="list-style: disc;">
<li class="p"><p style="margin-left: 104px; font-weight: normal;"><span
style="font-weight: bold;">309 - Shipments & Trip</span>:</p></li>
<li style="list-style: none; display: inline;"><ul style="list-style: circle;">
<li class="p"><p style="margin-left: 104px; font-weight: normal;"><span
style="font-weight: bold;">P - Prelim</span>: means you might
be adding another Freight Bill to the Shipment.</p></li>
<li class="p"><p style="margin-left: 104px; font-weight: normal;"><span
style="font-weight: bold;">W - Origin</span>: means you are
submitting everything (Trip and/or Shipment).</p></li>
<li class="p"><p style="margin-left: 104px; font-weight: normal;"><span
style="font-weight: bold;">Y - Amend</span>: means you might
be amending a Freight Bill you already sent (perhaps because
you sent the wrong quantity or something on the Freight Bill
was incorrect and thus needs amendment).</p></li>
<li class="p"><p style="margin-left: 104px; font-weight: normal;"><span
style="font-weight: bold;">3 - Delete</span>: means you want
to delete the Shipment and/or Trip.</p></li>
</ul></li>
<li class="p"><p style="margin-left: 104px; font-weight: normal;"><span
style="font-weight: bold;">353 - Manifest Status</span>:</p></li>
<li class="p" style="list-style: circle;"><p style="margin-left: 144px;"><span
style="font-weight: bold;">Z - End</span>:</p></li>
<li class="p" style="list-style: circle;"><p style="margin-left: 144px;"><span
style="font-weight: bold;">H - Notify</span>:</p></li>
<li class="p"><p style="margin-left: 104px; font-weight: normal;"><span
style="font-weight: bold;">358 - Trip Information</span>:</p></li>
<li style="list-style: none; display: inline;"><ul style="list-style: circle;">
<li class="p"><p style="margin-left: 104px; font-weight: normal;">b:
means you are just sending the Trip information for the first
time.</p></li>
<li class="p"><p style="margin-left: 104px; font-weight: normal;"><span
style="font-weight: bold;">Y - Amend</span>: means you want
to amend a Driver/Punit/Trailer information (perhaps because
you sent the wrong Driver or wrong plate number and you need
to amend the trip information).</p></li>
<li class="p"><p style="margin-left: 104px; font-weight: normal;"><span
style="font-weight: bold;">3 - Delete</span>: means you want
to delete the Trip information.</p></li>
</ul></li>
</ul>
<p style="margin-left: 104px; font-weight: bold;">Amendment Reason
Code</p>
<p style="margin-left: 104px; font-weight: normal;">This drop-down
menu will allow you to select an Manifest Amendment Reason Code.</p>
<p class="Notes" style="margin-left: 151px;"><b><span style="font-weight: normal;"><img
src="../../notes.gif" alt="" style="border: none;" width="25" height="25"
border="0" /></span></b> This field is only available if you have
selected either '<span style="font-weight: bold;">309 - Shipments
& Trip</span>' or '<span style="font-weight: bold;">358 - Trip
Information</span>' as your EDI Transaction Set and have specified
the '<span style="font-weight: bold;">Y - Amend</span>' option from
the 'Transaction Set Purpose' drop-down menu.</p>
<p style="margin-left: 104px; font-weight: bold;">353 In-Bond Code</p>
<p style="margin-left: 104px; font-weight: normal;">Use the Database
search button to select a353 Notification Code from those available
in your system.</p>
<p class="Notes" style="margin-left: 151px;"><b><span style="font-weight: normal;"><img
src="../../notes.gif" alt="" style="border: none;" width="25" height="25"
border="0" /></span></b> This field is only available if you have
selected the '<span style="font-weight: bold;">353 - Manifest Status</span>'
as your EDI Transaction Set and have chosen the '<span style="font-weight: bold;">H
- Notify</span>' option from the 'Transaction Set Purpose' drop-down
menu.</p>
<h4 style="margin-left: 52px;">Applicable Manifest Details</h4>
<p style="margin-left: 64px;">Select the radio option that best describes
the details of the Manifest being sent.</p>
<h4 style="margin-left: 52px;">Processing Buttons</h4>
<p style="font-weight: bold; margin-left: 104px;">Validate</p>
<p style="margin-left: 104px;">Select this button to Validate the currently
displayed Manifest. The Manifest record will be changed from 'ENTRY'
status to 'VALIDATED' and the 'Validated' flag next to this button
will be checked.</p>
<p style="margin-left: 104px;">When you select the Validate button,
the eManifest program will attempt to Validate the Manifest as entered,
and will output a Validation Log to the <a href="#Validation_Notes_Tab">Validation
Notes Tab</a>. If you are having trouble Validating your Manifests,
consult the generated log for any warning messages.</p>
<p style="font-weight: bold; margin-left: 104px;">Approve</p>
<p style="margin-left: 104px;">Select this button to Approve the currently
displayed Manifest. The approve button is only available when working
with Manifests with 'VALIDATED' status.</p>
<p style="font-weight: bold; margin-left: 104px;">Submit EDI</p>
<p style="margin-left: 104px;">Select this button to Submit the currently
displayed Manifest. The Submit EDI button is only available when working
with Manifests with 'APPROVED' status.</p><?rh-droptext_end ?>
<h3><a name="Manifests_Tab<bc=16"></a><a name="Manifests_Tab<bc=38"></a><a
name="Manifests_Tab<bc=60"></a><a name="Manifests_Tab<bc=82"></a><a
name="Manifests_Tab<bc=104"></a> <a name="Manifests_Tab" id="Manifests_Tab"></a>Manifests
Tab</h3>
<p>The <?rh-dropspot_start class="dropspot" href="javascript:TextPopup(this)"
id="a3" dataid="POPUP496364499" ?><span class="glosstext">Manifests
Tab</span><?rh-dropspot_end ?> provides a summary of all the Manifests
created by the eManifest program, and provides a Status History for each
manifest record.</p>
<?rh-droptext_start class="droptext" id="POPUP496364499" style="display: none;" ?>
<p style="margin-left: 64px;"><img src="../images/80EMANmanifestsTab.gif"
alt="" style="border: none;" width="897"
height="274" border="0" /></p>
<h4 style="margin-left: 52px;">Manifest Summary Grid</h4>
<p style="margin-left: 64px;">The Manifest Summary Grid displays your
Manifest records, depending on the filters currently set. Using the
'<span style="font-weight: bold;">Status</span>' and '<span style="font-weight: bold;">User</span>'
Filters available on the eManifest program's <a href="#Menu_Bar">Toolbar</a>,
you can have only certain records display here.</p>
<p style="margin-left: 64px;">The details listed for each Manifest
are entered using the eManifest program's <a href="#Header">Header
section</a>. You can complete some tasks using the right-click Context
Menu (see below).</p>
<h4 class="HeadingCM" style="margin-left: 92px;">Context Menu</h4>
<p style="margin-left: 104px; font-weight: bold;">Flag Manifest as
Complete</p>
<p style="margin-left: 104px;">Select this option when a currently
Active record has been completed. It will be removed from the Record
Summary Grid and will be viewable only when the Status Filter is set
to 'ALL' or to 'COMPLETE'.</p>
<p style="margin-left: 104px; font-weight: bold;">Set Manifest Back
to Active</p>
<p style="margin-left: 104px; font-weight: normal;">If the User must
make some changes to a Manifest with the status of 'COMPLETE', selecting
this option will set the Manifest's status to 'REWORK', allowing it
to be modified. Note that to view Manifests with 'COMPLETE' status,
you must configure the Status Filter in the <a href="#Menu_Bar">Toolbar</a>.</p>
<h4 style="margin-left: 52px;">Status Summary Grid</h4>
<p style="margin-left: 64px;">The Status Summary Grid displays all
of the Status changes that have been applied to the Manifest selected
in the Manifest Summary Grid, as well as some information regarding
when and whom completed the changes. These records are for informational
purposes only, and cannot be edited.</p><?rh-droptext_end ?>
<h3><a name="Vehicle_Tab<bc=21"></a><a name="Vehicle_Tab<bc=43"></a><a
name="Vehicle_Tab<bc=65"></a><a name="Vehicle_Tab<bc=87"></a><a
name="Vehicle_Tab<bc=109"></a> <a name="Vehicle_Tab" id="Vehicle_Tab"></a>Vehicle
Tab</h3>
<p>The <?rh-dropspot_start class="dropspot" href="javascript:TextPopup(this)"
id="a4" dataid="POPUP496349970" ?><span class="glosstext">Vehicle
Tab</span><?rh-dropspot_end ?> provides a summary of the Power Unit attached
to the currently selected Manifest record.</p>
<?rh-droptext_start class="droptext" id="POPUP496349970" style="display: none;" ?>
<p style="margin-left: 64px;"><img src="../images/80EMANvehicleTab.gif"
alt="" style="border: none;" width="897"
height="308" border="0" /></p>
<h4 style="margin-left: 52px;">Vehicle Summary Grid</h4>
<p style="margin-left: 64px;">The Vehicle Summary Grid lists details
regarding the Power Unit attached to the Manifest displayed in the
eManifest program <a href="#Header">Header section</a>. These values
normally populate automatically when a Manifest record is created
from a Dispatch Trip, but the User has the option of modifying these
detail records using the Tractor Details section below.</p>
<h4 style="margin-left: 52px;">Tractor Details</h4>
<p style="margin-left: 64px;">The Tractor Details section allows you
to edit the details of the Power Unit(s) attached to the selected
Manifest. If creating a Manifest record from a Dispatch Trip, some
of these fields may be automatically populated based on the Power
Unit's configuration in the <a href="../../profile/punit/punit_over.htm#18CustomsTab">Power
Unit Profiles program > Customs Tab</a>. Editing details regarding
a specific Power Unit in this section will not affect the Power Unit's
standard configuration as detailed on the Power Unit Profiles program
> Customs Tab.</p>
<p style="margin-left: 104px; font-weight: bold;">Power Unit</p>
<p style="margin-left: 104px; font-weight: normal;">To choose a Power
Unit to attach to the Manifest select the Database search button to
view the Power Units available in your system. Power Unit codes are
created and maintained in the <a href="../../profile/punit/punit_over.htm">Power
Unit Profiles program</a>.</p>
<p class="Notes" style="margin-left: 151px;"><b><span style="font-weight: normal;"><img
src="../../notes.gif" alt="" style="border: none;" width="25" height="25"
border="0" />  </span></b>You may, alternatively, enter a Power
Unit code that is not contained in the TruckMate system. The eManifest
program allows the entry of non-TruckMate resources without the need
of adding them into TruckMate.</p>
<p style="margin-left: 104px; font-weight: bold;">Type</p>
<p style="margin-left: 104px; font-weight: normal;">Use the Database
search button to select an ACE Type value for the selected Power Unit.</p>
<p style="margin-left: 104px; font-weight: bold;">Serial #</p>
<p style="margin-left: 104px; font-weight: normal;">Enter the Power
Unit's Serial Number in the field provided.</p>
<p style="margin-left: 104px; font-weight: bold;">License (Primary)
/ State/Prov / Country</p>
<p style="margin-left: 104px; font-weight: normal;">Because a Power
Unit may have different Licenses for various regions, you can enter
up to 4 different License plate numbers and their associated geographic
specifications.</p>
<p style="margin-left: 104px; font-weight: bold;">Unit's ACE ID / ID
Type</p>
<p style="margin-left: 104px; font-weight: normal;">Enter the Power
Unit's ACE ID in the field provided, then select the ID Type. 'AID'
refers to ACE ID, and 'CNV' refers to a Conveyance ID.</p>
<p style="margin-left: 104px; font-weight: bold;">DOT #</p>
<p style="margin-left: 104px; font-weight: normal;">Enter the Power
Unit's U.S. Department of Transportation number.</p>
<p style="margin-left: 104px; font-weight: bold;">Transponder ID</p>
<p style="margin-left: 104px; font-weight: normal;">Enter the Power
Unit's unique Transponder ID.</p>
<h5 style="margin-left: 104px;">Shipment Specific Information</h5>
<p style="margin-left: 144px; font-weight: bold;">Bond Liability</p>
<p style="margin-left: 144px; font-weight: normal;">Use the Database
search button to select a Bond Type for the selected Manifest. The
Type Codes correspond as follows:</p>
<ul style="list-style: disc;">
<li class="p"><p style="margin-left: 144px; font-weight: normal;"><span
style="font-weight: bold;">A</span>: loaded move. Merchandise
release covered by Carrier's Bond.</p></li>
<li class="p"><p style="margin-left: 144px; font-weight: normal;"><span
style="font-weight: bold;">B</span>: loaded move. Merchandise
release covered by Importer's Bond.</p></li>
<li class="p"><p style="margin-left: 144px; font-weight: normal;"><span
style="font-weight: bold;">C</span>: empty move. Equipment release
covered by Carrier's Bond.</p></li>
<li class="p"><p style="margin-left: 144px; font-weight: normal;"><span
style="font-weight: bold;">D</span>: empty move. Equipment release
covered by Importer's Bond.</p></li>
</ul>
<p style="margin-left: 144px; font-weight: bold;">Seal #1 / Seal #2
/ Seal #3 / Seal #4</p>
<p style="margin-left: 144px; font-weight: normal;">Enter the Seal
number attached to the Trailer. You can enter up to 4 unique seals.</p><?rh-droptext_end ?>
<h3><a name="Equipment_Tab<bc=13"></a><a name="Equipment_Tab<bc=35"></a><a
name="Equipment_Tab<bc=57"></a><a name="Equipment_Tab<bc=79"></a><a
name="Equipment_Tab<bc=101"></a> <a name="Equipment_Tab" id="Equipment_Tab"></a>Equipment
Tab</h3>
<p>The <?rh-dropspot_start class="dropspot" href="javascript:TextPopup(this)"
id="a5" dataid="POPUP496356691" ?><span class="glosstext">Equipment
Tab</span><?rh-dropspot_end ?> provides a summary of the Trailer attached
to the currently selected Manifest record.</p>
<?rh-droptext_start class="droptext" id="POPUP496356691" style="display: none;" ?>
<p style="margin-left: 64px;"><img src="../images/80EMANequipmentTab.gif"
alt="" style="border: none;" width="897"
height="299" border="0" /></p>
<h4 style="margin-left: 52px;">Equipment Summary Grid</h4>
<p style="margin-left: 64px;">The Vehicle Summary Grid lists details
regarding the Trailer(s) attached to the Manifest displayed in the
eManifest program <a href="#Header">Header section</a>. These values
normally populate automatically when a Manifest record is created
from a Dispatch Trip, but the User has the option of modifying these
detail records using the Trailer Details section below.</p>
<h4 style="margin-left: 52px;">Trailer Details</h4>
<p style="margin-left: 64px;">The Tractor Details section allows you
to edit the details of the Trailer(s) attached to the selected Manifest.
If creating a Manifest record from a Dispatch Trip, some of these
fields may be automatically populated based on the Trailer's configuration
in the <a href="../../profile/trailer/trailer_over.htm#19CustomsTab">Trailer
Profiles program > Customs Tab</a>. Editing details regarding a
specific Trailer in this section will not affect the Trailer's standard
configuration as detailed on the Trailer Profiles program > Customs
Tab.</p>
<p style="margin-left: 104px; font-weight: bold;">Unit ID</p>
<p style="margin-left: 104px; font-weight: normal;">To choose a Trailer
to attach to the Manifest select the Database search button to view
the Trailers available in your system. Trailer codes are created and
maintained in the <a href="../../profile/trailer/trailer_over.htm">Trailer
Profiles program</a>.</p>
<p class="Notes" style="margin-left: 151px;"><b><span style="font-weight: normal;"><img
src="../../notes.gif" alt="" style="border: none;" width="25" height="25"
border="0" />  </span></b>You may, alternatively, enter a Trailer
code that is not contained in the TruckMate system. The eManifest
program allows the entry of non-TruckMate resources without the need
of adding them into TruckMate.</p>
<p style="margin-left: 104px; font-weight: bold;">Type</p>
<p style="margin-left: 104px; font-weight: normal;">Use the Database
search button to select an ACE Type value for the selected Trailer.</p>
<p style="margin-left: 104px; font-weight: bold;">License (Primary)
/ State/Prov / Country</p>
<p style="margin-left: 104px; font-weight: normal;">Because a Trailer
may have different Licenses for various regions, you can enter up
to 4 different License plate numbers and their associated geographic
specifications.</p>
<p style="margin-left: 104px; font-weight: bold;">Alpha Prefix / Nbr</p>
<p style="margin-left: 104px; font-weight: normal;">Enter the Trailer's
Alpha Prefix code and then it's number in the field provided.</p>
<p style="margin-left: 104px; font-weight: bold;">Carrier's ACE ID</p>
<p style="margin-left: 104px; font-weight: normal;">Enter the associated
Carrier's ACE ID in the field provided.</p>
<h5 style="margin-left: 104px;">Shipment Specific Information</h5>
<p style="margin-left: 144px; font-weight: bold;">Bond Liability</p>
<p style="margin-left: 144px; font-weight: normal;">Use the Database
search button to select a Bond Type for the selected Manifest. The
Type Codes correspond as follows:</p>
<ul style="list-style: disc;">
<li class="p"><p style="margin-left: 144px; font-weight: normal;"><span
style="font-weight: bold;">A</span>: loaded move. Merchandise
release covered by Carrier's Bond.</p></li>
<li class="p"><p style="margin-left: 144px; font-weight: normal;"><span
style="font-weight: bold;">B</span>: loaded move. Merchandise
release covered by Importer's Bond.</p></li>
<li class="p"><p style="margin-left: 144px; font-weight: normal;"><span
style="font-weight: bold;">C</span>: empty move. Equipment release
covered by Carrier's Bond.</p></li>
<li class="p"><p style="margin-left: 144px; font-weight: normal;"><span
style="font-weight: bold;">D</span>: empty move. Equipment release
covered by Importer's Bond.</p></li>
</ul>
<p style="margin-left: 144px; font-weight: bold;">Seal #1 / Seal #2
/ Seal #3 / Seal #4</p>
<p style="margin-left: 144px; font-weight: normal;">Enter the Seal
number attached to the Trailer. You can enter up to 4 unique seals.</p><?rh-droptext_end ?>
<h3><a name="Crew_Tab<bc=7"></a><a name="Crew_Tab<bc=29"></a><a name="Crew_Tab<bc=51"></a><a
name="Crew_Tab<bc=73"></a><a name="Crew_Tab<bc=95"></a> <a name="Crew_Tab"
id="Crew_Tab"></a>Crew Tab</h3>
<p>The <?rh-dropspot_start class="dropspot" href="javascript:TextPopup(this)"
id="a15" dataid="POPUP496355398" ?><span class="glosstext">Crew
Tab</span><?rh-dropspot_end ?> allows the User to attach Drivers, Passenger
and general Crew members to the Manifest.</p>
<?rh-droptext_start class="droptext" id="POPUP496355398" style="display: none;" ?>
<p style="margin-left: 64px;"><img src="../images/80EMANcrewTab.gif"
alt="" style="border: none;" width="893"
height="317" border="0" /></p>
<p class="Notes" style="margin-left: 111px;"><b><span style="font-weight: normal;"><img
src="../../notes.gif" alt="" style="border: none;" width="25" height="25"
border="0" /></span></b> Many of these fields can be set to automatically
populate based on the default settings in the 'Crew' section on the
<a href="#Defaults_A_Tab">Defaults A Tab</a>.</p>
<p style="margin-left: 64px; font-weight: bold;">Driver / Crew</p>
<p style="margin-left: 64px; font-weight: normal;">Use the Database
search button to select a Driver for the current Shipment and then
assign them 'FAST/ACE' number and an 'Identification Type'. During
the Validation check of the Manifest, the program will verify that
the Driver has at least one of: '5K' (Commercial Drv Lic), or 'PY'
(FAST ID) Identification types.</p>
<p style="margin-left: 64px; font-weight: bold;">FAST / ACE</p>
<p style="margin-left: 64px;">Enter the Driver / Crew member's FAST
/ ACE code in the space provided.</p>
<p style="margin-left: 64px; font-weight: bold;">Identification Type</p>
<p style="margin-left: 64px;">Use the drop-down menu to select the
ACE Code Identification Type.</p>
<p style="margin-left: 64px; font-weight: bold;">Name / Birthdate /
Gender / Citizenship</p>
<p style="margin-left: 64px; font-weight: normal;">These details should
automatically populate depending on the Driver Code selected. If you
are entering a new Driver, you must fill out these fields as necessary.</p>
<h4 style="margin-left: 52px;">Initial US Destination</h4>
<p style="margin-left: 64px;">Use these fields to configure the initial
U.S. Destination for the currently displayed Shipment.</p>
<p style="margin-left: 104px; font-weight: bold;">Client ID Look-Up</p>
<p style="margin-left: 104px; font-weight: normal;">Use the Database
search button to select the Client ID that will be the initial U.S.
destination of the Shipment. Client IDs and their associated details
are maintained in the <a href="../../profile/profile/profile_cust.htm">Customer
& Vendor Profiles program</a>.</p>
<p style="margin-left: 104px; font-weight: bold;">Address Information</p>
<p style="margin-left: 104px; font-weight: normal;">The Client's address
information will automatically populate based on the Client ID selected.</p>
<h4 style="margin-left: 52px;">Crew Identification</h4>
<p style="margin-left: 64px;">This section is used to attach other
Crew members to the Manifest record. Use the '+' button on the TruckMate
Naviation Bar and enter their respective details in the provided fields.
Additional Crew members will then display on the Crew Identification
Grid.</p><?rh-droptext_end ?>
<h3><a name="BOL_Tab<bc=1"></a><a name="BOL_Tab<bc=23"></a><a name="BOL_Tab<bc=45"></a><a
name="BOL_Tab<bc=67"></a><a name="BOL_Tab<bc=89"></a> <a name="BOL_Tab"
id="BOL_Tab"></a>Bill of Lading Tab</h3>
<h4 style="margin-left: 52px;">Bill of Lading Grid</h4>
<p style="margin-left: 64px;">The Bill of Lading Grid displays any Freight
Bills that are attached to the current Shipment / Manifest. Changes to
the Freight Bill detail records are accomplished on the Bill of Lading
Sub-Tabs, described below. You also have access to two Context Menu options
from this Grid, which allow you to quickly remove Freight Bills from any
Shipments that need amendment.</p>
<h4 class="HeadingCM" style="margin-left: 92px;">Context Menu</h4>
<p style="margin-left: 104px; font-weight: bold;">Skip All Bills</p>
<p style="margin-left: 104px;">Selecting this option will set the 'Skip
Bill' field to 'True' on all Freight Bills in the Bill of Lading Grid,
removing them from the currently displayed Manifest. This is useful when
you are amending a Shipment with multiple Freight Bills on it, but do
not wish to make any modifications to a specific Freight Bill (because
it was correctly submitted the first time).</p>
<p style="margin-left: 104px; font-weight: bold;">Clear Skip on All Bills</p>
<p style="margin-left: 104px;">Selecting this option will change the 'Skip
Bill' field from 'True' back to 'False', including the Freight Bill(s)
in the Manifest.</p>
<h4 style="margin-left: 52px;"><a name="BOL_Item_Summary_Tab<bc=5"></a><a
name="BOL_Item_Summary_Tab<bc=27"></a><a name="BOL_Item_Summary_Tab<bc=49"></a><a
name="BOL_Item_Summary_Tab<bc=71"></a><a name="BOL_Item_Summary_Tab<bc=93"></a>
<a name="BOL_Item_Summary_Tab" id="BOL_Item_Summary_Tab"></a>Item Summary
Tab</h4>
<p style="margin-left: 64px;">The <?rh-dropspot_start class="dropspot"
href="javascript:TextPopup(this)"
id="a6" dataid="POPUP496361272" ?><span
class="glosstext">Item Summary Tab</span><?rh-dropspot_end ?> shows
the details of the Freight Bill attached to the selected Manifest record
and allows some configuration.</p>
<?rh-droptext_start class="droptext" id="POPUP496361272" style="display: none;" ?>
<p style="margin-left: 104px;"><img src="../images/80EMANbolItemSummaryTab.gif"
alt="" style="border: none;" width="885"
height="183" border="0" /></p>
<p class="Notes" style="margin-left: 151px;"><b><span style="font-weight: normal;"><img
src="../../notes.gif" alt="" style="border: none;" width="25" height="25"
border="0" /></span></b> Many of these fields can be set to automatically
populate based on the default settings in the 'Bill of Lading' section
on the <a href="#Defaults_A_Tab">Defaults A Tab</a>.</p>
<p style="margin-left: 104px; font-weight: bold;">Bill #</p>
<p style="margin-left: 104px;">This field displays the Freight Bill
number of the Freight Bill currently selected in the Bill of Lading
Grid.</p>
<p style="margin-left: 104px; font-weight: bold;">Skip Bill During
Processing</p>
<p style="margin-left: 104px; font-weight: normal;">Selecting this
flag will remove the selected Freight Bill Manifest that is sent electronically.
If you have multiple Freight Bills in a Manifest that has been sent,
and not all of them require amending, use this flag to avoid submitting
the same Freight Bill multiple times.</p>
<p style="margin-left: 104px; font-weight: bold;">Amendment / Amendment
Type / Amendment Reason Code</p>
<p style="margin-left: 104px;">If the Freight Bill selected in the
Bill of Lading Grid requires amending/modification, select the 'Amendment'
flag, then use the 'Amendment Type' drop down menu to choose the a
value from the following:</p>
<ol style="list-style: disc;">
<li style="list-style: none; display: inline;"><ul style="list-style: disc;">
<li class="p"><p style="margin-left: 64px;"><span style="font-weight: bold;">A</span>
- Add a Freight Bill</p></li>
<li class="p"><p style="margin-left: 64px;"><span style="font-weight: bold;">D</span>
- Delete a previously submitted Freight Bill.</p></li>
<li class="p"><p style="margin-left: 64px;"><span style="font-weight: bold;">M</span>
- Modify a previously submitted Freight Bill.</p></li>
</ul></li>
</ol>
<p style="margin-left: 104px;">Once you have chosen an 'Amendment Type',
you must then select an 'Amendment Reason Code' by selecting the Database
search button and choosing the reason for amendment from the list
of available options in your system.</p>
<p style="margin-left: 104px; font-weight: bold;">SCAC / Waybill</p>
<p style="margin-left: 104px;">These fields displays the SCAC number
used to file the Freight Bill, as well as the Waybill number of the
Freight Bill currently selected in the Bill of Lading Grid.</p>
<p class="Notes" style="margin-left: 151px;"><b><span style="font-weight: normal;"><img
src="../../notes.gif" alt="" style="border: none;" width="25" height="25"
border="0" /></span></b> The 'Waybill' field will default to a blank
field (rather than have it auto-populate with the Freight Bill Number.
This is to ensure that a Dispatcher does not send the eManifest without
updating the Waybill number manually. If a User attempts to send the
eManifest with a blank 'Waybill' field, the eManifest program will
return an error and won't send until they add the waybill number.</p>
<p style="margin-left: 104px;"><span style="margin-left: 104px; font-weight: bold;">BOL
Type</span></p>
<p style="margin-left: 104px;">Use the Database search button to select
a Bill of Lading Type from those available on your system. The User
can select from the following Types:</p>
<ul style="list-style: disc;">
<li class="p"><p style="margin-left: 104px;"><span style="font-weight: bold;">Type
00</span>: Regular Bill.</p></li>
<li class="p"><p style="margin-left: 104px;"><span style="font-weight: bold;">Type
13</span>: Sec 321 Release.</p></li>
<li class="p"><p style="margin-left: 104px;"><span style="font-weight: bold;">Type
14</span>: Intangibles.</p></li>
<li class="p"><p style="margin-left: 104px;"><span style="font-weight: bold;">Type
18</span>: Goods Astray. This type entails several specific requirements.
See the 'Goods Astray' section of the <a href="#BOL_InBond_Tab">In-Bond
Tab</a> for more details.</p></li>
<li class="p"><p style="margin-left: 104px;"><span style="font-weight: bold;">Type
24</span>: Single Entry Per C4 Line Release.</p></li>
<li class="p"><p style="margin-left: 104px;"><span style="font-weight: bold;">Type
25</span>: Individual Entry for Multiple C4 Line Releases.</p></li>
<li class="p"><p style="margin-left: 104px;"><span style="font-weight: bold;">Type
33</span>: Preferred FAST Shipment.</p></li>
<li class="p"><p style="margin-left: 104px;"><span style="font-weight: bold;">Type
34</span>: Preferred Pre-Arrival Processing System (PAPS) Shipment.</p></li>
</ul>
<p style="margin-left: 104px; font-weight: bold;">Service Code</p>
<p style="margin-left: 104px; font-weight: normal;">Use the Database
search button to select the ACE Service Code required for the selected
Freight Bill on this Manifest.</p>
<p style="margin-left: 104px; font-weight: bold;">Foreign POL / POL
Type</p>
<p style="margin-left: 104px; font-weight: normal;">Use the Database
search button to select the Foreign POL and the drop down menu to
select the POL Type.</p>
<p style="margin-left: 104px; font-weight: bold;">Multiple Equipment
Assignment</p>
<p style="margin-left: 104px; font-weight: normal;">This flag allows
you to identify the Shipment as having Multiple Equipment assigned
to it. If selected, the applicable Equipment unit must be manually
selected for each Detail record of the Shipment on the <a href="#BOL_Details_Tab">Details
Tab</a>. <span style="margin-left: 104px; font-weight: normal;">This
field is useful in a "Two Trailer, One Shipment" scenario.</span></p>
<p style="margin-left: 104px; font-weight: bold;">Single Equipment
Assignment</p>
<p style="margin-left: 104px; font-weight: normal;">If the shipment
is to only have a single piece of Equipment associated with it, use
the Database search button to select a Trailer code from your system.</p>
<h4 style="margin-left: 92px;">Shipper</h4>
<p style="margin-left: 104px; font-weight: normal;">The Shipper section
will automatically populate based on the Freight Bill information
found in the Freight Bill specified by the 'Bill #' field.</p>
<h4 style="margin-left: 92px;">Consignee</h4>
<p style="margin-left: 104px; font-weight: normal;"><span style="font-weight: normal;">The
Consignee section will automatically populate based on the Freight
Bill information found in the Freight Bill specified by the 'Bill
#' field.</span></p><?rh-droptext_end ?>
<h4 style="margin-left: 52px;"><a name="BOL_InBond_Tab<bc=4"></a><a
name="BOL_InBond_Tab<bc=26"></a><a name="BOL_InBond_Tab<bc=48"></a><a
name="BOL_InBond_Tab<bc=70"></a><a name="BOL_InBond_Tab<bc=92"></a>
<a name="BOL_InBond_Tab" id="BOL_InBond_Tab"></a>In-Bond Tab</h4>
<p style="margin-left: 64px;">The <?rh-dropspot_start class="dropspot"
href="javascript:TextPopup(this)"
id="a8" dataid="POPUP496372163" ?><span
class="glosstext">In-Bond Tab</span><?rh-dropspot_end ?> shows the
details of the Shipment's In-Bond Customs information.</p>
<?rh-droptext_start class="droptext" id="POPUP496372163" style="display: none;" ?>
<p style="margin-left: 104px;"><img src="../images/80EMANbolInBondTab.gif"
alt="" style="border: none;" width="881"
height="183" border="0" /></p>
<p class="Notes" style="margin-left: 151px;"><b><span style="font-weight: normal;"><img
src="../../notes.gif" alt="" style="border: none;" width="25" height="25"
border="0" /></span></b> Many of these fields can be set to automatically
populate based on the 'Entry Type' selected by configuring defaults
on the <a href="#Defaults_B_Tab">Defaults B Tab</a>.</p>
<p style="margin-left: 104px; font-weight: bold;">Entry Type</p>
<p style="margin-left: 104px; font-weight: normal;">Use the Database
search button to select the Entry Type of the displayed Manifest.
The Entry Type values correspond as follows:</p>
<ul style="list-style: disc;">
<li class="p"><p style="margin-left: 104px; font-weight: normal;"><span
style="font-weight: bold;">Type 61</span>: Immediate Transportation.</p></li>
<li class="p"><p style="margin-left: 104px; font-weight: normal;"><span
style="font-weight: bold;">Type 62</span>: Transportation Exportation.
This Type is intended for export shipments (the 'Arrival Port'
and the 'U.S. In-Bond Port' cannot be the same). <span style="margin-left: 104px;
font-weight: normal;">Type 62 means the Freight is entering the
U.S. and is intended for departure from the U.S. at another Port.</span></p></li>
<li class="p"><p style="margin-left: 104px; font-weight: normal;"><span
style="font-weight: bold;">Type 63</span>: Immediate Exportation.
Type 63 is for Immediate Exportation from the Port the Freight
is arriving into the U.S. at.</p></li>
<li class="p"><p style="margin-left: 104px; font-weight: normal;"><span
style="font-weight: bold;">Type 65</span>: Permit to Proceed (Permit
to Transfer). This Type designates local Freight transfers.</p></li>
</ul>
<p style="margin-left: 104px; font-weight: bold;">U.S. In-Bond Port</p>
<p style="margin-left: 104px; font-weight: normal;">Use the Database
search button to select the U.S. Port of Entry where the shipment
will clear U.S. Customs.</p>
<p style="margin-left: 104px; font-weight: bold;">FDA Monitored Goods</p>
<p style="margin-left: 104px; font-weight: normal;">If the displayed
shipment contains Food and Drug Administration monitored goods, select
this flag.</p>
<p style="margin-left: 104px; font-weight: bold;">Customs Entry #</p>
<p style="margin-left: 104px; font-weight: normal;">Enter the In-Bond
Entry number that was supplied for the shipment by the Canadian Border
Protection agency (CBP) upon entry into the U.S.</p>
<p style="margin-left: 104px; font-weight: bold;">In-Bond Control #</p>
<p style="margin-left: 104px; font-weight: normal;">Enter the 9-digit
In-Bond Control # supplied by U.S. Customs. If a 9-digit value is
not entered, the eManifest program will generate a warning message
during the Validation process.</p>
<p style="margin-left: 104px; font-weight: bold;">FIRMS Code</p>
<p style="margin-left: 104px; font-weight: normal;">Enter the FIRMS
location identifier code of the destination arrival/transfer facility.</p>
<p style="margin-left: 104px; font-weight: bold;">Customs Returned
Entry #</p>
<p style="margin-left: 104px; font-weight: normal;">This field will
display the Customs Returned Entry # provided by a 350 EDI from the
Canadian Border Protection agency. This field is display only and
cannot be modified.</p>
<h4 style="margin-left: 92px;">Goods Astray - Type 18</h4>
<p style="margin-left: 104px;">If the Manifest is for a Goods Astray
shipment (Type 18), the following special restrictions should be noted:</p>
<ol style="list-style: decimal;">
<li class="p"><p style="margin-left: 104px;">Must be an In-Bond
Shipment under the Carrier’s own bond.</p></li>
<li class="p"><p style="margin-left: 104px;">Must not have left
the Carrier's custody while astray from the U.S.</p></li>
<li class="p"><p style="margin-left: 104px;">Freight must return
to the U.S. with 45 days of departing the U.S. (or duties become
payable).</p></li>
<li class="p"><p style="margin-left: 104px;">Shipper and Consignee
must both be of U.S. Origin</p></li>
</ol>
<p style="margin-left: 144px; font-weight: bold;">Original Date of
Departure</p>
<p style="margin-left: 144px; font-weight: normal;">Double click this
field to select the date of original departure from the U.S. using
a calendar menu. The Freight in the Shipment must return to the U.S.
within 45 days of the date in this field.</p>
<p style="margin-left: 144px; font-weight: bold;">Goods did not leave
Carrier custody while astray</p>
<p style="margin-left: 144px; font-weight: normal;">This is a required
flag when issuing a Goods Astray shipment. If this flag is not checked,
the Validation process for the Manifest will fail.</p>
<p class="Notes" style="margin-left: 191px;"><b><span style="font-weight: normal;"><img
src="../../notes.gif" alt="" style="border: none;" width="25" height="25"
border="0" /></span></b> These fields will only be available if the
'<span style="font-weight: bold;">BOL Type</span>' is set to '<span
style="font-weight: bold;">18</span>' on the <a href="#BOL_Item_Summary_Tab">Item
Summary Tab</a>.</p>
<h4 style="margin-left: 92px;">Transfer to Onward Bonded Carrier</h4>
<p style="margin-left: 144px; font-weight: bold;">Carrier SCAC</p>
<p style="margin-left: 144px;">Enter the SCAC of the Onward Carrier
the In-Bond shipment is expected to be transferred to.</p>
<p style="margin-left: 144px; font-weight: bold;">Bonded Carrier ID</p>
<p style="margin-left: 144px;">Use the drop-down menu to select the
Bonded Carrier's Internal Revenue Services (IRS) Identification code,
then enter the Carrier ID in the provided field.</p>
<h4 style="margin-left: 92px;">For Export From the U.S.</h4>
<p style="margin-left: 104px;">If the displayed shipment is set to
leave the United States (export), the following fields are required:</p>
<p style="margin-left: 144px; font-weight: bold;">Foreign Destination
Port</p>
<p style="margin-left: 144px;">Use the Database search button to select
a Foreign In-Bond Port Code.</p>
<p style="margin-left: 144px; font-weight: bold;">Estimated Departure
Date</p>
<p style="margin-left: 144px;">Select the calendar icon to chose an
estimated departure date for the export from the U.S.</p><?rh-droptext_end ?>
<h4 style="margin-left: 52px;"><a name="BOL_Importer_Tab<bc=3"></a><a
name="BOL_Importer_Tab<bc=25"></a><a name="BOL_Importer_Tab<bc=47"></a><a
name="BOL_Importer_Tab<bc=69"></a><a name="BOL_Importer_Tab<bc=91"></a>
<a name="BOL_Importer_Tab" id="BOL_Importer_Tab"></a>Importer / Broker
Tab</h4>
<p style="margin-left: 64px;">The <?rh-dropspot_start class="dropspot"
href="javascript:TextPopup(this)"
id="a12" dataid="POPUP496366709" ?><span
class="glosstext">Importer / Broker Tab</span><?rh-dropspot_end ?>
allows you to assign an Importer and/or Customs Broker to the current
Manifest.</p>
<?rh-droptext_start class="droptext" id="POPUP496366709" style="display: none;" ?>
<h4 style="margin-left: 52px;"><img src="../images/80EMANimporterBrokerTab.gif"
alt="" style="border: none;" width="881"
height="183" border="0" /></h4>
<h4 style="margin-left: 52px;">Importer</h4>
<p class="Notes" style="margin-left: 111px;"><b><span style="font-weight: normal;"><img
src="../../notes.gif" alt="" style="border: none;" width="25" height="25"
border="0" /> T</span></b>hese fields can be set to automatically
populate based on the configuration settings for the 'Importer' section
in the <a href="#Defaults_A_Tab">Defaults A Tab</a>.</p>
<p style="margin-left: 64px; font-weight: bold;">Importer ID</p>
<p style="margin-left: 64px; font-weight: normal;">Use the Database
search button to select a Client ID that will be Importing the shipment
detailed by the Manifest. The other detail fields in this section
will automatically populate based on the Client's setup in the <a
href="../../profile/profile/profile_cust.htm">Customer & Vendor
Profiles program</a>.</p>
<h4 style="margin-left: 52px;">Customs Broker</h4>
<p class="Notes" style="margin-left: 111px;"><b><span style="font-weight: normal;"><img
src="../../notes.gif" alt="" style="border: none;" width="25" height="25"
border="0" /> T</span></b>hese fields can be set to automatically
populate based on the configuration settings for the 'Customs Broker'
section in the <a href="#Defaults_B_Tab">Defaults B Tab</a>.</p>
<p style="margin-left: 64px; font-weight: bold;">Broker Download</p>
<p style="margin-left: 64px; font-weight: normal;">Select this flag
to requests downloads from the Canadian Border Protection (CBP) to
be sent to the Customs Broker.</p>
<p style="margin-left: 64px; font-weight: bold;">Filer Code / Filer
Name / Port Code</p>
<p style="margin-left: 64px; font-weight: normal;">Enter the Customs
Broker's Filer information and Port Code in the provided fields.</p><?rh-droptext_end ?>
<h4 style="margin-left: 52px;"><a name="BOL_Details_Tab<bc=2"></a><a
name="BOL_Details_Tab<bc=24"></a><a name="BOL_Details_Tab<bc=46"></a><a
name="BOL_Details_Tab<bc=68"></a><a name="BOL_Details_Tab<bc=90"></a>
<a name="BOL_Details_Tab" id="BOL_Details_Tab"></a>Details Tab</h4>
<p style="margin-left: 64px;">The <?rh-dropspot_start class="dropspot"
href="javascript:TextPopup(this)"
id="a14" dataid="POPUP496344593" ?><span
class="glosstext">Details Tab</span><?rh-dropspot_end ?> lists specific
information about the kind of goods being shipped on the selected Freight
Bill in the Bill of Lading Grid.</p>
<?rh-droptext_start class="droptext" id="POPUP496344593" style="display: none;" ?>
<p style="margin-left: 104px;"><img src="../images/80EMANbolDetailsTab.gif"
alt="" style="border: none;" width="881"
height="183" border="0" /></p>
<p style="margin-left: 104px;"> </p>
<p> </p><?rh-droptext_end ?>
<h4 style="margin-left: 52px;"><a name="BOL_RefNum_Tab<bc=6"></a><a
name="BOL_RefNum_Tab<bc=28"></a><a name="BOL_RefNum_Tab<bc=50"></a><a
name="BOL_RefNum_Tab<bc=72"></a><a name="BOL_RefNum_Tab<bc=94"></a>
<a name="BOL_RefNum_Tab" id="BOL_RefNum_Tab"></a>Reference Numbers Tab</h4>
<p style="margin-left: 64px;">The <?rh-dropspot_start class="dropspot"
href="javascript:TextPopup(this)"
id="a16" dataid="POPUP496364953" ?><span
class="glosstext">Reference Numbers Tab</span><?rh-dropspot_end ?>
allows the User to attach a variety of specific Reference Numbers required
when sending Shipments to Mexico.</p>
<?rh-droptext_start class="droptext" id="POPUP496364953" style="display: none;" ?>
<p style="margin-left: 104px;"><img src="../images/80EMANbolReferenceNumbersTab.gif"
alt="" style="border: none;" width="881"
height="182" border="0" /></p>
<p style="margin-left: 104px;">Use the '+' button at the bottom of
the Reference Grid to create a new record detail line, then use the
options in the 'Reference Number Type' section to add a Reference
entry.</p>
<h4 style="margin-left: 92px;">Reference Number Type</h4>
<p style="margin-left: 104px;">These fields are used to add records
to the Reference Number Grid. Choose one of the following radio options:</p>
<ul style="list-style: disc;">
<li class="p"><p style="margin-left: 104px;"><span style="font-weight: bold;">Broker's
Entry Number - BEN</span>:</p></li>
<li class="p"><p style="margin-left: 104px;"><span style="font-weight: bold;">Foreign
Entry Number (Mexican Pdimento) - FEN</span>:</p></li>
<li class="p"><p style="margin-left: 104px;"><span style="font-weight: bold;">Shipper's
ID (SID) Number - SI</span>:</p></li>
</ul>
<p style="margin-left: 104px;">These values will appear in the 'Ref
Type' column of the Reference Tab Grid.</p>
<p style="font-weight: bold; margin-left: 144px;">Number</p>
<p style="margin-left: 144px; font-weight: normal;">Once you have chosen
the Reference Number Type, enter the Reference Number here. This value
will be added to the 'Reference Value' column in the Reference Tab
Grid.</p><?rh-droptext_end ?>
<h3><a name="Shipment_Amendment_Tab<bc=19"></a><a name="Shipment_Amendment_Tab<bc=41"></a><a
name="Shipment_Amendment_Tab<bc=63"></a><a name="Shipment_Amendment_Tab<bc=85"></a><a
name="Shipment_Amendment_Tab<bc=107"></a> <a name="Shipment_Amendment_Tab"
id="Shipment_Amendment_Tab"></a>Shipment
Amendment Control Tab</h3>
<p>The <?rh-dropspot_start class="dropspot" href="javascript:TextPopup(this)"
id="a17" dataid="POPUP496372062" ?><span class="glosstext">Shipment
Amendment Control Tab</span><?rh-dropspot_end ?> is used to modify ("amend")
a Manifest that has already been submitted. For example, the User may
have already sent a 309W but now wants to add another Freight Bill to
the Manifest, perhaps because of a clerical error. The User will be able
to add the new Freight Bill while skipping the other (already included)
Freight Bill so that it is not send again. The Tab may also be used to
remove and/or edit one of the Freight Bills already submitted as part
of the Manifest.</p>
<?rh-droptext_start class="droptext" id="POPUP496372062" style="display: none;" ?>
<p style="margin-left: 64px;"><img src="../images/80EMANshipmentAmendmentControlTab.gif"
alt="" style="border: none;" width="893"
height="229" border="0" /></p>
<p style="margin-left: 64px; font-weight: bold;">Bill Number</p>
<p style="margin-left: 64px;">This field displays the Freight Bill
number of the Freight Bill currently selected in the Shipment Amendment
Control Grid.</p>
<p style="margin-left: 64px; font-weight: bold;">SCAC / Waybill</p>
<p style="margin-left: 64px;">These fields displays the SCAC number
used to file the Freight Bill, as well as the Waybill number of the
Freight Bill currently selected in the Shipment Amendment Control
Grid.</p>
<p style="margin-left: 64px; font-weight: bold;">Skip Bill During Processing</p>
<p style="margin-left: 64px;">Selecting this flag will remove the selected
Freight Bill in the Shipment Amendment Control Grid from the Amended
Manifest. If you have multiple Freight Bills in a Manifest that has
been sent, and not all of them require amending, use this flag to
avoid submitting the same Freight Bill multiple times.</p>
<p style="margin-left: 64px; font-weight: bold;">Amendment / Amendment
Type / Amendment Reason Code</p>
<p style="margin-left: 64px;">If the Freight Bill selected in the Shipment
Amendment Control Grid requires amending/modification, select the
'Amendment' flag, then use the 'Amendment Type' drop down menu to
choose the a value from the following:</p>
<ul style="list-style: disc;">
<li class="p"><p style="margin-left: 64px;"><span style="font-weight: bold;">A</span>
- Add a Freight Bill</p></li>
<li class="p"><p style="margin-left: 64px;"><span style="font-weight: bold;">D</span>
- Delete a previously submitted Freight Bill.</p></li>
<li class="p"><p style="margin-left: 64px;"><span style="font-weight: bold;">M</span>
- Modify a previously submitted Freight Bill.</p></li>
</ul>
<p style="margin-left: 64px;">Once you have chosen an 'Amendment Type',
you must then select an 'Amendment Reason Code' by selecting the Database
search button and choosing the reason for amendment from the list
of available options in your system.</p>
<h4 style="margin-left: 52px;">Shipment Amendment Control Grid</h4>
<p style="margin-left: 64px;">This Grid displays all of the Freight
Bills that are attached to the Manifest. You can highlight a specific
Freight Bill in this Grid by selecting one of its fields, and then
use the above fields and options to change the amendment values for
the selected Freight Bill.</p>
<p style="margin-left: 64px; font-weight: bold;">Skip All</p>
<p style="margin-left: 64px; font-weight: normal;">Select this button
to enable the 'Skip Bill During Processing' flag for all Freight Bills
displayed in the Shipment Amendment Control Grid.</p>
<p style="margin-left: 64px; font-weight: bold;">Clear All Skips</p>
<p style="margin-left: 64px; font-weight: normal;">Select this button
to remove the 'Skip Bill During Processing' flag from all Freight
Bills displayed in the Shipment Amendment Control Grid.</p>
<p style="margin-left: 64px; font-weight: bold;">Clear All Amendments</p>
<p style="margin-left: 64px; font-weight: normal;">Selecting this button
will remove any data from the 'Amendment Type' and 'Amendment Code'
fields and reset the 'Amendment' field to 'False' for all Freight
Bills displayed in the Shipment Amendment Control Grid.</p><?rh-droptext_end ?>
<h3><a name="Hazardous_Materials_Tab<bc=14"></a><a name="Hazardous_Materials_Tab<bc=36"></a><a
name="Hazardous_Materials_Tab<bc=58"></a><a name="Hazardous_Materials_Tab<bc=80"></a><a
name="Hazardous_Materials_Tab<bc=102"></a> <a name="Hazardous_Materials_Tab"
id="Hazardous_Materials_Tab"></a>Hazardous
Materials Tab</h3>
<p>The <?rh-dropspot_start class="dropspot" href="javascript:TextPopup(this)"
id="a9" dataid="POPUP496369209" ?><span class="glosstext">Hazardous
Materials Tab</span><?rh-dropspot_end ?> details any hazardous or dangerous
materials included on the Freight Bill(s) attached to the displayed Manifest
record. If the Shipment's Freight Bill details in the Customer Service
program are identified as 'HazMat' (Hazardous Materials), the detail record
will automatically be flagged as 'HazMat' in the eManifest program. If
there is a UN HazMat product identification code associated with the Customer
Service Detail record, it will be imported into the eManifest Detail record.
The eManifest program will also accommodate entered UN codes prefixed
with or without the 'UN' code prefix.</p>
<?rh-droptext_start class="droptext" id="POPUP496369209" style="display: none;" ?>
<p style="margin-left: 64px;"><img src="../images/80EMANhazardousMaterialsTab.gif"
alt="" style="border: none;" width="893"
height="232" border="0" /></p>
<h4 style="margin-left: 52px;">Insurance Information</h4>
<p style="margin-left: 64px;">The details in the Insurance Information
may automatically populated based on the settings for the selected
Trade Partner on the <a href="#Defaults_B_Tab">Defaults B Tab</a>.</p>
<p style="margin-left: 104px; font-weight: bold;">Insurance Company</p>
<p style="margin-left: 104px; font-weight: normal;">Enter the name
of the Insurance Company that will be covering the insurance for the
Hazardous Freight Manifest.</p>
<p style="margin-left: 104px; font-weight: bold;">Policy #</p>
<p style="margin-left: 104px; font-weight: normal;">Enter the Policy
number with the displayed Insurance Company.</p>
<p style="margin-left: 104px; font-weight: bold;">Insurance Amount</p>
<p style="margin-left: 104px; font-weight: normal;">Enter the total
amount that the Manifest is insured for.</p>
<p style="margin-left: 104px; font-weight: bold;">Year Applicable</p>
<p style="margin-left: 104px; font-weight: normal;">Enter the year
in which the Insurance Policy is valid for.</p>
<h4 style="margin-left: 52px;">Hazardous Materials Summary Grid</h4>
<p style="margin-left: 64px;">This Grid lists the Freight Bills included
in the Manifest that contain Dangerous Freight items. The Grid lists
several details, including the Freight's unique 'HAZMAT UN Code' and
other details, including the 'HAZMAT Contact'.</p>
<p style="margin-left: 64px;">Some of the fields in this Grid will
automatically populate based on the settings on the <a href="#Defaults_B_Tab">Defaults
B Tab</a>. 'UN Codes' and other information regarding Hazardous Freight
materials are maintained in the <a href="../../profile/bulkcodes/bulkcodes_over.htm">Bulk
Codes Maintenance program</a>.</p><?rh-droptext_end ?>
<h3><a name="Message_Details_Tab<bc=18"></a><a name="Message_Details_Tab<bc=40"></a><a
name="Message_Details_Tab<bc=62"></a><a name="Message_Details_Tab<bc=84"></a><a
name="Message_Details_Tab<bc=106"></a> <a name="Message_Details_Tab"
id="Message_Details_Tab"></a>Message
Details Tab</h3>
<p>The Message Details Tab provides expanded details about the inbound
and outbound EDI transactions and pertinent analyses of CBP codes used
in transaction sets and expanded interpretations.</p>
<h2><a name="Defaults_Settings_Window" id="Defaults_Settings_Window"></a>Defaults
and Settings Window</h2>
<h3><a name="Defaults_A_Tab<bc=9"></a><a name="Defaults_A_Tab<bc=31"></a><a
name="Defaults_A_Tab<bc=53"></a><a name="Defaults_A_Tab<bc=75"></a><a
name="Defaults_A_Tab<bc=97"></a> <a name="Defaults_A_Tab" id="Defaults_A_Tab"></a>Defaults
A Tab</h3>
<p>The <?rh-dropspot_start class="dropspot" href="javascript:TextPopup(this)"
id="a1" dataid="POPUP439874787" ?><span class="glosstext">Defaults
A Tab</span><?rh-dropspot_end ?> contains several configurable options
for various sections of the eManifest program.</p>
<?rh-droptext_start class="droptext" id="POPUP439874787" style="display: none;" ?>
<p style="margin-left: 64px;"><img src="../images/80EMANdefaultsWindowDefaultsATab.gif"
alt="" style="border: none;" width="675"
height="473" border="0" /></p>
<h4 style="margin-left: 52px;">Manifest Header</h4>
<p style="margin-left: 64px;">If you would like to setup defaults that
will apply to the <a href="#Header">Header section</a> of the eManifest
program, enter details in this section.</p>
<p style="margin-left: 104px; font-weight: bold;">Trading Partner</p>
<p style="margin-left: 104px;">Use the database search button to select
a Trading Partner. The default options you setup on this Tab will
be applied when the Trading Partner you select here is used for a
Manifest.</p>
<p style="margin-left: 104px; font-weight: bold;">Filer SCAC</p>
<p style="margin-left: 104px; font-weight: normal;">Enter the SCAC
of the company that is going to be generating the Manifest.</p>
<p style="margin-left: 104px; font-weight: bold;">Carrier SCAC</p>
<p style="margin-left: 104px; font-weight: normal;">Enter the SCAC
of the Carrier that is going to cross the border with your shipment.</p>
<p style="margin-left: 104px; font-weight: bold;">Point of Entry</p>
<p style="margin-left: 104px; font-weight: normal;">Use the database
search button to select a default Port of Entry for the Manifest.</p>
<p style="margin-left: 104px; font-weight: bold;">Time Zone</p>
<p style="margin-left: 104px; font-weight: normal;">Use the drop-down
menu to select a default Time Zone.</p>
<p style="margin-left: 104px; font-weight: bold;">Daylight Savings
Applicable</p>
<p style="margin-left: 104px; font-weight: normal;">If flagged here,
the '<span style="font-weight: bold;">Daylight Savings</span>' flag
in the <a href="#Header">Header section</a> will be checked by default
when this Trading Partner is added to a Manifest.</p>
<p style="margin-left: 104px; font-weight: bold;">Preferred Manifest</p>
<p style="margin-left: 104px; font-weight: normal;"><span>If flagged
here, the '</span><span style="font-weight: bold;">Preferred Manifest</span><span>'
flag in the <a href="#Header">Header section</a> will be checked by
default when this Trading Partner is added to a Manifest.</span></p>
<p style="margin-left: 104px; font-weight: bold;">Insurance Company
/ Policy # / Amt / Year</p>
<p style="margin-left: 104px; font-weight: normal;">Enter the default
Insurance Company and Policy information for the displayed Trading
Partner. When this Trading Partner is attached to a Manifest, these
values will automatically populate into the <a href="#Hazardous_Materials_Tab">Hazardous
Materials Tab</a>.</p>
<h4 style="margin-left: 52px;">Auto Refresh</h4>
<p style="margin-left: 64px;">The Auto Refresh section controls the
global refresh behavior for the eManifest program.</p>
<p style="margin-left: 104px; font-weight: bold;">Auto Refresh / Frequency</p>
<p style="margin-left: 104px; font-weight: normal;">If you would like
the eManifest program grids to refresh while the program is being
used, select this flag, then enter an integer value (in seconds) into
the '<span style="font-weight: bold;">Frequency</span>' field to determine
the interval between automatic refreshes. The Auto-Refresh behaviour
is only applicable when the <a href="#Manifests_Tab">Manifests Tab</a>
or <a href="#Message_Details_Tab">Message Details Tab</a> is visible.</p>
<p style="margin-left: 104px; font-weight: normal;">When working with
the eManifest program on a local machine, the following shortcuts
are available:</p>
<ul style="list-style: disc;">
<li class="p"><p style="margin-left: 104px; font-weight: normal;"><span
style="font-weight: bold;"><Ctrl><R></span>: toggles
refresh on/off.</p></li>
<li class="p"><p style="margin-left: 104px; font-weight: normal;">Double-click
the '<span style="font-weight: bold;">Auto Refresh</span>' label
(bottom right corner of Summary Tab and Messages Details Tab)
toggles refresh on/off.</p></li>
<li class="p"><p style="margin-left: 104px; font-weight: normal;"><span
style="font-weight: bold;"><Ctrl><U></span>: when
auto refresh on, increases the number of seconds interval between
each refresh.</p></li>
<li class="p"><p style="margin-left: 104px; font-weight: normal;"><span
style="font-weight: bold;"><Ctrl><D></span>: when
auto refresh on, decreases the number of seconds interval between
each refresh.</p></li>
</ul>
<h4 style="margin-left: 52px;">Codes Validation</h4>
<p style="margin-left: 64px;">These options allow you to verify if
the system codes used in the Manifest are accurate during the Validation
check:</p>
<p style="margin-left: 104px; font-weight: bold;">None</p>
<p style="margin-left: 104px; font-weight: normal;">No Codes validation.</p>
<p style="margin-left: 104px; font-weight: bold;">Warning</p>
<p style="margin-left: 104px;">When exceptions are found, eManifest
will return a warning and continue with validation.</p>
<p style="margin-left: 104px; font-weight: bold;">Fail</p>
<p style="margin-left: 104px; font-weight: normal;">When exceptions
are found, eManifest will return an error and validation will fail.</p>
<h4 style="margin-left: 52px;">Bill of Lading</h4>
<p style="margin-left: 64px;">These options setup defaults for use
with the <a href="#BOL_Item_Summary_Tab">Bill of Lading Tab > Item
Summary Tab</a> when entering new records.</p>
<h4 style="margin-left: 52px;">Crew</h4>
<p style="margin-left: 64px;">These options setup defaults for use
with the <a href="#Crew_Tab">Crew Tab</a> when entering new records.</p>
<h4 style="margin-left: 52px;">Importer</h4>
<p style="margin-left: 64px;">These options setup defaults for use
with the <a href="#BOL_Importer_Tab">Bill of Lading Tab > Importer
/ Broker Tab</a> when entering new records.</p><?rh-droptext_end ?>
<h3><a name="Defaults_B_Tab<bc=10"></a><a name="Defaults_B_Tab<bc=32"></a><a
name="Defaults_B_Tab<bc=54"></a><a name="Defaults_B_Tab<bc=76"></a><a
name="Defaults_B_Tab<bc=98"></a> <a name="Defaults_B_Tab" id="Defaults_B_Tab"></a>Defaults
B Tab</h3>
<p>The <?rh-dropspot_start class="dropspot" href="javascript:TextPopup(this)"
id="a2" dataid="POPUP439895551" ?><span class="glosstext">Defaults
B Tab</span><?rh-dropspot_end ?> contains several configurable options
for various sections of the eManifest program.</p>
<?rh-droptext_start class="droptext" id="POPUP439895551" style="display: none;" ?>
<p style="margin-left: 64px;"><img src="../images/80EMANdefaultsWindowDefaultsBTab.gif"
alt="" style="border: none;" width="675"
height="473" border="0" /></p>
<h4 style="margin-left: 52px;">In-Bond</h4>
<p style="margin-left: 64px;">The settings in this section control
the default configuration for the <a href="#BOL_InBond_Tab">Bill of
Lading > In-Bond Tab</a>. Any values entered here will become the
default values and will be automatically entered into the Bill of
Lading > In-Bond Tab when new Manifests are being created.</p>
<h4 style="margin-left: 52px;">Hazardous Materials</h4>
<p style="margin-left: 64px;">The settings in this section control
the default configuration for the <a href="#Hazardous_Materials_Tab">Hazardous
Materials Tab</a>. Any values entered here will become the default
values and will be automatically entered into the Hazardous Materials
Tab when new Manifests are being created.</p>
<h4 style="margin-left: 52px;">Customs Brokers</h4>
<p style="margin-left: 64px;">The settings in this section control
the default configuration for the <a href="#BOL_Importer_Tab">Bill
of Lading > Importer / Broker Tab</a>. Any values entered here
will become the default values and will be automatically entered into
the Bill of Lading > Importer / Broker Tab when new Manifests are
being created.</p>
<p style="margin-left: 64px;">The top area of the Customs Brokers section
sets up a global default for the eManifest program. If you would instead
like to setup default Customs Brokers for individual Clients, use
the Customs Brokers and Client Relationships Grid.</p>
<p style="margin-left: 64px; font-weight: bold;">Broker Download</p>
<p style="margin-left: 64px; font-weight: normal;">Select this flag
to have the 'Broker Download' flag on the <a href="#BOL_Importer_Tab"
style="font-weight: normal;">Bill
of Lading > Importer / Broker Tab</a> automatically select when
entering a Manifest record. When selected, this flag requests information
downloads from the Canadian Border Protection (CBP) agency to be sent
to the Customs Broker.</p>
<p style="margin-left: 64px; font-weight: bold;">Filer Code / Filer
Name / Filer Port</p>
<p style="margin-left: 64px;">Enter the Customs Broker information
for the selected Client. Some of these fields may automatically populate
based on the chosen 'Vendor ID'. These defaults will apply to the
'Customs Broker' section of the <a href="#BOL_Importer_Tab">Bill of
Lading > Importer / Broker Tab</a>.</p>
<h5 style="margin-left: 104px;">Customs Brokers and Client Relationships
Grid</h5>
<p style="margin-left: 104px;">This Grid allows you to configure specific
Custom Broker relationships with your various TruckMate EDI Clients.</p>
<p style="margin-left: 144px; font-weight: bold;">Default by Client</p>
<p style="margin-left: 144px; font-weight: normal;">If you wish to
use setup default Customs Brokers for your individual TruckMate Clients,
ensure that this flag is checked, and then enter details for each
field below.</p>
<p style="margin-left: 144px; font-weight: bold;">Client ID</p>
<p style="margin-left: 144px;">Double click this field to select a
TruckMate Client ID to create Customs Broker defaults for.</p>
<p style="margin-left: 144px; font-weight: bold;">Client Is</p>
<p style="margin-left: 144px;">Double click this field to access a
drop-down menu where you can set the Client Type. Available options
are 'Shipper', 'Consignee', 'Bill-To' and 'Customer'. When the Client
selected in the 'Client ID' field is included on a Freight Bill as
the 'Client Is' value selected here, the Customs Broker defaults will
apply.</p>
<p style="margin-left: 144px; font-weight: bold;">Default</p>
<p style="margin-left: 144px;">If the 'Client Is' value chosen for
the selected Client is that Client's default value, set this field
to 'True' by double clicking the field.</p>
<p style="margin-left: 144px; font-weight: bold;">Vendor ID</p>
<p style="margin-left: 144px;">Choose the Vendor ID / Customs Broker
for the selected Client.</p>
<p style="margin-left: 144px; font-weight: bold;">Filer Code / Filer
Name / Filer Port</p>
<p style="margin-left: 144px; font-weight: normal;">Enter the Customs
Broker information for the selected Client. Some of these fields may
automatically populate based on the chosen 'Vendor ID'.</p><?rh-droptext_end ?>
<h3><a name="Notifications_Tab<bc=11"></a><a name="Notifications_Tab<bc=33"></a><a
name="Notifications_Tab<bc=55"></a><a name="Notifications_Tab<bc=77"></a><a
name="Notifications_Tab<bc=99"></a> <a name="Notifications_Tab"
id="Notifications_Tab"></a>Notifications
Tab</h3>
<p>The <?rh-dropspot_start class="dropspot" href="javascript:TextPopup(this)"
id="a11" dataid="POPUP439885047" ?><span class="glosstext">Notifications
Tab</span><?rh-dropspot_end ?> allows you to configure how Inbound and
Outbound update messages are stored in the <a href="../../dispatch/dispatch/dispatch_trip.htm">Dispatch
program > Trip Grid</a>.</p>
<?rh-droptext_start class="droptext" id="POPUP439885047" style="display: none;" ?>
<p style="margin-left: 64px;"><img src="../images/80EMANnotificationsTab.gif"
alt="" style="border: none;" width="675"
height="473" border="0" /></p>
<h4 style="margin-left: 52px;">Outbound Notifications</h4>
<p style="margin-left: 64px;">For each of the Outbound Notification
messages, you can configure the <a href="../../dispatch/dispatch/dispatch_trip.htm">Dispatch
program > Trip Grid</a> 'User fields' to contain data regarding
the Outbound EDI transmissions to the Canadian Border Protection Agency.</p>
<p style="margin-left: 64px;">Simply select the '<span style="font-weight: bold;">Trip
Update</span>' flag for the EDI transmission you wish to track (309,
353 and/or 358), and then use the drop-down menu to select the '<span
style="font-weight: bold;">User Field</span>' in the Dispatch program
> Trip Grid that will contain the Outbound message notification
data.</p>
<p style="margin-left: 64px;">This will let your Dispatchers know what
data has been sent to the CBP.</p>
<h4 style="margin-left: 52px;">Inbound Notifications</h4>
<p style="margin-left: 64px;">For each of the Inbound Notification
messages, you can configure the <a href="../../dispatch/dispatch/dispatch_trip.htm">Dispatch
program > Trip Grid</a> 'User fields' to contain data regarding
the Inbound EDI transmissions from the Canadian Border Protection
Agency.</p>
<p style="margin-left: 64px;">Simply select the '<span style="font-weight: bold;">Trip
Update</span>' flag for the EDI transmission you wish to track (350,
355 and/or 997), and then use the drop-down menu to select the '<span
style="font-weight: bold;">User Field</span>' in the Dispatch program
> Trip Grid that will contain the Inbound message notification
data.</p>
<p style="margin-left: 64px;">This will let your Dispatchers know if
the Manifest has been accepted by the CBP.</p><?rh-droptext_end ?>
<h3><a name="Cross_Ref_Tab<bc=8"></a><a name="Cross_Ref_Tab<bc=30"></a><a
name="Cross_Ref_Tab<bc=52"></a><a name="Cross_Ref_Tab<bc=74"></a><a
name="Cross_Ref_Tab<bc=96"></a> <a name="Cross_Ref_Tab" id="Cross_Ref_Tab"></a>Cross
Reference Tab</h3>
<p>The <?rh-dropspot_start class="dropspot" href="javascript:TextPopup(this)"
id="a10" dataid="POPUP439872252" ?><span class="glosstext">Cross
Reference Tab</span><?rh-dropspot_end ?> allows you to match TruckMate
system codes for Commodities, Units of Measurement and Weight with the
codes used by the ACE system.</p>
<?rh-droptext_start class="droptext" id="POPUP439872252" style="display: none;" ?>
<p style="margin-left: 64px;"><img src="../images/80EMANcrossReferenceTab1.gif"
alt="" style="border: none;" width="675"
height="377" border="0" /></p>
<p style="margin-left: 64px;">The three sections of the Cross Reference
Tab allow you to link TruckMate Codes with ACE Harmonized Transit
Commodity (HTC) Codes, ACE Manifest Codes and ACE Weight Codes. When
a Freight Bill is added to a Manifest, the eManifest program will
search the Freight Bill details (as entered in the <a href="../../bill/cserv/Details_Tab.htm">Customer
Service program > Details Tab</a>) and match any Commodity Codes
found there with HTC and/or ACE Manifest Codes based on the rules
specified in the followinj three sections.</p>
<p style="margin-left: 64px;">Manifest (HTC / ACE) Codes are equated
with TruckMate Codes using the following logic:</p>
<ol style="list-style: decimal;">
<li class="p"><p style="margin-left: 64px;">The 'Shipper' and 'Consignee',
and 'Commodity' (or 'Pieces Unit') all match.</p></li>
<li class="p"><p style="margin-left: 64px;">The 'Shipper', and
'Commodity' (or 'Pieces Unit') match.</p></li>
<li class="p"><p style="margin-left: 64px;">The 'Consignee', and
'Commodity' (or 'Pieces Unit') match.</p></li>
<li class="p"><p style="margin-left: 64px;">'Commodity' or 'Pieces
Unit' match, 'Shipper' and 'Consignee' are blank in the cross
reference record.</p></li>
</ol>
<h4 style="margin-left: 52px;">TruckMate Commodity = ACE HTC</h4>
<p style="margin-left: 64px;">This section allows you to link a TruckMate
Commodity Code, as defined in the <a href="../../profile/code/index.htm">Codes
Maintenance program</a>, with an ACE Harmonized Transit Commodity
Code.</p>
<p style="margin-left: 104px; font-weight: bold;">TM Code</p>
<p style="margin-left: 104px; font-weight: bold;"><span style="font-weight: normal;">Double
click this field to select a TruckMate Commodity Code. Commodity Codes
are defined in the</span> <a href="../../profile/code/codes_cmod.htm">Codes
Maintenance program > Commodity Tab</a><span style="font-weight: normal;">.</span></p>
<p style="margin-left: 104px; font-weight: bold;">Shipper / Consignee</p>
<p style="margin-left: 104px; font-weight: normal;">Based on the matching
logic outlined above, the 'Shipper' and 'Consignee' fields are used
to setup Commodity relationships between TruckMate and HTC / ACE that
are 'Shipper' and 'Consignee' specific.</p>
<p style="margin-left: 144px;"><span style="font-weight: bold;">For
example</span>: a client uses Commodity Code '<span style="font-weight: bold;">FAK</span>'
for all orders in the Customer Service program. For most freight for
the Carrier, the Manifest Unit Code is '<span style="font-weight: bold;">PCS</span>',
but for one specific Shipper ('SHIPPERA'), the Manifest Unit Code
is '<span style="font-weight: bold;">BLK</span>' (Bulk). This Carrier
would set up two Cross Reference records:</p>
<ol style="list-style: decimal;">
<li style="list-style: none; display: inline;"><ol style="list-style: decimal;">
<li style="list-style: none; display: inline;"><ol style="list-style: decimal;">
<li class="p" style="font-weight: normal;"><p style="margin-left: 104px;
font-weight: normal;">TM Code = FAK,  Shipper
= (Blank), Consignee = (Blank), ACE Unit Code = PCS</p></li>
<li class="p" style="font-weight: normal;"><p style="margin-left: 104px;
font-weight: normal;">TM Code = FAK,  Shipper
= SHIPPERA, Consignee = (Blank), ACE Unit Code = BLK</p></li>
</ol></li>
</ol></li>
</ol>
<p style="margin-left: 144px;">Thus when normal 'FAK' Freight is entered,
the eManifest program will transfer that to the Manifests as 'PCS',
but when the specific Carrier 'SHIPPERA' is attached to a Freight
Bill as 'Shipper', the Manifest code 'BLK' is used.</p>
<p style="margin-left: 104px; font-weight: bold;">ACE HTC Code</p>
<p style="margin-left: 104px; font-weight: normal;">When you double-click
this field, your web browser will automatically open to the United
States International Trade Commission's website (<a href="http://www.usitc.gov/tata/hts/bychapter/index.htm">http://www.usitc.gov/tata/hts/bychapter/index.htm</a>),
with the Tariff Information Center page displayed.</p>
<p style="margin-left: 104px; font-weight: normal;">Browse the various
.PDFs found on this site to locate the specific Commodity you are
linking from TruckMate, and then record the HTC Code and enter it
in this field. The HTC Code consists of the '<span style="font-weight: bold;">Heading/SubHeading</span>'
value and the '<span style="font-weight: bold;">Stat Suffix</span>'
value (without any periods), which are found next to the commodity
you are shipping in the various .PDFs available at the USITC website.</p>
<h4 style="margin-left: 52px;">TruckMate Commodity Unit = ACE Manifest
Unit</h4>
<p style="margin-left: 64px;">This section allows you to link a TruckMate
Commodity Unit Code, as defined in the <a href="../../profile/code/index.htm">Codes
Maintenance program</a>, with an ACE Manifest Unit Code.</p>
<p style="margin-left: 104px; font-weight: bold;"><span style="font-weight: bold;">TM
Code</span></p>
<p style="margin-left: 104px; font-weight: bold;"><span style="font-weight: normal;">Double
click this field to select a TruckMate Commodity Unit Code. Unit Codes
are defined in the</span> <a href="../../profile/code/codes_units.htm">Codes
Maintenance program > Units Tab</a><span style="font-weight: normal;">.</span></p>
<p style="margin-left: 104px; font-weight: bold;">Shipper / Consignee</p>
<p style="margin-left: 104px; font-weight: normal;">See the above description
in the 'TruckMate Commodity = ACE HTC' section.</p>
<p style="margin-left: 104px; font-weight: bold;">ACE Unit Code</p>
<p style="margin-left: 104px; font-weight: normal;">Double click this
field to select an ACE Unit Code to match against the 'TM Code'. The
ACE Unit Codes are hard-coded into the TruckMate system and cannot
be modified.</p>
<h4 style="margin-left: 52px;">TruckMate Weight Unit = ACE Weight Unit</h4>
<p style="margin-left: 64px;">This section allows you to link a TruckMate
Weight Unit Code, as defined in the <a href="../../profile/code/index.htm">Codes
Maintenance program</a>, with an ACE Weight Code.</p>
<p style="margin-left: 104px; font-weight: bold;"><span style="font-weight: bold;">TM
Code</span></p>
<p style="margin-left: 104px; font-weight: bold;"><span style="font-weight: normal;">Double
click this field to select a TruckMate Commodity Unit Code. Unit Codes
are defined in the</span> <a href="../../profile/code/codes_units.htm">Codes
Maintenance program > Units Tab</a><span style="font-weight: normal;">.</span></p>
<p style="margin-left: 104px; font-weight: bold;">Shipper / Consignee</p>
<p style="margin-left: 104px; font-weight: normal;"><span style="font-weight: normal;">See
the above description in the 'TruckMate Commodity = ACE HTC' section.</span></p>
<p style="margin-left: 104px; font-weight: bold;">ACE Wgt Code</p>
<p style="margin-left: 104px; font-weight: normal;">Double click this
field to select an ACE Weight Code to match against the 'TM Code'.
The ACE Unit Codes are hard-coded into the TruckMate system and cannot
be modified.</p><?rh-droptext_end ?>
<h3><a name="Passengers_Tab<bc=12"></a><a name="Passengers_Tab<bc=34"></a><a
name="Passengers_Tab<bc=56"></a><a name="Passengers_Tab<bc=78"></a><a
name="Passengers_Tab<bc=100"></a> <a name="Passengers_Tab" id="Passengers_Tab"></a>Passengers
Tab</h3>
<p>The <?rh-dropspot_start class="dropspot" href="javascript:TextPopup(this)"
id="a13" dataid="POPUP494854319" ?><span class="glosstext">Passengers
Tab</span><?rh-dropspot_end ?> is used to create records for any Passengers
that may be crossing the border with an ACE qualified Driver and Power
Unit.</p>
<?rh-droptext_start class="droptext" id="POPUP494854319" style="display: none;" ?>
<p style="margin-left: 64px;"><img src="../images/80EMANpassengersTab.gif"
alt="" style="border: none;" width="675"
height="409" border="0" /></p>
<p style="margin-left: 64px; font-weight: bold;">Passenger ID</p>
<p style="margin-left: 64px; font-weight: normal;">When creating a
new Passenger ID, simply enter the Passenger ID Code you wish to use,
and then fill in the address information below. If you would like
view and/or edit the details of an existing Passenger ID code, select
the Database search button to browse the Passenger records available
in your system.</p>
<p style="margin-left: 64px; font-weight: bold;">Name / Address Information</p>
<p style="margin-left: 64px; font-weight: normal;">Enter all the relevant
details for the displayed Passenger ID. Not all fields are required,
but the more information included, the better.</p>
<p style="margin-left: 64px; font-weight: bold;">Driver Assoc</p>
<p style="margin-left: 64px; font-weight: normal;">Use the Database
search button to choose a TruckMate Driver that will be associated
with the displayed Passenger ID. If you associate a Passenger ID with
a specific Driver ID (as configured in the <a href="../../profile/driver/driver_over.htm">Driver
Profiles program</a>), you will only be able to assign the selected
Passenger to a Manifest where the associated Driver has been added.
Driver and Passengers are added to Manifests on the <a href="#Crew_Tab">Crew
Tab</a>.</p>
<p style="margin-left: 64px; font-weight: bold;">Auto Assign</p>
<p style="margin-left: 64px; font-weight: normal;">If the Auto Assign
flag is enabled, whenever you add a Passenger's Associated Driver
to a Manifest as the <span style="font-weight: bold;">'EJ</span>'
(Principal Person) crew member on the <a href="#Crew_Tab">Crew Tab</a>,
a dialogue will open asking if you would like to add the displayed
Passenger.</p>
<p style="margin-left: 64px; font-weight: bold;">Passenger Notes</p>
<p style="margin-left: 64px; font-weight: normal;">Enter any free format
notes regarding the displayed Passenger.</p>
<h4 style="margin-left: 52px;">ACE (CBP) US Customs Compliance</h4>
<p style="margin-left: 64px;">This section is used to setup the Passenger's
ACE (CBP) US Customs Compliance information.</p>
<p style="font-weight: bold; margin-left: 104px;"><span style="font-weight: bold;">Last
Name / First Name / Middle Name</span></p>
<p style="margin-left: 104px;">Enter the relevant details for the selected
Passenger ID in the spaces provided.</p>
<p style="font-weight: bold; margin-left: 104px;">Gender</p>
<p style="margin-left: 104px;">Use the pull down menu to select either
'<span style="font-weight: bold;">M</span>' (Male) or '<span style="font-weight: bold;">F</span>'
(Female).</p>
<p style="font-weight: bold; margin-left: 104px;">Citizenship</p>
<p style="margin-left: 104px;">Click the search button to select a
Citizenship code from those available on your system.</p>
<h5 style="margin-left: 104px;">Customs Detail Grid</h5>
<p style="font-weight: bold; margin-left: 144px;">Type</p>
<p style="margin-left: 144px;">Double click this field to select as
Customs Type ID from those available on your system.</p>
<p style="font-weight: bold; margin-left: 144px;">Description</p>
<p style="margin-left: 144px;">This field should automatically populate
based on the 'Type selected above. If not, enter a brief description
of the Type value in this field.</p>
<p style="font-weight: bold; margin-left: 144px;">ID Number</p>
<p style="margin-left: 144px;">Enter the selected Passenger's Customs
ID number in the space provided.</p>
<p style="font-weight: bold; margin-left: 144px;">Expiry Date</p>
<p style="margin-left: 144px;">Double click this field to select a
date from a Calendar menu.</p>
<p style="font-weight: bold; margin-left: 144px;">Province / State</p>
<p style="margin-left: 144px;">Double click this field to select a
Province / State Zone code.</p>
<p style="font-weight: bold; margin-left: 144px;">Country</p>
<p style="margin-left: 144px;">Double click this field to select a
Country code for this Passenger.</p>
<p style="font-weight: bold; margin-left: 144px;">SCAC</p>
<p style="margin-left: 144px;">Enter this Passenger's Standard Carrier
Alpha Code (SCAC), defined by the National Motor Freight Traffic Association,
which is sometimes required when crossing into the US.</p>
<p style="font-weight: bold; margin-left: 144px;">On Person</p>
<p style="font-weight: bold; margin-left: 144px;"><span style="font-weight: normal;">The
'On Person' field specifies if the Passenger has on his person the
specific document described on this Grid detail line. In some cases
certain documents are required to be physically available to make
a successful border crossing (birth certificate, passport, etc.).
Double click this field to set the value to 'True' or 'False'.</span></p><?rh-droptext_end ?>
<?rh-script_start ?><script type="text/javascript" language="JavaScript1.2">//<![CDATA[
if( typeof( TextPopupInit ) != 'function' ) TextPopupInit = new Function();
TextPopupInit('a19', 'POPUP444741587');
TextPopupInit('a18', 'POPUP444744794');
TextPopupInit('a20', 'POPUP496340166');
TextPopupInit('a21', 'POPUP496357075');
TextPopupInit('a22', 'POPUP496341493');
TextPopupInit('a23', 'POPUP496348508');
TextPopupInit('a7', 'POPUP496353807');
TextPopupInit('a3', 'POPUP496364499');
TextPopupInit('a4', 'POPUP496349970');
TextPopupInit('a5', 'POPUP496356691');
TextPopupInit('a15', 'POPUP496355398');
TextPopupInit('a6', 'POPUP496361272');
TextPopupInit('a8', 'POPUP496372163');
TextPopupInit('a12', 'POPUP496366709');
TextPopupInit('a14', 'POPUP496344593');
TextPopupInit('a16', 'POPUP496364953');
TextPopupInit('a17', 'POPUP496372062');
TextPopupInit('a9', 'POPUP496369209');
TextPopupInit('a1', 'POPUP439874787');
TextPopupInit('a2', 'POPUP439895551');
TextPopupInit('a11', 'POPUP439885047');
TextPopupInit('a10', 'POPUP439872252');
TextPopupInit('a13', 'POPUP494854319');
//]]></script><?rh-script_end ?>
</body>
</html>

Copy link to clipboard
Copied
Did you apply the patches before upgrading?
Try the project after applying the patches. If no luck, then upgrade again
with patches applied.
Copy link to clipboard
Copied
Peter, thanks for your suggestion. I have applied the patches (via Help > Updates), but my project's dropdown content has not been restored.
Any further suggestions?
Gabriela
Copy link to clipboard
Copied
Did you try upgrading a copy of the backup from the old version?
Is the project on a local drive?
BTW. It is RoboHelp 2015. Important for people searching later.

 AdChoices