

- Home
- RoboHelp
- Discussions
- Re: Efficient workflow for adding images
- Re: Efficient workflow for adding images

Copy link to clipboard
Copied
I'm using RoboHelp HTML 2015 to author user guides for software products. My workflow for authoring often involves capturing and adding images as I am writing text in RH. For example, I might
- Write several paragraphs on a topic in RH
- Capture a screen shot of the software product using SnagIt to save a PNG file into a project subfolder named Images.
- Return to RH and click the Image button to insert an image in Design view.
This is the point where my workflow slows to a crawl, and I'm looking for suggestions on how to reduce the number of steps/click. The next part of the workflow looks like this:
- In the Image dialog, I navigate to the subfolder containing my images and the new PNG file.
- Since I haven't used the new image in any project document yet, the file name does not show up in the list of files.
- I click on another PNG file that has been used, and manually edit the name to match the name of my new image file.
- Now the Preview window shows the new image, and I click OK to insert the image into the document.
We try to use lots of images in our user guides, so these extra steps end up adding a fair amount of time to the authoring process. They also distract from the task at hand - authoring the user guide.
There are two things that would make this much faster for me. The first would be for me to be able to tell RH which folder I want it to look in for my image files so that I don't have to navigate every time I insert an image. The second would be for RH to show me image files even if they haven't been added to a document in my project.
Does anyone have suggestions on how to speed my workflow while maintaining the ability to author/capture/add images simultaneously?
Thanks for your help.
Ben


 1 Correct answer
Hi there
Yeah, I feel your pain on the bit about typing a few characters as Paul suggested. I have begged the developers for that feature for a long while now to no avail.
I can think of a couple of ways you might consider that would probably improve that workflow. Both are eerily similar.
In the first approach, you have a Windows Explorer window open at your images location. Then when you want an image, you pop over to that window and just click and drag the image into the editor.
In the second app
... 8
Replies
8
8
Replies
8

Copy link to clipboard
Copied
When you are at this point in the process you outlined above:
- In the Image dialog, I navigate to the sub-folder containing my images and the new PNG file.
- Since I haven't used the new image in any project document yet, the file name does not show up in the list of files.
What happens if you either a) type the first few characters of the image you want to add or b) type *.* where you can enter the file name. In a lot of Windows dialogs, typing *.* will change the files listed to all files in a given folder.
Copy link to clipboard
Copied
Thanks for your question, prh. Here are some screen shots of what the Image dialog looks like as I go through these steps.
1. When if first appears, it's showing a higher level folder which has no images in it:

2. I navigate to the "images" folder using the dropdown list:
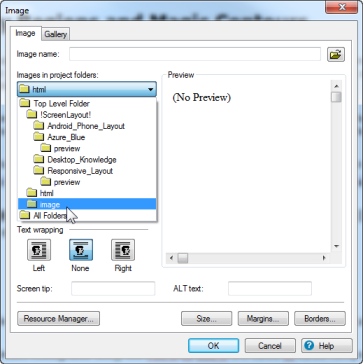
3. Now the files that RH has actually used are listed. It does NOT show me any files that are in the "images" folder that haven't been used in a document, so my new file does not appear:

I can get the file to load if I select a file in the list and edit the name to the new file name. Alternatively, I can click the little "open file" icon and go through the navigation/selection process there. Either way, it's a lot of clicks...
Copy link to clipboard
Copied
Click "All Folders" and see if the image shows up in your list.
Copy link to clipboard
Copied
Good thought, but the image file still doesn't show up. The list appears to have only the files that are actually used in the project so far.
Copy link to clipboard
Copied
Hi there
Yeah, I feel your pain on the bit about typing a few characters as Paul suggested. I have begged the developers for that feature for a long while now to no avail.
I can think of a couple of ways you might consider that would probably improve that workflow. Both are eerily similar.
In the first approach, you have a Windows Explorer window open at your images location. Then when you want an image, you pop over to that window and just click and drag the image into the editor.
In the second approach, you use the Resouorce Manager pod to basically do the same thing I advised in the first approach. The only real difference here is that you would first have to configure the Resource Manager pod to point to the location you want to use.
Cheers... Rick 
Copy link to clipboard
Copied
Rick -
You just saved me a boatload of time and hassles. Drag-and-drop from Explorer works perfectly and I can very easily slip that into my workflow. Just tried it out and it's a slick solution.
Thanks for the great suggestion!
Ben
Copy link to clipboard
Copied
Happy to help!


Copy link to clipboard
Copied
Also, clicking on the little browse icon at the end of the Image name field will open a regular file open window. That window generally remembers the last folder you browsed to, which is a slight help.
The Images in project folders field needs to be renamed Images in your project folders that are currently used in your project. 

Get ready! An upgraded Adobe Community experience is coming in January.
Learn more
 AdChoices