

- Home
- RoboHelp
- Discussions
- Re: How to Map a multilevel List in Word with a mu...
- Re: How to Map a multilevel List in Word with a mu...
How to Map a multilevel List in Word with a multilevel List in RoboHelp

Copy link to clipboard
Copied
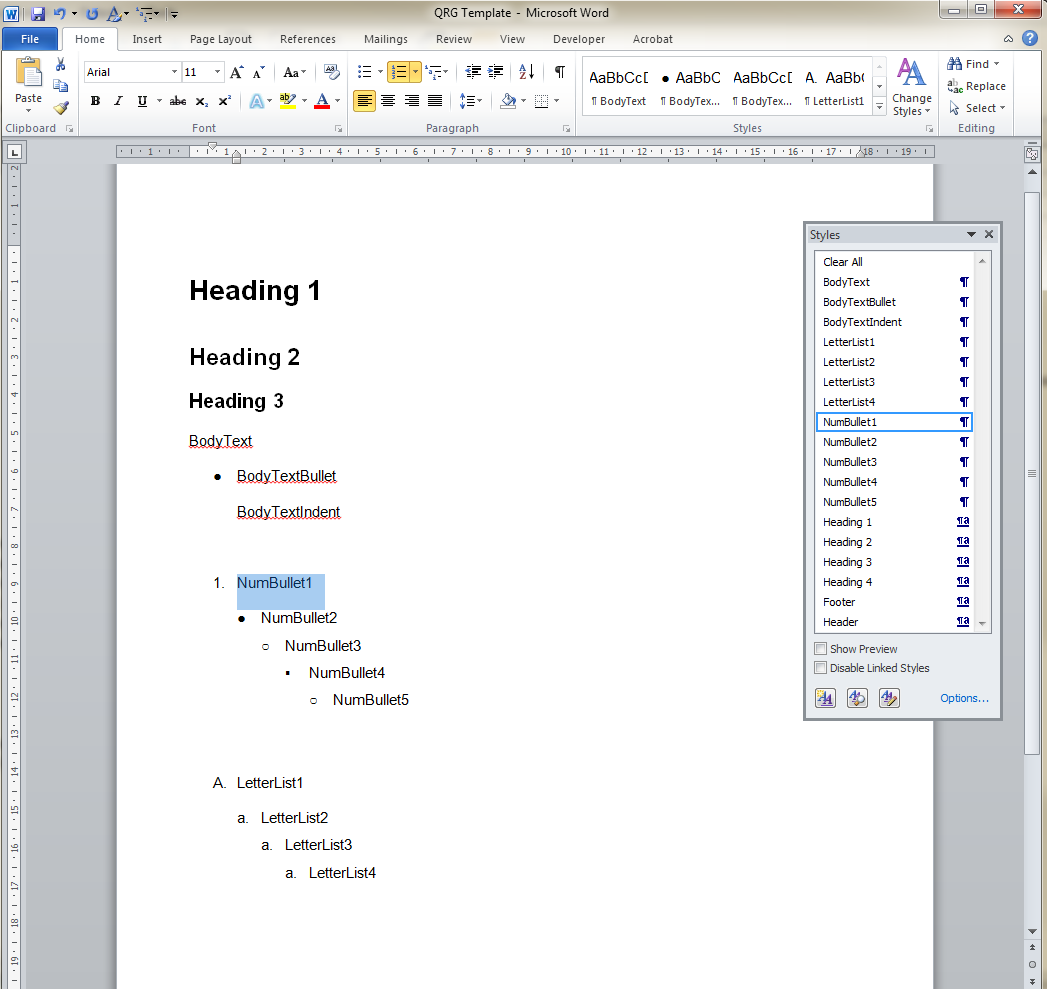
1. First of all make a clean simple Word template. To do that,
- Modify the default paragraph styles that you cannot delete them, like Headings,
- Create new paragraph styles for each line of your multilevel list/s and name them rationally (don't make list style, just for each level of your multilevel list define an individual paragraph style),
- Delete the extra paragraph styles you don't need them (for those you cannot delete it's better to remove from Quick Style List).
So at the end you will have something like this:
2. Now in RoboHelp:
- Modify the default CSS sheet or create a new CSS and define all the paragraph styles you need and are NOT part of the multilevel list like Headings and Normal. You can do it by modifying those styles that already built or by creating new styles. It is better to use the same names you used in your Word template (other wise there might be problems in auto mapping later so you need to map them manually). It's not necessary to have exactly the same characteristics for styles with the same name in Word template and RoboHelp, for example the size of Heading 2 can be chosen different in RoboHelp in comparison to Word or the amount of indentations and so on, but the names of the compatible paragraph styles better to be exactly the same.

- Then make a new multilevel list:
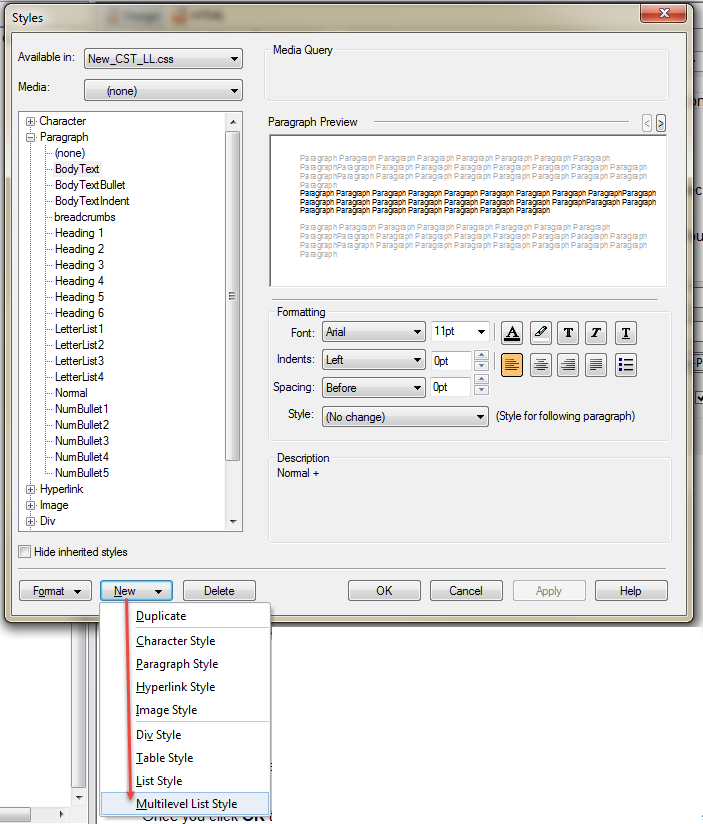
- Give it a new name and define the characteristics of each level (numbering style, indentations amount, dot or parenthesis after, etc.).

- When you finished your multilevel list, start creating new paragraph styles for each level of your multilevel list. Names these paragraph styles exactly the same name you used in Word. For bulleting and indentation, you need to match them with the levels of your multilevel list as following:
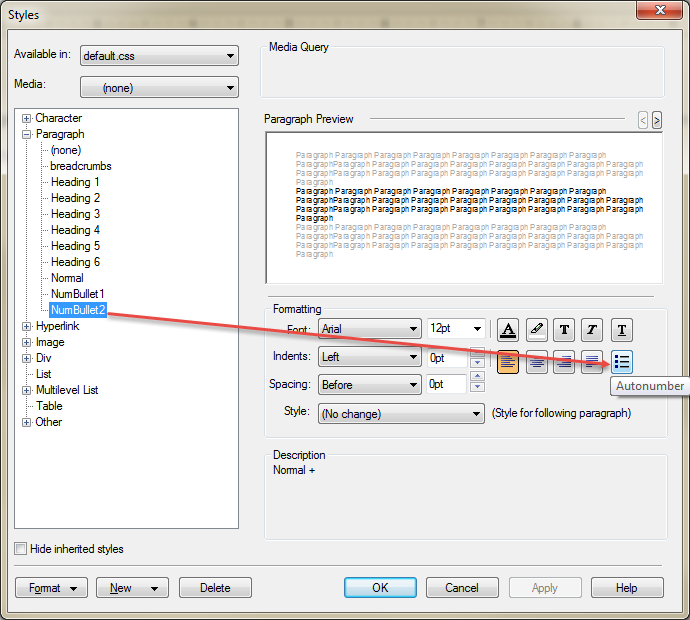
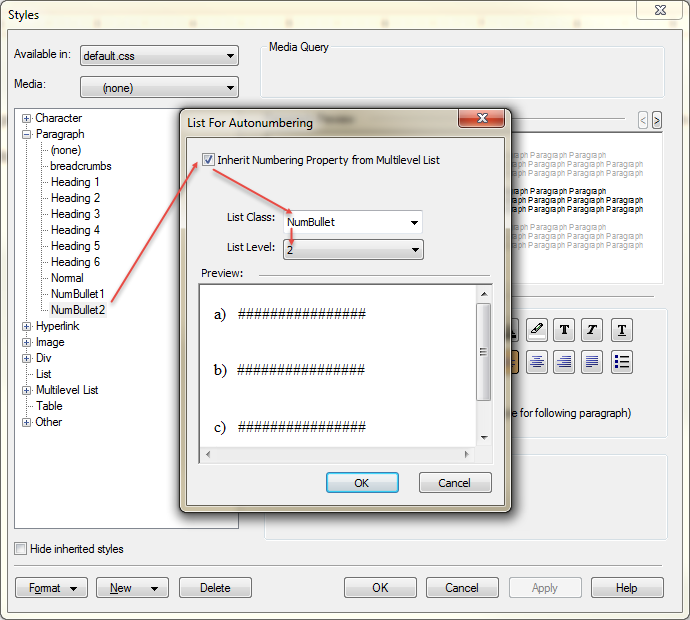
- So now you have a multilevel list that for each level you defined a paragraph style inherited the numbering property like this:

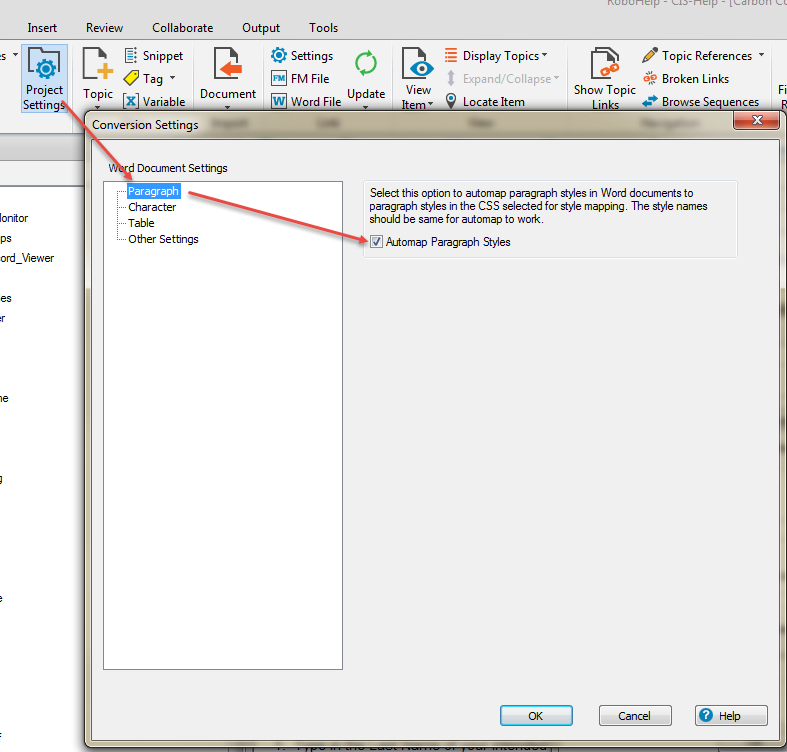
3. Now define Automap for paragraph styles,
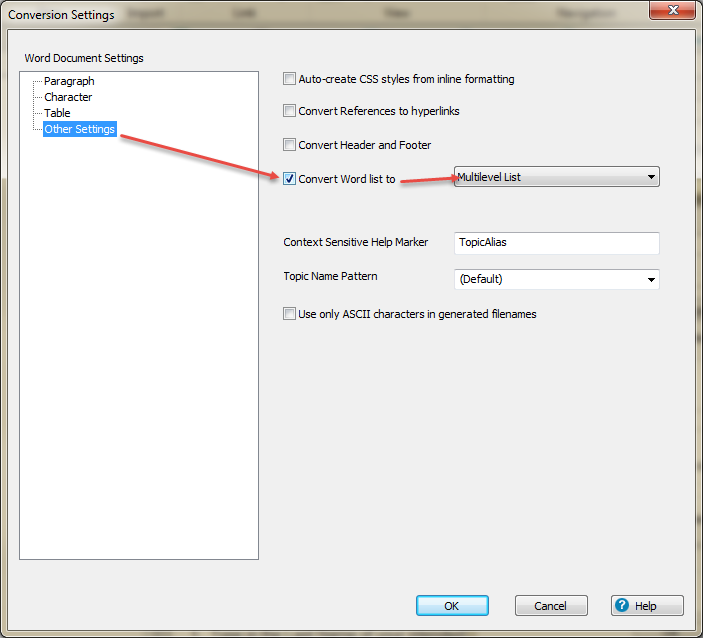
then for Other Settings choose Convert Word list to Multilevel List:
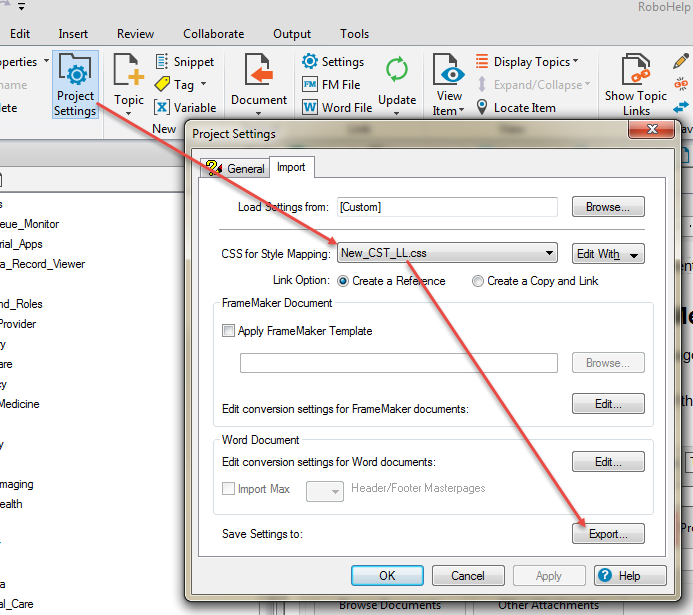
4. Now you need to define the mapping setting. Click Project Settings, choose your CSS for Style Mapping, then say Export:
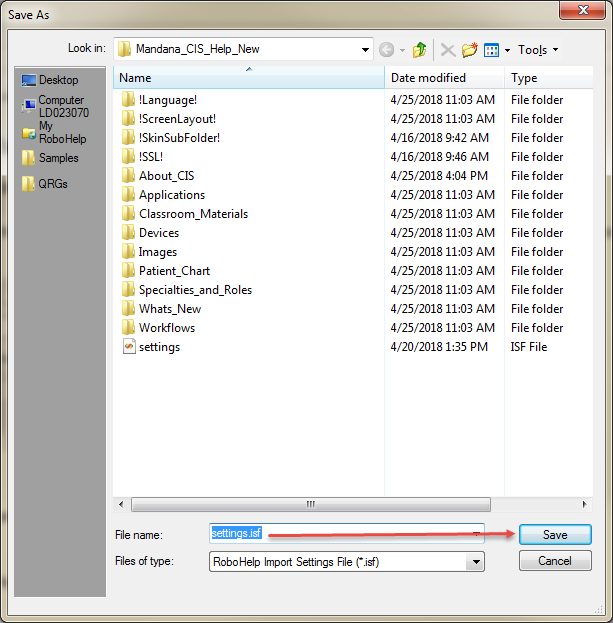
You can save it with the same name (settings) as a .isf file and overwrite it on the previous setting.isf by clicking Save, Yes, OK.
TADDAHH!
It's all done. Create your Word document based on your template, import it and allow RoboHelp to map it by automapping. If the paragraph styles in your Word template are not exactly in the same name of RoboHelp paragraph styles, during the import process Edit the mapping process manually (uncheck the automap, and for each Word paragraph style that RoboHelp found in your Word document determine the compatible RoboHelp paragraph style like the following):

Eager to have any feedback 


 8
Replies
8
8
Replies
8

Copy link to clipboard
Copied
I haven't tested the method but it looks logical and I have no reason to doubt it works.
I think my main observation is that it is fine in an environment where you control the Word template that documents are created with and so often that is not the case.
I have taken another look at this process based on a recent find in how the importing dialog works.
If you import one document only, RoboHelp will create a new CSS for it. Using your method you will see that whilst the mapping is done with your CSS, after the import the topics created from the import have their own CSS. If you choose two documents, when you click Edit in the import dialog the Other settings have an additional field Select. There you can choose the CSS that will be applied to the documents.
To make this alternative method work, as with your method, you need the multilevel list style set up in RoboHelp first. Then create a copy of that CSS so that you can select the copy in Project Settings. Start the import process and select two or more documents. If you only really want to import one document, create a blank one, include that and then delete it after the import is done.
For mapping, apply Automap to the list styles at least or use Automap all.. In the Select field, choose your project CSS and the option to set styles not mapped to Normal. As with your method, set lists to Multilevel.
After the import the list will have the project CSS applied already but it will look wrong. Simply select the list and reapply the style.
****************************************
So which is the better solution? I think the answer is entirely dependent on your workflow.
- Where you control the source documents and the template used for them, then I would say your method is worth the time invested in setting it up. The only wrinkle is the CSS applied to your imported topics is not the project CSS but I imagine you could set things up so that switching to that would not affect the import.
- Where you don't have that luxury and have to accept documents based on all sorts of templates, then it's probably easier to just work through the multilevel lists reapplying the style.
Nice work setting up your method.
See www.grainge.org for free RoboHelp and Authoring information.
![]()
Copy link to clipboard
Copied
Hi Peter, thank you for the feedback.
You are right. First, I have to describe in more details, how to create the Word document based on the prepared template and second, applying the created CSS sheet to all imported Word documents to keep the consistency.
Actually in our project we are importing hundreds of word documents have written by a big crew of tens. We wanted to keep the consistency between all of these documents/topics. So although each document imported to RoboHelp makes it's own CSS, we always apply our Master page (connected to our CSS) after importing process. By this way we keep the consistency for Header, Footer and most importantly for multilevel list. So Applying the CSS sheet mentioned in discussion is an important step after importing each Word document.
Regarding to the Word document, I just finished up a short instruction about how to create Word documents based on the template. Here it is:
- Open up the template for each single document you are creating. Keep the first page and start your content from the second page to have examples of available paragraph styles. When you finished your document then delete the first page content.
- Write down the contents or copy-paste them from other resources.
- Put the cursor on any word of a paragraph then double click on the name of the paragraph style (in Quick Style List) you would like to apply to the paragraph. If the first double click didn’t work, double
click again. For each single paragraph of your contents you need to apply one of the paragraph styles of the template. - If it’s a multilevel list, for choosing the upper levels or lower levels of the list style don’t decrease or
increase the indent (). Just as discussed before, put the cursor on any word of the paragraph and double click one of the appropriate paragraph style (NumBullets or LetterLists) based on the prefix format and indentation. - To start numbering from 1 for the new section, right-click the item and select Restart from 1.
- The other way to apply a paragraph style, especially useful when you want to follow up a sequential list and other paragraph styles are between, is selecting the text of the original paragraph
style, click Format Painter (), then select the destination paragraph. - Keep in mind if you want the next line in your document follow up the previous paragraph style, press SHIFT+ENTER. If you want to jump to a new paragraph style for the next line press ENTER.
- For images always use SHIFT+Enter to keep the same indentation of the last text before the image.
- When you applied paragraph styles to all of the paragraphs in your document, clear up the extra paragraph styles pasted from the original content resource. (not sure about this step, might be a little complicated for the average users)
Please note that even correct mapping between Word and RoboHelp cannot get where the new multilevel list is started. In other words, you need to re-start numbering anywhere a new sequence is being started.
Hope these descriptions would clarify the process.
Thank you

Copy link to clipboard
Copied
Hi and thanks for your tenacious work! I have not had a chance to apply your solution myself, but from Peter's analysis, it looks promising for some scenarios. It happens that Peter and I have worked together on a couple of similar challenges over the years and it's always so frustrating to work with MS Word's weirdness. Adobe has tried to mitigate the import, but there are just so many variables.
Congratulations again for your hard work and I hope you get a raise soon!
John
John Daigle
Adobe Certified RoboHelp and Captivate Instructor
Evergreen, Colorado
Adobe Certified RoboHelp and Captivate Instructor
Newport, Oregon
Copy link to clipboard
Copied
Hi John, thank you for your encouraging words. You know, sometimes it's frustrating when the application doesn't work in how we expect. For this answer I made 13 test projects and for each one tried 4 different option. Finally at around 2 am it worked. So Sweet. Honestly others discussions helped me a lot to get a better understanding of what is going on in mapping process (I'm a new user of RoboHelp so still getting more knowledge). When it solved I thought I have to share it. It might help others as others' discussions helped me.
Mandana,
Vancouver Coastal Health

Copy link to clipboard
Copied
Great job, thank you for sharing.
Copy link to clipboard
Copied
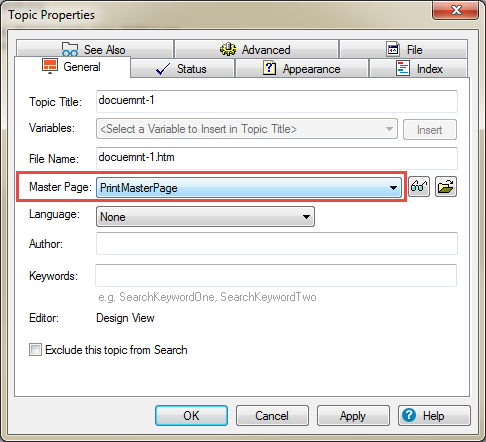
Here I need to emphasise again at the end of the process mentioned in the post, in other words after importing the Word document into RoboHelp, you need to apply your CSS sheet to the imported document to see your paragraph styles:
- Open the Properties panel of the imported topic
- First select the Master page
- Select the customized CSS Sheet you made.
- Apply and OK

Copy link to clipboard
Copied
Is there a specific reason for including setting a master page in the instructions? If a master page is required, that's fine but it doesn't seem necessary for the procedure to work.
See www.grainge.org for free RoboHelp and Authoring information.
![]()
Copy link to clipboard
Copied
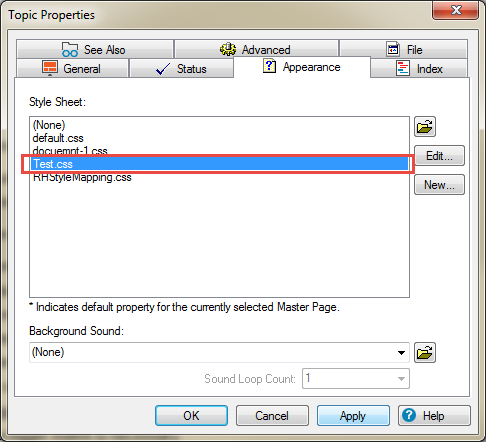
Hi Peter,
You are totally right. Having a master page is not necessary. We just used it in our project to keep continuity between topics written by different people. The necessary step is just applying the CSS sheet described in discussion.
It's good to remind if there is a master page connected by default to another CSS sheet, first apply the master page, then apply the customized CSS sheet. If we change customized CSS first then the master page, the CSS will switch back to that CSS connected to the master page.

Find more inspiration, events, and resources on the new Adobe Community
Explore Now
 AdChoices