- Home
- Type & Typography
- Discussions
- Re: How to replicate this effect on text?
- Re: How to replicate this effect on text?
Copy link to clipboard
Copied
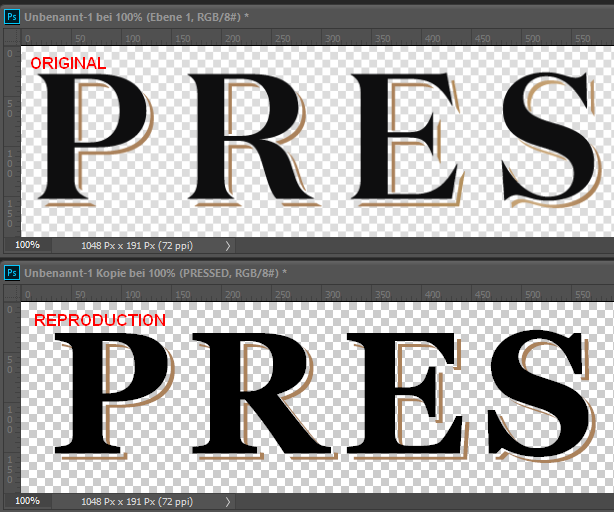
I received this from a designer who will not share the source files, and I need to manipulate the legal information on the product label, so I'm not able to change things. I'm trying to re-create this effect. Can anyone advise how best to go about it? I have the typeface as well as the colors and gradients, but I can't figure out how to replicate the styling that is applied (images were given to me as "outlined" instead of working/editable text)
From what I can tell, there are two text layers - perhaps the original (Domain Display, Extra Bold) and a second (regular) behind it, slightly offset, and given the gold color. But the "backdrop shadow" characters are not complete - you can see that the gold serifs below the P, R, E, to the right of the E, S etc. do not connect to the rest of the gold outlines. What would be the most practical way to emulate this?
 1 Correct answer

1. Make a copy of the black text layer.
2. Fill the lower text with gold color.
3. Move the golden text, say, about 3 pixels to the right and downwards.
4. Rasterize the golden text layer.
5. Make a selection of the black text, but DO NOT activate its layer.
6. The golden layer beeing active, press the delete key. There are just some bits of the characters left.
7. Now move the golden layer once more 3-4 pixels to the right and downwards.
Fenja
Copy link to clipboard
Copied
Sorry to be a newb, but how to make a selection of the black text WITHOUT activating its layer?
Thanks!
Copy link to clipboard
Copied
Control+Click (Win) or CMD+Click (Mac) on the layer thumbnail
Copy link to clipboard
Copied
Ah...just realized you are working in Photoshop and I never specified that I only have illustrator artwork files ![]()
Copy link to clipboard
Copied
Oh, I thought it's Photoshop because of the checkered background.
Illustrator:
1. Write the text, fill it with gold color.
2. Select it and ...
- Menu Type > Create Outlines
- Menu Object > Ungroup
- Menu Object > Compound Path > Make
3. Make 2 copies, fill them with black and put one of them aside.
4. Move the other black text over the gold text, but a few millimeters upwards and to the left.
5. Select both and open the pathfinder panel (Menu Window). Choose the option "Minus Front". The golden text will be cropped.
6. Move the second black text over the golden scraps until you achieve the desired appearance.
May be there's another faster or smarter procedure, I don't use Illustrater very often. But it works. ![]()
Fenja
Copy link to clipboard
Copied
Just for illustration:
Step 4:
Step 5:
Step 6:
Fenja
