dw24154351
Known Participant
October 19, 2022
Open for Voting

P: (Masking) Multi-color mask layers - identify the contributing mask

  • October 19, 2022
  • 8 replies
  • 533 views

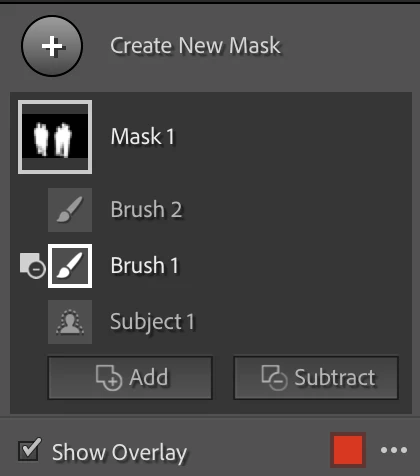
When cleaning up a Subject mask I'm finding that I need two sub-masks 1) Add Brush 2) Subtract Brush.


What I'm running into is the need to figure out which of the 3 masks is contributing to the mask as they are all "red". Sure you can show/hide each mask but I want a quick way to see which mask I should be using to make the needed refinements.


You start to realise this when the brush changes you are making don't seem to be working.


A quick method to visually identify masks would help here. My first thought is a mode to quickly reveal different coloured mask layers and where they overlap.


For instance, I had an add and subtract overlapping a subject mask. The active mask wasn't the correct one to be editing, so the changes were not modifying the ruby lith mask. You then have to work through a show/hide process to figure out which one needs to be modified.


8 replies

dw24154351
Known Participant
October 23, 2022

Some of the "fixes" that come out of this discussion are related to the contents of the help available from the ? button in the Mask palette. Based on what @johnrellis has added, this probably also applies to the online documentation too.


  1. Hold Space to enable Pan
  2. / to toggle between A/B brushes.
dw24154351
Known Participant
October 22, 2022

when you "hover" over the icon ... thanks autocorrect. Is it me, or is Edit reply not working?

dw24154351
Known Participant
October 22, 2022

Thanks. Eventually discovered this one.


The behaviour isn't super obvious because the target area of the mask component is small and only activated when you have over the icon, not the accompanying text. You discover it by accident, especially because you are initially trained to notice the ellipsis menu or the show/hide button. Double clicking the text gives you rename. So it is possible to use the tool (for months) and not trigger the hover to highlight feature - I just watched how I was moving between the image and the menu and I naturally curved the mouse trajectory coming in and up from the bottom of the menu. On a Wacom, you can move fast enough over the menu not to trigger the highlight. 


It's a little more obvious if you collapse the mask menu - but today is the first time I enabled this for that menu.


In interface/interaction design we talk about Fitt's Law where the time it takes to target a small area takes longer if the distance to the target is large and the target is small. Hovering over such a small area, and traversing to it from the edit area takes time. Explains why Dock magnification on Mac is useful.


I would love to see a better designed context menu that appears around your edit cursor that quickly reveals your chosen highlight. 

Bob Somrak
Legend
October 22, 2022

Just drag your mouse cursor over the Mask Component Icons and each component mask will highlight individually.

M4 Pro Mac Mini. 48GB
johnrellis
Legend
October 22, 2022

"Couldn't see a way to toggle between the A/B brushes with keyboard shortcuts."


The shortcut is / (in English):


The shortcuts shown in the app and at helpx.adobe.com are incomplete (and often wrong in other languages).  Use the Any Shortcut pluglin or download free complete, correct tables from Lightroom Queen.


dw24154351
Known Participant
October 20, 2022

Interesting. Thanks for pointing that out about the icon behaviour. Also found the ? button to reveal the keyboard shortcuts.


I think the reason why I didn't notice hover behaviour is the placement of the icons is because its location corresponds to the first region where you create a brush. If you have zoomed into another region elsewhere in the image, you don't see the icon anymore.


Hovering over the Masks window layer icon also achieves the same outcome as hoving over the icon. But you have to be over the square icon and not the text label.


The scenario is editing group portraits around heads and shoes. You might start at the shoes and then keep working around the hair. So you never see the icon that's near the feet, unless you zoom out. Zooming in and out becomes cumbersome. The hover in the Mask palette helps here.


Couldn't see a way to toggle between the A/B brushes with keyboard shortcuts.


and for those newcomers wanting to know more about the new masking functionality in 12.....


https://helpx.adobe.com/au/lightroom-classic/help/masking.html


Participating Frequently
October 20, 2022

If you are showing the Edit Pins (H toggles the display of the pins), the Subject mask will have a "head" icon, the Add Brush will be just a brush, and the Subtract brush will be a brush with a minus sign. Moving the cursor over each icon displays the area in that element of the mask. Click on the icon of the element that needs refinements. 

GoldingD
Legend
October 20, 2022

Give the masks names. For example, execute an Add, perhaps select Brush, now rename that AddBrush, similarly when you execute a Subtract, rename that one SubBrush. This way you can see the forest thru the trees.


I make it a habit of renaming all my masks, and often any Add or Subtract, so I can "remember" what did what.