
Building an Adobe Express Add-on: Markdown Converter
This guide walks you through creating a simple add-on that converts Markdown files to styled text in Adobe Express documents. After completing this tutorial, you’ll understand the fundamentals needed to build your own add-ons.
Prerequisites
Adobe Express account (create one at new.express.adobe.com)
Node.js 18 or higher
Basic knowledge of React and JavaScript
Step 1: Enable Add-on Development
1. Open new.express.adobe.com in your browser
2. Click your avatar icon in the top right, then the gear icon to open Settings
3. Enable “Add-on Development” (you may need to accept Developer Terms)
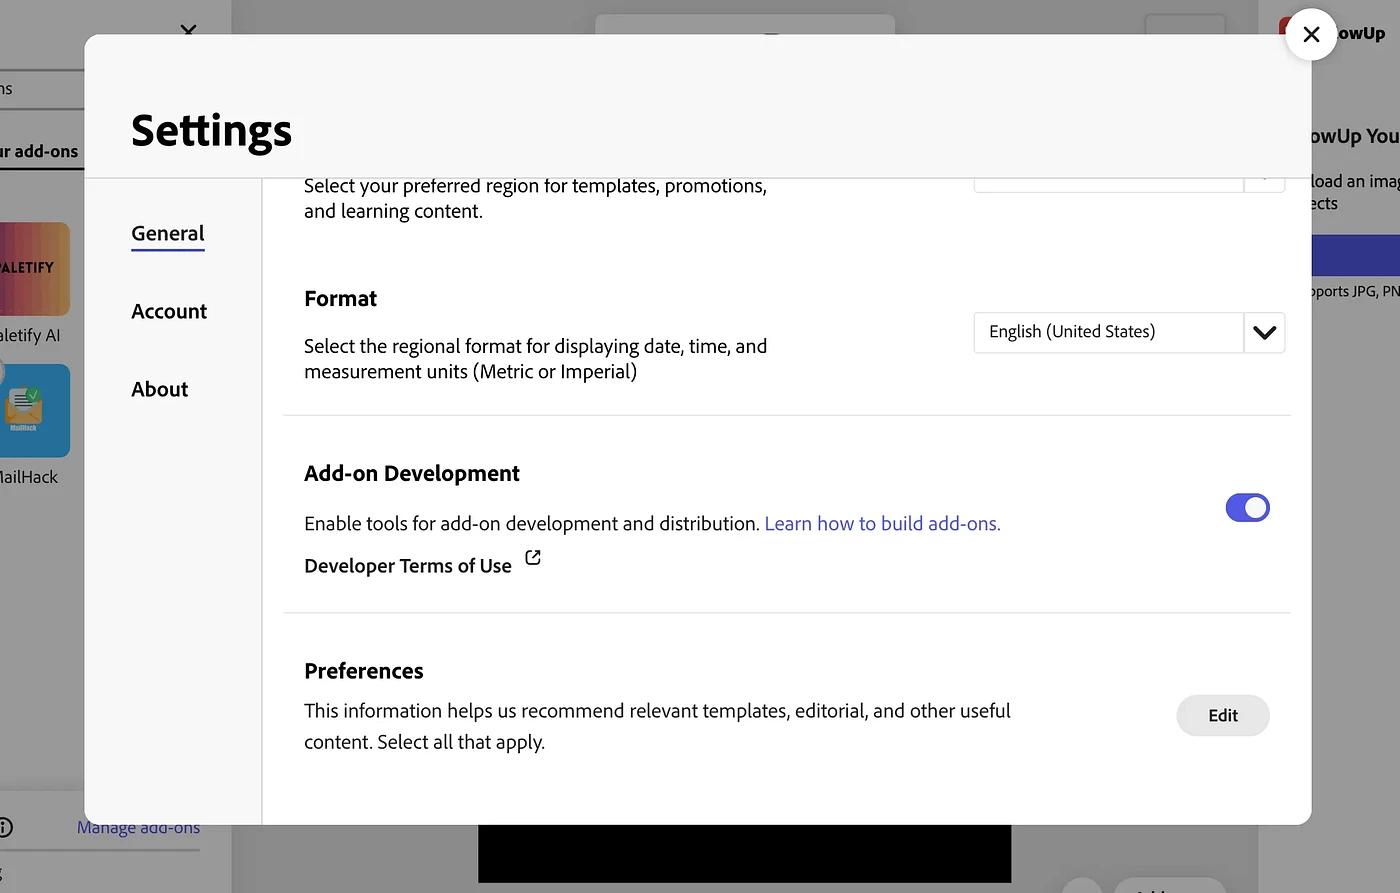
4. Close Settings
We already discussed these things how to set up the development environment and many other things, in the previous blog; you can check it out here (https://www.fardeen.me/blogs/cmhg3u1630000aprc4jz7d0ly).
Step 2: Create Your Add-on Project
Open your terminal and run:
npx @adobe/create-ccweb-add-on markdown-to-text --template react-javascript-with-document-sandbox
This creates a React-based add-on template with Document Sandbox support. Navigate to the project:
cd markdown-to-text
npm install
npm run build
npm run start
The server will start and display a local URL.
Step 3: Load Your Add-on in Adobe Express
1. Open new.express.adobe.com
2. Create or open a document
3. Click the Add-ons icon in the left rail
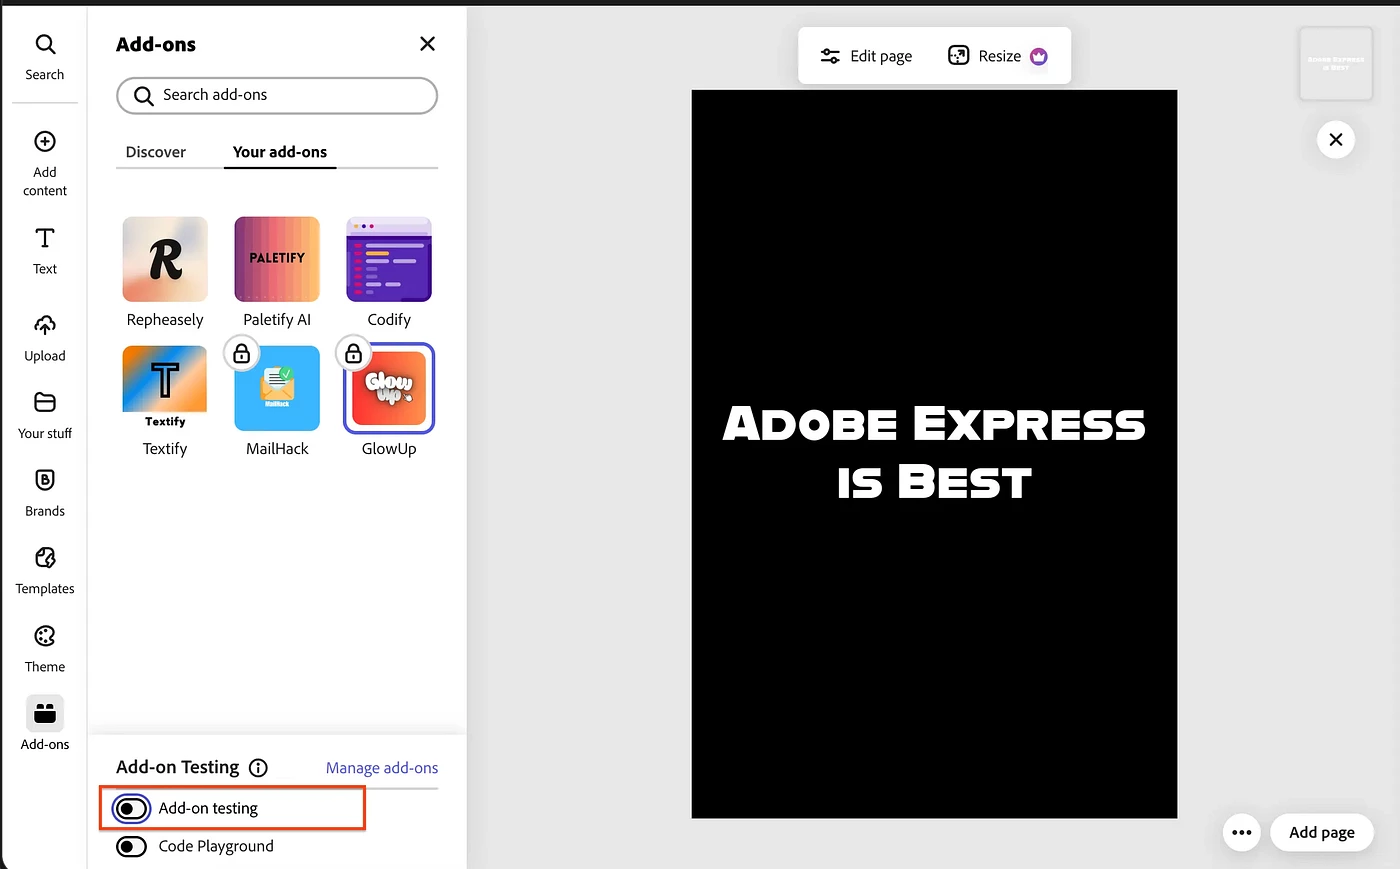
4. Enable “Add-On Testing”
5. Paste the local URL from your terminal
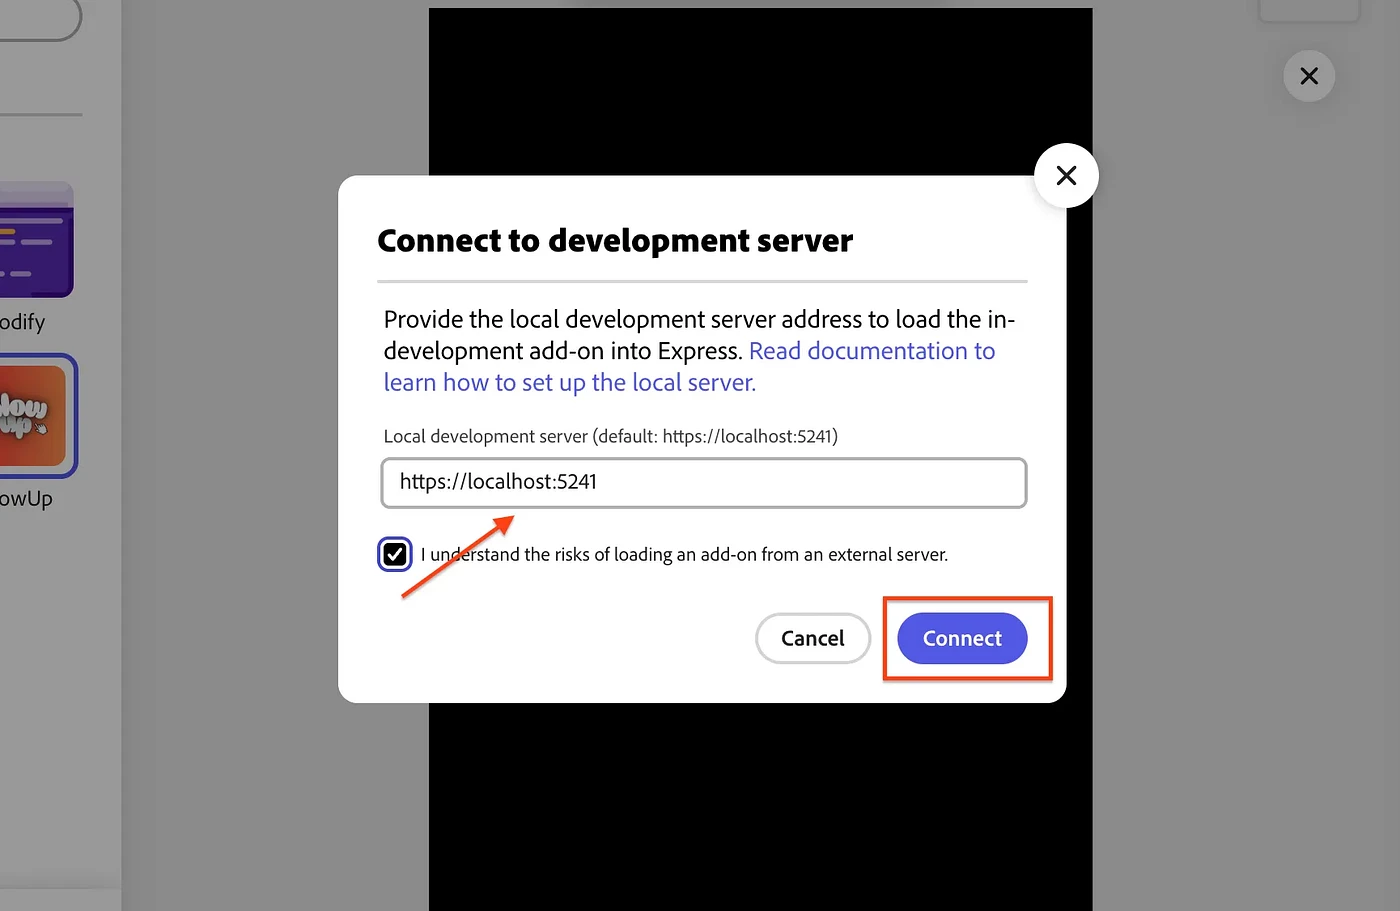
6. Your add-on panel will appear on the right side
Step 4: Understand the Project Structure
The template creates this structure:
src/
├── index.html # Entry point HTML
├── manifest.json # Add-on configuration
├── ui/
│ ├── index.jsx # React app entry (sets up SDK connection)
│ └── components/
│ └── App.jsx # Your main UI component
└── sandbox/
└── code.js # Document manipulation logic
Key concepts:
UI (iframe): Your React app runs here. This is where users interact.
Document Sandbox: Code that manipulates the Adobe Express document runs here.
Communication: The UI and Sandbox communicate via proxies using runtime.apiProxy() and runtime.exposeApi().
The ui/index.jsx file handles the SDK initialization and passes the sandboxProxy to your App component as a prop.
Step 5: Install Additional Components
We’ll need these components. Install it:
npm install @swc-react/progress-circle @swc-react/field-label @swc-react/textfield
Ensure all @swc-react/* packages use the same version (check package.json).
Step 6: Build the UI
Open src/ui/components/App.jsx. Replace the default button example with this file upload interface:
import "@spectrum-web-components/theme/express/scale-medium.js";
import "@spectrum-web-components/theme/express/theme-light.js";

import { Button } from "@swc-react/button";
import { Theme } from "@swc-react/theme";
import { ProgressCircle } from "@swc-react/progress-circle";
import { FieldLabel } from "@swc-react/field-label";
import { Textfield } from "@swc-react/textfield";
import React, { useState, useCallback, useRef } from "react";
import "./App.css";

const App = ({ addOnUISdk, sandboxProxy }) => {
    const [file, setFile] = useState(null);
    const [fileContent, setFileContent] = useState(null);
    const [processing, setProcessing] = useState(false);
    const [title, setTitle] = useState("");

    const fileInputRef = useRef(null);

    const isMarkdownFile = (file) => {
        return (
            file.name.toLowerCase().endsWith(".md") ||
            file.type === "text/markdown"
        );
    };

    const handleFile = useCallback((selectedFile) => {
        if (!selectedFile) return;

        if (!isMarkdownFile(selectedFile)) {
            alert("Please select a Markdown (.md) file");
            return;
        }

        setFile(selectedFile);

        const reader = new FileReader();
        reader.onload = (e) => {
            setFileContent(e.target.result);
        };
        reader.onerror = () => {
            alert("Error reading file");
        };
        reader.readAsText(selectedFile);
    }, []);

    const handleFileSelect = useCallback((event) => {
        const selectedFile = event.target.files?.[0];
        handleFile(selectedFile);
    }, [handleFile]);

    const handleInsert = useCallback(async () => {
        if (!fileContent || !sandboxProxy) return;

        setProcessing(true);
        try {
            await sandboxProxy.insertMarkdownText(fileContent, title || null);
        } catch (error) {
            console.error("Error inserting markdown:", error);
            alert("Failed to insert markdown. Check console for details.");
        } finally {
            setProcessing(false);
        }
    }, [fileContent, title, sandboxProxy]);

    return (
        <Theme system="express" scale="medium" color="light">
            <div className="container">
                <h2>Markdown to Text</h2>

                <FieldLabel for="title-input">Document Title (optional)</FieldLabel>
                <Textfield
                    id="title-input"
                    placeholder="Enter title"
                    value={title}
                    onInput={(e) => setTitle(e.target.value)}
                    style={{ width: "100%", marginBottom: "16px" }}
                />

                <div
                    style={{
                        border: "2px dashed #ccc",
                        borderRadius: "8px",
                        padding: "24px",
                        textAlign: "center",
                        marginBottom: "16px",
                        cursor: "pointer",
                        backgroundColor: file ? "#f0f0f0" : "transparent",
                        minHeight: "100px",
                        display: "flex",
                        flexDirection: "column",
                        justifyContent: "center",
                        alignItems: "center"
                    }}
                    onClick={() => {
                        const fileInput = document.getElementById("file-input");
                        if (fileInput) {
                            fileInput.click();
                        }
                    }}
                >
                    {file ? (
                        <div>
                            <p style={{ fontWeight: "bold", marginBottom: "8px" }}>File Selected</p>
                            <p style={{ fontSize: "14px", color: "#666" }}>
                                {file.name}
                            </p>
                            <p style={{ fontSize: "12px", color: "#999", marginTop: "8px" }}>
                                Click to select a different file
                            </p>
                        </div>
                    ) : (
                        <div>
                            <p style={{ fontWeight: "bold", marginBottom: "8px" }}>Select Markdown File</p>
                            <p style={{ fontSize: "14px", color: "#666", marginTop: "8px" }}>
                                Click here to choose a .md file
                            </p>
                        </div>
                    )}
                    <input
                        ref={fileInputRef}
                        type="file"
                        id="file-input"
                        accept=".md,.markdown"
                        onChange={handleFileSelect}
                        style={{ display: "none" }}
                    />
                </div>

                <Button
                    variant="accent"
                    onClick={handleInsert}
                    disabled={!fileContent || processing}
                    style={{ width: "100%" }}
                >
                    {processing ? "Processing..." : "Insert Markdown"}
                </Button>

                {processing && (
                    <div style={{ marginTop: "16px", textAlign: "center" }}>
                        <ProgressCircle size="s" indeterminate />
                    </div>
                )}
            </div>
        </Theme>
    );
};

export default App;
This UI:
Allows users to select a Markdown file
Reads the file content using the FileReader API
Optionally accepts a document title
Calls the sandbox proxy to insert the content when the button is clicked
Step 7: Implement Document Sandbox Logic
Open src/sandbox/code.js. Replace the createRectangle function with markdown insertion logic:
import addOnSandboxSdk from "add-on-sdk-document-sandbox";
import { editor, constants } from "express-document-sdk";

const { runtime } = addOnSandboxSdk.instance;

function start() {
    const sandboxApi = {
        insertMarkdownText: (markdownText, title) => {
            // Parse simple markdown patterns
            const lines = markdownText.split(/\r?\n/);
            const insertionParent = editor.context.insertionParent;

            // Combine title and content
            let fullText = "";
            if (title) {
                fullText = title + "\n\n";
            }

            // Convert markdown to plain text (simple version)
            let plainText = fullText;
            for (const line of lines) {
                // Remove markdown syntax for basic formatting
                let processedLine = line
                    .replace(/^#{1,6}\s+/, "") // Remove heading markers
                    .replace(/\*\*(.+?)\*\*/g, "$1") // Remove bold markers
                    .replace(/\*(.+?)\*/g, "$1") // Remove italic markers
                    .replace(/`(.+?)`/g, "$1"); // Remove code markers

                if (processedLine.trim()) {
                    plainText += processedLine + "\n";
                } else {
                    plainText += "\n";
                }
            }

            // Create text node
            const textNode = editor.createText(plainText.trim());

            // Position text on the page
            textNode.setPositionInParent(
                { x: 50, y: 50 },
                { x: 0, y: 0 }
            );

            // Apply basic styling
            textNode.fullContent.applyCharacterStyles(
                { fontSize: 16 },
                { start: 0, length: textNode.fullContent.text.length }
            );

            // Style the title if present
            if (title) {
                const titleLength = title.length;
                textNode.fullContent.applyCharacterStyles(
                    { fontSize: 24, fontWeight: 700 },
                    { start: 0, length: titleLength }
                );
            }

            // Apply heading styles (lines starting with #)
            let currentOffset = title ? title.length + 2 : 0;
            for (const line of lines) {
                const match = line.match(/^(#{1,6})\s+(.+)$/);
                if (match) {
                    const level = match[1].length;
                    const headingText = match[2];
                    const fontSize = 28 - (level * 2);

                    textNode.fullContent.applyCharacterStyles(
                        { fontSize, fontWeight: 700 },
                        { start: currentOffset, length: headingText.length }
                    );
                    currentOffset += headingText.length + 1;
                } else if (line.trim()) {
                    currentOffset += line.length + 1;
                } else {
                    currentOffset += 1;
                }
            }

            // Add to document
            insertionParent.children.append(textNode);
        }
    };

    runtime.exposeApi(sandboxApi);
}

start();
This implementation:
Receives markdown text and optional title from the UI
Parses basic markdown patterns (headings, bold, italic)
Creates a text node in the document
Applies character styles for headings and titles
Inserts the text at position (50, 50) on the page
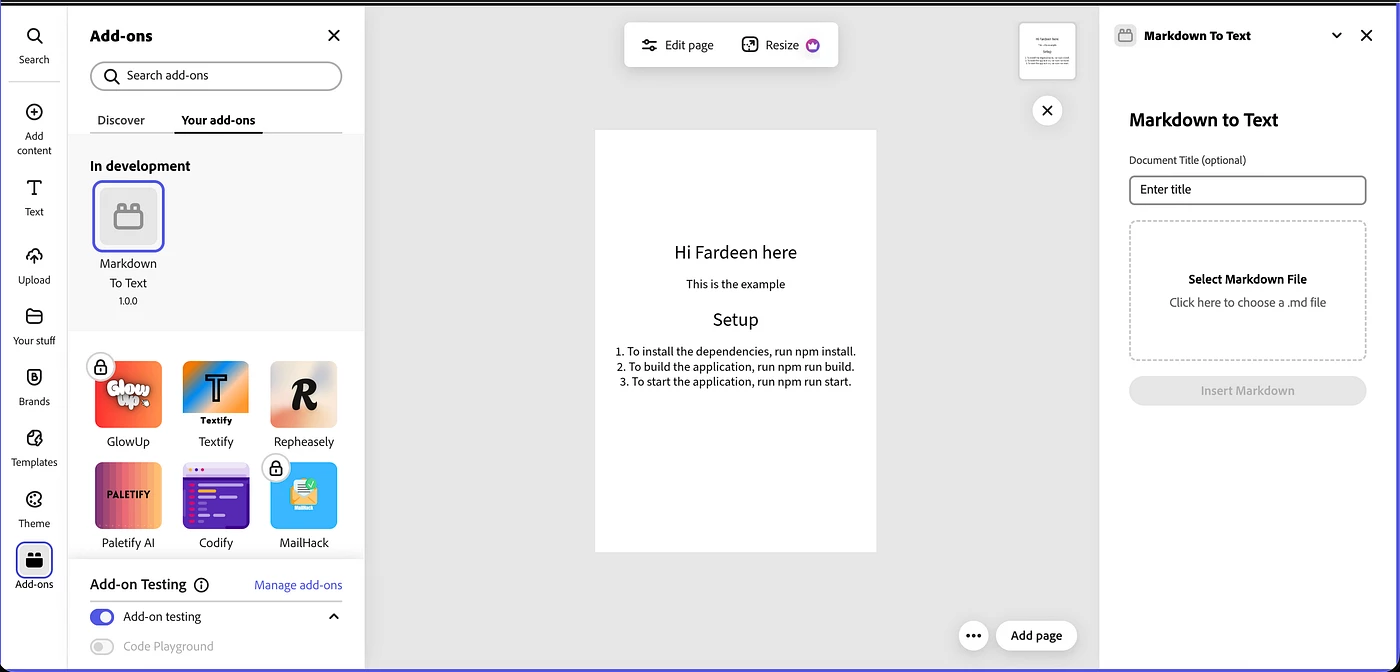
Step 8: Test Your Add-on
1. Save all files. The webpack dev server should auto-reload
2. In Adobe Express, refresh your add-on panel (or reload it)
3. Create or open a document
4. In the add-on panel:
Optionally enter a title
Select a .md file
Click “Insert Markdown”
5. The styled text should appear in your document
Understanding How It Works
UI to Sandbox Communication:
ui/index.jsx waits for the SDK to be ready, gets a sandboxProxy, and passes it to App
App.jsx calls sandboxProxy.insertMarkdownText() When the user clicks the button
The sandbox receives this call and executes document manipulation code
Document API Basics:
editor.createText() creates a new text node
textNode.setPositionInParent() positions it on the page
textNode.fullContent.applyCharacterStyles() applies formatting to text ranges
insertionParent.children.append() adds the node to the document
File Handling:
The UI uses the browser’s FileReader API to read file contents
File reading happens in the UI (iframe), not in the sandbox
Only the text content is passed to the sandbox
Next Steps
Now that you have a working add-on, you can extend it:
1. Enhanced Markdown Parsing: Add support for lists, links, and code blocks
2. Better Styling: Use fonts from the Document API (`fonts.fromPostscriptName()`)
3. Paragraph Styles: Apply paragraph-level formatting for lists and spacing
4. Error Handling: Add better user feedback for errors
5. Multiple Formats: Support exporting or importing other file types
Key Takeaways
UI handles user interaction: File selection, forms, buttons — all in React
Sandbox handles document manipulation: Creating nodes, applying styles, positioning
Communication is async: Always await sandbox proxy calls
File reading happens in UI: Use the FileReader API before sending to the sandbox
Text API is powerful: You can style specific character ranges and paragraphs
You now have the foundation to build your own Adobe Express add-ons. Explore the Document API reference to discover more capabilities.
See you in the next one!!!
Follow me on x dot com: https://x.com/fardeentwt
See all my Add-Ons here: https://addon.fardeen.me/