
nancy33534756
Inspiring
April 4, 2018
Answered

Text frame flows that is NOT autoconnected

  • April 4, 2018
  • 9 replies
  • 807 views

Hello, all.

I am using FM 2015 in a Windows 10 environment.

I am creating a template that has three master pages:

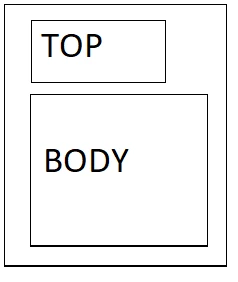
  • First: Contains one text frame ("Top") at the top of the page for document title and type variables, and one large text frame for body text ("Body"), which takes up the remainder of the page. I tagged "Top" as flow B, and did not autoconnect it. "Body" is flow A, and is autoconnected. The First master page looks like this:
  • Left: Standard FrameMaker master page with untagged text frames for header and footer, and "Body" text frame
  • Right: Identical to Left

"Top" is intended to be self-contained. I want it to be obvious to any writer using the template for the first time, so they know where to put the title and doc type information.  I tagged it separately as B, and did not autoconnect it. If a document title overflows the "Top" text box, I would expect to see a black line at the bottom of "Top" indicating that my text was too lengthy.

Instead, if "Top" overflows, FrameMaker inserts a new First page as page 3 of the document. The text overflow appears in the Top text frame of that new page. Even if I select and delete the excess text, the new First page remains. I have to use the Special menu to delete it manually.

How can I stop this from happening? Or am I taking the wrong approach?

Thanks for all suggestions.

--Nancy

    This topic has been closed for replies.
    Correct answer Barb Binder

    Hi Nancy:

    Thank you for sharing your file with me, I'll admit I was as baffled as you were—your settings matched mine but the behavior was quite different.

    I ended up taking notes on the frame size and position, deleted it, and recreated it with your exact same settings. Silly computers.

    I have no idea it wasn't working before, but glad to see that now it is.

    ~Barb

    9 replies

    Barb Binder
    Community Expert
    Barb BinderCommunity ExpertCorrect answer
    Community Expert
    April 6, 2018

    Hi Nancy:

    Thank you for sharing your file with me, I'll admit I was as baffled as you were—your settings matched mine but the behavior was quite different.

    I ended up taking notes on the frame size and position, deleted it, and recreated it with your exact same settings. Silly computers.

    I have no idea it wasn't working before, but glad to see that now it is.

    ~Barb

    ~Barb at Rocky Mountain Training
    nancy33534756
    Inspiring
    April 6, 2018

    Thank you! I have no idea what it was, either, but am delighted to have a working template!

    --Nancy

    Barb Binder
    Community Expert
    Community Expert
    April 4, 2018

    I just keystroked it for you Nancy, and it works the way you want it to.

    So, head back to the custom master:

    1. Select the top frame with the Object Selection Tool
    2. Graphics > Object Properties, and double check that Flow B has Auto-connect off (empty check box). Remember that checkboxes have three states: on, off and as is. 


    3. Then test again on the Body page:

    ~Barb

    ~Barb at Rocky Mountain Training
    nancy33534756
    Inspiring
    April 5, 2018

    Hi, Barb.

    I have done just what you did, and I'm still having the same problem.  I thought maybe I was having a problem because I'd created Top from the default heading text box that is provided on the Right page of the Portrait template. I deleted it and created a new text box and assigned it as follows; your settings and mine are identical:

    The body text frames are flow A and are autoconnected.

    I double-checked and am still getting the same problem ON THE BODY PAGE:

    • On the Master page ("First"), if I enter too much text in Top, I get the black line as expected at the bottom of the text frame.
    • On the Body page to which the First master page has been applied, if the text overflows the "Top" textframe,  Framemaker adds a new body page 3, applying First to it, and pouring the overflow text into the Top textframe.

    Is there some other element that accounts for the difference? Thanks very much for your help.

    --Nancy

    Barb Binder
    Community Expert
    Community Expert
    April 5, 2018

    Hi Nancy:

    Perhaps I misunderstood the original question.

    "Top" is intended to be self-contained. I want it to be obvious to any writer using the template for the first time, so they know where to put the title and doc type information.  I tagged it separately as B, and did not autoconnect it. If a document title overflows the "Top" text box, I would expect to see a black line at the bottom of "Top" indicating that my text was too lengthy.

    My first screen shot is the master, the second is the body—with the overset text. Here are larger screen shots that include the status bar so that you can see that for yourself:

    Master Page (top frame settings are shown in my first reponse, bottom frame is using defaults):

    ;

    Body Page 1 (I pasted twice as much text as is visible—it is overset, shows the black line and did not generate a second body page.

    That's what I thought you asked for. If I misunderstood, I hope you will accept my apology and the please clarify the question. If this is what you want and aren't getting it, please show me the object properties for both frames on the custom master, and what is happening on body page 1.

    ~Barb

    ~Barb at Rocky Mountain Training