Blend Tool Unexpected Behavior--again.
I want to roughly simulate the perspective in hand tracing a photo. So I draw a simple rectangle and skew it slightly then modify to of it's endpoints to simulate the plane I want to create.
The bricks that I am simulating are crazily laid and terribly inconsistent in both size and material, but that doesn't matter. I am drawing a simple diagram for a pond and this is totally not critical. Being able to get Illustrator to operate the way I expect it to, however, is.
I take the first "brick" shape and ctrl-drag it to the end of the wall where the bricks end.
Using the scale tool, I scale the shape down to roughly match the bricks at the end fo the wall.
See Figure A.
 FIGURE A - BEFORE BLEND
Next, I modify the shape just a little to get the perspective closer by dragging two points.
I then select the Blend Tool and blend from one shape to the other.
I don't want continuous color, but rather I want to pick the specificed steps to roughly match the number of bricks in the photo. I realize that I don't want to do the space between because the second shape is smaller so the space between will vary.

FIGURE B - Oriented Blend between specified steps.
Figure B shows the crazy distribution of the shapes if I select the second orientatiopn. In this figure, the new "bricks" are blended from one to the other and the shape transition is done correctlly, but they are not in any way distributed with any logic. So I try the other orientation.
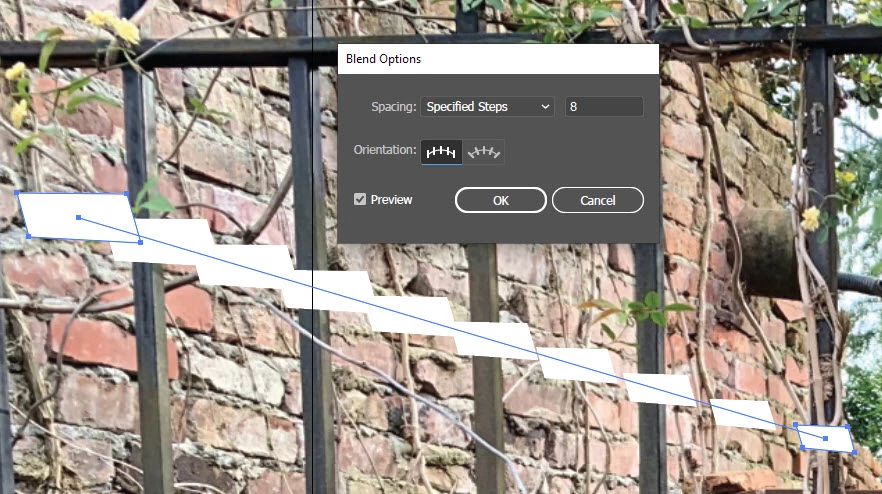
FIGURE C - Straight Orientation Blend specified steps
FIgure C shows my biggest pet peeve and what I STILL CONSIDER to be a definite error in the blend tool. It modifies my starting and ending points and then incorrectly blends between the two showing inproper distribution. It DID NOT blend from my first shape to the second shape, it modified my first AND second shape and blended the modified shapes. Then rather than distribute the space between them, it bunched them up at the beginning. This is a problem and I just don't understand how anyone can say it's not. Who wants Illustrator to modify their blend endpoints? In what situation could this be useful?
Regardless, could someone tell me why this strange behavior (Figure B) is happening and what I can do to remedy the situation in the future? I would simply like to blend from one shape to another along a path with uniform distribution between the sames. If I modify the path, I can use the handles on the endpoints to modify the distribution and orientation, but I won't be able to get a mathematically accurate distribution of space along the line without a new script or a tool that does what the blend tool should do.
I have found that every time I report something like this as a bug that the developers return and say that is expected behavior--not a bug. My problem is that when I want to do precise design where I am concerned about pixel position, how can you predict anything that the blend tool does? The Devs would be wise to have a customer-participation exercise where they present a bunch of tools to do different things and explain what the tools are supposed to do, then see what the expected results are. Because I would be shocked if anyone could accurately predict both of these peculiar behaviors for the blend tool.