Roger Breton
Legend
July 12, 2024
Question

Blends -- Why isn't a Spine created always? Automatically?

  • July 12, 2024
  • 2 replies
  • 901 views

Is there a way, some option, to force Illustrator to ALWAYS create a "Spine" when creating a Blend?
I would like to experiment with Blend option where by pulling on the Anchor points, we can use Bezier curves to change the default "uniform" spacingf between the steps. I tried different things to no avail.
I tried creating the Blend using both the Blend tool and the Path > Blend command but both did not give me a Spine? I can force Illustrator to "change" Spine after the fact, by drawing a line and using the command "Replace Spine" but that sort of gives "unpredictable" results. Here's the shape I'm trying to recreate:

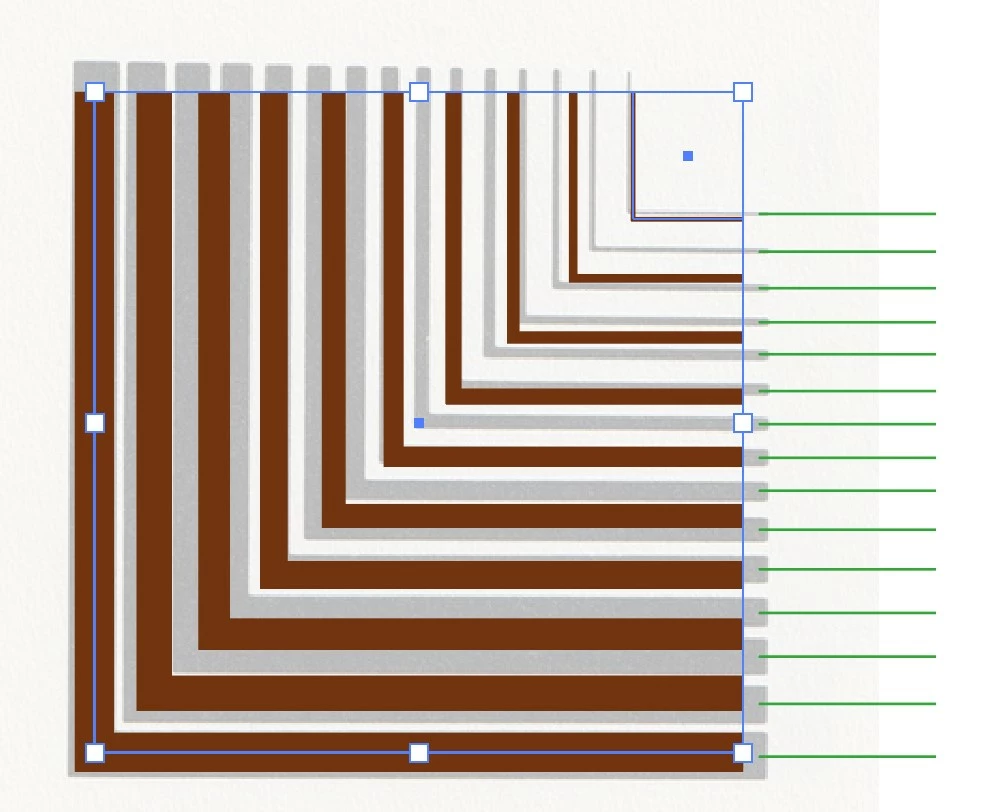
As you can see, it's a series of "L-shape" wedges. The green lines on the right show that the spacing between each elements is not constant? So, in principles, this is not a job for Blends but if I could experiment with a Spine, perhaps I can force the spacing to change? I have not gotten the stroke thickness quite right in this screen capture but it's showing you what is going on.
I can always generate more "Steps" but if I make the bottom stroke the right thickness, about 32 pts, then I pregressively loose the white space between the strokes as we're nearing the bottom of the figure.

This topic has been closed for replies.

2 replies

Mike_Gondek10189183
Community Expert
Community Expert
July 13, 2024

You will need at least one closed path as per Kurt.


Use Object >> Path >> Outline Stroke on alteast one L shape, then make the blend

Roger Breton
Legend
July 13, 2024

Kurt and Mike,


Thank you for fielding my question. I tried making one object a "closed path" (outline stroke or some other means) and it seems to work. BUT I've gone back to an old artwork which I remember "worked" with simple strokes and noticed the following behavior. Here's a screen capture of the elements as I construct them :

When I first used the Blend tool (W) to go from the "Red" to the "Yellow" stroke, no Spine showed up? But when I continued with the Blend tool, this time going from the Yellow to the Green stroke, a Spine appeared, as shown by the screen capture? It seems that, possibly, when more than two objects are incolved in the Blend, a Spine *shows" up? I'll continue to test this, in case it makes any sense...

Monika Gause
Community Expert
Community Expert
July 13, 2024

There are 4 situations in which no spine appears. 


A) If there are at least three paths selected, and at least one of them is
an open, unstroked, unfilled path, and at least two of them
are not, then the open unpainted path is used as an initial spine and the
other objects are moved onto it.

B) If the bounding box of the anchor points of each object encloses the
bounding box of the anchor points of all the objects above it in the
stacking order, then no spine path is created. (This is the ‘nested objects’
case.)

C) all centers are enclosed in the intersection that is built by of all objects

D) If all of the objects are open paths.

Kurt Gold
Community Expert
Community Expert
July 12, 2024

At least one path of the initial selection has to be a closed path to "force create" a spine.


That closed path can be a ghost object (e.g. a rectangle with no attributes and zero-sized in width and height).


That may or may not be helpful in your specific situation, but it will always create a spine.