Participant
July 11, 2022
Answered

Como hacer esta figura en Illustrator

  • July 11, 2022
  • 3 replies
  • 437 views

Buenas tardes:

Llevo mucho tiempo invertido y no he encontrado la forma de hacer esta figura en Illustrator

Qué herramientas debo utilizar para llegar a esa forma.  Parto del hecho que tengo 6 franjas grises separadas de manera horizontal.


Muchas gracias por su colaboración.

J.S.

This topic has been closed for replies.
Correct answer Jacob Bugge

John,


You can start over and:


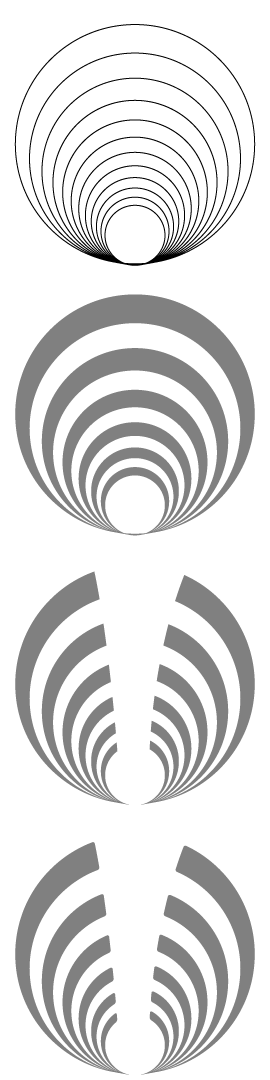
1) Create a circle with a Stroke and no Fill, then in the Effect dropdown click Distort & Transform, then click Transform, and set the Scale to 113.4% for both Horizontal and Vertical and set the number of copies to 11 and click the bottom centre Reference Point and press Enter; this will give you the basic circular shapes for the Figura; adjust the scaling factor if needed to get the desired ratio of the largest and the smallest circle; this looks like the first image below;

2) Object>Expand Appearance, then Ungroup until you have only single paths (circles), then select the two largest circles and hold Ctrl/Cmd and press 8 to turn them into a Compund Path, then repeat for each of the other pairs of circles (6 in total); this still looks like the first image below;

3) Select all the Compound Paths and switch from Stroke to Fill with the desired Fill Color (shown as 50% on the Grayscale; this looks like the second image below;

4) Create two paths from top to bottom down though the Compound Paths, one to the left and one to the right, each with the desired position and shape (curved), then select each and Object>Path>Divide Objects Below, then delete all the paths down the middle (you can also do this with the Shape Builder or Pathfinder>Minus front); this looks like the third image below;

5) Round the corners at the inner (top) ends of the paths; this looks like the fourth image below.


If you wish to have sharp corners, just leave out 5).
 

Click Here to see in Chrome 


Edit: Hi Ton, I believe it is about time to attend to other duties to be concluded before the sun is up.


3 replies

Participant
July 12, 2022

Thanks to Ton and Jacob for their quick and accurate responses.
I never would have imagined that the solution was like that.
I learned a lot from you.

Ton Frederiks
Community Expert
Community Expert
July 12, 2022

Good to hear that helped.

Jacob Bugge
Community Expert
Jacob BuggeCommunity ExpertCorrect answer
Community Expert
July 11, 2022

John,


You can start over and:


1) Create a circle with a Stroke and no Fill, then in the Effect dropdown click Distort & Transform, then click Transform, and set the Scale to 113.4% for both Horizontal and Vertical and set the number of copies to 11 and click the bottom centre Reference Point and press Enter; this will give you the basic circular shapes for the Figura; adjust the scaling factor if needed to get the desired ratio of the largest and the smallest circle; this looks like the first image below;

2) Object>Expand Appearance, then Ungroup until you have only single paths (circles), then select the two largest circles and hold Ctrl/Cmd and press 8 to turn them into a Compund Path, then repeat for each of the other pairs of circles (6 in total); this still looks like the first image below;

3) Select all the Compound Paths and switch from Stroke to Fill with the desired Fill Color (shown as 50% on the Grayscale; this looks like the second image below;

4) Create two paths from top to bottom down though the Compound Paths, one to the left and one to the right, each with the desired position and shape (curved), then select each and Object>Path>Divide Objects Below, then delete all the paths down the middle (you can also do this with the Shape Builder or Pathfinder>Minus front); this looks like the third image below;

5) Round the corners at the inner (top) ends of the paths; this looks like the fourth image below.


If you wish to have sharp corners, just leave out 5).


Click Here to see in Chrome 


Edit: Hi Ton, I believe it is about time to attend to other duties to be concluded before the sun is up.

Ton Frederiks
Community Expert
Community Expert
July 11, 2022

You can try this:

Start witth a curve with a thick stroke and a pointed Variable Width Profile.

Use the Effect > Transform > Distort & Transform > Transform... to scale and repeat.

Either use another Transform Effet to mirror it or use Object > Expand Appearance and duplicate a mirrored version