vivekg17706440
Known Participant
September 17, 2018
Answered

Create an offset shape / arc

  • September 17, 2018
  • 5 replies
  • 2794 views

Hello,

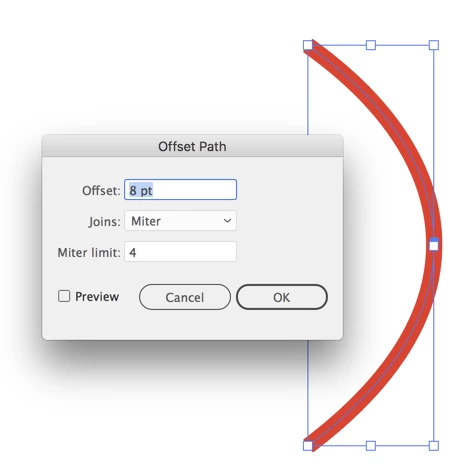
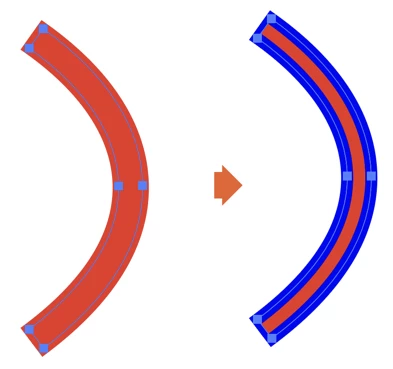
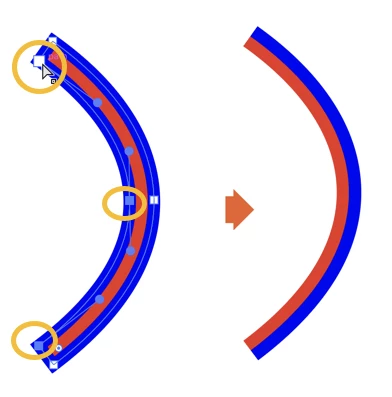
(Referring to the attached image). I'm trying to create a blue arc that will be adjacent to the red stroke in the image, but to the right of it, such that a continuous blue stroke results. Is there an easy way to do this? I can use the arc tool to eye-ball the right shape and just place it where it should be. However, I'm hoping there's a better way? Please let me know if my description is unclear. Thank you!

    This topic has been closed for replies.
    Correct answer tromboniator

    1. Select the red path with the Selection Tool (black pointer). Copy. Paste in front.

    2. Go to Object > Path > Offset Path. In the Offset field enter the stroke weight of the red pat. Click OK.

    3. Change the color of the currently selected path to blue.

    4. Click to select the center red path, delete. The original red path should still be there, so it will look the same. Do not delete it.

    5. With the Direct Selection Tool (white pointer) shift-click on each of the anchor points on the blue path (except on the portion you want to keep). Delete.

    6. You can use the Scissors Tool to cut the blue path if needed, then select and delete unwanted parts.

    Peter

    5 replies

    Myra Ferguson
    Community Expert
    Community Expert
    September 18, 2018

    So here's one way to do what I think you're trying to make:

    1. Make a circle
    2. Duplicate it (Ctrl + C), pasted it in place (Ctrl + Shift + V), and scale it up from the center (Shift + Alt + Drag)
    3. Draw your path for the handles
    4. Select everything and use the Shape Builder Tool to Alt + click or Alt + drag over the parts you don't want
    5. Use the Join Toll to connect the strokes
    6. Change the color of the path
    tromboniator
    Community Expert
    tromboniatorCommunity ExpertCorrect answer
    Community Expert
    September 18, 2018

    1. Select the red path with the Selection Tool (black pointer). Copy. Paste in front.

    2. Go to Object > Path > Offset Path. In the Offset field enter the stroke weight of the red pat. Click OK.

    3. Change the color of the currently selected path to blue.

    4. Click to select the center red path, delete. The original red path should still be there, so it will look the same. Do not delete it.

    5. With the Direct Selection Tool (white pointer) shift-click on each of the anchor points on the blue path (except on the portion you want to keep). Delete.

    6. You can use the Scissors Tool to cut the blue path if needed, then select and delete unwanted parts.

    Peter

    vivekg17706440
    Known Participant
    September 18, 2018

    Thank you for all the replies and help! I ended up using the offset path solution.

    tromboniator
    Community Expert
    Community Expert
    September 18, 2018

    You're welcome, I'm glad we could help you.

    lambiloon
    Community Expert
    Community Expert
    September 18, 2018

    Hi can you please show us a final result image which you are trying to get so we can tell you best way to achieve it....thank you

    Ali Sajjad / Graphic Design Trainer / Freelancer / Adobe Certified Professional
    Sjaani
    Community Expert
    Community Expert
    September 18, 2018

    There is an example of what they're aiming for as a reply to the first suggested solution.

    barbara_a7746676
    Community Expert
    Community Expert
    September 18, 2018

    There's more than one way you could approach this. Here's one way.

    With the Ellipse tool, draw a circle.

    Copy the circle. Then choose Edit > Paste in Front.

    Change the color of the new circle.

    In the Transform panel, make sure that the Constrain icon on the right is turned on.

    Increase the W and H until the rings are touching. I usually do that by clicking inside either the W or H cell and hitting the up and down arrows on the keypad.

    With the Direct Selection tool, drag over the anchor points.

    And hit Delete.

    sishamIAGD
    Community Expert
    Community Expert
    September 17, 2018

    Are you just trying to replicate the red arch the opposite way around..?

    Like so:

    If so just select the red arch and then select the reflect tool.

    Place the reflect anchor in the middle and then click and drag the arch (holding alt + shift) and you'll see that it flips the arch in the position you require then add the blue colour.

    Try that, unless that isn't what you mean..?

    vivekg17706440
    Known Participant
    September 17, 2018

    Hi, thanks for your reply. I'm trying to do something like this (ignore the black and green colors). However, I did this by eye-balling the blue arcs. I was wondering if there is a way to make an arc that follows the red path but slightly offset so it is adjacent to it with no gap in between, but not directly on top.

    Sjaani
    Community Expert
    Community Expert
    September 18, 2018

    If you use the pen tool you can recreate the line and you will have handles to then be able to move it around until it fits the desired outcome.

    I believe you're after something like this?