Inspiring
November 15, 2019
Answered

Expand clipped object and its contents

  • November 15, 2019
  • 3 replies
  • 1265 views

Hi,

This is for CS4. I thought this was a slam dunk but it doesn't work as I expected.

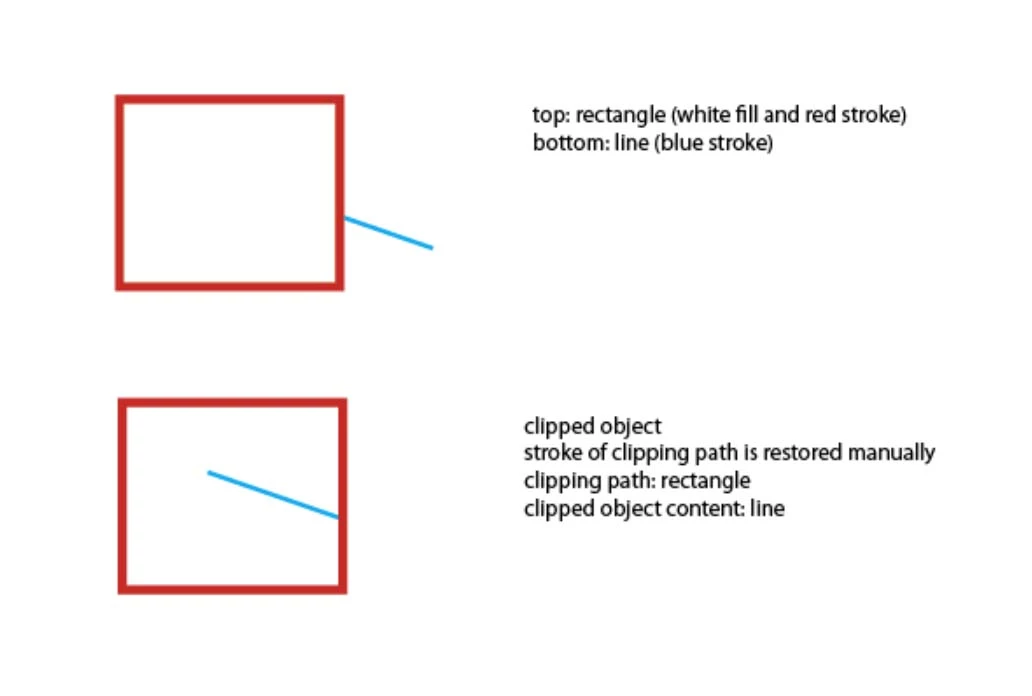
I want to expand a clipped object and its contents. I would like the result to look exactly as the non-expanded clipped object, except that now the clipping path and the contents that were clipped have been expanded and are selectable. How can I do that?


Here is a picture of what I'd like to do. The rectangle is the clipping path and the line is what is being clipped. I would like the expanded object (expanded rectangle and clipped line) to look exactly like the clipped object.


Thanks.


This topic has been closed for replies.
Correct answer Jacob Bugge

s,


You may simpy do the dirty destructive deed, with the Clipping Mask selected (exact way depending on version):


1) In the Transparency palette/panel dropdown list select anything but Normal (Multiply is fine; this step may be unneeded in your version, you may try without it); I am unsure about CS4;
2) Object/Edit>Flatten Transparency, just keep the defaults including 100% Vector;
3) Shudder (optional, unless unavoidable).


This will crop everything to give you a Group with the outlined Stroke at the top, the outlined cut line in the middle, and the rectangle at the bottom, all as separate fill/nostroke paths.


3 replies

Jacob Bugge
Community Expert
Community Expert
November 15, 2019

For my part you are welcome, s.


In addition to what Monika said, depending on the actual artwork and the chosen settings, Flatten Transparency will/may simplify the artwork in a number of ways including what you need namely the cropping of the artwork (ridding you of the outer part of the blue line) and breaking it down into simple(r) objects; as you can see (especially if you have View>Show Grid or Transparency Grid on) if you create a rectangle with a black fill and make it (partially) transparent by giving it an Opacity of 50% in the Transparency palette (so you can see the (Transparency) Grid through the fill), then Flatten Transparency, you will se that you get a fill with 50% black and 100% Opacity (so you no longer see the (Transparency) Grid through the fill), which is flattening the transparency.

Jacob Bugge
Community Expert
Jacob BuggeCommunity ExpertCorrect answer
Community Expert
November 15, 2019

s,


You may simpy do the dirty destructive deed, with the Clipping Mask selected (exact way depending on version):


1) In the Transparency palette/panel dropdown list select anything but Normal (Multiply is fine; this step may be unneeded in your version, you may try without it); I am unsure about CS4;
2) Object/Edit>Flatten Transparency, just keep the defaults including 100% Vector;
3) Shudder (optional, unless unavoidable).


This will crop everything to give you a Group with the outlined Stroke at the top, the outlined cut line in the middle, and the rectangle at the bottom, all as separate fill/nostroke paths.


sPretzelAuthor
Inspiring
November 15, 2019

Hi Jacob,

Thanks. I did mostly 3), and not just now but for the last several days!

Your method seems to do the job though I will have to explore it more. It's wicked to use transparency only to get rid of it in the next step. I wonder why expand cannot do the same thing, since it also outlines strokes. Would you know what underlying mechanism flattening is using here that expand isn't?

Monika Gause
Community Expert
Community Expert
November 15, 2019

Flatten transparncy should work without transparency being applied.

Legend
November 15, 2019

Draw both items in the order shown, the blue line and the square above.

Select the red stroked square, in Stroke panel>Align Stroke to Outside.

Copy it.

Select both items and create a (Object>) Clipping Mask (Ctrl/Cmd+7)

Select Object>Paste in Back (Ctrl/Cmd+B)

Voilá!


sPretzelAuthor
Inspiring
November 15, 2019

Hi Federico.

Thanks for your input. But in CS4, I don't see Object>Paste in Back. Presumably, that's Edit>Paste in Back. By doing what you describe, the stroke in the final result is not in the same position as the original rectangle. Also, where in your method do you expand the object (clipping path and contents)?

Legend
November 15, 2019

Excuse, that menu, Paste in Back is in Edit, sorry.

Note: Path operations, clipping masks, strokes, etc, are the same for CS4, CS6, CC2019,.... it has not changed since at least Illustrator 12.

The stroke is where it was. It does not move

I thought part of it were hidden under the white filled rectangle

No I am not expanding anything. I just take a look of your first figure, and the second one, and explained you the steps to visually arrive at. (Guessing that if a segment is inside the rctangle is because it was the hidden part of a blue line extending under the rectangle. Nothing has been moved from its original position.

Thus, you have a white square and a blue line. What's is then the clipped object? There is nothing under that square? Expanding the line and rectangle? what's the need for?