varxtis
Inspiring
February 17, 2021
Answered

Expand Object ring radius without effecting Object sizes

  • February 17, 2021
  • 10 replies
  • 2211 views

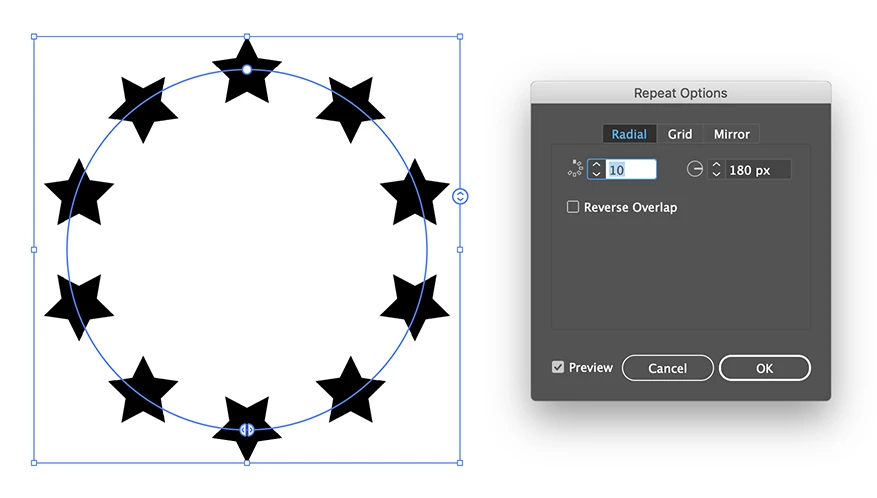
I need help figuring some thing out. I looked around the net, youtube, and this community, but oddly haven't found anything that addresses my specific needs. If I have a ring of objects like the stars here, I want to be able to expand its radius, scaling the gap, but not affecting the size of the objects. Photoshop has a meathod (I think) that allows to you snap object to a path, and adjust the way Im hoping to in Illustrator, but I can't find an equivelant feature. It's probably something simple and obvious, but I can't find it.

Attatched is an image and I link to a video recording.
https://youtu.be/ZWRp38WuYiU

This topic has been closed for replies.
Correct answer Ton Frederiks

And another one with the recently introduced Object > Repeat > Radial.

Just select a single star and apply the repeat.

10 replies

pixxxelschubser
Community Expert
Community Expert
March 19, 2021

Just for completeness: a mini tutorial about the repeat function (which I created for a similar topic).


Let us use the new Repeat function.


create your (one) "arrow" and go to menu: Object --> Repeat --> Radial


go to menu: Object --> Repeat --> Options

set the desired values

done.

By @pixxxelschubser


Jacob Bugge
Community Expert
Community Expert
February 24, 2021

Indeed, Ton.


I keep forgetting about it, until now as many times as you have posted about it. I shall have to pull my socks up; I even have the Helpx Repeat page as a snippet.


Ton Frederiks
Community Expert
Ton FrederiksCommunity ExpertCorrect answer
Community Expert
February 24, 2021

And another one with the recently introduced Object > Repeat > Radial.

Just select a single star and apply the repeat.

varxtis
varxtisAuthor
Inspiring
February 25, 2021

This approach definetly seems to have its merit, but like my initial issue, the Stars grow or shrink based on the radius of the ring. And despite trying different ways of changing the stars size, it produces undesired results. Any suggestions?

The thing I love about all these options is experimenting with them to see how they can be applied to other things.

Ton Frederiks
Community Expert
Community Expert
February 25, 2021

I don't see the objects grow or shrink with the radial repeat.

Jacob Bugge
Community Expert
Community Expert
February 24, 2021

A most exquisite way and tutorial, Hans Jürgen.


I have Bookmarked it for future reference.


pixxxelschubser
Community Expert
Community Expert
February 23, 2021

A few steps.

You'll need a single anchor point and your star - both aligned vertically. And the Transform Effekt.


  • choose the Pen Tool

  • draw a single anchor point

  • draw the star exactly vertical aligned (or align it afterwards)

  • group the star and the single anchor point

  • apply the effect: Transform

  • set the number and the angle (this step is not needed - only for example) but note the reference point: bottom center

  • you can choose the new number and the new angle


  • select the star with the Group-Selection-Tool

  • drag the star (exactly vertical) to the new position

  • new result (immediately visible) - just change/edit your first star in geometry, color or position

This is just an editable effect. If you need real paths you have to Expand Appearance (Object menu) however, you lose flexibility (or you just expand a copy of your group and hide the original).


If that works for you

have fun

😉

varxtis
varxtisAuthor
Inspiring
February 25, 2021

I really like this approach! A lot of editabl flexibility and control. and that guide was layed out remarkably well. Thank you. I swear, you three are great! You guys have literally switched my entire work flow over to Illustrator when once I used to cringe in fear.

Jacob Bugge
Community Expert
Community Expert
February 18, 2021

Indeed, Hans-Jürgen, that is the way to cover any number.


And it can be kept in position by placing the Anchor Point at the intended immovable centre and having the relevant Reference Point chosen (such as bottom centre).


pixxxelschubser
Community Expert
Community Expert
February 18, 2021

I would do the same as @Jacob Bugge - using the transform effect.

But for more flexibility: only one star and a simple anchorpoint (both aligned vertically and grouped).


Then use Effect - Distort & Transform --> Transform


Changing the distance from the star to the anchor point (within the group) does what you want. Changes to the star change all instances of the star. Changing the angle of rotation and the number of copies in the effect will change the spacing between instances and / or the number.

Jacob Bugge
Community Expert
Community Expert
February 18, 2021

varxtis,


Or, for whichever (visually determined) dragged increase of the ring in question, you can also go on from what you have as follows:


1) Delete all but the top and bottom stars, then Group those two and Effect>Distort & Transform>Transform and recreate the others as copies by rotation;

2) Deselect and Direct Select the top or bottom star, then ShiftClickDrag to the desired new size;


If you need the (centre of the) ring of stars in the same position as before, either:

3A) Realign with the object in question (can be done in different ways),

Or independent of everything else, if anything:

3B) Select (black arrow) and Object>Transform>Move by half the current value with the opposite sign (add or remove - in front and add /2 behind the current value).


Similarly for any ring with an even number of objects, where you can just start out with two opposite objects as 1).


Jacob Bugge
Community Expert
Community Expert
February 18, 2021

Varxtis,


If you know how much you wish to scale the ring of stars, you can just go on from what you have as follows:


1) Select all and Object>Scale>Uniform by the desired factor (3 or whatever),

2) Object>Transform Each>Scale>Horizontal & Vertical by the reverse factor (1/3 or whatever).


Monika Gause
Community Expert
Community Expert
February 18, 2021

I would use a blend along a circle spine (by replacing the spine of the blend). The circle needs to be opened (with closed paths blends get funky).


In order to do the scaling, select the blend spine (the circle) with the group selection tool and then scale it.


https://www.dropbox.com/s/wgs2vmyminydnzi/star-circle.mov?dl=0

varxtis
varxtisAuthor
Inspiring
February 18, 2021

Monika, your approach is just what I was looking for. I'd be able to control the radius of the object disperssion and shape, all just by scaling up a path. Is there any way to keep the object (stars) the same size and the gaps between them proportionate to the radius increase?

https://youtu.be/IL9IypOilb0

Monika Gause
Community Expert
Community Expert
February 19, 2021

You need to just select the spine path with the group selection tool. Don't select the object as a whole.