KShinabery212
Community Expert
Community Expert
September 3, 2018
Answered

Gradient spillage.

  • September 3, 2018
  • 7 replies
  • 1288 views

So here is a question or at least something that I never have figured out..... but it is something that I need to learn.

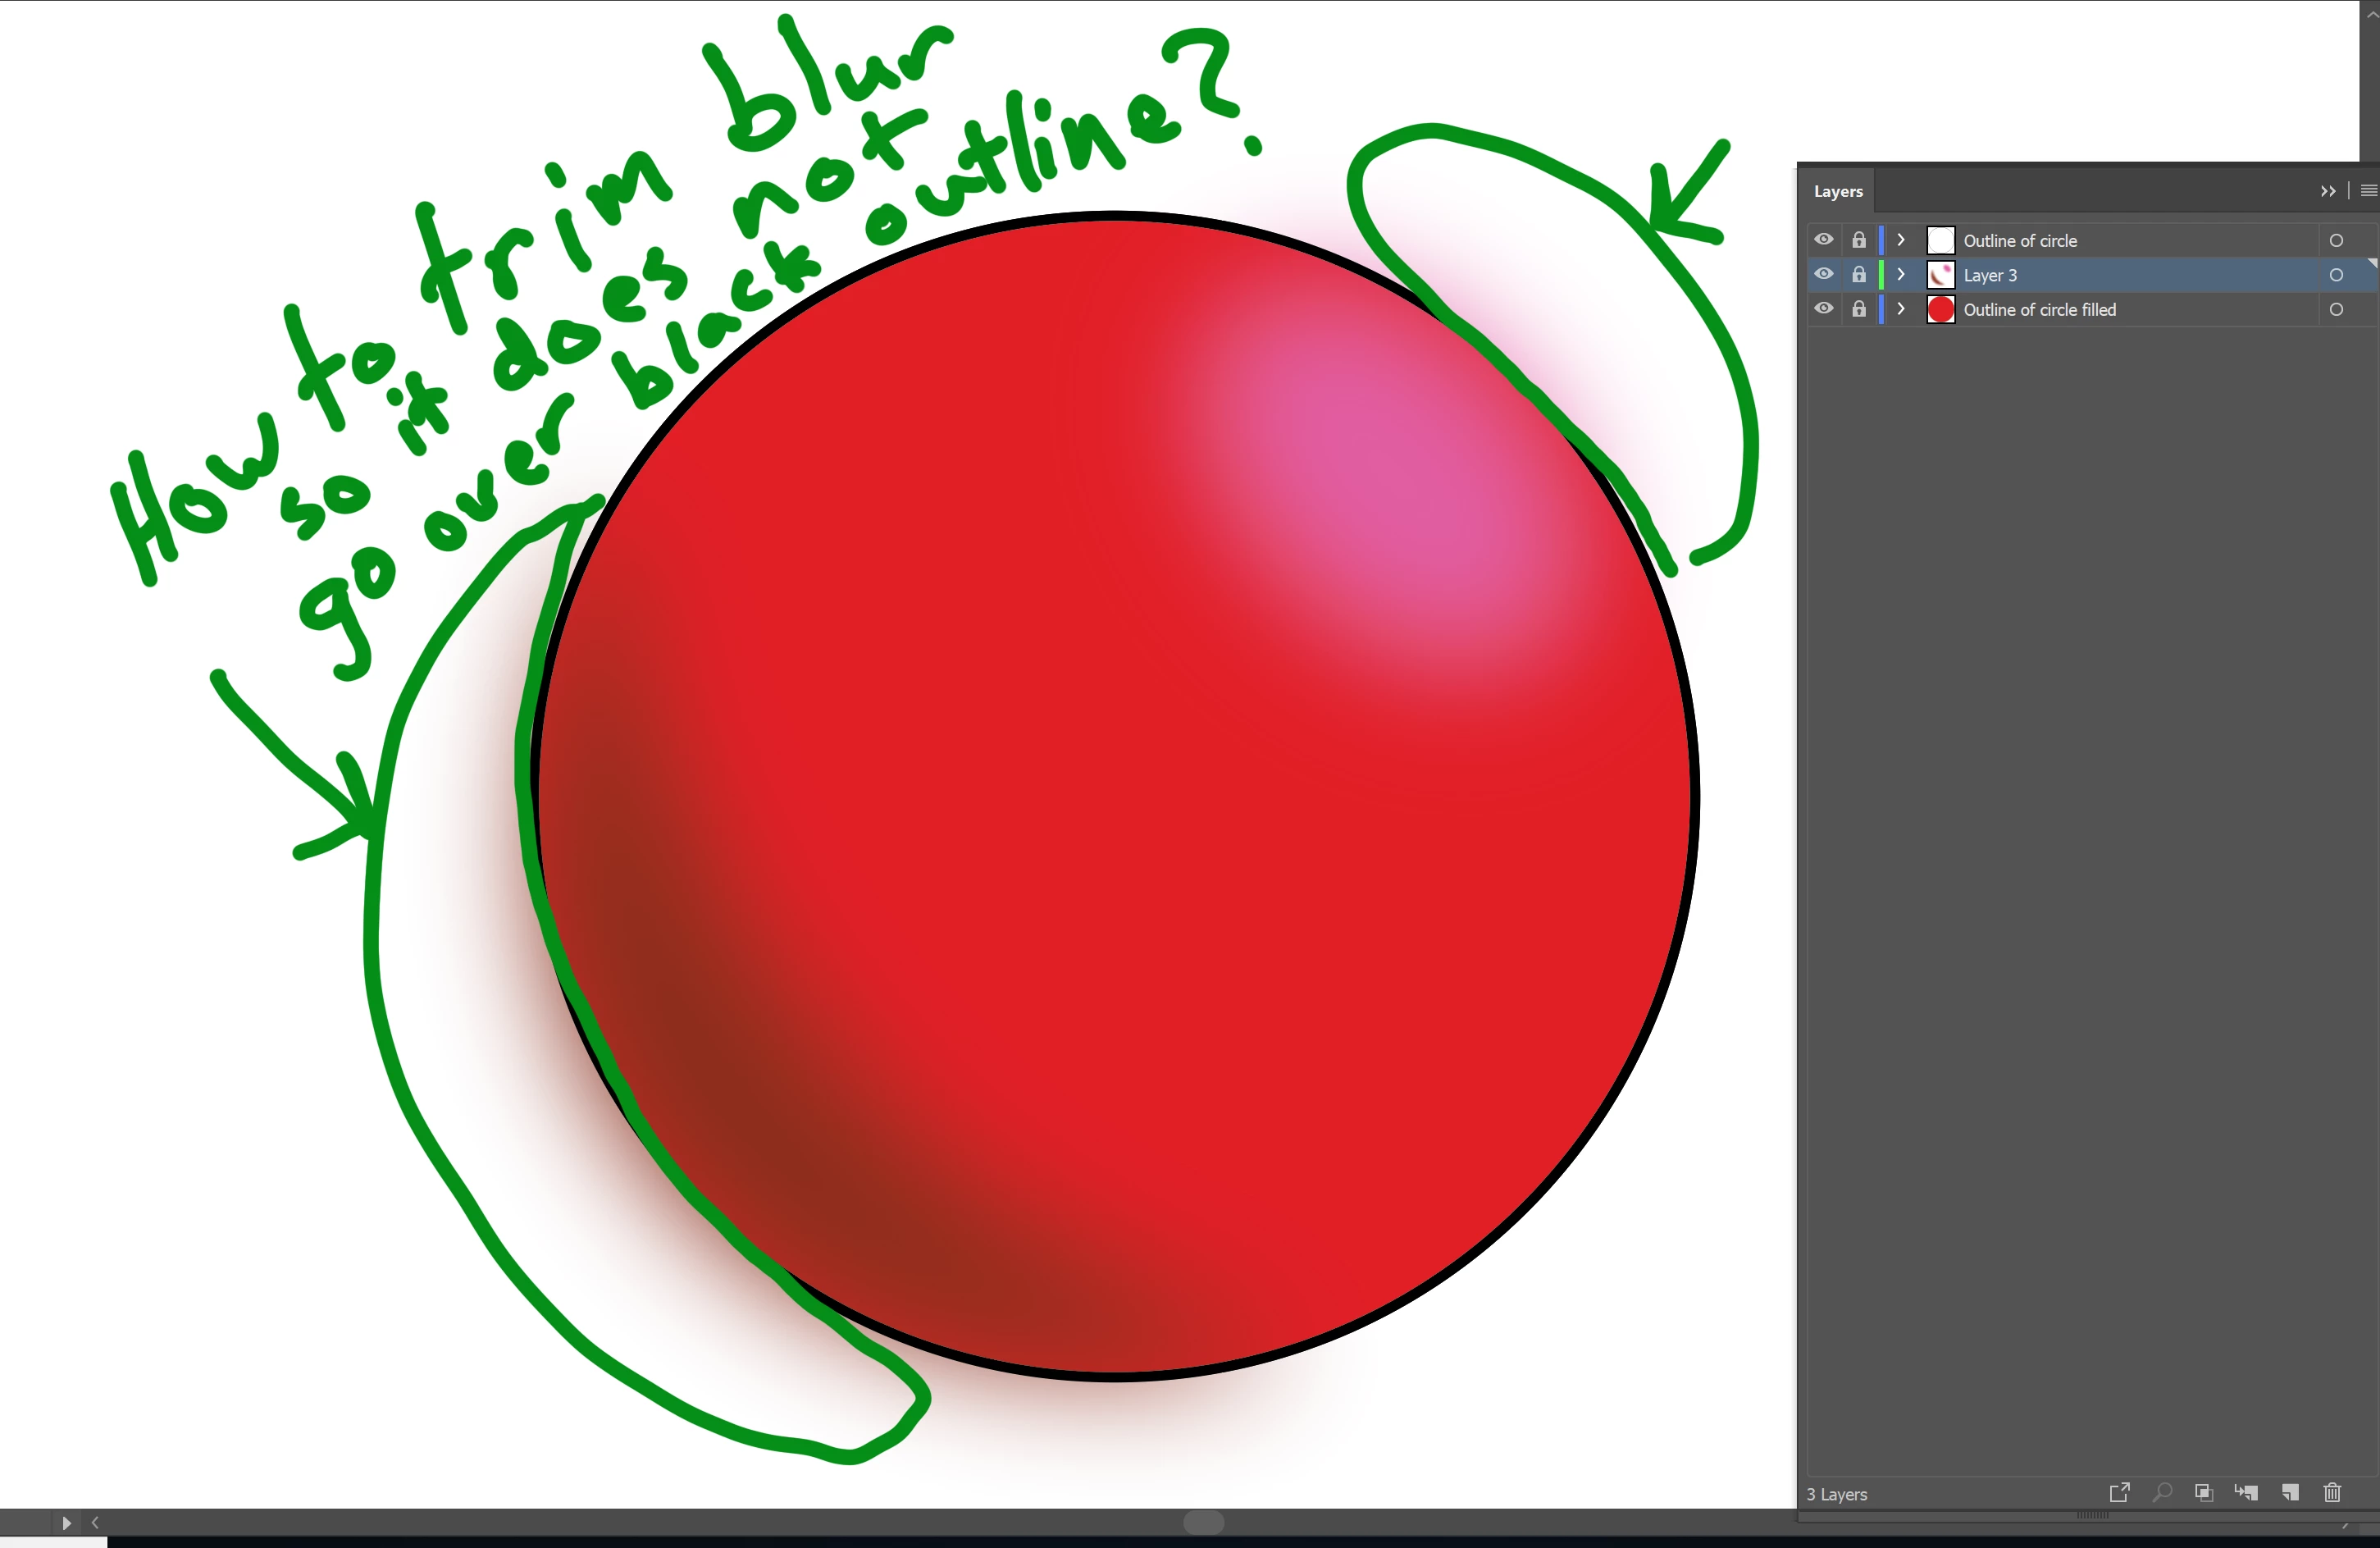
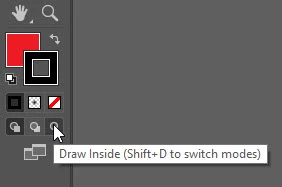
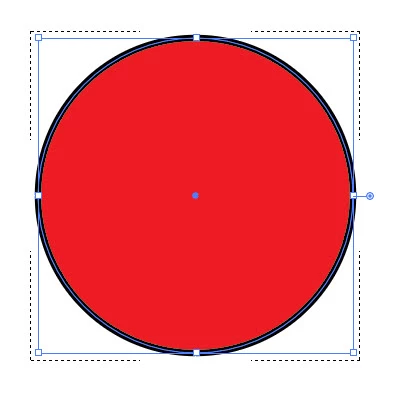
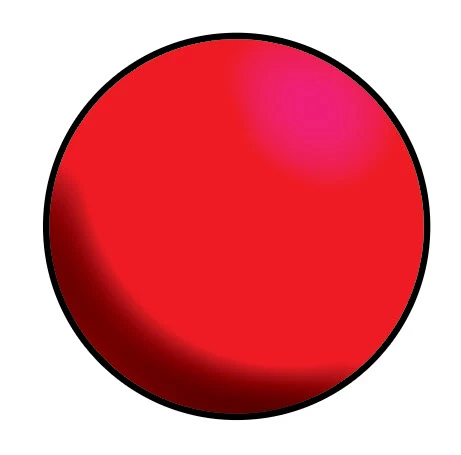
In Photoshop, if I create line art of let's say a character in one layer.  Then in a layer below it, I color the line art (fill in the shapes with solid colors).  Now between those layers I want to had shadows or highlights.  I can easily do this and use a Gaussian Blur.  I want the blur to go directly to the edge of the line art.  So in the layer with the gradient I can erase the portion that goes out side the lines.  Thus, the shadow or highly stays with in the object.

So my question... is how can I do this in Illustrator.  And how can I do it easily.

The reason I ask is I create a lot of characters as vector graphics for various projects... be it animations or just to simply have them as vectors.  I want to avoid having the blur go over the black out line.  You can see my work via the following link and you will see how detailed I get in Illustrator.  Thus, knowing how to safely do the blur correctly would help. https://kennshinabery.myportfolio.com/digital-artwork-and-character-design

Like I said in Photoshop this is not an issue, but in Illustrator is the one thing I have yet to figure out.

    This topic has been closed for replies.
    Correct answer Myra Ferguson

    For the shadow:

    1. Draw your circle
    2. At the bottom of the Tools, select Draw Inside
    3. Select the Paintbrush tool and draw the shadow with a wide brush
    4. With the Direct Selection Tool, select the path
    5. Go to Effect > Stylize > Feather and set it for the amount of blur/feathering you want
    6. With the path still selected, open the Appearance panel and click on Opacity
    7. Change the Blend mode to multiply

    For the highlight:

    1. Keep the circle set to draw inside
    2. Select the Paintbrush tool
    3. It'll paint with the same blend mode, size, effect, and color as your last stroke. We want the same size and effect, so change the other parts by selecting the path with the Direct Selection tool and in the Appearance panel, change the blend mode under Opacity back to Normal and change the stroke to a fuchsia color. 

    7 replies

    KShinabery212
    Community Expert
    Community Expert
    September 4, 2018

    These are all good ideas.  There are always several ways to achieve something, so these are various solutions to work through.  Thanks.

    Let's connect on LinkedIn. https://www.linkedin.com/in/kshinabery/
    sharp_hands16B8
    Community Expert
    Community Expert
    September 4, 2018

    I know this isn't a direct answer to the problem, but you may want to consider diving into gradient meshes. Because you have a solid filled object, it wouldn't take much to add a mesh to each object, circle an area with the lasso for thoes mesh anchor points, and then point a lighter/darker tone on those points to create Highlights and Shadows. Otherwise I concur with Monika and Myra on their approaches.

    Myra Ferguson
    Community Expert
    Myra FergusonCommunity ExpertCorrect answer
    Community Expert
    September 3, 2018

    For the shadow:

    1. Draw your circle
    2. At the bottom of the Tools, select Draw Inside
    3. Select the Paintbrush tool and draw the shadow with a wide brush
    4. With the Direct Selection Tool, select the path
    5. Go to Effect > Stylize > Feather and set it for the amount of blur/feathering you want
    6. With the path still selected, open the Appearance panel and click on Opacity
    7. Change the Blend mode to multiply

    For the highlight:

    1. Keep the circle set to draw inside
    2. Select the Paintbrush tool
    3. It'll paint with the same blend mode, size, effect, and color as your last stroke. We want the same size and effect, so change the other parts by selecting the path with the Direct Selection tool and in the Appearance panel, change the blend mode under Opacity back to Normal and change the stroke to a fuchsia color. 
    jane-e
    Community Expert
    Community Expert
    September 3, 2018

    Myra, I like your idea. One more thing to add is to save custom brushes and to create a Graphic Styles for re-use.

    KShinabery212
    Community Expert
    Community Expert
    September 3, 2018

    Ok.... I am working on using a Clipping Mask.  But this is going to be so time consuming. 

    Is there no faster way?  This is just the shadows.  And just one head.

    There is this body, another body different clothing (same head) and a whole other body with head (different colors completely).  Needless to say this is going to take some time.

    But in end effect it will be less 2D and more like what you see in App games.

    Let's connect on LinkedIn. https://www.linkedin.com/in/kshinabery/
    jane-e
    Community Expert
    Community Expert
    September 3, 2018

    Hi KShinabery212,

    Can you please explain how you are doing "Layer 3" now? Sometimes you call it a gradient, and other times a blur. Maybe it's both?

    Currently you have three layers. I am wondering (after you answer the above question) if you can create one object and use the Appearance panel to add fills and to put a Gaussian blur on the Gradient Fill?

    Something like this, but fine-tuned when we see how you did your shadows.

    KShinabery212
    Community Expert
    Community Expert
    September 3, 2018

    Sorry.... is a Gaussian Blur.  My mistake for saying Gradient (typing too fast).

    Normally I create characters like Snow White here....   I have to cheat the blues that are near the edges.  In this example I have a top layer that is only outlines.  The bottom layer is the created using Live paint.  Between the top layer and bottom layer I build the shading and highlights using Gaussian Blurs. NOTE: Snow White is finished.  She is just an example of what I have been doing.

    But since I only know how to cheat the blurs... I need to find the better solution to creating intricate blurs that do not go past the outlines or certain parts.

    Currently I am working on a simpler character (see below) that I will be importing into Adobe Character Animator.  The shading will be less, but I still need to figure out the best way to add Gaussian Blurs to create shadows and highlights without going over the edges.

    Again, I started out with an outline for the various parts (not filled in).  Then created a bottom layer that I filled in the solids parts using Live Paint.  In between these two layers I will do the shading and highlights.

    There are various versions of this character that I will create Keyboard Toggles for.  Different hands, and even clothing.  It is going to be fun.  My last step is just creating the shading and highlights in a better less time consuming manner if that makes sense.

    Let's connect on LinkedIn. https://www.linkedin.com/in/kshinabery/
    Monika Gause
    Community Expert
    Community Expert
    September 3, 2018

    Make a copy of those outlines and use them as clipping masks. That's what I would do.

    As a side remark: I don't think I would blur the shadows as hard edged shadows fit the overall nature of the drawing better. But then as well I would use the outlines to clip the shapes for the shadows.

    KShinabery212
    Community Expert
    Community Expert
    September 3, 2018

    From my understanding.... one can use a clipping mask.  But realize the ball is just an example.  I am talking about doing 100 times in an illustration that is more like a Marvel comic or Disney character. 

    Let's connect on LinkedIn. https://www.linkedin.com/in/kshinabery/
    Ray Yorkshire
    Participating Frequently
    September 3, 2018

    As they are pixel based effects, you may be better just switching a pixel based program, at least for the colouring.

    c.pfaffenbichler
    Community Expert
    Community Expert
    September 3, 2018

    You could duplicate the pertinent Path, move it to the top, select all the blurred objects and invoke Object > Clipping Mask > Make

    KShinabery212
    Community Expert
    Community Expert
    September 3, 2018

    Would that work for all the shading for something like this????

    Kenneth Shinabery - Not Your Average Princess Digital Vol. 1

    I will never create simple things like just a circle.... I create full blown characters.   And I use Live Paint to fill in the base color.

    Let's connect on LinkedIn. https://www.linkedin.com/in/kshinabery/
    c.pfaffenbichler
    Community Expert
    Community Expert
    September 3, 2018

    If the intended soft-edged color areas are too numerous maybe you should try to use the Mesh Tool instead of blurred objects of their own.

    But you should consider that you can create one Clipping Mask over the whole object with many elements.